-
教您完美 win10 安装 Appium1.7.2 支持 win 客户端自动化 at 2019年03月07日
我看了下 https://stackoverflow.com/questions/54250178/appium-finishing-setting-up-optional-dependencies
stack 也有人问 你可以去 appium github 提个 issue
官方这个https://github.com/google/bundletool 才发布 10 个月 估计国内关注使用的少 所以暴露问题的少.https://developer.android.com/studio/command-line/bundletool
按照 http://appium.io/docs/en/writing-running-appium/android/android-appbundle/ 也没说什么 就是说 有 jar 包 添加 PATH appium-doctor 就能识别了.... 你去 appium-doctor github 下 也提问 issue 一下吧.
我看 appium-doctor 下 https://github.com/appium/appium-doctor/releases 1.8.0 才支持了 app bundle tool check
但是这个 bundle tool 我用 android studio 升级了下 android sdk 到 28.0.3 版本 并没有在相关目录下看到这个 倒是在 android studio 目录下找到了个

我按照 stack 那个人的弄法 doctor 也没法识别 bundle tool我已经提了 https://github.com/appium/appium/issues/12269 或者你们自己 issue 里 搜 bundletool
-
教您完美 win10 安装 Appium1.7.2 支持 win 客户端自动化 at 2019年03月06日
你俩 确定 要用到 opencv4nodejs 和 ffmpeg 的功能来做 UI 自动化么....
你俩是做游戏 APP 的?
bundletool.jar 问问 你们开发怎么用的.... 这个我也不清楚
-
教您完美 win10 安装 Appium1.7.2 支持 win 客户端自动化 at 2019年03月04日
opencv4nodejs
ffmpeg 你牛啊 win 环境 这个两个装好了吗? 怎么装的 我装过一次 opencv4nodejs 失败了 但我用不上这个 就没管它.至于 bundletool.jar 不是提示你 看 Pleas
e read http://appium.io/docs/en/writing-running-appium/android/android-appbundle
/ to install it -
传统的 C/S 架构产品,在 windows 上的 client 端,如何进行自动化测试? at 2019年02月28日
https://docs.microsoft.com/zh-cn/windows/desktop/WinAuto/entry-uiauto-win32
用 appium 集成的 winappdriver 也可以。https://testerhome.com/topics/12988
-
传统的 C/S 架构产品,在 windows 上的 client 端,如何进行自动化测试? at 2019年02月28日
windows 系统官方有给文档和方案的
-
AppCrawler 自动遍历工具 2.1.1 版本发布 at 2019年02月19日

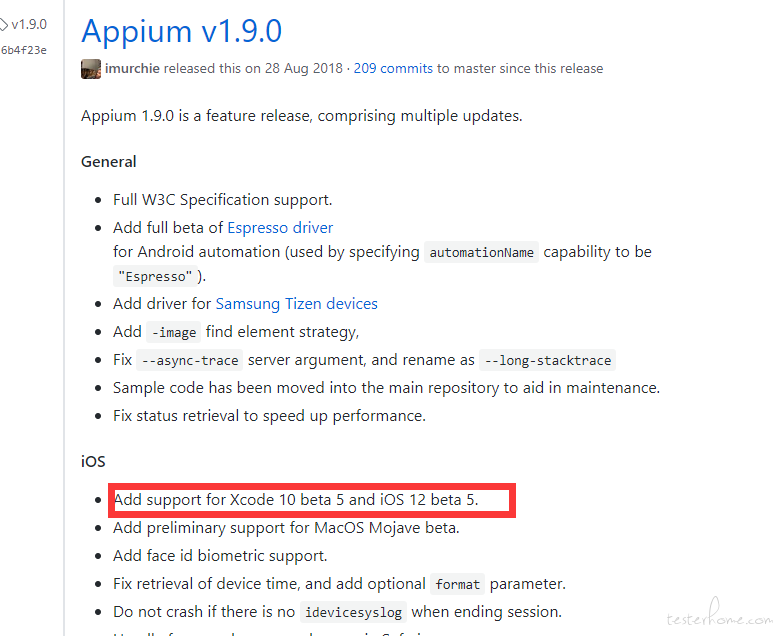
我看官方 release 说明 1.9.0 才开始支持 xcode 10 beta 可能你的 xcode 太新了 你再确认下 appium 和 xcode 版本对应关系 -
AppCrawler 自动遍历工具 2.1.1 版本发布 at 2019年02月15日
1.9.1 以下都可以
-
求助!! npm 安装 appium 时报错:RequestError: Error: read ECONNRESET at 2019年02月14日
npm i appium -g --CHROMEDRIVER_CDNURL=http://npm.taobao.org/mirrors/chromedriver/
-
教您完美 win10 安装 Appium1.7.2 支持 win 客户端自动化 at 2019年02月14日
PS C:\WINDOWS\system32> appium-doctor
info AppiumDoctor Appium Doctor v.1.9.0
info AppiumDoctor ### Diagnostic for necessary dependencies starting ###
info AppiumDoctor  ✔ The Node.js binary was found at: D:\nodejs\node.EXE
info AppiumDoctor  ✔ Node version is 10.15.1
info AppiumDoctor  ✔ ANDROID_HOME is set to: D:\Android\android-sdk
info AppiumDoctor  ✔ JAVA_HOME is set to: C:\Program Files\Java\jdk1.8.0_201
info AppiumDoctor  ✔ adb exists at: D:\Android\android-sdk\platform-tools\adb.exe
info AppiumDoctor  ✔ android exists at: D:\Android\android-sdk\tools\android.bat
info AppiumDoctor  ✔ emulator exists at: D:\Android\android-sdk\tools\emulator.exe
info AppiumDoctor  ✔ Bin directory of %JAVA_HOME% is set
info AppiumDoctor ### Diagnostic for necessary dependencies completed, no fix needed. ###
info AppiumDoctor
info AppiumDoctor ### Diagnostic for optional dependencies starting ###
info AppiumDoctor  ✔ Python required by node-gyp (used by heapdump) is installed at: D:\Python27\python.EXE. Installed version is: 2.7.14
WARN AppiumDoctor  ✖ opencv4nodejs cannot be found.
WARN AppiumDoctor  ✖ ffmpeg cannot be found
WARN AppiumDoctor  ✖ bundletool.jar cannot be found
info AppiumDoctor ### Diagnostic for optional dependencies completed, 3 fixes possible. ###
info AppiumDoctor
info AppiumDoctor ### Optional Manual Fixes ###
info AppiumDoctor The configuration can install optionally. Please do the following manually:
WARN AppiumDoctor  ➜ Why opencv4nodejs is needed and how to install it: https://github.com/appium/appium/blob/master/docs/en/writing-running-appium/image-comparison.md
WARN AppiumDoctor  ➜ ffmpeg is needed to record screen features. Please read https://www.ffmpeg.org/ to install it
WARN AppiumDoctor  ➜ bundletool.jar is used to handle Android App Bundle. Please read http://appium.io/docs/en/writing-running-appium/android/android-appbundle/ to install it
最新的 appium-doctor 可选功能里也有检查 node-gyp
Python required by node-gyp (used by heapdump) is installed at: D:\Python27\python.EXE. Installed version is: 2.7.14
该句 也提到了 node-gyp 这里边也有 https://github.com/nodejs/node-gyp关于 windows 的 Visual C++ build tools 的 nodejs 环境 的安装说明
-
教您完美 win10 安装 Appium1.7.2 支持 win 客户端自动化 at 2019年02月14日
实际关于这个构建依赖工具 windows-build-tools 也就是 Visual Studio Build Tools 的依赖 有两种安装方式
方法一
使用 npm,管理员方式的 powershell
npm install --global --production windows-build-tools方法二
首先,Visual C++ Build Tools 从微软官方网站下载 vc++ Build Tools
https://visualstudio.microsoft.com/thank-you-downloading-visual-studio/?sku=BuildTools 下载 vs_buildtools__1717812901.1535341177.exe
安装的时候使用默认安装就可以了,这个步骤比较简单。和安装 vs 一样只需要等待就可以了。
然后,我们需要 python2.7 构建环境,python 官方网站下载 python2.7.然后默认安装,安装的时候会有一个选项是添加 PATH 可以勾选,但是安装完以后还是要去环境变量里面查看一下是否添加了。
如果本地有两种 python 版本环境 2.7 或 3.6 以上的话,根据安装包安装好以后配置环境变量,如果之前安装过 python3 的话,可以直接进入到 python3 的文件夹当猴子那个将 python.exe 改名为 python3.exe,以后在 cmd 当中使用的时候直接输入 python 进入的是 python2.7,输入 python3 进入的就是 python3 了。这里对设置 windows 支持 2.7 和 3.6+ 双版本环境不太了解的可以百度一下,很简单。确保 Visual C++ Build Tools 和 Python2.7 的环境就可以了 . 剩下的就可以管理员 powershell 安装 appium 了
目前 https://github.com/felixrieseberg/windows-build-tools/releases 第一种方法的 5.0.0 和 5.1.0 都无法正常安装 会报错 我最新的 windows10 1809 ,os version 17763.316
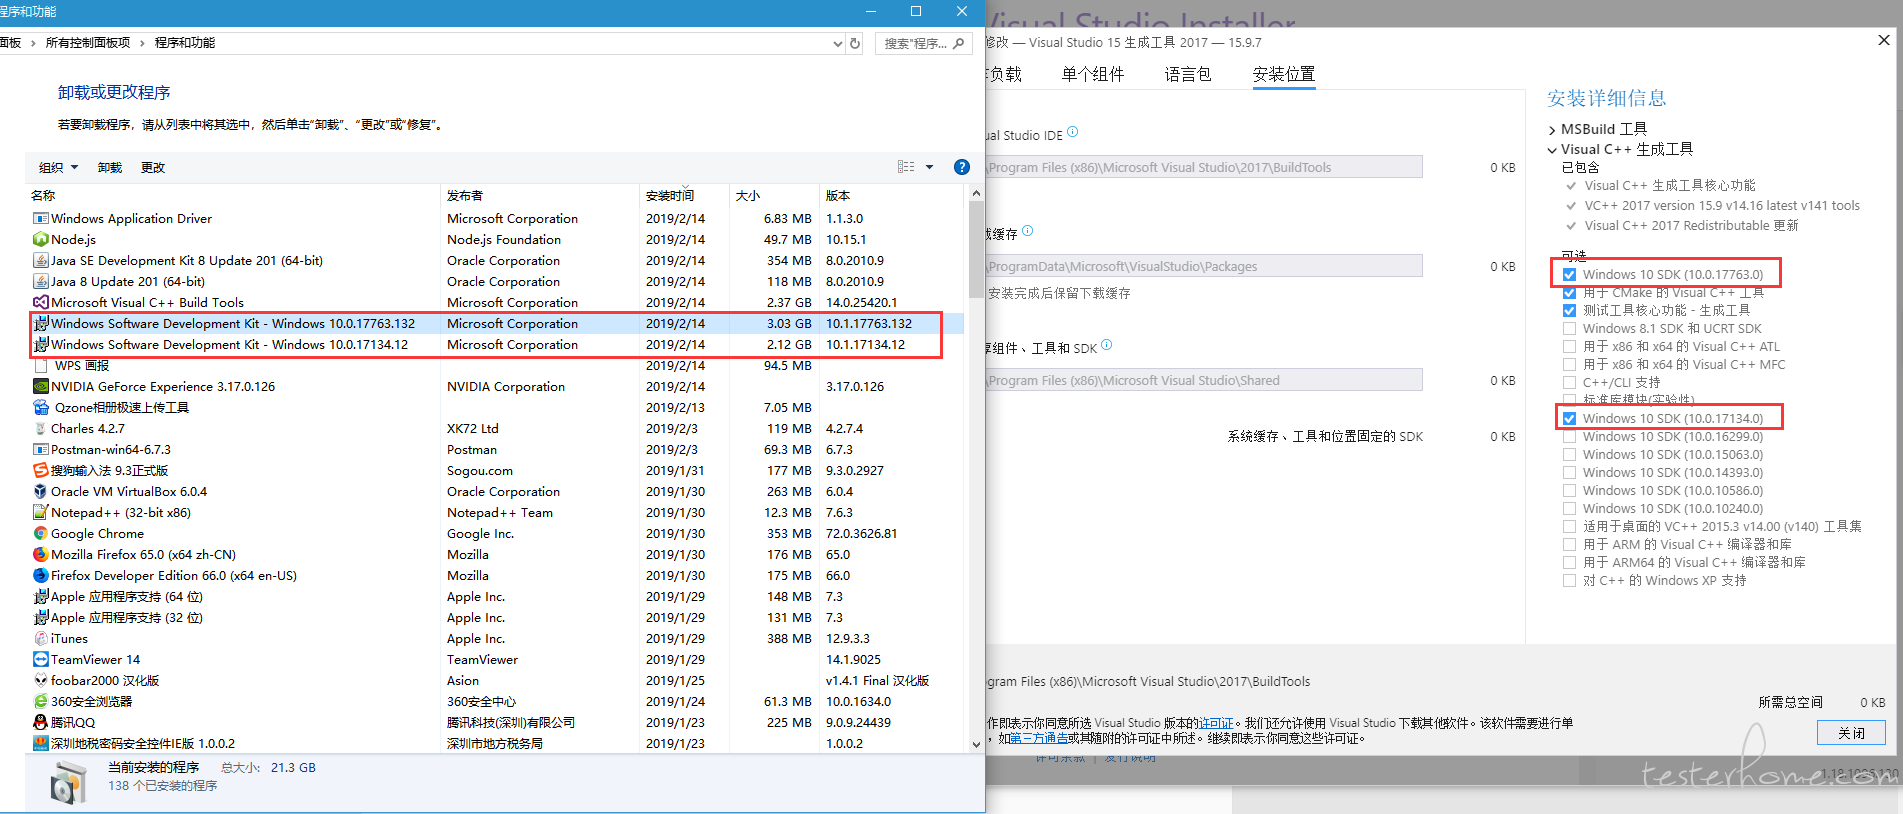
加上 17763.132.181022-1834.rs5_release_svc_prod1_WindowsSDK.iso 无法正常安装 windows-build-tools 5.0.0 和 5.1.0 , 但可以正常安装 4.0.0 且可以正常构建 appium 1.9.1 支持 win ui auto .
实际 vs_buildtools__1717812901.1535341177.exe 安装程序默认安装 会安装一个 windows 10 sdk 版本为 图中的 17134 而上图左边的是,独立下载 17763.132.181022-1834.rs5_release_svc_prod1_WindowsSDK.iso 安装的 版本为 17763 所以
windows 10 sdk 的部署 也可以简化 为直接下载 vs_buildtools 来合并为一步.最后 在该环境下 部署成功 appium 1.11.0 最新发布的
PS C:\WINDOWS\system32>  npm i appium -g --CHROMEDRIVER_CDNURL=http://npm.taobao.org/mirrors/chromedriver/
npm WARN deprecated fsevents@2.0.1: Not Ready For Production
D:\nodejs\node-global\appium -> D:\nodejs\node-global\node_modules\appium\build\lib\main.js

> appium-chromedriver@4.10.1 install D:\nodejs\node-global\node_modules\appium\node_modules\appium-chromedriver
> node install-npm.js

[16:24:57] [Chromedriver Install] Installing Chromedriver version '2.45' for platform 'win' and architecture '32'
[16:24:57] [Chromedriver Install] Opening temp file to write 'chromedriver_win32' to...
[16:24:57] [Chromedriver Install] Opened temp file 'C:\Users\cmd\AppData\Local\Temp\2019114-8776-1y7betj.hbeqg\chromedriver_win32.zip'
[16:24:57] [Chromedriver Install] Downloading http://npm.taobao.org/mirrors/chromedriver//2.45/chromedriver_win32.zip...
[16:25:15] [Chromedriver Install] Writing binary content to C:\Users\cmd\AppData\Local\Temp\2019114-8776-1y7betj.hbeqg\chromedriver_win32.zip...
[16:25:15] [Chromedriver Install] Extracting C:\Users\cmd\AppData\Local\Temp\2019114-8776-1y7betj.hbeqg\chromedriver_win32.zip to C:\Users\cmd\AppData\Local\Temp\2019114-8776-1y7betj.hbeqg\chromedriver_win32
[16:25:16] [Chromedriver Install] Creating D:\nodejs\node-global\node_modules\appium\node_modules\appium-chromedriver\chromedriver\win...
[16:25:16] [Chromedriver Install] Copying unzipped binary, reading from C:\Users\cmd\AppData\Local\Temp\2019114-8776-1y7betj.hbeqg\chromedriver_win32\chromedriver.exe...
[16:25:16] [Chromedriver Install] Writing to D:\nodejs\node-global\node_modules\appium\node_modules\appium-chromedriver\chromedriver\win\chromedriver.exe...
[16:25:16] [Chromedriver Install] D:\nodejs\node-global\node_modules\appium\node_modules\appium-chromedriver\chromedriver\win\chromedriver.exe successfully put in place

> appium-selendroid-driver@1.13.3 install D:\nodejs\node-global\node_modules\appium\node_modules\appium-selendroid-driver
> node ./bin/install.js

 found:19] Java version 1.8.0_201
[16:25:19] Ensuring D:\nodejs\node-global\node_modules\appium\node_modules\appium-selendroid-driver\selendroid\download exists
[16:25:19] Downloading Selendroid standalone server version 0.17.0 from https://repo1.maven.org/maven2/io/selendroid/selendroid-standalone/0.17.0/selendroid-standalone-0.17.0-with-dependencies.jar --> D:\nodejs\node-global\node_modules\appium\node_modules\appium-selendroid-driver\selendroid\download\selendroid-server-7cf7163ac47f1c46eff95b62f78b58c1dabdec534acc6632da3784739f6e9d82.jar
[16:27:57] Writing binary content to D:\nodejs\node-global\node_modules\appium\node_modules\appium-selendroid-driver\selendroid\download\selendroid-server.jar.tmp
[16:27:57] Selendroid standalone server downloaded
[16:27:57] Determining AndroidManifest location
[16:27:57] Determining server apk location
[16:27:58] Extracting manifest and apk to D:\nodejs\node-global\node_modules\appium\node_modules\appium-selendroid-driver\selendroid\download
[16:27:58] Copying manifest and apk to D:\nodejs\node-global\node_modules\appium\node_modules\appium-selendroid-driver\selendroid
[16:27:58] Cleaning up temp files
[16:27:58] Fixing AndroidManifest icon bug

> appium-windows-driver@1.5.1 install D:\nodejs\node-global\node_modules\appium\node_modules\appium-windows-driver
> node install-npm.js

info WinAppDriver You must use WinAppDriver version 1.1
info WinAppDriver Verifying WinAppDriver version 1.1 is installed via comparing the checksum.
info WinAppDriver WinAppDriver.exe version 1.1 already exists with correct checksum, not re-downloading

> heapdump@0.3.9 install D:\nodejs\node-global\node_modules\appium\node_modules\heapdump
> node-gyp rebuild


D:\nodejs\node-global\node_modules\appium\node_modules\heapdump>if not defined npm_config_node_gyp (node "D:\nodejs\node_modules\npm\node_modules\npm-lifecycle\node-gyp-bin\\..\..\node_modules\node-gyp\bin\node-gyp.js" rebuild )  else (node "D:\nodejs\node_modules\npm\node_modules\node-gyp\bin\node-gyp.js" rebuild )
在此解决方案中一次生成一个项目。若要启用并行生成,请添加“/m”开关。
  heapdump.cc
d:\nodejs\node-global\node_modules\appium\node_modules\heapdump\src\compat-inl.h(300): warning C4996: 'v8::Isolate::GetCpuProfiler': 被声明为已否决 [D:\nodejs\node-
global\node_modules\appium\node_modules\heapdump\build\addon.vcxproj]
  c:\users\cmd\.node-gyp\10.15.1\include\node\v8.h(7484): note: 参见“v8::Isolate::GetCpuProfiler”的声明
d:\nodejs\node-global\node_modules\appium\node_modules\heapdump\src\compat-inl.h(310): warning C4996: 'v8::Isolate::GetCpuProfiler': 被声明为已否决 [D:\nodejs\node-
global\node_modules\appium\node_modules\heapdump\build\addon.vcxproj]
  c:\users\cmd\.node-gyp\10.15.1\include\node\v8.h(7484): note: 参见“v8::Isolate::GetCpuProfiler”的声明
d:\nodejs\node-global\node_modules\appium\node_modules\heapdump\src\heapdump.cc(106): warning C4996: 'v8::String::Utf8Value::Utf8Value': 被声明为已否决 [D:\nodejs\n
ode-global\node_modules\appium\node_modules\heapdump\build\addon.vcxproj]
  c:\users\cmd\.node-gyp\10.15.1\include\node\v8.h(2891): note: 参见“v8::String::Utf8Value::Utf8Value”的声明
d:\nodejs\node-global\node_modules\appium\node_modules\heapdump\src\heapdump.cc(143): warning C4996: 'node::MakeCallback': 被声明为已否决 [D:\nodejs\node-global\nod
e_modules\appium\node_modules\heapdump\build\addon.vcxproj]
  c:\users\cmd\.node-gyp\10.15.1\include\node\node.h(176): note: 参见“node::MakeCallback”的声明
d:\nodejs\node-global\node_modules\appium\node_modules\heapdump\src\heapdump.cc(157): warning C4996: 'v8::Value::Int32Value': 被声明为已否决 [D:\nodejs\node-global\
node_modules\appium\node_modules\heapdump\build\addon.vcxproj]
  c:\users\cmd\.node-gyp\10.15.1\include\node\v8.h(2478): note: 参见“v8::Value::Int32Value”的声明
    正在创建库 D:\nodejs\node-global\node_modules\appium\node_modules\heapdump\build\Release\addon.lib 和对象 D:\nodejs\node-global\node_modules\appium\node_modules\
  heapdump\build\Release\addon.exp
  正在生成代码
  All 95 functions were compiled because no usable IPDB/IOBJ from previous compilation was found.
  已完成代码的生成
  addon.vcxproj -> D:\nodejs\node-global\node_modules\appium\node_modules\heapdump\build\Release\\addon.node

> pre-commit@1.2.2 install D:\nodejs\node-global\node_modules\appium\node_modules\pre-commit
> node install.js


> wd@1.11.1 install D:\nodejs\node-global\node_modules\appium\node_modules\wd
> node scripts/build-browser-scripts


> spawn-sync@1.0.15 postinstall D:\nodejs\node-global\node_modules\appium\node_modules\spawn-sync
> node postinstall

npm WARN optional SKIPPING OPTIONAL DEPENDENCY: fsevents@2.0.1 (node_modules\appium\node_modules\fsevents):
npm WARN notsup SKIPPING OPTIONAL DEPENDENCY: Unsupported platform for fsevents@2.0.1: wanted {"os":"darwin","arch":"any"} (current: {"os":"win32","arch":"x64"})
npm WARN optional SKIPPING OPTIONAL DEPENDENCY: fsevents@1.2.6 (node_modules\appium\node_modules\chokidar\node_modules\fsevents):
npm WARN notsup SKIPPING OPTIONAL DEPENDENCY: Unsupported platform for fsevents@1.2.6: wanted {"os":"darwin","arch":"any"} (current: {"os":"win32","arch":"x64"})

+ appium@1.11.0
added 1306 packages from 1503 contributors in 421.543s
PS C:\WINDOWS\system32> appium-doctor info AppiumDoctor Appium Doctor v.1.9.0 info AppiumDoctor ### Diagnostic for necessary dependencies starting ### info AppiumDoctor ✔ The Node.js binary was found at: D:\nodejs\node.EXE info AppiumDoctor ✔ Node version is 10.15.1 info AppiumDoctor ✔ ANDROID_HOME is set to: D:\Android\android-sdk info AppiumDoctor ✔ JAVA_HOME is set to: C:\Program Files\Java\jdk1.8.0_201 info AppiumDoctor ✔ adb exists at: D:\Android\android-sdk\platform-tools\adb.exe info AppiumDoctor ✔ android exists at: D:\Android\android-sdk\tools\android.bat info AppiumDoctor ✔ emulator exists at: D:\Android\android-sdk\tools\emulator.exe info AppiumDoctor ✔ Bin directory of %JAVA_HOME% is set info AppiumDoctor ### Diagnostic for necessary dependencies completed, no fix needed. ### info AppiumDoctor info AppiumDoctor ### Diagnostic for optional dependencies starting ### info AppiumDoctor ✔ Python required by node-gyp (used by heapdump) is installed at: D:\Python27\python.EXE. Installed version is: 2.7.14 WARN AppiumDoctor ✖ opencv4nodejs cannot be found. WARN AppiumDoctor ✖ ffmpeg cannot be found WARN AppiumDoctor ✖ bundletool.jar cannot be found info AppiumDoctor ### Diagnostic for optional dependencies completed, 3 fixes possible. ### info AppiumDoctor info AppiumDoctor ### Optional Manual Fixes ### info AppiumDoctor The configuration can install optionally. Please do the following manually: WARN AppiumDoctor ➜ Why opencv4nodejs is needed and how to install it: https://github.com/appium/appium/blob/master/docs/en/writing-running-appium/image-comparison.md WARN AppiumDoctor ➜ ffmpeg is needed to record screen features. Please read https://www.ffmpeg.org/ to install it WARN AppiumDoctor ➜ bundletool.jar is used to handle Android App Bundle. Please read http://appium.io/docs/en/writing-running-appium/android/android-appbundle/ to install it info AppiumDoctor info AppiumDoctor ### info AppiumDoctor info AppiumDoctor Bye! Run appium-doctor again when all manual fixes have been applied! -
好消息,社区专栏新功能来啦! at 2018年12月10日
@simple 可以开放下
1 重新修改 专栏名称 和 别名吗?
2 新建多个专栏 -
测试开发之路 -- 不要成为你曾经最讨厌的人 at 2018年12月10日
手动点赞
我快成为 自己曾经最讨厌的人了....
看了这篇, 我再努努力 踩踩刹车吧 -
WiFi 无线拉起执行 APP 稳定性 / 压力测试,免 USB 连线 at 2018年12月07日
对 所以 这些云测平台 appetizer 也好 领导们 都担心安全和 user infomation 问题
-
WiFi 无线拉起执行 APP 稳定性 / 压力测试,免 USB 连线 at 2018年12月07日
开源,不是喊一声大神,大神给你免费开放用自己开发的框架,然后要从安装开始教你,Fix 你特殊设备的 Bug,完成你提的这个那个需求,还给你写文档,完了你就去交 KPI 了;这不是开源,这是抢劫
Maxim 作者聊到过,iOS 端开源了 1 年多,没有人贡献过
Appium 作者来华私聊到,从流量上看到大量中国人在用 Appium,但是却没有看到过 PR,这是为什么
我们 AppetizerIO 作为一个使用开源项目的商业产品,取之于社区,还之于社区:用开源工具充实我们的同时,为开源项目 1. 写文档 2. 做 GUI 配给,集成,项目调和 3. 回答问题处理 issue 4. Bugfix, 新 feature
独乐了不如众乐乐,开源是精神,不是形式,不是收费就不是开源
大神这个能不能加上 -> 大神我加了个这个,PR review 一下
大神没找到文档啊 -> 大神我把 xxx 这里写了一下,PR 了合并一下吧
大神我这个手机上跑不了 -> 大神,我适配了 xxx,PR 合并一下吧
大神我是小白,这个怎么用啊 -> 大神我是小白看了文档试用了一下,这个是我在 TesterHome 分享的踩坑贴,有些可以并到 README
大神这个是不是一直免费啊 -> 大神我能做什么就是这么个理儿....
不过 大神都被 BAT 360 大厂挖走了 小公司成测开规模上 3 人规模的都很少....
拿来主义盛行,也是没办法的事....最后上一图 大家笑笑

做测开好的都去了 BAT 要做 API UI 测开 就要用那些技能稍微不好的 ,但弄的好不好不重要,重要的通过 UI API 来找手工业务测试新韭菜!!
-
关于最近某商业机构广告投放包含社区关键词的申明 at 2018年12月06日
做 SEO 优化人员弄的吧。蹭关键词热点。说明咱们坛子有影响力了,被盯上了。
-
Yuntestin 基于 jmeter 的轻量级云测试平台 at 2018年12月04日
@ 笑哼
1 github 地址呢?
2 支持 grafana 扩展监控吗
3 支持接口测试用例组织和接口报告吗?
4 支持 jmeter 的内核是什么版本 支持自动升级 jmeter 内核吗?
5 支持 bin 下各种 jmeter.properties user.properties 和其他 *.properties 的全局引用配置吗? 即任意 jmx 有一套自己的.properties 配置,互不影响或者可以引用某一 jmx 的配置 而不影响 jmeter 运行 或者说可以穿插运行不同 properties 配置的 jmx.
6 支持引用自定义 jar 包 自定义 Custom Config Element 配置元素组件或自定义函数 配置吗 -
appium 环境搭配问题 at 2018年12月03日
仔细按我贴的步骤来 ,要打开开发者选项 和 用管理员模式的 powershell 来安装 还有要 ***
-
appium 环境搭配问题 at 2018年12月03日
1 ***
2 设置重定向 下载 mirror 镜像地址 -
appium 环境搭配问题 at 2018年12月02日
-
Appium 1.10.0 发布 at 2018年11月29日
一般 1.10.1 会稳定 先别升级.........
-

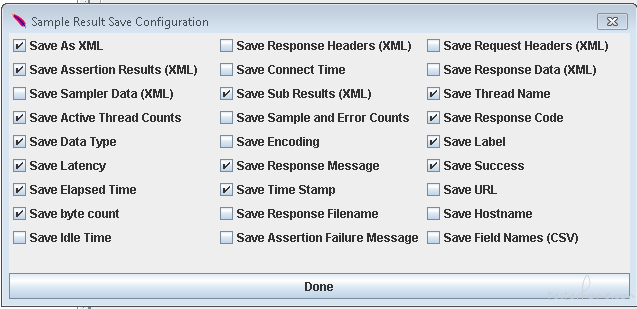
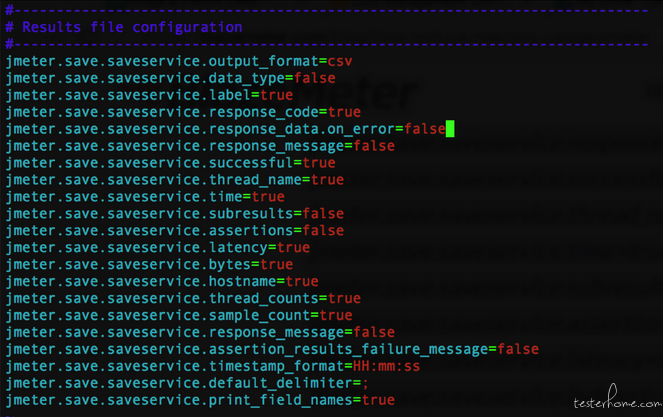
这里配置下需要生成和查看的内容,比如 你要做负载压力测试的时候,可以去掉一些选项 比如是否保存响应消息 save response message/bin/jmeter.properties 的一些配置 也可以控制需要度量和记录的东西
这主要是由于存储响应数据 response message,大量响应被写入.jtl 文件,这会导致额外的磁盘 IO 并扩大.jtl 大小
可以配置为
1 使用 CSV 作为输出格式
2 取消选中 Save Sub Results (XML)
相关的 user.properties 是:
jmeter.save.saveservice.output_format=csv
jmeter.save.saveservice.subresults=true
-
百度 AI3.0 让传统质检升级为人工智能,下一个失业的是谁? at 2018年11月27日
反正 阿里云 这种东西, cloud 和 APM 这种东西 运维 可以失业了. 云测 测试也可以失业了 .
而且还不贵,一个手工测试人工 中高级的北上广深都要 13K 左右了.
买和用这种服务平台,实际不贵 最好的也才 1 个月 4K 左右吧 看你买什么服务了. 提供优秀的脚本 IDE 编辑,封装的傻瓜 API 写写脚本就能跑自动化了,还适配了大量国产安卓 ROM 兼容性报告详细具体. 现在又上 AI Test........................
所以 我现在都不敢让老板和老大 了解到这些服务. 哪天算明白账了,我还鼓捣啥..... -
基于 Jmeter 的轻量级云压测平台的原理与实现 (一):开篇 at 2018年11月27日
还有一点 就是我看你的 Report 是 Jmeter 自带的实际是性能方向的报告.
能支持接口测试方向的报告么? 比如 ant 那种的 或者 allure 等其他 report 框架那种的. -
基于 Jmeter 的轻量级云压测平台的原理与实现 (一):开篇 at 2018年11月27日
-
基于 Jmeter 的轻量级云压测平台的原理与实现 (一):开篇 at 2018年11月26日