Macaca iOS 真机实战
前言
目前在圈子里好像还没人介绍过 Macaca 在 iOS 真机上的测试过程,下面我主要介绍一下楼主是怎么猜坑的。真机与模拟器最大的区别在于要对 WebDriverAgent 和 测试 App 进行重签名。
如果你用的是测试 App 是直接从 Appstore 中下载的,那么可以不用对测试 App 重签名。
目的
实现 Macaca 项目,在 iOS 真机上执行用例。
准备工作
- 安装 Macaca
shell $ npm i macaca-cli macaca-ios -g - 请安装 Xcode8 或者更高版本
- 需要安装 usbmuxd 以便于通过 USB 通道测试 iOS 真机,不需要测试真机则不用安装
shell $ brew install usbmuxd - 应用中如含有 WebView,请安装 ios-webkit-debug-proxy
shell
$ brew install ios-webkit-debug-proxy
Macaca 真机调用原理
Macaca 通过调用 WebDriverAgent 实现在真机上安装测试 app 并执行测试用例。
在执行测试用例时,Macaca 首先会在真机上安装 WebDriverAgent ,该 App 原始地址 /usr/local/lib/node_modules/macaca-ios/node_modules/webdriveragent/WebDriverAgent/WebDriverAgent.xcodeproj
然后通过 WebDriverAgent 发送指令调用被测试 App。
WebDriverAgent 是什么
WebDriverAgent 在 iOS 端实现了一个 WebDriver server ,借助这个 server 我们可以远程控制 iOS 设备。你可以启动、杀死应用,点击、滚动视图,或者确定页面展示是否正确。
iOS 真机调试步骤
工作环境: Mac OS
Xcode: >= 8.0
-
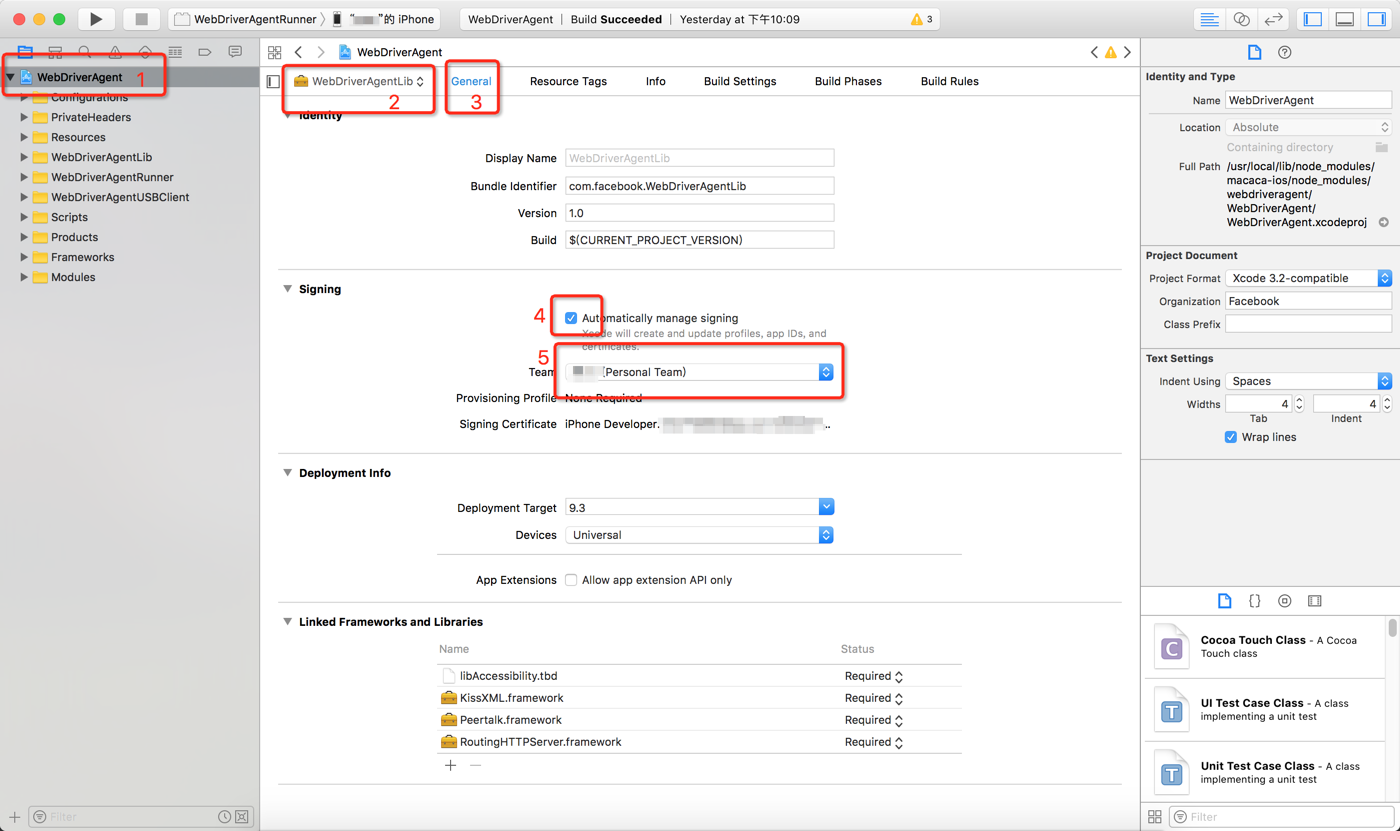
重签名 WebDriverAgent:
双击 /usr/local/lib/node_modules/macaca-ios/node_modules/webdriveragent/WebDriverAgent/WebDriverAgent.xcodeproj
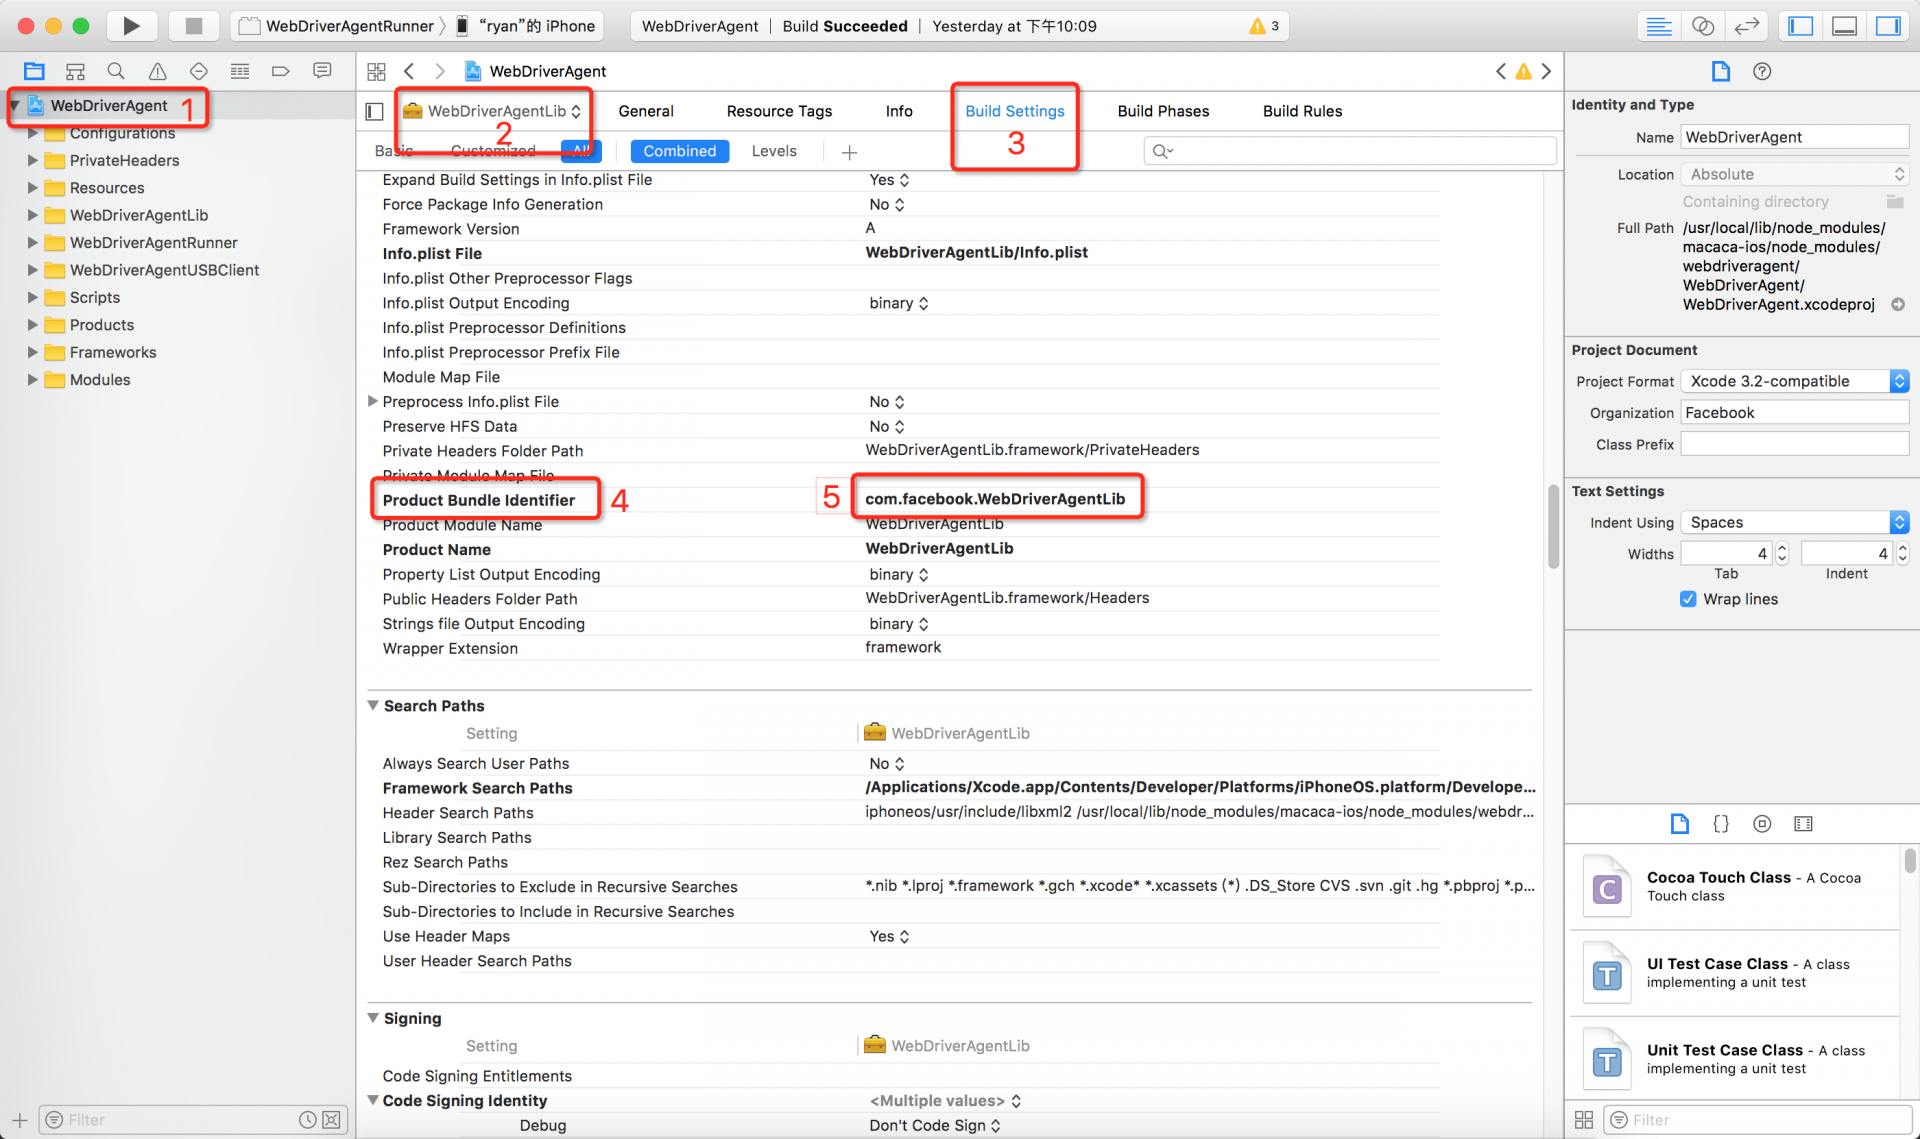
在打开的 Xcode 中按照下图中的顺序进行设置

如果上图中 步骤 5 报错,则需要先按照 下图所示设置一个自定义的 Product Bundle Identifier

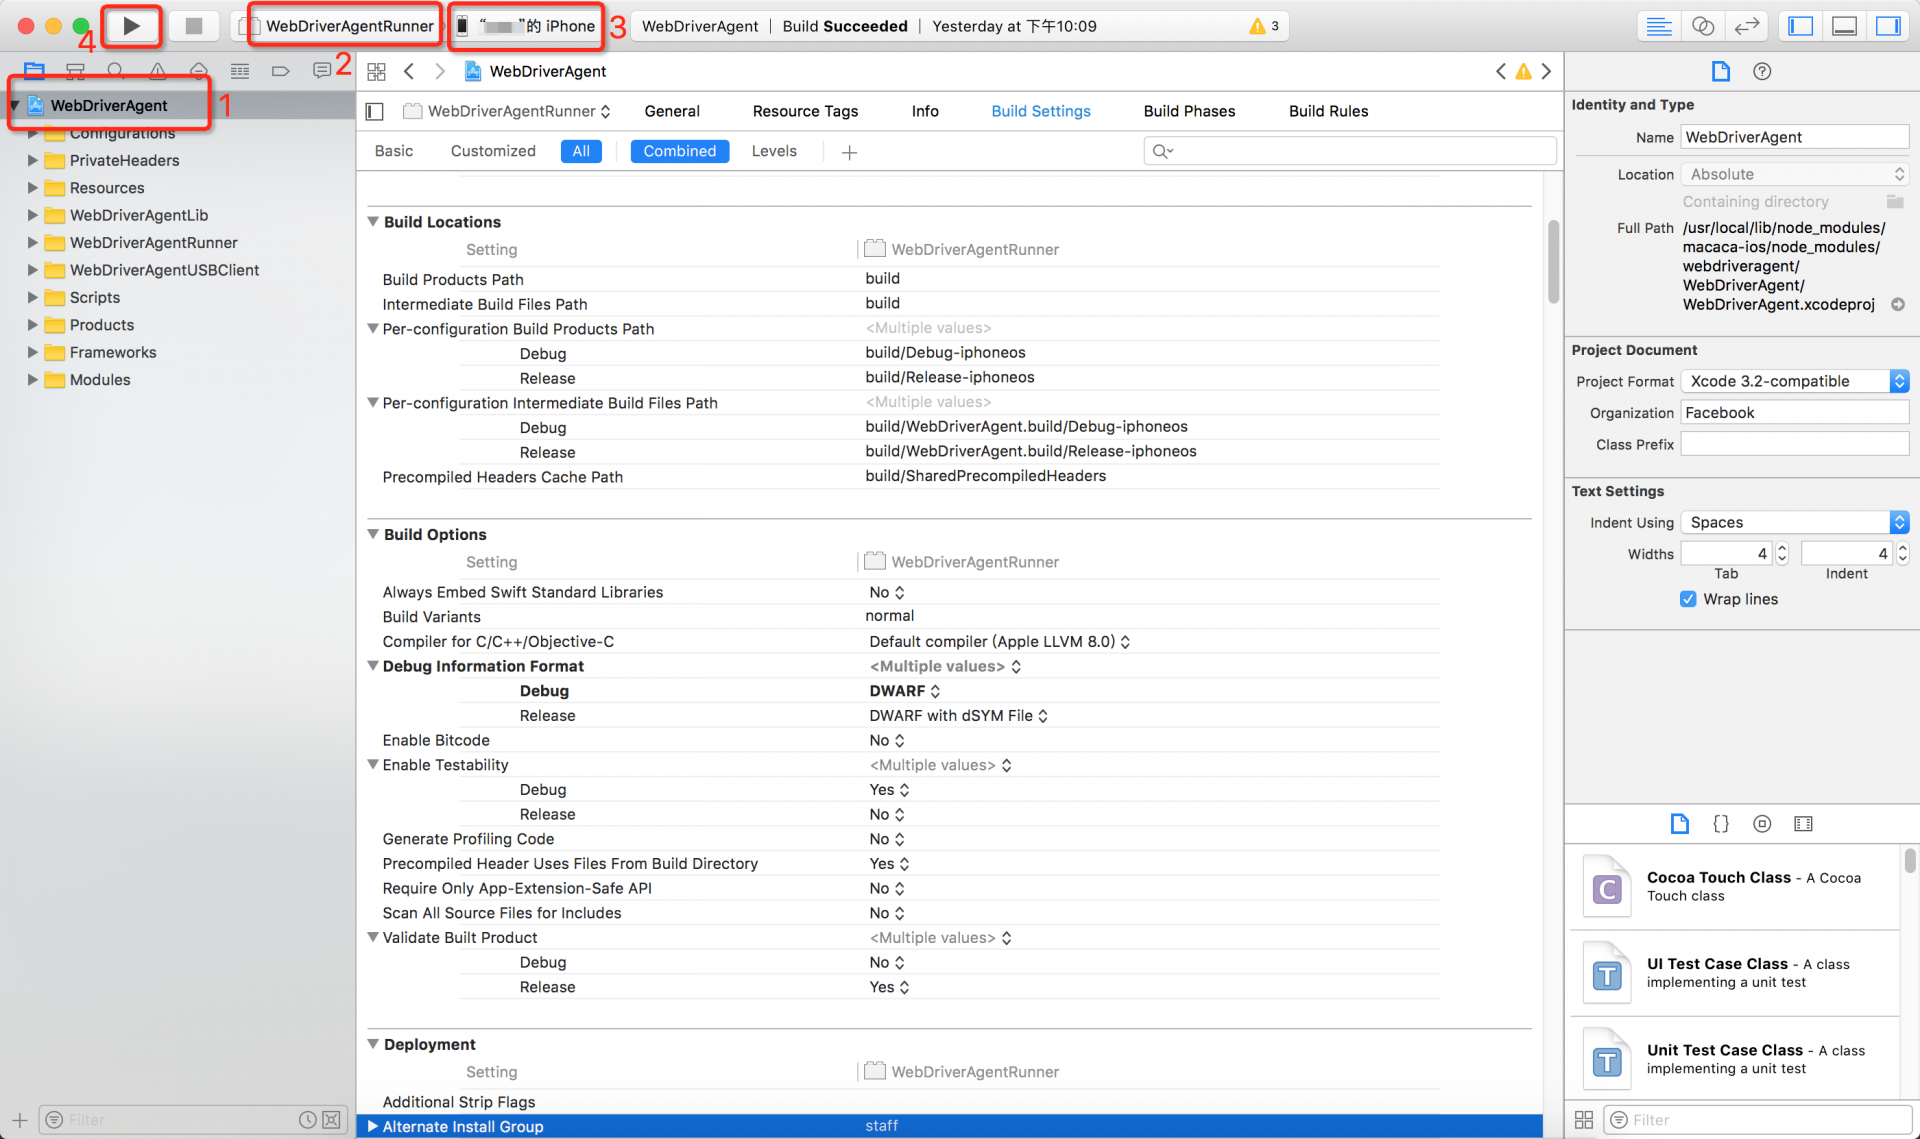
注意:按照以上步骤操作完,则已经完成了对 WebDriverAgentLib 的重签名工作,接下来需要对 WebDriverAgentRunner 进行相同的重签名工作,步骤参考上两图:)
完成以上设置后 接下来需要 build 一下:
- 步骤如下图所示

- 点击 上图中的 步骤 4 后如果提示 Build Successed 那么恭喜你重签名成功了。
-
重签名 待测试的 App
步骤:参见 WebDriverAgent 的重签名过程
至此,你已经完成了一般的工作,亲 恭喜你:)
准备测试用例
test.js
'use strict';

require('should');
var xml2map = require('xml2map');
var platform = process.env.platform || 'iOS';//iOS  Android
platform = platform.toLowerCase();
var pkg = require('../package');

var iOSOpts = {
  deviceName: 'iPhone 6 Plus',
  platformName: 'iOS',
  autoAcceptAlerts: false,
  udid: '8cdb7*********a61',
  bundleId: 'com.ant.***',
  app: 'apk/****.ipa'
};

const isIOS = platform === 'ios';
const infoBoardId = isIOS ? 'info' : 'com.github.android_app_bootstrap:id/info';
const wd = require('macaca-wd');
require('./wd-extend')(wd, isIOS);

describe('macaca mobile sample', function() {
  this.timeout(5 * 60 * 1000);

  const driver = wd.promiseChainRemote({
    host: 'localhost',
    port: 3456
  });

  driver.configureHttp({
    timeout: 600 * 1000
  });

  before(function() {
    return driver
      .init(isIOS ? iOSOpts : androidOpts);
  });

  after(function() {
    return driver
      .sleep(1000)
      .quit();
  });

  it('#1 should login success', function() {
    return driver
      .getWindowSize()
      .then(size => {
        console.log(`current window size ${JSON.stringify(size)}`);
      })
      .appLogin('中文+Test+12345678', '111111')
      .sleep(1000);
  });
});
以上代码中需要修改的内容为:
udid(你设备的 udid,可在 iTunes 中查看)
bundleId(步骤 2 中的 Product Bundle Identifier)
app(此处支持 .ipa 或者 你将 .app 打成压缩包也可以,如:test.app => test.zip)
注意:此处多说一点,udid 是用来告诉 Macaca 要在哪儿个设备上执行测试代码;
bundleId 的作用是告诉 Macaca 哪儿个是要测试的 App;
app 的作用是在找不到 bundleId 指定的 App 的情况下,安装指定的 App,如果你的测试机上已经安装了测试 App,那么本参数可以不写;
启动测试用例:
macaca run -d test.js --verbose