Appium 教您完美 win10 安装 Appium1.7.2 支持 win 客户端自动化

老马 · 2018年04月17日 · 最后由 Forkey 回复于 2021年08月25日 · 7334 次阅读

参考内容:

https://testerhome.com/topics/10193
https://testerhome.com/topics/8223
https://testerhome.com/topics/8812
https://github.com/appium/appium/blob/71fac8d2759b18bb2a506a5c8359bfdf41a6443b/docs/cn/writing-running-appium/windows-app-testing.md
https://developer.microsoft.com/zh-cn/windows/downloads/windows-10-sdk
https://github.com/Microsoft/WinAppDriver/releases

解决步骤:

https://testerhome.com/topics/10193
该贴遗留问题:

MSBUILD : error MSB3428: 未能加载 Visual C++ 组件“VCBuild.exe”。要解决此问题,1) 安装 .NET Framework 2.0 SDK;2) 安装 Microsoft Vis ual Studio 2005;或 3)
如果将该组件安装到了其他位置,请将其位置添加到系统路径中。 [D:\nodejs\node-global\node_modules\appium\node_modules\heapdump\build\bi nding.sln]

这个问题意思是需要利用报错的组件来编译 WinAppDriver,WinAppDriver 是用来支持 windows 应用 UI 自动化的,Appium 引用了该底层支持驱动.
但是这个问题,你不关心它,还是可以继续用来做 ios app 或 android app 基于 UI 元素识别的自动化的,没有任何影响.

如果想解决该问题,我大致花了半天时间搜了些帖子和科学上谷大哥,绕了点弯道,最终解决了该报错,也成功的在 Appium 下编译安装成功了 WinAppDriver 组件.
达到了 Win10 完美安装 Appium1.7.2. 即不会报任何错误和警告.这样也可以直接支持 Appium 使用 WinAppDriver 做 windows 客户端 或 uwp 客户端应用的 UI 自动化了.

解决掉了这种报错:

MSBUILD : error MSB3428: 未能加载 Visual C++ 组件“VCBuild.exe”。要解决此问题,1) 安装 .NET Framework 2.0 SDK;2) 安装 Microsoft Vis ual Studio 2005;或 3)
如果将该组件安装到了其他位置,请将其位置添加到系统路径中。 [D:\nodejs\node-global\node_modules\appium\node_modules\heapdump\build\bi nding.sln]

解决掉了这种警告:

> appium-windows-driver@1.0.0 install D:\nodejs\node-global\node_modules\appium\node_modules\appium-windows-driver
> node install-npm.js
info WinAppDriver You must use WinAppDriver version 1.0
info WinAppDriver Verifying WinAppDriver version 1.0 is installed via comparing the checksum.
info WinAppDriver WinAppDriver.exe doesn't exist at the correct version 1.0, setting up
WARNING: You are not running as an administrator so WinAppDriver cannot be installed for you; please reinstall as admin
WinAppDriver was not installed; please check your system and re-run npm install if you need WinAppDriver
> heapdump@0.3.9 install D:\nodejs\node-global\node_modules\appium\node_modules\heapdump
> node-gyp rebuild
D:\nodejs\node-global\node_modules\appium\node_modules\heapdump>if not defined npm_config_node_gyp (node "D:\nodejs\node_modules\npm\node_modules\npm-lifecycle\node-gyp-bin\\..\..\node_modules\node-gyp\bin\node-gyp.js" rebuild ) else (node "D:\nodejs\node_modules\npm\node_modules\node-gyp\bin\node-gyp.js" rebuild )
在此解决方案中一次生成一个项目。若要启用并行生成,请添加“/m”开关。

具体解决步骤:

最终的方法,期间参考一些折腾了一些其他的,反复试了几次,应该是这样的步骤:

1 卸载 npm uninstall appium -g
哦 实际 我也开启了 win10 的开发人员模式,此步是不是必要 我暂时不清楚,参考乱七八糟的帖子 折腾了许多,所以并不知道 是否此步必要

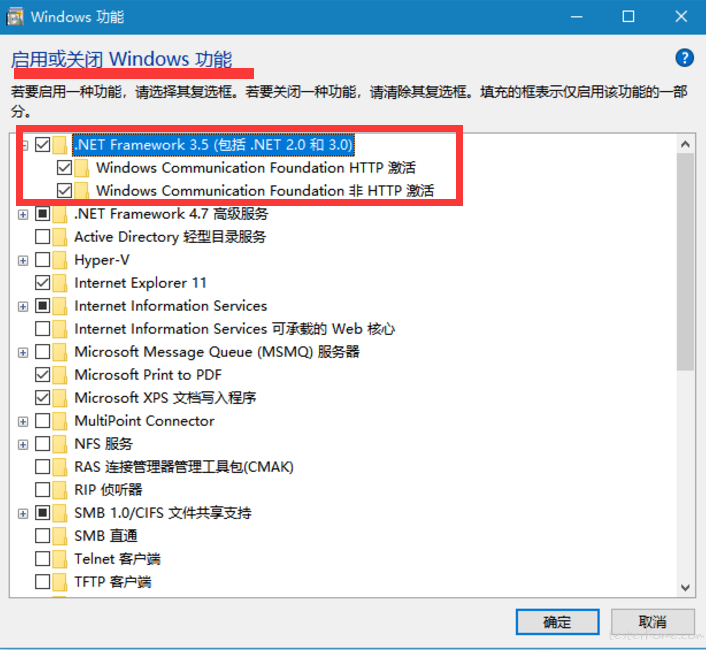
2 控制面板-->程序和功能 开启标红两项
3 去 https://developer.microsoft.com/zh-cn/windows/downloads/windows-10-sdk 下载 .iso

一共 760 多 MB 16299.15.170928-1534.rs3_release_WindowsSDK.iso win10 可以直接双击该 iso 便会加载为一个光盘 DVD 驱动器,进去,直接双击 WinSDKSetup.exe 安装即可.默
认路径,默认 features 全选择
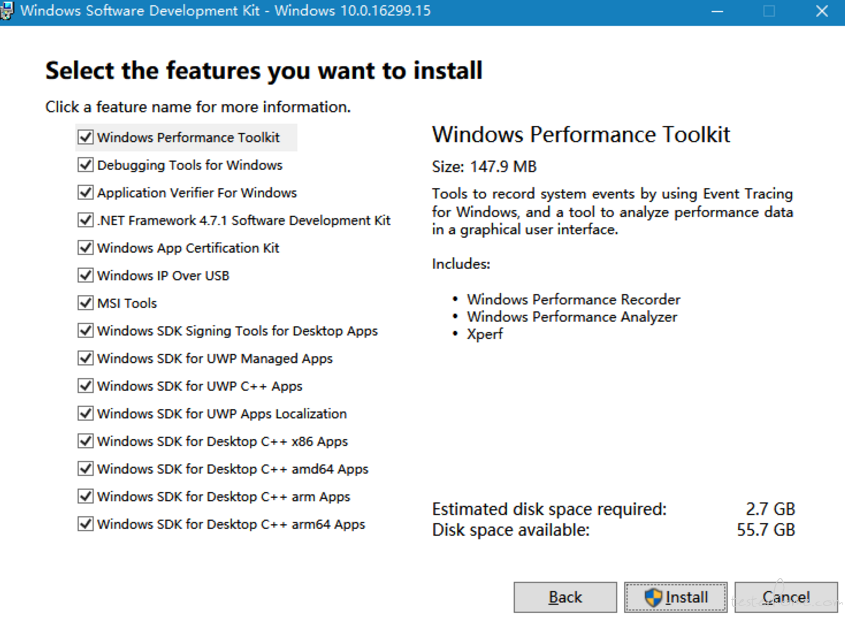
安装成功后,程序和功能会多出这几项,可以确认下

4 https://github.com/Microsoft/WinAppDriver/releases 下载 v1.0 的 WindowsApplicationDriver.msi .
安装到默认 C:\Program Files (x86)\Windows Application Driver
路径,然后命令行到该路径,尝试启动下

保证启动正常. 保证正常启动不报错后,就可以关掉了,安装其他过程中不需要保证开启该 server

5 管理员权限 powershell 执行 npm install --global --production windows-build-tools
过程很长,需要在线下载一些组件.我全程科学上网.

Windows PowerShell
版权所有 (C) Microsoft Corporation。保留所有权利。
PS C:\WINDOWS\system32> npm install --global --production windows-build-tools
> windows-build-tools@2.2.1 postinstall D:\nodejs\node-global\node_modules\windows-build-tools
> node ./lib/index.js
Downloading BuildTools_Full.exe
Downloading python-2.7.14.amd64.msi
[> ] 0.0% (0 B/s)
Downloaded python-2.7.14.amd64.msi. Saved to C:\Users\cmd\.windows-build-tools\python-2.7.14.amd64.msi.
Starting installation...
Launched installers, now waiting for them to finish.
This will likely take some time - please be patient!
Status from the installers:
---------- Visual Studio Build Tools ----------
Successfully installed Visual Studio Build Tools.
------------------- Python --------------------
Successfully installed Python 2.7
+ windows-build-tools@2.2.1
added 132 packages in 1365.525s

6 管理员权限 powershell 执行 npm i appium -g

然后就正常了 没 WARNING 了.

PS C:\WINDOWS\system32> npm i appium -g
D:\nodejs\node-global\appium -> D:\nodejs\node-global\node_modules\appium\build\lib\main.js

> appium-chromedriver@3.1.4 install D:\nodejs\node-global\node_modules\appium\node_modules\appium-chromedriver
> node install-npm.js

info Chromedriver Install Installing Chromedriver version '2.33' for platform 'win' and architecture '32'
info Chromedriver Install Opening temp file to write chromedriver_win32 to...
info Chromedriver Install Downloading https://chromedriver.storage.googleapis.com/2.33/chromedriver_win32.zip...
info Chromedriver Install Writing binary content to C:\Users\cmd\AppData\Local\Temp\2018317-14572-briz5r.jt6ow\chromedriver_win32.zip...
info Chromedriver Install Extracting C:\Users\cmd\AppData\Local\Temp\2018317-14572-briz5r.jt6ow\chromedriver_win32.zip to C:\Users\cmd\AppData\Local\Temp\2018317-14572-briz5r.jt6ow\chromedriver_win32
info Chromedriver Install Creating D:\nodejs\node-global\node_modules\appium\node_modules\appium-chromedriver\chromedriver\win...
info Chromedriver Install Copying unzipped binary, reading from C:\Users\cmd\AppData\Local\Temp\2018317-14572-briz5r.jt6ow\chromedriver_win32\chromedriver.exe...
info Chromedriver Install Writing to D:\nodejs\node-global\node_modules\appium\node_modules\appium-chromedriver\chromedriver\win\chromedriver.exe...
info Chromedriver Install D:\nodejs\node-global\node_modules\appium\node_modules\appium-chromedriver\chromedriver\win\chromedriver.exe successfully put in place

> appium-selendroid-driver@1.6.6 install D:\nodejs\node-global\node_modules\appium\node_modules\appium-selendroid-driver> node ./bin/install.js

dbug AndroidDriver Getting Java version
info AndroidDriver Java version is: 1.8.0_121
info Selendroid Ensuring D:\nodejs\node-global\node_modules\appium\node_modules\appium-selendroid-driver\selendroid\download exists
info Selendroid Downloading Selendroid standalone server version 0.17.0 from http://repo1.maven.org/maven2/io/selendroid/selendroid-standalone/0.17.0/selendroid-standalone-0.17.0-with-dependencies.jar --> D:\nodejs\node-global\node_modules\appium\node_modules\appium-selendroid-driver\selendroid\download\selendroid-server-7cf7163ac47f1c46eff95b62f78b58c1dabdec534acc6632da3784739f6e9d82.jar
info Selendroid Writing binary content to D:\nodejs\node-global\node_modules\appium\node_modules\appium-selendroid-driver\selendroid\download\selendroid-server.jar.tmp
info Selendroid Selendroid standalone server downloaded
info Selendroid Determining AndroidManifest location
info Selendroid Determining server apk location
info Selendroid Extracting manifest and apk to D:\nodejs\node-global\node_modules\appium\node_modules\appium-selendroid-driver\selendroid\download
info Selendroid Copying manifest and apk to D:\nodejs\node-global\node_modules\appium\node_modules\appium-selendroid-driver\selendroid
info Selendroid Cleaning up temp files
info Selendroid Fixing AndroidManifest icon bug

> appium-uiautomator2-driver@0.11.0 install D:\nodejs\node-global\node_modules\appium\node_modules\appium-uiautomator2-driver
> node ./bin/install.js

dbug AndroidDriver Getting Java version
info AndroidDriver Java version is: 1.8.0_121
info UiAutomator2 downloading UiAutomator2 Server APK v0.3.0 : https://github.com/appium/appium-uiautomator2-server/releases/download/v0.3.0/appium-uiautomator2-server-v0.3.0.apk
info UiAutomator2 downloading UiAutomator2 Server test APK v0.3.0 : https://github.com/appium/appium-uiautomator2-server/releases/download/v0.3.0/appium-uiautomator2-server-debug-androidTest.apk
info UiAutomator2 UiAutomator2 Server APKs downloaded

> appium-windows-driver@1.0.0 install D:\nodejs\node-global\node_modules\appium\node_modules\appium-windows-driver
> node install-npm.js

info WinAppDriver You must use WinAppDriver version 1.0
info WinAppDriver Verifying WinAppDriver version 1.0 is installed via comparing the checksum.
info WinAppDriver WinAppDriver.exe version 1.0 already exists with correct checksum, not re-downloading

> heapdump@0.3.9 install D:\nodejs\node-global\node_modules\appium\node_modules\heapdump
> node-gyp rebuild


D:\nodejs\node-global\node_modules\appium\node_modules\heapdump>if not defined npm_config_node_gyp (node "D:\nodejs\node_modules\npm\node_modules\npm-lifecycle\node-gyp-bin\\..\..\node_modules\node-gyp\bin\node-gyp.js" rebuild )  else (node "D:\nodejs\node_modules\npm\node_modules\node-gyp\bin\node-gyp.js" rebuild )
在此解决方案中一次生成一个项目。若要启用并行生成,请添加“/m”开关。
  heapdump.cc
     Creating library D:\nodejs\node-global\node_modules\appium\node_modules\heapdump\build\Release\addon.lib and object D:\nodejs\node-global\node_modules\appium\node_modules\heapdump\build\Release\addon.exp
  Generating code
  Finished generating code
  addon.vcxproj -> D:\nodejs\node-global\node_modules\appium\node_modules\heapdump\build\Release\\addon.node
  addon.vcxproj -> D:\nodejs\node-global\node_modules\appium\node_modules\heapdump\build\Release\addon.pdb (Full PDB)

> pre-commit@1.2.2 install D:\nodejs\node-global\node_modules\appium\node_modules\pre-commit
> node install.js


> wd@1.5.0 install D:\nodejs\node-global\node_modules\appium\node_modules\wd
> node scripts/build-browser-scripts


> spawn-sync@1.0.15 postinstall D:\nodejs\node-global\node_modules\appium\node_modules\spawn-sync
> node postinstall

npm WARN optional SKIPPING OPTIONAL DEPENDENCY: fsevents@1.1.3 (node_modules\appium\node_modules\fsevents):
npm WARN notsup SKIPPING OPTIONAL DEPENDENCY: Unsupported platform for fsevents@1.1.3: wanted {"os":"darwin","arch":"any"} (current: {"os":"win32","arch":"x64"})

+ appium@1.7.2
added 1375 packages in 682.967s

跑 Python demo:

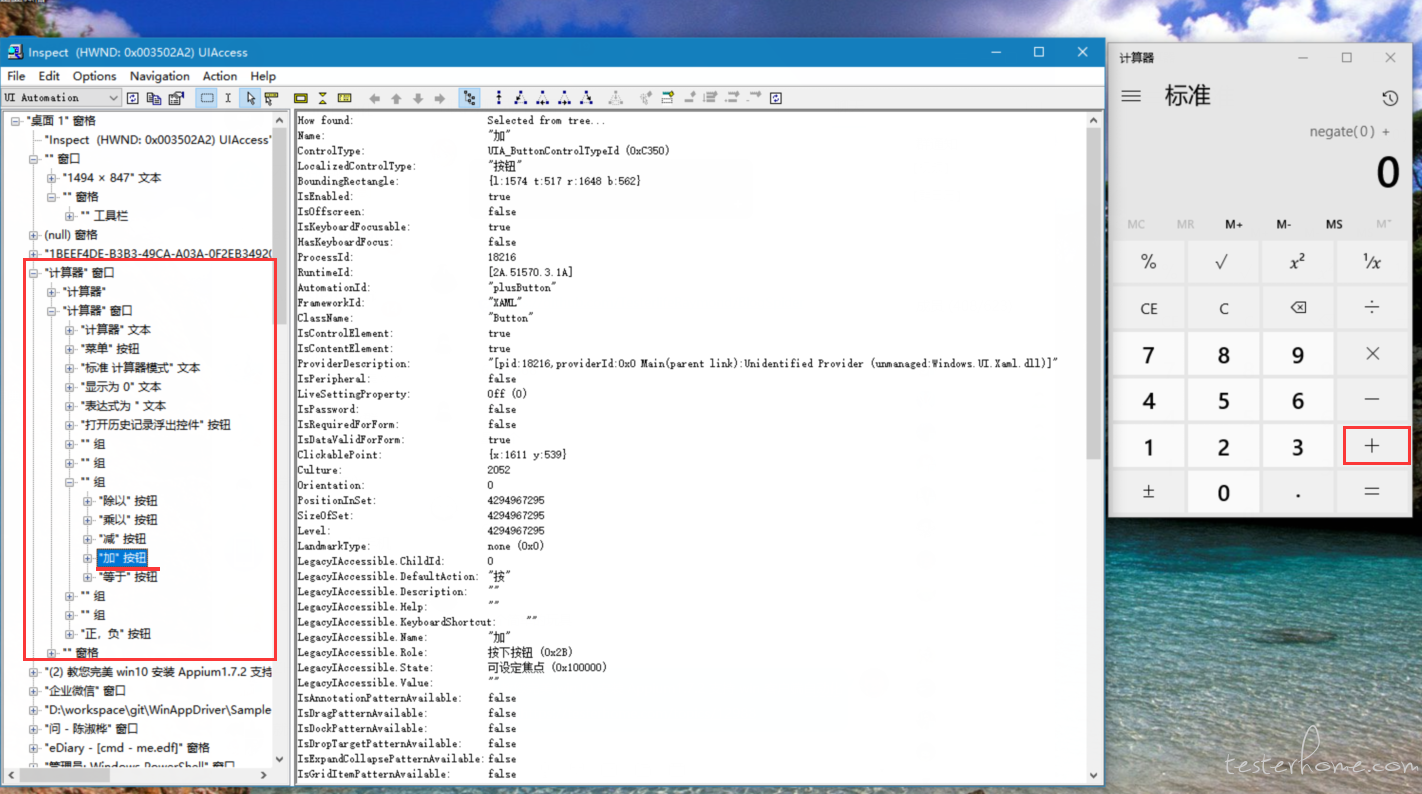
inspect.exe 位置

根据你所安装的 16299.15.170928-1534.rs3_release_WindowsSDK.iso 版本,找到 inspect.exe 在该位置 ,可以用来查看界面元素
C:\Program Files (x86)\Windows Kits\10\bin\10.0.16299.0\x64
git clone 样例

D:\workspace\git>git clone https://github.com/Microsoft/WinAppDriver.git
Cloning into 'WinAppDriver'...
remote: Counting objects: 2275, done.
remote: Compressing objects: 100% (10/10), done.
remote: Total 2275 (delta 4), reused 3 (delta 0), pack-reused 2265
Receiving objects: 100% (2275/2275), 13.97 MiB | 77.00 KiB/s, done.
Resolving deltas: 100% (1388/1388), done.

开启 python 虚拟环境 Appium364

为了确认相关 appium python 环境

C:\Users\cmd\Appium364>cd Scripts

C:\Users\cmd\Appium364\Scripts>activate.bat
(Appium364) C:\Users\cmd\Appium364\Scripts>pip list -o
DEPRECATION: The default format will switch to columns in the future. You can use --format=(legacy|columns) (or define a format=(legacy|columns) in your pip.conf under the [list] section) to disable this warning.
pip (9.0.2) - Latest: 10.0.0 [wheel]
wheel (0.30.0) - Latest: 0.31.0 [wheel]
You are using pip version 9.0.2, however version 10.0.0 is available.
You should consider upgrading via the 'python -m pip install --upgrade pip' command.
(Appium364) C:\Users\cmd\Appium364\Scripts>python -m pip install --upgrade pip
Collecting pip
  Downloading https://files.pythonhosted.org/packages/62/a1/0d452b6901b0157a0134fd27ba89bf95a857fbda64ba52e1ca2cf61d8412/pip-10.0.0-py2.py3-none-any.whl (1.3MB)
    100% |████████████████████████████████| 1.3MB 607kB/s
Installing collected packages: pip
  Found existing installation: pip 9.0.2
    Uninstalling pip-9.0.2:
      Successfully uninstalled pip-9.0.2
Successfully installed pip-10.0.0
(Appium364) C:\Users\cmd\Appium364\Scripts>pip list -o
Package Version Latest Type
------- ------- ------ -----
wheel 0.30.0 0.31.0 wheel
(Appium364) C:\Users\cmd\Appium364\Scripts>pip list
Package Version
-------------------- -------
Appium-Python-Client 0.26
pip 10.0.0
selenium 3.11.0
setuptools 39.0.1
wheel 0.30.0

Pycharm 打开项目 WinAppDriver
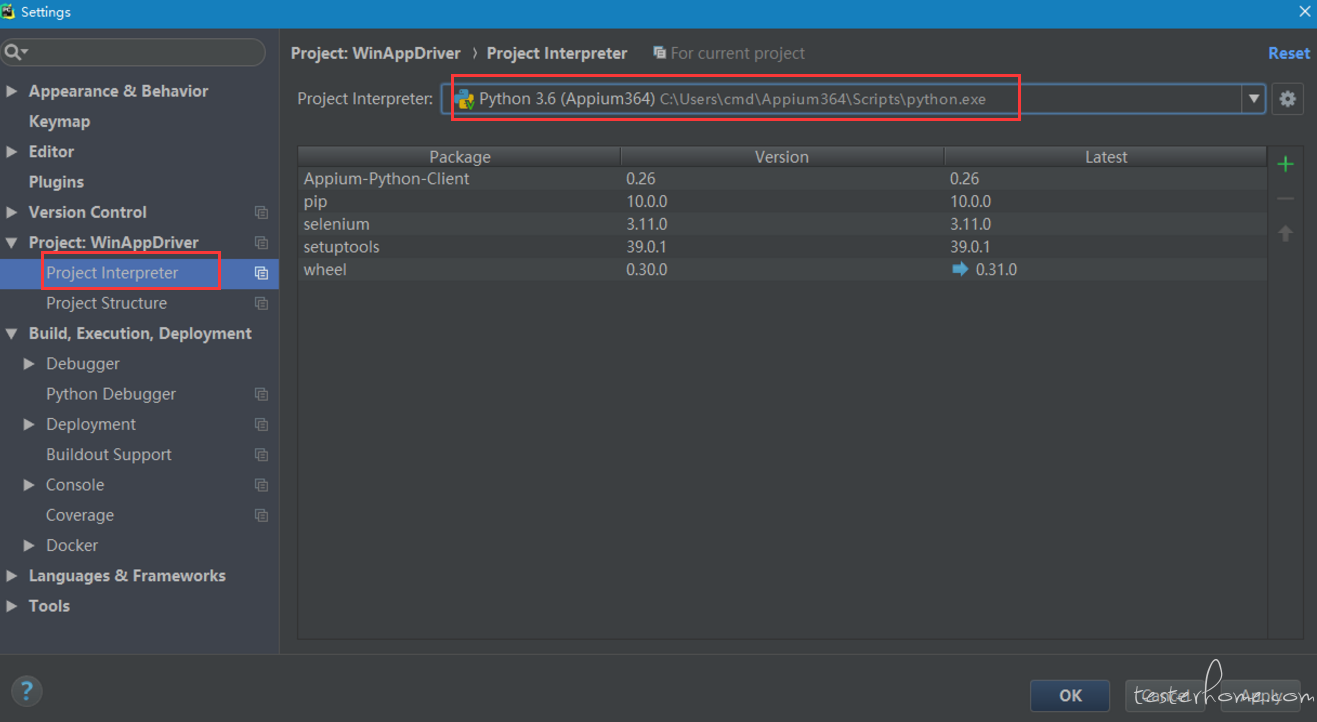

切换好 python 执行环境

好了,可以选中 calculatortest.py 右键 Run 了.
哦,先要启动 appium --session-override 然后 Run
啊额...脚本报错了 ,appium server 也显示

C:\Users\cmd>appium --session-override
[Appium] Welcome to Appium v1.7.2
[Appium] Non-default server args:
[Appium]   sessionOverride: true
[Appium] Appium REST http interface listener started on 0.0.0.0:4723
[HTTP] --> POST /session {"capabilities":{"firstMatch":[{}],"alwaysMatch":{}},"desiredCapabilities":{"app":"Microsoft.WindowsCalculator_8wekyb3d8bbwe!App"}}
[debug] [HTTP] No route found. Setting content type to 'text/plain'
[HTTP] <-- POST /session 404 5 ms - 50

看了下脚本报错,和脚本内容,和 server 显示 应该是没找到服务,既然底层是用的 WinAppDriver
那我们就直接启动该 WinAppDriver server 吧 (关掉 appium server 否则会报冲突

C:\Program Files (x86)\Windows Application Driver>WinAppDriver.exe
Windows Application Driver listening for requests at: http://127.0.0.1:4723/
Address 'http://127.0.0.1:4723/' is already in use
Failed to initialize: 0x80004005

)

启动 WinAppDriver server

C:\Program Files (x86)\Windows Application Driver>WinAppDriver.exe

哦,打开 WinAppDriver server 也需要开启,win10 开发人员模式,否则会报错:

C:\Program Files (x86)\Windows Application Driver>WinAppDriver.exe
Developer mode is not enabled. Enable it through Settings and restart Windows Application Driver
Failed to initialize: 0x80004005

好,继续右键 Run calculatortest.py
可以看到成功的打开了计算器,但是执行到具体动作点击行为,报错了,从报错内容来看,应该是我的 win10 更新太新了,计算器的一些界面元素已经和当初该脚本不一致了,是
find_element_by_name 之类没找到的错误,那说明我们的环境基本 OK 了.

接下来调整脚本内容,原内容为calculatortest

最终都改为不用 name 改为 Inspect.exe 查得的 AutomationId:值,即用 API 为 find_element_by_accessibility_id
附上最终调整后脚本:

#******************************************************************************
#
# Copyright (c) 2016 Microsoft Corporation. All rights reserved.
#
# This code is licensed under the MIT License (MIT).
#
# THE SOFTWARE IS PROVIDED "AS IS", WITHOUT WARRANTY OF ANY KIND, EXPRESS OR
# IMPLIED, INCLUDING BUT NOT LIMITED TO THE WARRANTIES OF MERCHANTABILITY,
# FITNESS FOR A PARTICULAR PURPOSE AND NONINFRINGEMENT. IN NO EVENT SHALL THE
# AUTHORS OR COPYRIGHT HOLDERS BE LIABLE FOR ANY CLAIM, DAMAGES OR OTHER
# // LIABILITY, WHETHER IN AN ACTION OF CONTRACT, TORT OR OTHERWISE, ARISING FROM,
# OUT OF OR IN CONNECTION WITH THE SOFTWARE OR THE USE OR OTHER DEALINGS IN
# THE SOFTWARE.
#
#******************************************************************************


import unittest
from appium import webdriver

class SimpleCalculatorTests(unittest.TestCase):

    @classmethod

    def setUpClass(self):
        #set up appium
        desired_caps = {}
        desired_caps["app"] = "Microsoft.WindowsCalculator_8wekyb3d8bbwe!App"
        self.driver = webdriver.Remote(
            command_executor='http://127.0.0.1:4723',
            desired_capabilities= desired_caps)

    @classmethod
    def tearDownClass(self):
        self.driver.quit()

    def getresults(self):
        displaytext = self.driver.find_element_by_accessibility_id("CalculatorResults").text
        displaytext = displaytext.strip("Display is " )
        displaytext = displaytext.rstrip(' ')
        displaytext = displaytext.lstrip(' ')
        return displaytext


    def test_initialize(self):
        self.driver.find_element_by_accessibility_id("clearButton").click()
        self.driver.find_element_by_accessibility_id("num7Button").click()
        self.assertEqual(self.getresults(), "显示为 7")
        self.driver.find_element_by_accessibility_id("clearButton").click()

    def test_addition(self):
        self.driver.find_element_by_accessibility_id("num1Button").click()
        self.driver.find_element_by_accessibility_id("plusButton").click()
        self.driver.find_element_by_accessibility_id("num7Button").click()
        self.driver.find_element_by_accessibility_id("equalButton").click()
        self.assertEqual(self.getresults(), "显示为 8")

    def test_combination(self):
        self.driver.find_element_by_accessibility_id("num7Button").click()
        self.driver.find_element_by_accessibility_id("multiplyButton").click()
        self.driver.find_element_by_accessibility_id("num9Button").click()
        self.driver.find_element_by_accessibility_id("plusButton").click()
        self.driver.find_element_by_accessibility_id("num1Button").click()
        self.driver.find_element_by_accessibility_id("equalButton").click()
        self.driver.find_element_by_accessibility_id("divideButton").click()
        self.driver.find_element_by_accessibility_id("num8Button").click()
        self.driver.find_element_by_accessibility_id("equalButton").click()
        self.assertEqual(self.getresults(), "显示为 8")

    def test_division(self):
        self.driver.find_element_by_accessibility_id("num8Button").click()
        self.driver.find_element_by_accessibility_id("num8Button").click()
        self.driver.find_element_by_accessibility_id("divideButton").click()
        self.driver.find_element_by_accessibility_id("num1Button").click()
        self.driver.find_element_by_accessibility_id("num1Button").click()
        self.driver.find_element_by_accessibility_id("equalButton").click()
        self.assertEqual(self.getresults(), "显示为 8")

    def test_multiplication(self):
        self.driver.find_element_by_accessibility_id("num9Button").click()
        self.driver.find_element_by_accessibility_id("multiplyButton").click()
        self.driver.find_element_by_accessibility_id("num9Button").click()
        self.driver.find_element_by_accessibility_id("equalButton").click()
        self.assertEqual(self.getresults(), "显示为 81")

    def test_subtraction(self):
        self.driver.find_element_by_accessibility_id("num9Button").click()
        self.driver.find_element_by_accessibility_id("minusButton").click()
        self.driver.find_element_by_accessibility_id("num1Button").click()
        self.driver.find_element_by_accessibility_id("equalButton").click()
        self.assertEqual(self.getresults(), "显示为 8")

if __name__ == '__main__':
    suite = unittest.TestLoader().loadTestsFromTestCase(SimpleCalculatorTests)
    unittest.TextTestRunner(verbosity=2).run(suite)
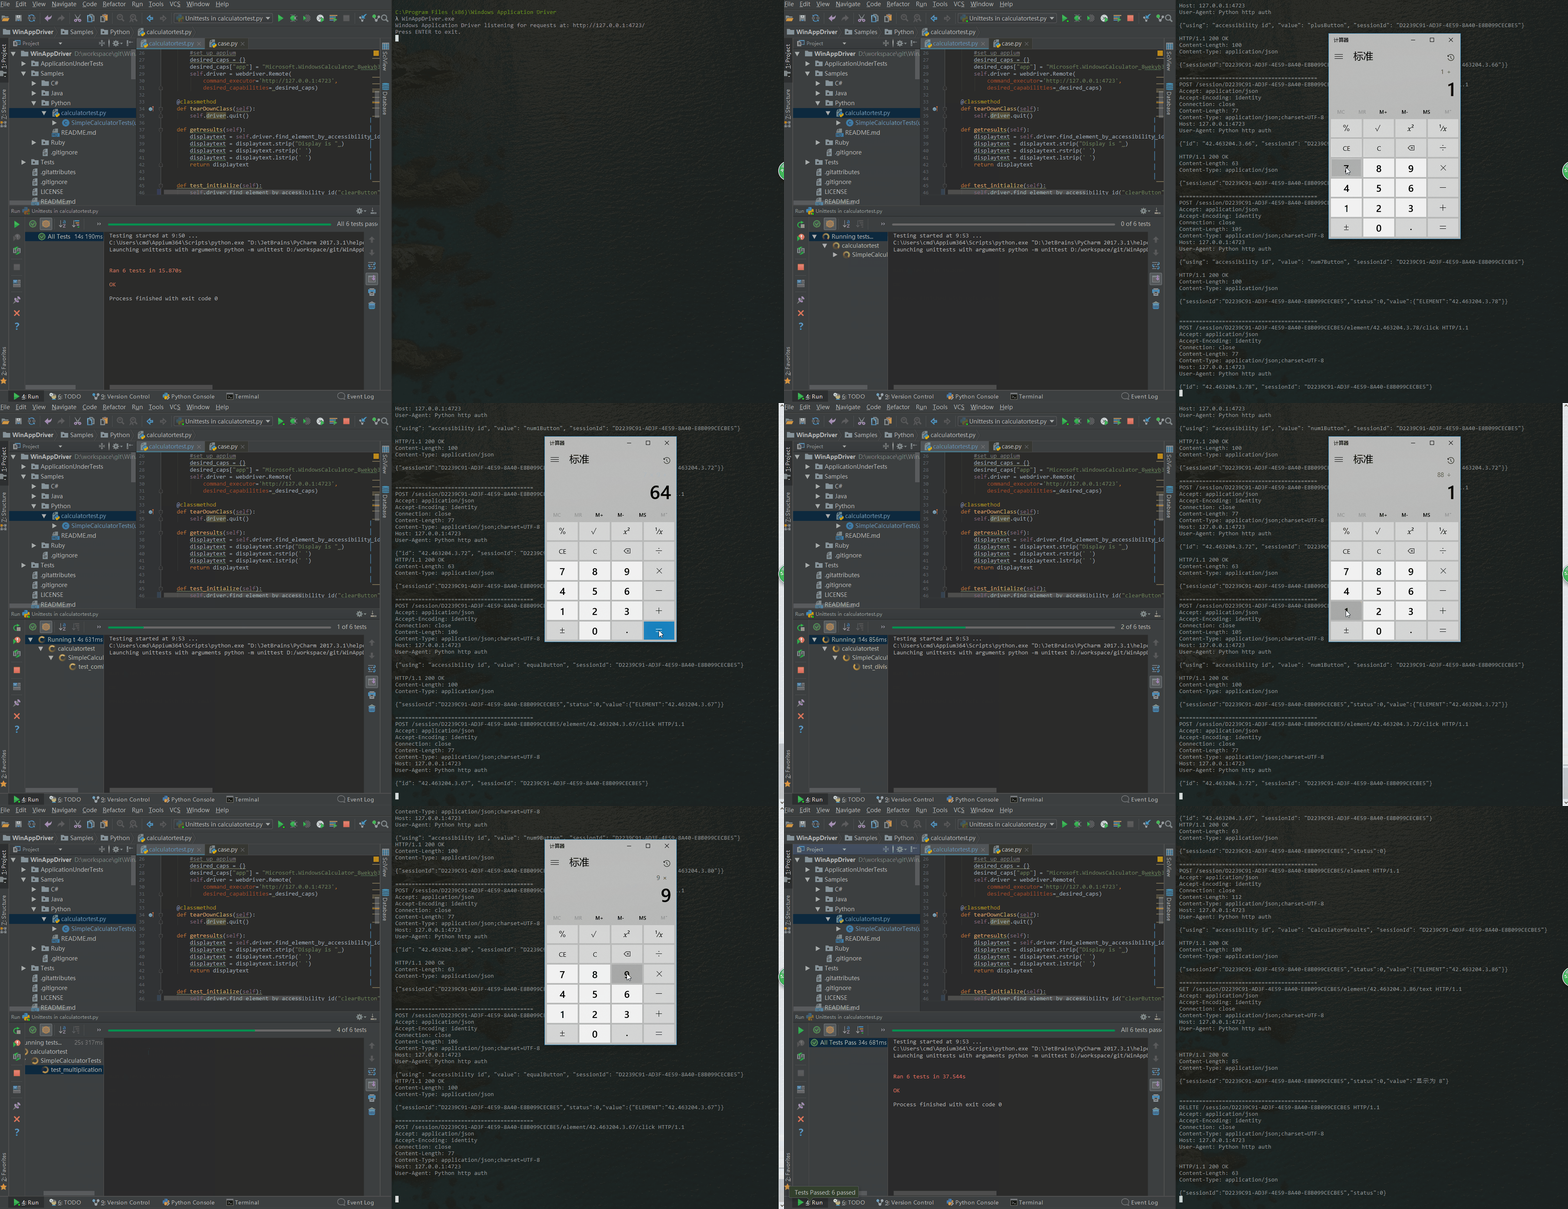
附上 WinAppDriver server 部分日志:

POST /session/C487A78F-4370-4EBE-AB89-39840A5B5B57/element/42.463076.3.66/click HTTP/1.1
Accept: application/json
Accept-Encoding: identity
Connection: close
Content-Length: 77
Content-Type: application/json;charset=UTF-8
Host: 127.0.0.1:4723
User-Agent: Python http auth

{"id": "42.463076.3.66", "sessionId": "C487A78F-4370-4EBE-AB89-39840A5B5B57"}
HTTP/1.1 200 OK
Content-Length: 63
Content-Type: application/json

{"sessionId":"C487A78F-4370-4EBE-AB89-39840A5B5B57","status":0}

==========================================
POST /session/C487A78F-4370-4EBE-AB89-39840A5B5B57/element HTTP/1.1
Accept: application/json
Accept-Encoding: identity
Connection: close
Content-Length: 105
Content-Type: application/json;charset=UTF-8
Host: 127.0.0.1:4723
User-Agent: Python http auth

{"using": "accessibility id", "value": "num1Button", "sessionId": "C487A78F-4370-4EBE-AB89-39840A5B5B57"}

HTTP/1.1 200 OK
Content-Length: 100
Content-Type: application/json

{"sessionId":"C487A78F-4370-4EBE-AB89-39840A5B5B57","status":0,"value":{"ELEMENT":"42.463076.3.72"}}


==========================================
POST /session/C487A78F-4370-4EBE-AB89-39840A5B5B57/element/42.463076.3.72/click HTTP/1.1
Accept: application/json
Accept-Encoding: identity
Connection: close
Content-Length: 77
Content-Type: application/json;charset=UTF-8
Host: 127.0.0.1:4723
User-Agent: Python http auth

{"id": "42.463076.3.72", "sessionId": "C487A78F-4370-4EBE-AB89-39840A5B5B57"}
HTTP/1.1 200 OK
Content-Length: 63
Content-Type: application/json

{"sessionId":"C487A78F-4370-4EBE-AB89-39840A5B5B57","status":0}


疑问:

为啥直接用 appium server 会报那样的错,不是说 WinAppDriver 已经通过安装 appium 也安装成功了吗?那应该 appium server 也接收和处理的到脚本请求啊?
求解释.

解决疑问:

为啥直接用 appium server 会报那样的错,不是说 WinAppDriver 已经通过安装 appium 也安装成功了吗?那应该 appium server 也接收和处理的到脚本请求啊?
仔细去看
https://github.com/Microsoft/WinAppDriver/blob/master/README.md
最末尾有如下内容:

Using Appium
Windows Application Driver is integrated with Appium, meaning if you use Appium as part of the test runner then it will launch WinAppDriver.exe and proxy the requests for you.

Important Notes
Appium will install Windows Application Driver for you on Windows if you don't already have it. Every release of Appium is linked to a specific release of WinAppDriver and will not proxy to a different version of WinAppDriver. The easiest way to manage this is to let Appium install WinAppDriver for you.
To create multiple sessions with one Appium server you need Appium 1.6.4 or newer
When pointing a test at Appium you need to include /wd/hub on the server URI. E.g. http://127.0.0.1:4723/wd/hub
For more details visit the Appium documentation: http://appium.io/slate/en/master/?ruby#windows-application-ui-testing

好了,得到启示,When pointing a test at Appium you need to include /wd/hub on the server URI. E.g. http://127.0.0.1:4723/wd/hub
去脚本里修改
command_executor='http://127.0.0.1:4723',
改为
command_executor='http://127.0.0.1:4723/wd/hub',

满怀欣喜,打开 appium --session-override ,走你 Run calulatortest.py.
啊额....appium server 端报错了,仔细找到该句'"[MJSONWP] Encountered internal error running command: Error: You must include a platformName capability"'
根据错误提示,加上
desired_caps["platformName"] = "Windows"

再执行又报错 "[BaseDriver] SessionNotCreatedError: A new session could not be created. Details: The desiredCapabilities object was not valid for the following reason (s): deviceName can't be blank,"
根据错误提示,加上
desired_caps["deviceName"] = "WindowsPC"

最终如下:

def setUpClass(self):
    #set up appium
    desired_caps = {}
    desired_caps["app"] = "Microsoft.WindowsCalculator_8wekyb3d8bbwe!App"
    desired_caps["platformName"] = "Windows"
    desired_caps["deviceName"] = "WindowsPC"
    self.driver = webdriver.Remote(
        command_executor='http://127.0.0.1:4723/wd/hub',
        desired_capabilities= desired_caps)

OK ,最后走你!!! 完美!!!
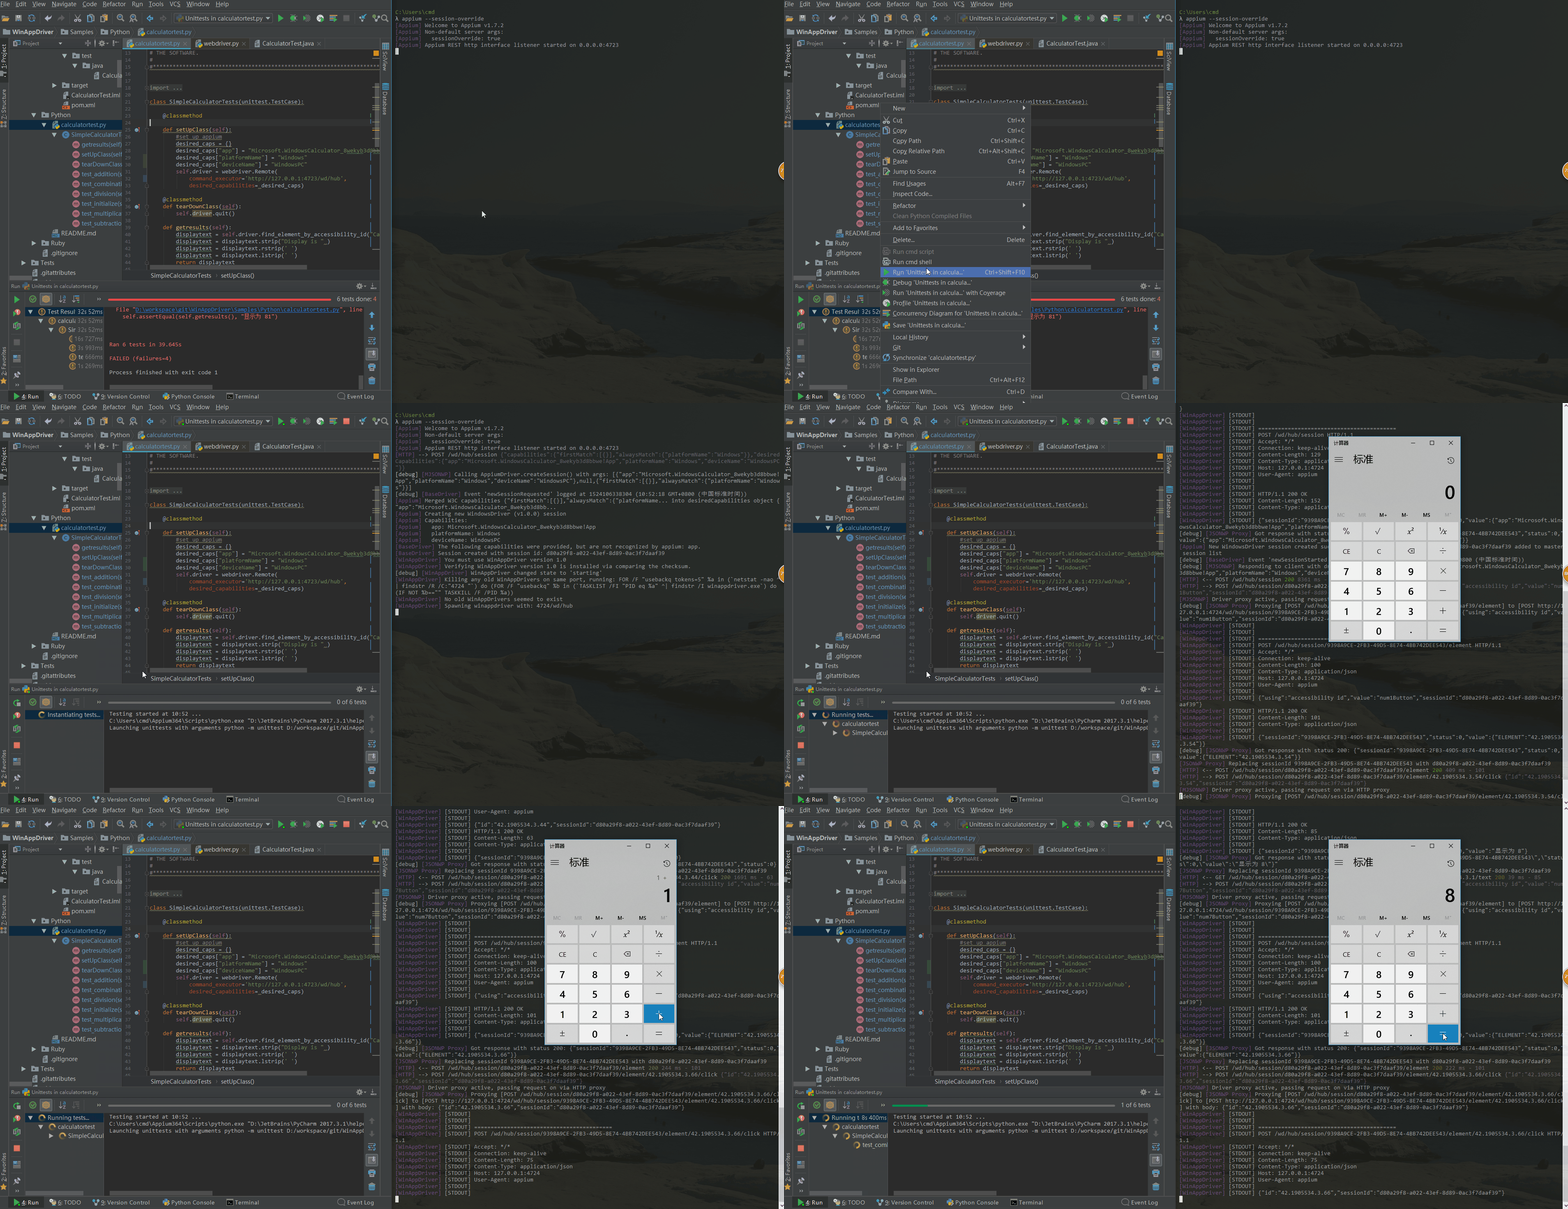
实际 testerhome 那两个帖子,已经带上了这个两个 desired_caps,只是我没仔细看,不过这样折腾下来,还是锻炼了自己分析问题,找方案解决问题的能力,过程经验吸取到了.
别人嚼过的馍不香的.
如果觉得我的文章对您有用,请随意打赏。您的支持将鼓励我继续创作!
最佳回复

https://github.com/Microsoft/nodejs-guidelines/blob/master/windows-environment.md#compiling-native-addon-modules

实际关于这个构建依赖工具 windows-build-tools 也就是 Visual Studio Build Tools 的依赖 有两种安装方式
方法一
使用 npm,管理员方式的 powershell
npm install --global --production windows-build-tools

方法二
首先,Visual C++ Build Tools 从微软官方网站下载 vc++ Build Tools
https://visualstudio.microsoft.com/thank-you-downloading-visual-studio/?sku=BuildTools 下载 vs_buildtools__1717812901.1535341177.exe
安装的时候使用默认安装就可以了,这个步骤比较简单。和安装 vs 一样只需要等待就可以了。
然后,我们需要 python2.7 构建环境,python 官方网站下载 python2.7.然后默认安装,安装的时候会有一个选项是添加 PATH 可以勾选,但是安装完以后还是要去环境变量里面查看一下是否添加了。
如果本地有两种 python 版本环境 2.7 或 3.6 以上的话,根据安装包安装好以后配置环境变量,如果之前安装过 python3 的话,可以直接进入到 python3 的文件夹当猴子那个将 python.exe 改名为 python3.exe,以后在 cmd 当中使用的时候直接输入 python 进入的是 python2.7,输入 python3 进入的就是 python3 了。这里对设置 windows 支持 2.7 和 3.6+ 双版本环境不太了解的可以百度一下,很简单。

确保 Visual C++ Build Tools 和 Python2.7 的环境就可以了 . 剩下的就可以管理员 powershell 安装 appium 了

目前 https://github.com/felixrieseberg/windows-build-tools/releases 第一种方法的 5.0.0 和 5.1.0 都无法正常安装 会报错 我最新的 windows10 1809 ,os version 17763.316
加上 17763.132.181022-1834.rs5_release_svc_prod1_WindowsSDK.iso 无法正常安装 windows-build-tools 5.0.0 和 5.1.0 , 但可以正常安装 4.0.0 且可以正常构建 appium 1.9.1 支持 win ui auto .


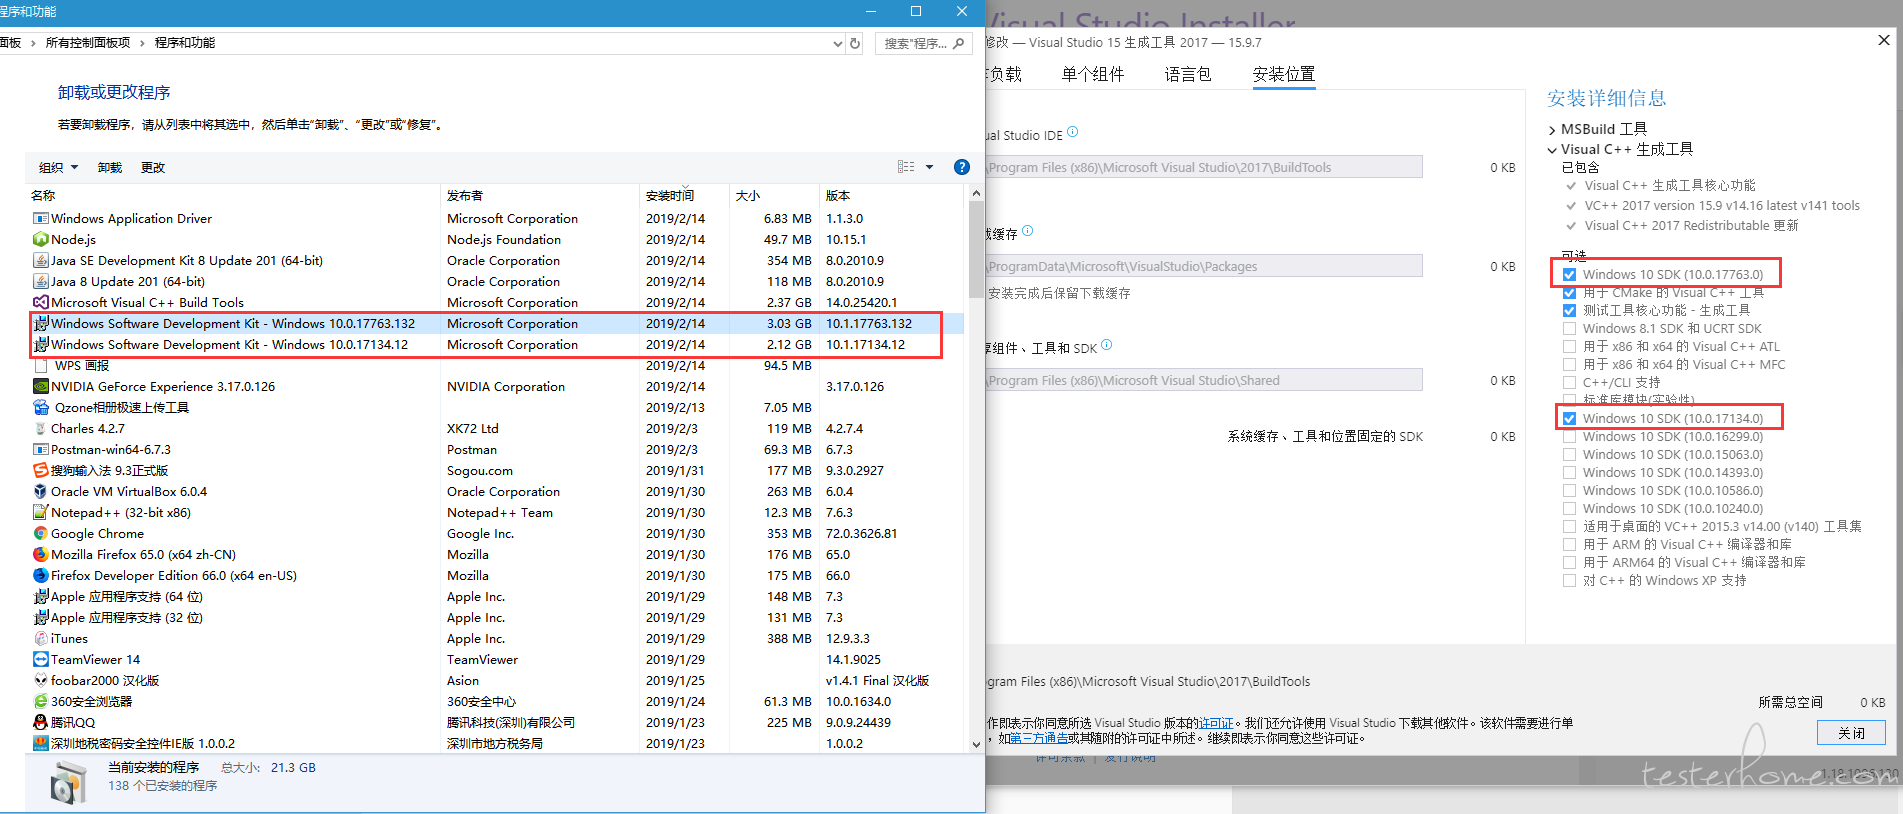
实际 vs_buildtools__1717812901.1535341177.exe 安装程序默认安装 会安装一个 windows 10 sdk 版本为 图中的 17134 而上图左边的是,独立下载 17763.132.181022-1834.rs5_release_svc_prod1_WindowsSDK.iso 安装的 版本为 17763 所以

windows 10 sdk 的部署 也可以简化 为直接下载 vs_buildtools 来合并为一步.

最后 在该环境下 部署成功 appium 1.11.0 最新发布的

PS C:\WINDOWS\system32>  npm i appium -g --CHROMEDRIVER_CDNURL=http://npm.taobao.org/mirrors/chromedriver/
npm WARN deprecated fsevents@2.0.1: Not Ready For Production
D:\nodejs\node-global\appium -> D:\nodejs\node-global\node_modules\appium\build\lib\main.js

> appium-chromedriver@4.10.1 install D:\nodejs\node-global\node_modules\appium\node_modules\appium-chromedriver
> node install-npm.js

[16:24:57] [Chromedriver Install] Installing Chromedriver version '2.45' for platform 'win' and architecture '32'
[16:24:57] [Chromedriver Install] Opening temp file to write 'chromedriver_win32' to...
[16:24:57] [Chromedriver Install] Opened temp file 'C:\Users\cmd\AppData\Local\Temp\2019114-8776-1y7betj.hbeqg\chromedriver_win32.zip'
[16:24:57] [Chromedriver Install] Downloading http://npm.taobao.org/mirrors/chromedriver//2.45/chromedriver_win32.zip...
[16:25:15] [Chromedriver Install] Writing binary content to C:\Users\cmd\AppData\Local\Temp\2019114-8776-1y7betj.hbeqg\chromedriver_win32.zip...
[16:25:15] [Chromedriver Install] Extracting C:\Users\cmd\AppData\Local\Temp\2019114-8776-1y7betj.hbeqg\chromedriver_win32.zip to C:\Users\cmd\AppData\Local\Temp\2019114-8776-1y7betj.hbeqg\chromedriver_win32
[16:25:16] [Chromedriver Install] Creating D:\nodejs\node-global\node_modules\appium\node_modules\appium-chromedriver\chromedriver\win...
[16:25:16] [Chromedriver Install] Copying unzipped binary, reading from C:\Users\cmd\AppData\Local\Temp\2019114-8776-1y7betj.hbeqg\chromedriver_win32\chromedriver.exe...
[16:25:16] [Chromedriver Install] Writing to D:\nodejs\node-global\node_modules\appium\node_modules\appium-chromedriver\chromedriver\win\chromedriver.exe...
[16:25:16] [Chromedriver Install] D:\nodejs\node-global\node_modules\appium\node_modules\appium-chromedriver\chromedriver\win\chromedriver.exe successfully put in place

> appium-selendroid-driver@1.13.3 install D:\nodejs\node-global\node_modules\appium\node_modules\appium-selendroid-driver
> node ./bin/install.js

 found:19] Java version 1.8.0_201
[16:25:19] Ensuring D:\nodejs\node-global\node_modules\appium\node_modules\appium-selendroid-driver\selendroid\download exists
[16:25:19] Downloading Selendroid standalone server version 0.17.0 from https://repo1.maven.org/maven2/io/selendroid/selendroid-standalone/0.17.0/selendroid-standalone-0.17.0-with-dependencies.jar --> D:\nodejs\node-global\node_modules\appium\node_modules\appium-selendroid-driver\selendroid\download\selendroid-server-7cf7163ac47f1c46eff95b62f78b58c1dabdec534acc6632da3784739f6e9d82.jar
[16:27:57] Writing binary content to D:\nodejs\node-global\node_modules\appium\node_modules\appium-selendroid-driver\selendroid\download\selendroid-server.jar.tmp
[16:27:57] Selendroid standalone server downloaded
[16:27:57] Determining AndroidManifest location
[16:27:57] Determining server apk location
[16:27:58] Extracting manifest and apk to D:\nodejs\node-global\node_modules\appium\node_modules\appium-selendroid-driver\selendroid\download
[16:27:58] Copying manifest and apk to D:\nodejs\node-global\node_modules\appium\node_modules\appium-selendroid-driver\selendroid
[16:27:58] Cleaning up temp files
[16:27:58] Fixing AndroidManifest icon bug

> appium-windows-driver@1.5.1 install D:\nodejs\node-global\node_modules\appium\node_modules\appium-windows-driver
> node install-npm.js

info WinAppDriver You must use WinAppDriver version 1.1
info WinAppDriver Verifying WinAppDriver version 1.1 is installed via comparing the checksum.
info WinAppDriver WinAppDriver.exe version 1.1 already exists with correct checksum, not re-downloading

> heapdump@0.3.9 install D:\nodejs\node-global\node_modules\appium\node_modules\heapdump
> node-gyp rebuild


D:\nodejs\node-global\node_modules\appium\node_modules\heapdump>if not defined npm_config_node_gyp (node "D:\nodejs\node_modules\npm\node_modules\npm-lifecycle\node-gyp-bin\\..\..\node_modules\node-gyp\bin\node-gyp.js" rebuild )  else (node "D:\nodejs\node_modules\npm\node_modules\node-gyp\bin\node-gyp.js" rebuild )
在此解决方案中一次生成一个项目。若要启用并行生成,请添加“/m”开关。
  heapdump.cc
d:\nodejs\node-global\node_modules\appium\node_modules\heapdump\src\compat-inl.h(300): warning C4996: 'v8::Isolate::GetCpuProfiler': 被声明为已否决 [D:\nodejs\node-
global\node_modules\appium\node_modules\heapdump\build\addon.vcxproj]
  c:\users\cmd\.node-gyp\10.15.1\include\node\v8.h(7484): note: 参见“v8::Isolate::GetCpuProfiler”的声明
d:\nodejs\node-global\node_modules\appium\node_modules\heapdump\src\compat-inl.h(310): warning C4996: 'v8::Isolate::GetCpuProfiler': 被声明为已否决 [D:\nodejs\node-
global\node_modules\appium\node_modules\heapdump\build\addon.vcxproj]
  c:\users\cmd\.node-gyp\10.15.1\include\node\v8.h(7484): note: 参见“v8::Isolate::GetCpuProfiler”的声明
d:\nodejs\node-global\node_modules\appium\node_modules\heapdump\src\heapdump.cc(106): warning C4996: 'v8::String::Utf8Value::Utf8Value': 被声明为已否决 [D:\nodejs\n
ode-global\node_modules\appium\node_modules\heapdump\build\addon.vcxproj]
  c:\users\cmd\.node-gyp\10.15.1\include\node\v8.h(2891): note: 参见“v8::String::Utf8Value::Utf8Value”的声明
d:\nodejs\node-global\node_modules\appium\node_modules\heapdump\src\heapdump.cc(143): warning C4996: 'node::MakeCallback': 被声明为已否决 [D:\nodejs\node-global\nod
e_modules\appium\node_modules\heapdump\build\addon.vcxproj]
  c:\users\cmd\.node-gyp\10.15.1\include\node\node.h(176): note: 参见“node::MakeCallback”的声明
d:\nodejs\node-global\node_modules\appium\node_modules\heapdump\src\heapdump.cc(157): warning C4996: 'v8::Value::Int32Value': 被声明为已否决 [D:\nodejs\node-global\
node_modules\appium\node_modules\heapdump\build\addon.vcxproj]
  c:\users\cmd\.node-gyp\10.15.1\include\node\v8.h(2478): note: 参见“v8::Value::Int32Value”的声明
    正在创建库 D:\nodejs\node-global\node_modules\appium\node_modules\heapdump\build\Release\addon.lib 和对象 D:\nodejs\node-global\node_modules\appium\node_modules\
  heapdump\build\Release\addon.exp
  正在生成代码
  All 95 functions were compiled because no usable IPDB/IOBJ from previous compilation was found.
  已完成代码的生成
  addon.vcxproj -> D:\nodejs\node-global\node_modules\appium\node_modules\heapdump\build\Release\\addon.node

> pre-commit@1.2.2 install D:\nodejs\node-global\node_modules\appium\node_modules\pre-commit
> node install.js


> wd@1.11.1 install D:\nodejs\node-global\node_modules\appium\node_modules\wd
> node scripts/build-browser-scripts


> spawn-sync@1.0.15 postinstall D:\nodejs\node-global\node_modules\appium\node_modules\spawn-sync
> node postinstall

npm WARN optional SKIPPING OPTIONAL DEPENDENCY: fsevents@2.0.1 (node_modules\appium\node_modules\fsevents):
npm WARN notsup SKIPPING OPTIONAL DEPENDENCY: Unsupported platform for fsevents@2.0.1: wanted {"os":"darwin","arch":"any"} (current: {"os":"win32","arch":"x64"})
npm WARN optional SKIPPING OPTIONAL DEPENDENCY: fsevents@1.2.6 (node_modules\appium\node_modules\chokidar\node_modules\fsevents):
npm WARN notsup SKIPPING OPTIONAL DEPENDENCY: Unsupported platform for fsevents@1.2.6: wanted {"os":"darwin","arch":"any"} (current: {"os":"win32","arch":"x64"})

+ appium@1.11.0
added 1306 packages from 1503 contributors in 421.543s
PS C:\WINDOWS\system32> appium-doctor
info AppiumDoctor Appium Doctor v.1.9.0
info AppiumDoctor ### Diagnostic for necessary dependencies starting ###
info AppiumDoctor  ✔ The Node.js binary was found at: D:\nodejs\node.EXE
info AppiumDoctor  ✔ Node version is 10.15.1
info AppiumDoctor  ✔ ANDROID_HOME is set to: D:\Android\android-sdk
info AppiumDoctor  ✔ JAVA_HOME is set to: C:\Program Files\Java\jdk1.8.0_201
info AppiumDoctor  ✔ adb exists at: D:\Android\android-sdk\platform-tools\adb.exe
info AppiumDoctor  ✔ android exists at: D:\Android\android-sdk\tools\android.bat
info AppiumDoctor  ✔ emulator exists at: D:\Android\android-sdk\tools\emulator.exe
info AppiumDoctor  ✔ Bin directory of %JAVA_HOME% is set
info AppiumDoctor ### Diagnostic for necessary dependencies completed, no fix needed. ###
info AppiumDoctor
info AppiumDoctor ### Diagnostic for optional dependencies starting ###
info AppiumDoctor  ✔ Python required by node-gyp (used by heapdump) is installed at: D:\Python27\python.EXE. Installed version is: 2.7.14
WARN AppiumDoctor  ✖ opencv4nodejs cannot be found.
WARN AppiumDoctor  ✖ ffmpeg cannot be found
WARN AppiumDoctor  ✖ bundletool.jar cannot be found
info AppiumDoctor ### Diagnostic for optional dependencies completed, 3 fixes possible. ###
info AppiumDoctor
info AppiumDoctor ### Optional Manual Fixes ###
info AppiumDoctor The configuration can install optionally. Please do the following manually:
WARN AppiumDoctor  ➜ Why opencv4nodejs is needed and how to install it: https://github.com/appium/appium/blob/master/docs/en/writing-running-appium/image-comparison.md
WARN AppiumDoctor  ➜ ffmpeg is needed to record screen features. Please read https://www.ffmpeg.org/ to install it
WARN AppiumDoctor  ➜ bundletool.jar is used to handle Android App Bundle. Please read http://appium.io/docs/en/writing-running-appium/android/android-appbundle/ to install it
info AppiumDoctor
info AppiumDoctor ###
info AppiumDoctor
info AppiumDoctor Bye! Run appium-doctor again when all manual fixes have been applied!
共收到 23 条回复 时间 点赞
老马 Appium Windows APP UI 自动化 中提及了此贴 04月17日 16:00
老马 appium 1.7.0 安装与疑问记 中提及了此贴 04月17日 16:01
老马 自动遍历工具 UICrawler 使用记录 中提及了此贴 06月05日 16:43
老马 appium 1.7.0 安装与疑问记 中提及了此贴 06月22日 13:49
老马 Appium1.8.0 已可更新 中提及了此贴 07月12日 13:50

您好,想请问一下 inspect 的元素定位您有什么好的方法或者技巧吗?换一个没有 automationID 的元素,name 都是同一个的元素应该怎么定位,您有解决办法吗?

陈辉 回复

xpath

老马 回复

您好,方面讲解一下吗,Windows 应用的元素定位工具 inspect 可以用 xpath 来定位?

老马 #10 · 2018年10月24日 Author

2018年10月24日尝试升级 appium1.8.1 升级为 appium 1.9.1 记录:
win10 OS 内部版本 17134.345
Java version 1.8.0_181

1 win10 所有设置->开发者选项 开启开发人员模式

2 控制面板->程序和功能
卸载掉 Windows Software Development Kit - Windows 10.0.16299.15 或者 Windows 10.0.0.17134.12 我实际保留了 Windows 10.0.0.17134.12 只卸载了 10.0.16299.15

3 下载 17763.1.180914-1434.rs5_release_WindowsSDK.iso 并安装 Windows Software Development Kit 17763.1.180914

4 控制面板->程序和功能
卸载 Windows Application Driver V1.0

5 下载 安装 WindowsApplicationDriverV1.1.msi 最终看到的版本是 V1.1.3.0

6 管理员模式 powershell 卸载掉 appium 和 windows-build-tools
npm uninstall appium -g
npm uninstall --global --production windows-build-tools

7 管理员模式 powershell 安装 windows-build-tools
日志如下

PS C:\WINDOWS\system32> npm install --global --production windows-build-tools
> windows-build-tools@5.0.0 postinstall D:\nodejs\node-global\node_modules\windows-build-tools
> node ./dist/index.js
Downloading vs_BuildTools.exe
[============================================>] 100.0% of 1.12 MB (1.12 MB/s)
Downloaded vs_BuildTools.exe. Saved to C:\Users\cmd\.windows-build-tools\vs_BuildTools.exe.

---------- Visual Studio Build Tools ----------
Successfully installed Visual Studio Build Tools.
------------------- Python --------------------
Python 2.7.14 is already installed, not installing again.

Now configuring the Visual Studio Build Tools..

All done!

+ windows-build-tools@5.0.0

8 管理员模式 powershell 安装 appium1.9.1
日志如下:

PS C:\WINDOWS\system32> npm i appium -g
D:\nodejs\node-global\appium -> D:\nodejs\node-global\node_modules\appium\build\lib\main.js

> appium-chromedriver@4.5.0 install D:\nodejs\node-global\node_modules\appium\node_modules\appium-chromedriver
> node install-npm.js

[13:37:31] [Chromedriver Install] Installing Chromedriver version '2.42' for platform 'win' and architecture '32'
[13:37:31] [Chromedriver Install] Opening temp file to write 'chromedriver_win32' to...
[13:37:31] [Chromedriver Install] Opened temp file 'C:\Users\cmd\AppData\Local\Temp\2018924-12004-j4vp48.psto\chromedriver_win32.zip'
[13:37:31] [Chromedriver Install] Downloading https://chromedriver.storage.googleapis.com/2.42/chromedriver_win32.zip...
[13:37:43] [Chromedriver Install] Writing binary content to C:\Users\cmd\AppData\Local\Temp\2018924-12004-j4vp48.psto\chromedriver_win32.zip...
[13:37:43] [Chromedriver Install] Extracting C:\Users\cmd\AppData\Local\Temp\2018924-12004-j4vp48.psto\chromedriver_win32.zip to C:\Users\cmd\AppData\Local\Temp\2018924-12004-j4vp48.psto\chromedriver_win32
[13:37:43] [Chromedriver Install] Creating D:\nodejs\node-global\node_modules\appium\node_modules\appium-chromedriver\chromedriver\win...
[13:37:43] [Chromedriver Install] Copying unzipped binary, reading from C:\Users\cmd\AppData\Local\Temp\2018924-12004-j4vp48.psto\chromedriver_win32\chromedriver.exe...
[13:37:43] [Chromedriver Install] Writing to D:\nodejs\node-global\node_modules\appium\node_modules\appium-chromedriver\chromedriver\win\chromedriver.exe...
[13:37:43] [Chromedriver Install] D:\nodejs\node-global\node_modules\appium\node_modules\appium-chromedriver\chromedriver\win\chromedriver.exe successfully put in place

> appium-selendroid-driver@1.12.0 install D:\nodejs\node-global\node_modules\appium\node_modules\appium-selendroid-driver
> node ./bin/install.js

 found:46] Java version 1.8.0_181
[13:37:46] Ensuring D:\nodejs\node-global\node_modules\appium\node_modules\appium-selendroid-driver\selendroid\download exists
[13:37:46] Downloading Selendroid standalone server version 0.17.0 from http://repo1.maven.org/maven2/io/selendroid/selendroid-standalone/0.17.0/selendroid-standalone-0.17.0-with-dependencies.jar --> D:\nodejs\node-global\node_modules\appium\node_modules\appium-selendroid-driver\selendroid\download\selendroid-server-7cf7163ac47f1c46eff95b62f78b58c1dabdec534acc6632da3784739f6e9d82.jar
[13:38:38] Writing binary content to D:\nodejs\node-global\node_modules\appium\node_modules\appium-selendroid-driver\selendroid\download\selendroid-server.jar.tmp
[13:38:38] Selendroid standalone server downloaded
[13:38:38] Determining AndroidManifest location
[13:38:38] Determining server apk location
[13:38:38] Extracting manifest and apk to D:\nodejs\node-global\node_modules\appium\node_modules\appium-selendroid-driver\selendroid\download
[13:38:39] Copying manifest and apk to D:\nodejs\node-global\node_modules\appium\node_modules\appium-selendroid-driver\selendroid
[13:38:39] Cleaning up temp files
[13:38:39] Fixing AndroidManifest icon bug

> appium-windows-driver@1.4.0 install D:\nodejs\node-global\node_modules\appium\node_modules\appium-windows-driver
> node install-npm.js

info WinAppDriver You must use WinAppDriver version 1.1
info WinAppDriver Verifying WinAppDriver version 1.1 is installed via comparing the checksum.
info WinAppDriver WinAppDriver.exe version 1.1 already exists with correct checksum, not re-downloading

> heapdump@0.3.9 install D:\nodejs\node-global\node_modules\appium\node_modules\heapdump
> node-gyp rebuild


D:\nodejs\node-global\node_modules\appium\node_modules\heapdump>if not defined npm_config_node_gyp (node "D:\nodejs\node-global\node_modules\npm\node_modules\npm-lifecycle\node-gyp-bin\\..\..\node_modules\node-gyp\bin\node-gyp.js" rebuild ) else (node "D:\nodejs\node-global\node_modules\npm\node_modules\node-gyp\bin\node-gyp.js" rebuild )
在此解决方案中一次生成一个项目。若要启用并行生成,请添加“/m”开关。
  heapdump.cc
    正在创建库 D:\nodejs\node-global\node_modules\appium\node_modules\heapdump\build\Release\addon.lib 和对象 D:\nodejs\node-global\node_modules\appium\node_modules\heapdump\build\Release\addon.exp
  正在生成代码
  已完成代码的生成
  addon.vcxproj -> D:\nodejs\node-global\node_modules\appium\node_modules\heapdump\build\Release\\addon.node
npm WARN optional SKIPPING OPTIONAL DEPENDENCY: fsevents@1.2.4 (node_modules\appium\node_modules\fsevents):
npm WARN notsup SKIPPING OPTIONAL DEPENDENCY: Unsupported platform for fsevents@1.2.4: wanted {"os":"darwin","arch":"any"} (current: {"os":"win32","arch":"x64"})

+ appium@1.9.1
added 524 packages from 419 contributors in 171.165s


从上已知 1.9.1 winuiauto 的依赖如下:
Java version 1.8.0_181 java 版本不是硬性 不明确
windows-build-tools@5.0.0
17763.1.180914-1434.rs5_release_WindowsSDK.iso
WinAppDriver V1.1

从已往记录已知 1.8.1 winuiauto 的依赖如下:
windows-build-tools 3.1.0
17134.12.180419-0858.rs4_release_svc_prod2_WindowsSDK.iso
WinAppDriver V1.0

如果 对应不上 实际最后的 npm i appium -g 就会报各种错 算是一种经验手段吧.

老马 自动遍历工具 UICrawler 使用记录 中提及了此贴 10月24日 14:10
老马 win7 是不是不支持 appium1.7 或 1.8 版本啊? 中提及了此贴 11月19日 17:58
老马 appium 环境搭配问题 中提及了此贴 12月02日 08:31

https://github.com/Microsoft/nodejs-guidelines/blob/master/windows-environment.md#compiling-native-addon-modules

实际关于这个构建依赖工具 windows-build-tools 也就是 Visual Studio Build Tools 的依赖 有两种安装方式
方法一
使用 npm,管理员方式的 powershell
npm install --global --production windows-build-tools

方法二
首先,Visual C++ Build Tools 从微软官方网站下载 vc++ Build Tools
https://visualstudio.microsoft.com/thank-you-downloading-visual-studio/?sku=BuildTools 下载 vs_buildtools__1717812901.1535341177.exe
安装的时候使用默认安装就可以了,这个步骤比较简单。和安装 vs 一样只需要等待就可以了。
然后,我们需要 python2.7 构建环境,python 官方网站下载 python2.7.然后默认安装,安装的时候会有一个选项是添加 PATH 可以勾选,但是安装完以后还是要去环境变量里面查看一下是否添加了。
如果本地有两种 python 版本环境 2.7 或 3.6 以上的话,根据安装包安装好以后配置环境变量,如果之前安装过 python3 的话,可以直接进入到 python3 的文件夹当猴子那个将 python.exe 改名为 python3.exe,以后在 cmd 当中使用的时候直接输入 python 进入的是 python2.7,输入 python3 进入的就是 python3 了。这里对设置 windows 支持 2.7 和 3.6+ 双版本环境不太了解的可以百度一下,很简单。

确保 Visual C++ Build Tools 和 Python2.7 的环境就可以了 . 剩下的就可以管理员 powershell 安装 appium 了

目前 https://github.com/felixrieseberg/windows-build-tools/releases 第一种方法的 5.0.0 和 5.1.0 都无法正常安装 会报错 我最新的 windows10 1809 ,os version 17763.316
加上 17763.132.181022-1834.rs5_release_svc_prod1_WindowsSDK.iso 无法正常安装 windows-build-tools 5.0.0 和 5.1.0 , 但可以正常安装 4.0.0 且可以正常构建 appium 1.9.1 支持 win ui auto .


实际 vs_buildtools__1717812901.1535341177.exe 安装程序默认安装 会安装一个 windows 10 sdk 版本为 图中的 17134 而上图左边的是,独立下载 17763.132.181022-1834.rs5_release_svc_prod1_WindowsSDK.iso 安装的 版本为 17763 所以

windows 10 sdk 的部署 也可以简化 为直接下载 vs_buildtools 来合并为一步.

最后 在该环境下 部署成功 appium 1.11.0 最新发布的

PS C:\WINDOWS\system32>  npm i appium -g --CHROMEDRIVER_CDNURL=http://npm.taobao.org/mirrors/chromedriver/
npm WARN deprecated fsevents@2.0.1: Not Ready For Production
D:\nodejs\node-global\appium -> D:\nodejs\node-global\node_modules\appium\build\lib\main.js

> appium-chromedriver@4.10.1 install D:\nodejs\node-global\node_modules\appium\node_modules\appium-chromedriver
> node install-npm.js

[16:24:57] [Chromedriver Install] Installing Chromedriver version '2.45' for platform 'win' and architecture '32'
[16:24:57] [Chromedriver Install] Opening temp file to write 'chromedriver_win32' to...
[16:24:57] [Chromedriver Install] Opened temp file 'C:\Users\cmd\AppData\Local\Temp\2019114-8776-1y7betj.hbeqg\chromedriver_win32.zip'
[16:24:57] [Chromedriver Install] Downloading http://npm.taobao.org/mirrors/chromedriver//2.45/chromedriver_win32.zip...
[16:25:15] [Chromedriver Install] Writing binary content to C:\Users\cmd\AppData\Local\Temp\2019114-8776-1y7betj.hbeqg\chromedriver_win32.zip...
[16:25:15] [Chromedriver Install] Extracting C:\Users\cmd\AppData\Local\Temp\2019114-8776-1y7betj.hbeqg\chromedriver_win32.zip to C:\Users\cmd\AppData\Local\Temp\2019114-8776-1y7betj.hbeqg\chromedriver_win32
[16:25:16] [Chromedriver Install] Creating D:\nodejs\node-global\node_modules\appium\node_modules\appium-chromedriver\chromedriver\win...
[16:25:16] [Chromedriver Install] Copying unzipped binary, reading from C:\Users\cmd\AppData\Local\Temp\2019114-8776-1y7betj.hbeqg\chromedriver_win32\chromedriver.exe...
[16:25:16] [Chromedriver Install] Writing to D:\nodejs\node-global\node_modules\appium\node_modules\appium-chromedriver\chromedriver\win\chromedriver.exe...
[16:25:16] [Chromedriver Install] D:\nodejs\node-global\node_modules\appium\node_modules\appium-chromedriver\chromedriver\win\chromedriver.exe successfully put in place

> appium-selendroid-driver@1.13.3 install D:\nodejs\node-global\node_modules\appium\node_modules\appium-selendroid-driver
> node ./bin/install.js

 found:19] Java version 1.8.0_201
[16:25:19] Ensuring D:\nodejs\node-global\node_modules\appium\node_modules\appium-selendroid-driver\selendroid\download exists
[16:25:19] Downloading Selendroid standalone server version 0.17.0 from https://repo1.maven.org/maven2/io/selendroid/selendroid-standalone/0.17.0/selendroid-standalone-0.17.0-with-dependencies.jar --> D:\nodejs\node-global\node_modules\appium\node_modules\appium-selendroid-driver\selendroid\download\selendroid-server-7cf7163ac47f1c46eff95b62f78b58c1dabdec534acc6632da3784739f6e9d82.jar
[16:27:57] Writing binary content to D:\nodejs\node-global\node_modules\appium\node_modules\appium-selendroid-driver\selendroid\download\selendroid-server.jar.tmp
[16:27:57] Selendroid standalone server downloaded
[16:27:57] Determining AndroidManifest location
[16:27:57] Determining server apk location
[16:27:58] Extracting manifest and apk to D:\nodejs\node-global\node_modules\appium\node_modules\appium-selendroid-driver\selendroid\download
[16:27:58] Copying manifest and apk to D:\nodejs\node-global\node_modules\appium\node_modules\appium-selendroid-driver\selendroid
[16:27:58] Cleaning up temp files
[16:27:58] Fixing AndroidManifest icon bug

> appium-windows-driver@1.5.1 install D:\nodejs\node-global\node_modules\appium\node_modules\appium-windows-driver
> node install-npm.js

info WinAppDriver You must use WinAppDriver version 1.1
info WinAppDriver Verifying WinAppDriver version 1.1 is installed via comparing the checksum.
info WinAppDriver WinAppDriver.exe version 1.1 already exists with correct checksum, not re-downloading

> heapdump@0.3.9 install D:\nodejs\node-global\node_modules\appium\node_modules\heapdump
> node-gyp rebuild


D:\nodejs\node-global\node_modules\appium\node_modules\heapdump>if not defined npm_config_node_gyp (node "D:\nodejs\node_modules\npm\node_modules\npm-lifecycle\node-gyp-bin\\..\..\node_modules\node-gyp\bin\node-gyp.js" rebuild )  else (node "D:\nodejs\node_modules\npm\node_modules\node-gyp\bin\node-gyp.js" rebuild )
在此解决方案中一次生成一个项目。若要启用并行生成,请添加“/m”开关。
  heapdump.cc
d:\nodejs\node-global\node_modules\appium\node_modules\heapdump\src\compat-inl.h(300): warning C4996: 'v8::Isolate::GetCpuProfiler': 被声明为已否决 [D:\nodejs\node-
global\node_modules\appium\node_modules\heapdump\build\addon.vcxproj]
  c:\users\cmd\.node-gyp\10.15.1\include\node\v8.h(7484): note: 参见“v8::Isolate::GetCpuProfiler”的声明
d:\nodejs\node-global\node_modules\appium\node_modules\heapdump\src\compat-inl.h(310): warning C4996: 'v8::Isolate::GetCpuProfiler': 被声明为已否决 [D:\nodejs\node-
global\node_modules\appium\node_modules\heapdump\build\addon.vcxproj]
  c:\users\cmd\.node-gyp\10.15.1\include\node\v8.h(7484): note: 参见“v8::Isolate::GetCpuProfiler”的声明
d:\nodejs\node-global\node_modules\appium\node_modules\heapdump\src\heapdump.cc(106): warning C4996: 'v8::String::Utf8Value::Utf8Value': 被声明为已否决 [D:\nodejs\n
ode-global\node_modules\appium\node_modules\heapdump\build\addon.vcxproj]
  c:\users\cmd\.node-gyp\10.15.1\include\node\v8.h(2891): note: 参见“v8::String::Utf8Value::Utf8Value”的声明
d:\nodejs\node-global\node_modules\appium\node_modules\heapdump\src\heapdump.cc(143): warning C4996: 'node::MakeCallback': 被声明为已否决 [D:\nodejs\node-global\nod
e_modules\appium\node_modules\heapdump\build\addon.vcxproj]
  c:\users\cmd\.node-gyp\10.15.1\include\node\node.h(176): note: 参见“node::MakeCallback”的声明
d:\nodejs\node-global\node_modules\appium\node_modules\heapdump\src\heapdump.cc(157): warning C4996: 'v8::Value::Int32Value': 被声明为已否决 [D:\nodejs\node-global\
node_modules\appium\node_modules\heapdump\build\addon.vcxproj]
  c:\users\cmd\.node-gyp\10.15.1\include\node\v8.h(2478): note: 参见“v8::Value::Int32Value”的声明
    正在创建库 D:\nodejs\node-global\node_modules\appium\node_modules\heapdump\build\Release\addon.lib 和对象 D:\nodejs\node-global\node_modules\appium\node_modules\
  heapdump\build\Release\addon.exp
  正在生成代码
  All 95 functions were compiled because no usable IPDB/IOBJ from previous compilation was found.
  已完成代码的生成
  addon.vcxproj -> D:\nodejs\node-global\node_modules\appium\node_modules\heapdump\build\Release\\addon.node

> pre-commit@1.2.2 install D:\nodejs\node-global\node_modules\appium\node_modules\pre-commit
> node install.js


> wd@1.11.1 install D:\nodejs\node-global\node_modules\appium\node_modules\wd
> node scripts/build-browser-scripts


> spawn-sync@1.0.15 postinstall D:\nodejs\node-global\node_modules\appium\node_modules\spawn-sync
> node postinstall

npm WARN optional SKIPPING OPTIONAL DEPENDENCY: fsevents@2.0.1 (node_modules\appium\node_modules\fsevents):
npm WARN notsup SKIPPING OPTIONAL DEPENDENCY: Unsupported platform for fsevents@2.0.1: wanted {"os":"darwin","arch":"any"} (current: {"os":"win32","arch":"x64"})
npm WARN optional SKIPPING OPTIONAL DEPENDENCY: fsevents@1.2.6 (node_modules\appium\node_modules\chokidar\node_modules\fsevents):
npm WARN notsup SKIPPING OPTIONAL DEPENDENCY: Unsupported platform for fsevents@1.2.6: wanted {"os":"darwin","arch":"any"} (current: {"os":"win32","arch":"x64"})

+ appium@1.11.0
added 1306 packages from 1503 contributors in 421.543s
PS C:\WINDOWS\system32> appium-doctor
info AppiumDoctor Appium Doctor v.1.9.0
info AppiumDoctor ### Diagnostic for necessary dependencies starting ###
info AppiumDoctor  ✔ The Node.js binary was found at: D:\nodejs\node.EXE
info AppiumDoctor  ✔ Node version is 10.15.1
info AppiumDoctor  ✔ ANDROID_HOME is set to: D:\Android\android-sdk
info AppiumDoctor  ✔ JAVA_HOME is set to: C:\Program Files\Java\jdk1.8.0_201
info AppiumDoctor  ✔ adb exists at: D:\Android\android-sdk\platform-tools\adb.exe
info AppiumDoctor  ✔ android exists at: D:\Android\android-sdk\tools\android.bat
info AppiumDoctor  ✔ emulator exists at: D:\Android\android-sdk\tools\emulator.exe
info AppiumDoctor  ✔ Bin directory of %JAVA_HOME% is set
info AppiumDoctor ### Diagnostic for necessary dependencies completed, no fix needed. ###
info AppiumDoctor
info AppiumDoctor ### Diagnostic for optional dependencies starting ###
info AppiumDoctor  ✔ Python required by node-gyp (used by heapdump) is installed at: D:\Python27\python.EXE. Installed version is: 2.7.14
WARN AppiumDoctor  ✖ opencv4nodejs cannot be found.
WARN AppiumDoctor  ✖ ffmpeg cannot be found
WARN AppiumDoctor  ✖ bundletool.jar cannot be found
info AppiumDoctor ### Diagnostic for optional dependencies completed, 3 fixes possible. ###
info AppiumDoctor
info AppiumDoctor ### Optional Manual Fixes ###
info AppiumDoctor The configuration can install optionally. Please do the following manually:
WARN AppiumDoctor  ➜ Why opencv4nodejs is needed and how to install it: https://github.com/appium/appium/blob/master/docs/en/writing-running-appium/image-comparison.md
WARN AppiumDoctor  ➜ ffmpeg is needed to record screen features. Please read https://www.ffmpeg.org/ to install it
WARN AppiumDoctor  ➜ bundletool.jar is used to handle Android App Bundle. Please read http://appium.io/docs/en/writing-running-appium/android/android-appbundle/ to install it
info AppiumDoctor
info AppiumDoctor ###
info AppiumDoctor
info AppiumDoctor Bye! Run appium-doctor again when all manual fixes have been applied!
老马 #15 · 2019年02月14日 Author
PS C:\WINDOWS\system32> appium-doctor
info AppiumDoctor Appium Doctor v.1.9.0
info AppiumDoctor ### Diagnostic for necessary dependencies starting ###
info AppiumDoctor  ✔ The Node.js binary was found at: D:\nodejs\node.EXE
info AppiumDoctor  ✔ Node version is 10.15.1
info AppiumDoctor  ✔ ANDROID_HOME is set to: D:\Android\android-sdk
info AppiumDoctor  ✔ JAVA_HOME is set to: C:\Program Files\Java\jdk1.8.0_201
info AppiumDoctor  ✔ adb exists at: D:\Android\android-sdk\platform-tools\adb.exe
info AppiumDoctor  ✔ android exists at: D:\Android\android-sdk\tools\android.bat
info AppiumDoctor  ✔ emulator exists at: D:\Android\android-sdk\tools\emulator.exe
info AppiumDoctor  ✔ Bin directory of %JAVA_HOME% is set
info AppiumDoctor ### Diagnostic for necessary dependencies completed, no fix needed. ###
info AppiumDoctor
info AppiumDoctor ### Diagnostic for optional dependencies starting ###
info AppiumDoctor  ✔ Python required by node-gyp (used by heapdump) is installed at: D:\Python27\python.EXE. Installed version is: 2.7.14
WARN AppiumDoctor  ✖ opencv4nodejs cannot be found.
WARN AppiumDoctor  ✖ ffmpeg cannot be found
WARN AppiumDoctor  ✖ bundletool.jar cannot be found
info AppiumDoctor ### Diagnostic for optional dependencies completed, 3 fixes possible. ###
info AppiumDoctor
info AppiumDoctor ### Optional Manual Fixes ###
info AppiumDoctor The configuration can install optionally. Please do the following manually:
WARN AppiumDoctor  ➜ Why opencv4nodejs is needed and how to install it: https://github.com/appium/appium/blob/master/docs/en/writing-running-appium/image-comparison.md
WARN AppiumDoctor  ➜ ffmpeg is needed to record screen features. Please read https://www.ffmpeg.org/ to install it
WARN AppiumDoctor  ➜ bundletool.jar is used to handle Android App Bundle. Please read http://appium.io/docs/en/writing-running-appium/android/android-appbundle/ to install it

最新的 appium-doctor 可选功能里也有检查 node-gyp
✔ Python required by node-gyp (used by heapdump) is installed at: D:\Python27\python.EXE. Installed version is: 2.7.14
该句 也提到了 node-gyp 这里边也有 https://github.com/nodejs/node-gyp

关于 windows 的 Visual C++ build tools 的 nodejs 环境 的安装说明

bundletool.jar cannot be found
这个错误怎么解决啊???

C:\Users\Administrator>appium-doctor
info AppiumDoctor Appium Doctor v.1.9.0
info AppiumDoctor ### Diagnostic for necessary dependencies starting ###
info AppiumDoctor ✔ The Node.js binary was found at: C:\Program Files\nodejs\n
ode.EXE
info AppiumDoctor ✔ Node version is 11.10.1
info AppiumDoctor ✔ ANDROID_HOME is set to: E:\android-sdk
info AppiumDoctor ✔ JAVA_HOME is set to: C:\Program Files\Java\jdk1.8.0_201
info AppiumDoctor ✔ adb exists at: E:\android-sdk\platform-tools\adb.exe
info AppiumDoctor ✔ android exists at: E:\android-sdk\tools\android.bat
info AppiumDoctor ✔ emulator exists at: E:\android-sdk\tools\emulator.exe
info AppiumDoctor ✔ Bin directory of %JAVA_HOME% is set
info AppiumDoctor ### Diagnostic for necessary dependencies completed, no fix ne
eded. ###
info AppiumDoctor
info AppiumDoctor ### Diagnostic for optional dependencies starting ###
info AppiumDoctor ✔ Python required by node-gyp (used by heapdump) is installe
d at: C:\Users\Administrator.windows-build-tools\Python27\python.EXE. Installed
version is: 2.7.15
info AppiumDoctor ✔ opencv4nodejs is installed at: C:\Users\Administrator\AppD
ata\Roaming\npm
info AppiumDoctor `-- opencv4nodejs@4.14.1
info AppiumDoctor
info AppiumDoctor . Installed version is: 4.14.1
info AppiumDoctor ✔ ffmpeg is installed at: C:\Program Files\ffmpeg\bin\ffmpeg
.EXE. ffmpeg version N-93264-g85051febc6 Copyright (c) 2000-2019 the FFmpeg deve
lopers
WARN AppiumDoctor ✖ bundletool.jar cannot be found
info AppiumDoctor ### Diagnostic for optional dependencies completed, one fix po
ssible. ###
info AppiumDoctor
info AppiumDoctor ### Optional Manual Fixes ###
info AppiumDoctor The configuration can install optionally. Please do the follow
ing manually:
WARN AppiumDoctor ➜ bundletool.jar is used to handle Android App Bundle. Pleas
e read http://appium.io/docs/en/writing-running-appium/android/android-appbundle
/ to install it
info AppiumDoctor
info AppiumDoctor ###
info AppiumDoctor
info AppiumDoctor Bye! Run appium-doctor again when all manual fixes have been a
pplied!
info AppiumDoctor

我的 appium 环境就差这个没有解决了,其他都搞定了。怎么搞?

老马 #19 · 2019年03月04日 Author
朱二哥 回复

opencv4nodejs

ffmpeg 你牛啊 win 环境 这个两个装好了吗? 怎么装的 我装过一次 opencv4nodejs 失败了 但我用不上这个 就没管它.

至于 bundletool.jar 不是提示你 看 Pleas
e read http://appium.io/docs/en/writing-running-appium/android/android-appbundle
/ to install it

老马 回复

马哥,我把 bundletools.jar 加入了 path,运行 appium-doctor 还是会提示 can not be found,搞了一两天了,谷歌不出解决法子

朱二哥 回复

同志,问题你解决了吗 我也是在 win 下装的环境

Gee 回复

同样最后一步搞不好,bundletool.jar 放在项目目录还是全局变量都没用。心疼

老马 #23 · 2019年03月06日 Author
lynnM1993 回复

你俩 确定 要用到 opencv4nodejs 和 ffmpeg 的功能来做 UI 自动化么....

你俩是做游戏 APP 的?

bundletool.jar 问问 你们开发怎么用的.... 这个我也不清楚

老马 #24 · 2019年03月07日 Author
Gee 回复

我看了下 https://stackoverflow.com/questions/54250178/appium-finishing-setting-up-optional-dependencies
stack 也有人问 你可以去 appium github 提个 issue
官方这个https://github.com/google/bundletool 才发布 10 个月 估计国内关注使用的少 所以暴露问题的少.

https://developer.android.com/studio/command-line/bundletool

按照 http://appium.io/docs/en/writing-running-appium/android/android-appbundle/ 也没说什么 就是说 有 jar 包 添加 PATH appium-doctor 就能识别了.... 你去 appium-doctor github 下 也提问 issue 一下吧.
我看 appium-doctor 下 https://github.com/appium/appium-doctor/releases 1.8.0 才支持了 app bundle tool check
但是这个 bundle tool 我用 android studio 升级了下 android sdk 到 28.0.3 版本 并没有在相关目录下看到这个 倒是在 android studio 目录下找到了个

我按照 stack 那个人的弄法 doctor 也没法识别 bundle tool

我已经提了 https://github.com/appium/appium/issues/12269 或者你们自己 issue 里 搜 bundletool

老马 #25 · 2019年05月05日 Author
Gee 回复

https://github.com/appium/appium/issues/12269#issuecomment-489378179

升级 appium-doctor 到 1.10.0

系统环境变量 PATH 添加 bundletool.jar 存放路径 如: D:\Android\android-sdk\bundle-tools
系统环境变量 PATHEXT 追加 ;.JAR 即可

@ 小马 你好,windows 程序的界面开发框架是 WPF 和 Qt5,appium 是否可以支持?

另外,为什么要用 appium 来进行 windows 程序的自动化测试,为什么不直接用 wins 的 automation?是因为 appium 可以在远端操作 app?

老马 回复

你好,想问下, Failed to locate opened application window with appId: C:\Users\chennan\AppData\Local\Postman\Postman.exe, and processId: 11588,启动钉钉出现这样的报错有遇过吗,启动就出错,网上回复的改 4724 端口也没用

你好,同样问题: Failed to locate opened application window with appId: E:\H 5000_V0.1.14.210428\H2102.exe, and processId: 18320,这个报错怎么解决呢?求帮助

想请问下,windows10 appnium 打开 windows 图标右下角带盾牌标志的应用,会出现报错为 “需要提升操作”。这个怎么解决呢,谢谢。

您好, 我想問下在整個過程中还要启动 appium 吗?

我打开 teamview 软件,报 500,无法创建 session, 您好,能帮忙看下吗?(我只打开 appium-server,其他都没启动)
def setUpClass(self):
    # set up appium
    desired_caps = {}
    desired_caps["app"] = "D:\\soft\\TeamViewer\\TeamViewer.exe"
    desired_caps["platformName"] = "Windows"
    desired_caps["deviceName"] = "WindowsPC"
    self.driver = webdriver.Remote(
        command_executor='http://127.0.0.1:4723/wd/hub',
        desired_capabilities=desired_caps)
    print("11111")
    time.sleep(8)
    print("22222")
appium 日志
[W3C] Calling AppiumDriver.createSession() with args: [{"app":"D:\\soft\\TeamViewer\\TeamViewer.exe","platformName":"Windows","deviceName":"WindowsPC"},null,{"firstMatch":[{"appium:app":"D:\\soft\\TeamViewer\\TeamViewer.exe","platformName":"Windows","appium:deviceName":"WindowsPC"}]}]
[BaseDriver] Event 'newSessionRequested' logged at 1629845760468 (06:56:00 GMT+0800 (中国标准时间))
[Appium] Appium v1.21.0 creating new WindowsDriver (v1.18.1) session
[Appium] Applying relaxed security to 'WindowsDriver' as per server command line argument. All insecure features will be enabled unless explicitly disabled by --deny-insecure
[BaseDriver] W3C capabilities and MJSONWP desired capabilities were provided
[BaseDriver] Creating session with W3C capabilities: {
[BaseDriver]   "alwaysMatch": {
[BaseDriver]     "platformName": "Windows",
[BaseDriver]     "appium:app": "D:\\soft\\TeamViewer\\TeamViewer.exe",
[BaseDriver]     "appium:deviceName": "WindowsPC"
[BaseDriver]   },
[BaseDriver]   "firstMatch": [
[BaseDriver]     {}
[BaseDriver]   ]
[BaseDriver] }
[BaseDriver] Session created with session id: f6279929-8445-4a07-9940-e07a5d1492f8
[WinAppDriver] WinAppDriver exists, but the checksum did not match. Was it replaced manually?
[WinAppDriver] Spawning 'C:\Program Files (x86)\Windows Application Driver\WinAppDriver.exe' with args: ["4725/wd/hub"]
[WD Proxy] Matched '/status' to command name 'getStatus'
[WD Proxy] Proxying [GET /status] to [GET http://127.0.0.1:4725/wd/hub/status] with no body
[WinAppDriver] 楗摮睯⁳灁汰捩瑡潩牄癩牥䈠瑥⁡楬瑳湥湩⁧潦⁲敲畱獥獴愠㩴栠瑴㩰⼯㈱⸷⸰⸰㨱㜴㔲眯⽤畨ൢ
[WinAppDriver] 倊敲獳䔠呎剅琠硥瑩മ
[WinAppDriver] ഊഊ㴊㴽㴽㴽㴽㴽㴽㴽㴽㴽㴽㴽㴽㴽㴽㴽㴽㴽㴽㴽㴽ഽ䜊呅⼠摷栯扵猯慴畴⁳呈偔ㄯㄮ഍䄊捣灥㩴愠灰楬慣楴湯樯潳Ɱ⨠⨯഍䌊湯敮瑣潩㩮欠敥⵰污癩൥਍潃瑮湥⵴祔数›灡汰捩瑡潩⽮獪湯※档牡敳㵴瑵ⵦസ਍潈瑳›㈱⸷⸰⸰㨱㜴㔲഍唊敳⵲杁湥㩴愠浤⽣摷ㄯㄮ⸳‰灡楰浵椭獮数瑣牯ㄯ㈮⸱ര਍഍ഊ
[WinAppDriver] 䠊呔⽐⸱‱〲‰䭏഍䌊湯整瑮䰭湥瑧㩨ㄠ㠰഍䌊湯整瑮吭灹㩥愠灰楬慣楴湯樯潳൮਍഍笊戢極摬㨢≻敲楶楳湯㨢〢Ⱒ琢浩≥∺ⴭ⴯⼭ⴭⰢ瘢牥楳湯㨢〢索∬獯㨢≻牡档㨢砢㘸Ⱒ渢浡≥∺楷摮睯≳∬敶獲潩≮∺索ൽ
[WD Proxy] Got response with status 200: {"build":{"revision":"0","time":"--/--/--","version":"0"},"os":{"arch":"x86","name":"windows","version":""}}
[WinAppDriver] Starting WinAppDriver session. Will timeout in '20000' ms.
[WD Proxy] Matched '/session' to command name 'createSession'
[WD Proxy] Proxying [POST /session] to [POST http://127.0.0.1:4725/wd/hub/session] with body: {"desiredCapabilities":{"platformName":"Windows","app":"D:\\soft\\TeamViewer\\TeamViewer.exe","deviceName":"WindowsPC"}}
[WinAppDriver] ഊഊ㴊㴽㴽㴽㴽㴽㴽㴽㴽㴽㴽㴽㴽㴽㴽㴽㴽㴽㴽㴽㴽ഽ倊协⁔眯⽤畨⽢敳獳潩呈偔ㄯㄮ഍䄊捣灥㩴愠灰楬慣楴湯樯潳Ɱ⨠⨯഍䌊湯敮瑣潩㩮欠敥⵰污癩൥਍潃瑮湥⵴敌杮桴›㈱ര਍潃瑮湥⵴祔数›灡汰捩瑡潩⽮獪湯※档牡敳㵴瑵ⵦസ਍潈瑳›㈱⸷⸰⸰㨱㜴㔲഍唊敳⵲杁湥㩴愠浤⽣摷ㄯㄮ⸳‰灡楰浵椭獮数瑣牯ㄯ㈮⸱ര਍഍ഊ
[WinAppDriver] 匊獥楳湯慍慮敧⁲‭牃慥楴杮猠獥楳湯映牯䐠尺潳瑦呜慥噭敩敷屲敔浡楖睥牥攮數਍敓獳潩䵮湡条牥ⴠ圠湩灁䑰楲敶⁲畳捣敥敤⁤潬摡湩⁧楍慴牂歯牥਍呈偔ㄯㄮ㔠〰䤠瑮牥慮牅潲൲਍潃瑮湥⵴敌杮桴›〱റ਍潃瑮湥⵴祔数›灡汰捩瑡潩⽮獪湯഍ഊ਍≻瑳瑡獵㨢㌳∬慶畬≥笺攢牲牯㨢猢獥楳湯渠瑯挠敲瑡摥Ⱒ洢獥慳敧㨢䄢渠睥猠獥楳湯挠畯摬渠瑯戠⁥牣慥整⹤索ൽ
[WD Proxy] Got response with status 500: {"status":33,"value":{"error":"session not created","message":"A new session could not be created."}}
[W3C] Matched W3C error code 'session not created' to SessionNotCreatedError
[WinAppDriver] Could not start WinAppDriver session error = 'A new session could not be created. Details: A new session could not be created.', attempt = '1' from 'undefined'
[WD Proxy] Matched '/session' to command name 'createSession'
[WD Proxy] Proxying [POST /session] to [POST http://127.0.0.1:4725/wd/hub/session] with body: {"desiredCapabilities":{"platformName":"Windows","app":"D:\\soft\\TeamViewer\\TeamViewer.exe","deviceName":"WindowsPC"}}
[WinAppDriver] ഊഊ㴊㴽㴽㴽㴽㴽㴽㴽㴽㴽㴽㴽㴽㴽㴽㴽㴽㴽㴽㴽㴽ഽ倊协⁔眯⽤畨⽢敳獳潩呈偔ㄯㄮ഍䄊捣灥㩴愠灰楬慣楴湯樯潳Ɱ⨠⨯഍䌊湯敮瑣潩㩮欠敥⵰污癩൥਍潃瑮湥⵴敌杮桴›㈱ര਍潃瑮湥⵴祔数›灡汰捩瑡潩⽮獪湯※档牡敳㵴瑵ⵦസ਍潈瑳›㈱⸷⸰⸰㨱㜴㔲഍唊敳⵲杁湥㩴愠浤⽣摷ㄯㄮ⸳‰灡楰浵椭獮数瑣牯ㄯ㈮⸱ര਍഍笊搢獥物摥慃慰楢楬楴獥㨢≻汰瑡潦浲慎敭㨢圢湩潤獷Ⱒ愢灰㨢䐢尺獜景屴呜慥噭敩敷屲呜慥噭敩敷⹲硥≥∬敤楶散慎敭㨢圢湩潤獷䍐索ൽ
[WinAppDriver] 匊獥楳湯慍慮敧⁲‭牃慥楴杮猠獥楳湯映牯䐠尺潳瑦呜慥噭敩敷屲敔浡楖睥牥攮數਍敓獳潩䵮湡条牥ⴠ圠湩灁䑰楲敶⁲畳捣敥敤⁤潬摡湩⁧楍慴牂歯牥਍呈偔ㄯㄮ㔠〰䤠瑮牥慮牅潲൲਍潃瑮湥⵴敌杮桴›〱റ਍潃瑮湥⵴祔数›灡汰捩瑡潩⽮獪湯഍ഊ਍≻瑳瑡獵㨢㌳∬慶畬≥笺攢牲牯㨢猢獥楳湯渠瑯挠敲瑡摥Ⱒ洢獥慳敧㨢䄢渠睥猠獥楳湯挠畯摬渠瑯戠⁥牣慥整⹤索ൽ
[WD Proxy] Got response with status 500: {"status":33,"value":{"error":"session not created","message":"A new session could not be created."}}
[W3C] Matched W3C error code 'session not created' to SessionNotCreatedError
[WinAppDriver] Could not start WinAppDriver session error = 'A new session could not be created. Details: A new session could not be created.', attempt = '2' from 'undefined'
[WinAppDriver] timeoutError was Condition unmet after 27613 ms. Timing out.
[WinAppDriver] Deleting WinAppDriver session
[WinAppDriver] WinAppDriver exited with code null, signal SIGTERM
[BaseDriver] Event 'newSessionStarted' logged at 1629845789032 (06:56:29 GMT+0800 (中国标准时间))
[W3C] Encountered internal error running command: SessionNotCreatedError: A new session could not be created. Details: A new session could not be created.
[W3C]     at errorFromW3CJsonCode (C:\Program Files\Appium\resources\app\node_modules\appium\node_modules\appium-base-driver\lib\protocol\errors.js:780:25)
[W3C]     at ProxyRequestError.getActualError (C:\Program Files\Appium\resources\app\node_modules\appium\node_modules\appium-base-driver\lib\protocol\errors.js:663:14)
[W3C]     at WADProxy.command (C:\Program Files\Appium\resources\app\node_modules\appium\node_modules\appium-base-driver\lib\jsonwp-proxy\proxy.js:272:19)
[W3C]     at processTicksAndRejections (internal/process/task_queues.js:85:5)
[HTTP] <-- POST /wd/hub/session 500 28565 ms - 824
[HTTP] 
需要 登录 后方可回复, 如果你还没有账号请点击这里 注册