一 部署环境
项目 git 地址:
https://github.com/macacajs/NoSmoke
环境介绍:
操作系统
cmd@TR:~$ lsb_release -a

No LSB modules are available.

Distributor ID:    Ubuntu

Description:    Ubuntu 16.04.3 LTS

Release:    16.04

Codename:    xenial
Macaca 底层依赖
请先部署安装好 Macaca
cmd@TR:~$ macaca doctor

  macaca-doctor version: 2.0.4


  Node.js checklist:

  node env: /opt/nodejs/bin/node

  node version: v6.10.3


  Android checklist:

  JAVA version is `1.8.0_151`

  JAVA_HOME is set to `/usr/lib/jvm/java-8-oracle`

  ANDROID_HOME is set to `/opt/android-sdk-linux`

  Platforms is set to `/opt/android-sdk-linux/platforms/android-26`

  ADB tool is set to `/opt/android-sdk-linux/platform-tools/adb`

  gradle is installed, version: 3.5


  Installed driver list:

  android: 2.0.44

  chrome: 1.0.7

  electron: 1.1.19
部署 NoSmoke:
直接参考官方的 2 种方式均可以:
1 是 npm i 方式
2 是 git clone 方式
Step 2. Setup NoSmoke - You can choose several ways to run it :]
Method 1: install the nosmoke command line from npmjs
$ npm i nosmoke -g
Open the terminal and initialize macaca server macaca server --verbose
then in your workspace directory, execute the following command
$ nosmoke -h path-of-your-hook.js -c path-of-your-config.yml
For full set of command please check:
nosmoke --help
Usage: nosmoke [options]
Options:
-p, --port port to use (5678 default)
-u, --udid udid of device
-h, --hooks location of the hook.js file
-c, --config location of the configuration file
-s, --silent start without opening browser
--verbose show more debugging information
-v, --versions output version infomation
-h, --help output usage information
Method 2: install via clone from git
$ git clone git@github.com:macacajs/NoSmoke.git
Open the terminal and initialize macaca server macaca server --verbose
then run the following under the nosmoke root dir:
$ bin/nosmoke -h path-of-your-hook.js -c path-of-your-config.yml
Note: -h is optional and -c (the path of the configuration file is a must) in order to run the crawler
检查部署后输出
cmd@TR:~$ nosmoke -v
 1.0.1

cmd@TR:~$ nosmoke --help
  Usage: nosmoke [options]
  Options:
    -p, --port <d>    port to use (5678 default)
    -u, --udid <s>    udid of device
    -a, --app <s>     path of app, will override the one specified in crawler.config.yml
    -h, --hooks <s>   location of the hook.js file
    -c, --config <s>  location of the configuration.yml file
    -s, --silent      start without opening browser
    --verbose         show more debugging information
    --server <s>      adddress for server: "http://172.31.9.162:1212/"
    -v, --versions    output version infomation
    -h, --help        output usage information
二 跑 Demo 测试
测试 Demo 在路径
github 路径:
https://github.com/macacajs/NoSmoke/tree/master/public
下的文件 crawler.config.yml 既是遍历 Demo 的配置文件
本地 git 项目路径:
cmd@TR:~/workspace/git/NoSmoke/public$ ls -al

总用量 36

drwxrwxr-x 3 cmd cmd 4096 1月   3 09:53 .

drwxrwxr-x 8 cmd cmd 4096 1月   2 15:31 ..

-rw-rw-r-- 1 cmd cmd  928 1月   3 10:18 androidTest.yml

-rw-rw-r-- 1 cmd cmd 1272 1月   3 10:44 androidDemo.yml

-rw-rw-r-- 1 cmd cmd 3714 1月   2 15:31 crawler.config.yml

-rw-rw-r-- 1 cmd cmd 2486 1月   2 15:31 hooks.js

-rw-rw-r-- 1 cmd cmd   86 1月   2 15:31 index.css

drwxrwxr-x 4 cmd cmd 4096 1月   3 10:19 reports

-rw-rw-r-- 1 cmd cmd  326 1月   3 09:55 webDemo.yml

-rw-rw-r-- 1 cmd cmd  420 1月   3 09:55 webTest.yml
初期为了方便,可以将自己的遍历配置 .yml 文件都先放这。调试通了后,你复制粘贴到其它路径都可以。关于 yml 文件格式的书写格式语法,请自行去学习。
hooks.js 也是遍历配置文件:再精密设计的深度遍历算法对于不同的 UI 界面设计, 也不能完全保证能够 cover 大部分的遍历场景,因此通过钩子的形式给使用者提供不干预流程的前提下,定制遍历可能性
用户可以通过定制 /public/hooks.js 中的各个函数 对默认行为进行定制。
reports 是结果报告目录,命令行有参数可以指定相关设置。不配置也可以,会在当前执行目录自动生成。
跑 android
根据 crawler.config.yml
简单改一下 android 的配置:
另存为 androidDemo.yml
---
# 1. Initialization option
desiredCapabilities:
  platformName: 'android'
  isWaitActivity: true
  activity: 'LoginActivity'
  permissionPatterns: '[\"继续安装\",\"下一步\",\"好\",\"允许\",\"确定\",\"我知道\"]'
  app: 'https://npmcdn.com/android-app-bootstrap@latest/android_app_bootstrap/build/outputs/apk/android_app_bootstrap-debug.apk'

# 2. Crawling option
crawlingConfig:
  platform: 'android'
  packages: 'com.github.android_app_bootstrap|com.xxx.your.optional.app'
  targetElements:
    loginAccount:
      searchValue : 'please input username'
      actionValue : '中文+Test+12345678'
    loginPassword:
      searchValue : 'please input password'
      actionValue : '111111'
    loginButton:
      searchValue : 'Login'
    alertConfirm:
      searchValue : 'yes'
  asserts:
    - type: 'regex'
      given: 'android\s+bootstrap'
      then: 'please\s+input\s+username'
    - type: 'regex'
      given: 'HOME'
      then: 'list'
  exclusivePattern: 'pushView|popView|cookie|userAgent:|Mozilla|cookie:|setTitle|Macaca Test Swipe API'
  clickTypes:
    - 'android.widget.ImageView'
    - 'android.widget.TextView'
    - 'android.widget.Button'
  editTypes:
    - 'android.widget.EditText'
  tabBarTypes:
    - 'android.widget.TabWidget'
...
如何跑?
1 依赖 macaca server 发请求 所以需要先启动
macaca server --verbose
2 启动 android 虚拟器或 USB 连接真机
cmd@TR:$ adb devices -l
List of devices attached
192.168.58.101:5555 device product:vbox86p model:Samsung_Galaxy_S7_6_0_0API_23__1440x2560 device:vbox86p
3 执行遍历配置
cmd@TR:~/workspace/git/NoSmoke/public$ nosmoke -c androidDemo.yml
跑 Pc Web
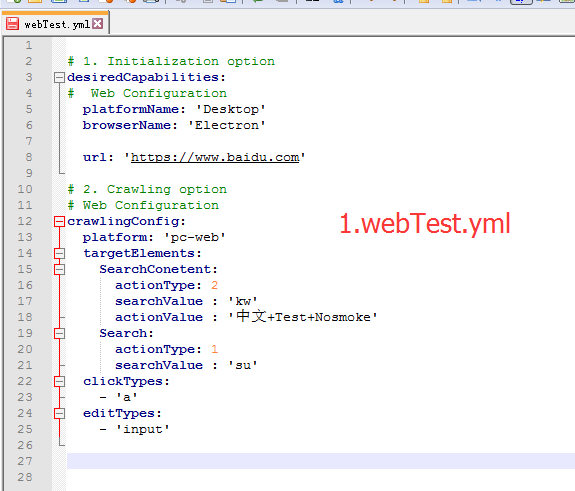
简单改一下 Pc Web 的配置:
另存为 webDemo.yml
---
# 1. Initialization option
desiredCapabilities:
#  Web Configuration
  platformName: 'Desktop'
  browserName: 'Electron'
  url: 'https://macacajs.github.io'
# 2. Crawling option
# Web Configuration
crawlingConfig:
  platform: 'pc-web'
  blacklist:
    - 'github.com'
  clickTypes:
    - 'a'
  editTypes:
    - 'input'
...
如何跑?
1 依赖 macaca server 发请求 所以需要先启动
macaca server --verbose
2 配置的是 Electron 浏览器
只要安装了 npm i macaca-electron -g 驱动即可
3 执行遍历配置
cmd@TR:~/workspace/git/NoSmoke/public$ nosmoke -c webDemo.yml
三 效果与配置参数说明
根据执行的效果和配置文件写的内容,大家应该可以很快理解。
安卓的既是根据 app 配置的路径 安装待测 app 然后 searchValue : 'please input username' 是找到该用户名输入框,actionValue : '中文 +Test+12345678'是在该用户名输入框输入内容。
loginAccount:

  searchValue : 'please input username'

  actionValue : '中文+Test+12345678'
是一组小 case 其中 loginAccount:是你自定义的 case 名称,你换其他名称亦可。其他看下文参数配置说明即可明白,不再赘述。
web 的既是访问 macacajs 的 github 官网,然后
clickTypes:

  - 'a'

editTypes:

  - 'input'
该段既是遍历配置块,什么意思呢,大家用火狐的 web 开发者工具 查看元素,即可明白。
a 和 input 就是 html 中的标签属性。意思就是遇到 a 属性的 UI 元素就点击,遇到 input 属性的 UI 元素就输入(输入的内容好像给了个默认值为)
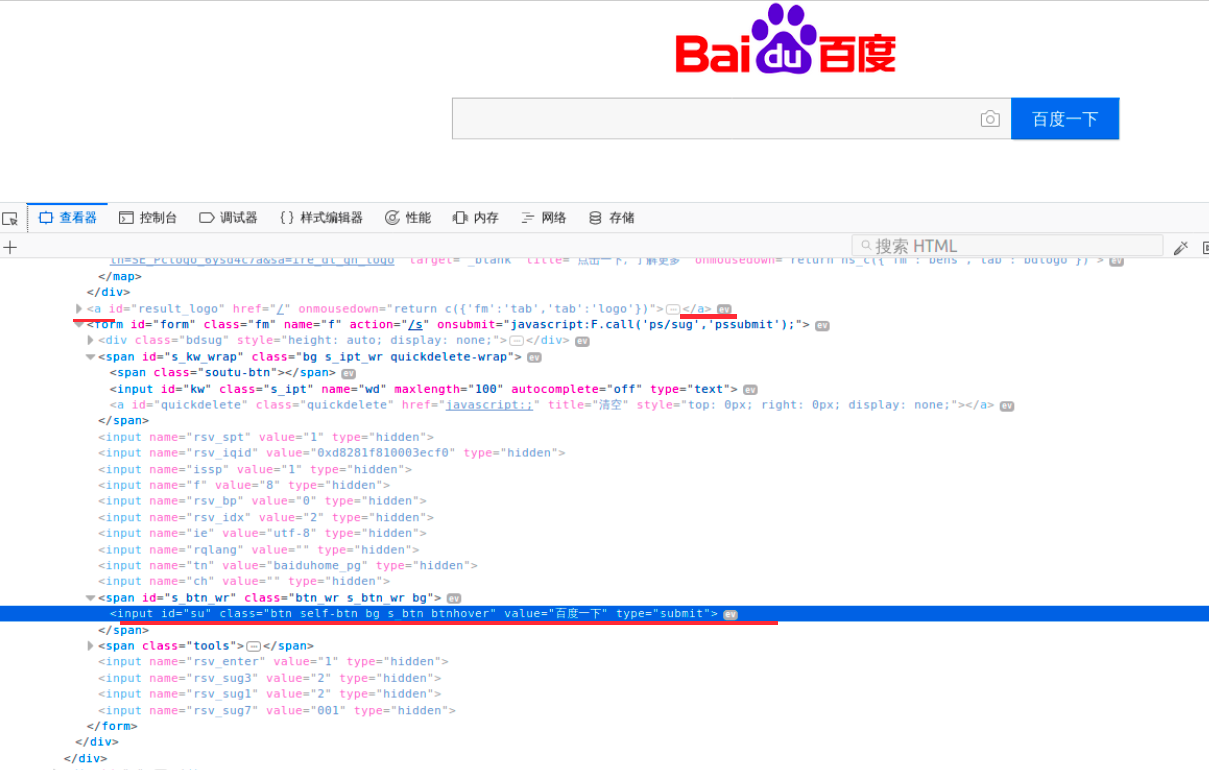
我们拿百度说明:
如百度的搜索内容输入框 和 搜索按钮百度一下 看到他们的标签属性都是类似这样写法
<input class="s_ipt" name="wd" id="kw" maxlength="100" autocomplete="off" type="text">

<input value="百度一下" id="su" class="btn self-btn bg s_btn" type="submit">

以及含<a      </a>
而这一句,是在真机测试时来捕获系统权限安装弹窗,让 android-unlock 自动许可安装通过的一步。
permissionPatterns: '[\"继续安装\",\"下一步\",\"好\",\"允许\",\"确定\",\"我知道\"]'
具体配置说明可参考 NoSmoke 的配置参数
b. Configurable
Refer to the crawler.config.yml file in the NoSmoke/public folder as a example. You can choose which platform to conduct the crawling task:
desiredCapabilities:
platformName: 'iOS'
deviceName: 'iPhone 6 Plus'
app: 'https://npmcdn.com/ios-app-bootstrap@latest/build/ios-app-bootstrap.zip'
And the corresponding configuration for crawling the app:
crawlingConfig:
platform: 'ios' // platforms to run: android, ios, pc-web
testingPeriod: // maximun testing period for a crawling task, after which the task will terminate
testingDepth : // maximum testing depth of the UI window tree, exeeding which 'Back' navigation will be triggered
newCommandTimeout:// time interval takes to examine current window source after a crawling UI action has been performed
launchTimeout: // time interval to wait after app has been launched.
maxActionPerPage: // max UI actions filtered and performed perpage, this will provide greate memory optimization and prevent an Page for staying too long
targetElements: // array of hight priority UI element to perform
asserts: // provide for regex assert test cases for windows
exclusivePattern: // specify the pattern hence you can let those element which contain the regex pattern be excluded from exection
clickTypes: // specify the types of UI element which can handle click events
editTypes: // specify the types of UI element which can handle edit events
horizontalScrollTypes: // specify the types of UI element which can handle horizontal scroll
tabBarTypes: // specify the types of UI element may act as a control widget in master-detail pattern
exclusiveTypes: // specify the types of UI element in which all the sub-views will be exclueded from scanning and crawl
或该文片段:
YML 配置文件选项详解:
# 1. Initialization option
desiredCapabilities:
  platformName: 'platform iOS/Android'
  deviceName: 'name of the device'
  app: 'url for downloading app here'

# 2. Crawling option
crawlingConfig:
  platform: 'iOS'
  targetElements:
    loginAccount:
      actionType  : 'action type: 1-click; 2-input'
      searchValue : 'the value to search'
      actionValue : 'the value to input'
  exclusivePattern: 'pushView/popView'
  clickTypes:
    - 'array of clickable UI types: StaticText/Button'
  editTypes:
    - 'array of editable UI types: SecureTextField/TextFiled'
  horizontalScrollTypes:
    - 'array of horizontal scrollable UI types: PageIndicator'
  verticalScrollTypes:
    - 'array of vertical scrollable UI types: ScrollView'
  tabBarTypes:
    - 'array of control widget which behaves like a master in the
    master-detail view structures: TabBar'
  exclusiveTypes:
    - 'array of disabled and esclusive UI types: NavigationBar'
  navigationBackKeyword:
    - 'array of words on which items should be regarded
    as a back button: back'
以及 macaca 的配置参数:
https://macacajs.github.io/zh/helpful-settings
四 改造 app 测试
既然跑通了 android app 和 Pc Web 的 Demo,我们接下来就可以再简单的用下其他 app 或网站来继续测试。
另存一个 yml 文件 androidTest.yml 根据以上对 Demo 的效果和配置参数的理解,我们尝试写出以下遍历配置先。
其中根据 macaca 提供的 desiredCapabilities 参数配置 加了一些 比如 NoSmoke 没有的 reuse udid 等 大家自行查阅对比。
---

# 1. Initialization option

desiredCapabilities:

  platformName: 'android'

  udid: 45806625

  app: '/home/cmd/app/acp4.7p.apk'

  packages: 'com.sinacp.ggaicai'

  activity: 'com.aicai.pluginhost.activity.MainActivity'

  isWaitActivity: true

  reuse: 3

  testingPeriod: 36000

  permissionPatterns: '[\"继续安装\",\"下一步\",\"好\",\"允许\",\"确定\",\"我知道\"]'


# 2. Crawling option

crawlingConfig:

  platform: 'android'

  targetElements:

    INmy:

      actionType: 1

      searchValue : '我的'

    loginUI:

      actionType: 1

      searchValue : '立即登录/注册'

    loginAccount:

      actionType: 2

      searchValue : "手机号/用户名"

      actionValue : 'mdc123'

    loginPassword:

      actionType: 2

      searchValue : "登录密码"

      actionValue : '123123'

    loginButton:

      actionType: 1

      searchValue : "登录"

  clickTypes:

    - 'android.widget.ImageView'

    - 'android.widget.TextView'

    - 'android.widget.Button'

  #  - 'android.widget.LinearLayout'

  editTypes:

    - 'android.widget.EditText'

  tabBarTypes:

    - 'android.widget.TabWidget'

...
接下来跑一下,效果还可以。继续研究。
四 有意思的 permissionPatterns 参数
运行真机小米 MIX2 时候,发现居然不用特别处理 手动点击 “继续安装” android-unlock 了,然后仔细研究了下 permissionPatterns 以为是 NoSmoke 提供的 结果看了源码没有。
然后又去 wd.java API 里找 去 macaca-cli 里找都没找到,然后看了下 macaca server 日志,发现应该是 UIAutomatorWD 干的事。
permissionPatterns: '[\"继续安装\",\"下一步\",\"好\",\"允许\",\"确定\",\"我知道\"]'
而这一句,是在真机测试时来捕获系统权限安装弹窗,让 android-unlock 自动许可安装通过的一步。
是 macaca 的 Desired Capabilities 是最近一个版本新加的 在官方说明中 还未有。
这是个很重要的 参数。 在真机测试时。 真棒。底层解决了。
看了下 macaca server 的日志
发现
>> helper.js:176:12 [master] pid:25727 Using local app form /home/cmd/app/acp4.7p.apk
>> checking permissionPatterns: [\"继续安装\",\"下一步\",\"好\",\"允许\",\"确定\",\"我知道\"]
>> uiautomator-client.js:62:14 [master] pid:25727 INSTRUMENTATION_STATUS: numtests=1
INSTRUMENTATION_STATUS: stream=
com.macaca.android.testing.UIAutomatorWD:
>> uiautomator-client.js:62:14 [master] pid:25727
INSTRUMENTATION_STATUS: id=AndroidJUnitRunner
INSTRUMENTATION_STATUS: test=MacacaTestRunner
INSTRUMENTATION_STATUS: class="com".macaca.android.testing.UIAutomatorWD
INSTRUMENTATION_STATUS: current=1
INSTRUMENTATION_STATUS_CODE: 1

>> uiautomator-client.js:62:14 [master] pid:25727 INSTRUMENTATION_STATUS: stream=
UIAutomatorWD->http://localhost:9002<-UIAutomatorWD
INSTRUMENTATION_STATUS_CODE: 0

>> UIAutomatorWD http server ready
>> macaca-android.js:303:10 [master] pid:25727 start app with: {"package":"com.sinacp.ggaicai","activity":""}
>> responseHandler.js:49:14 [master] pid:25727 Send HTTP Respone to Client[2018-01-03 14:28:04]: {"sessionId":"41c53e4f-4ae4-4762-8a08-867edd515f94","status":0,"value":"{\"platformName\":\"android\",\"app\":\"/home/cmd/app/acp4.7p.apk\",\"packages\":\"com.sinacp.ggaicai\",\"activity\":\"com.aicai.pluginhost.activity.MainActivity\",\"isWaitActivity\":true,\"reuse\":3,\"udid\":45806625,\"permissionPatterns\":\"[\\\\\\\"继续安装\\\\\\\",\\\\\\\"下一步\\\\\\\",\\\\\\\"好\\\\\\\",\\\\\\\"允许\\\\\\\",\\\\\\\"确定\\\\\\\",\\\\\\\"我知道\\\\\\\"]\"}"}
是 UIAutomatorWD 负责发的这个 responseHandler ,就去找到 UIAutomatorWD 项目 发现最近 NoSmoke 的作者提交了 permissionPatterns 相关
https://github.com/macacajs/UIAutomatorWD/commit/dee4dad116995f956cdfa9fc7fbca68da8912ac3
论坛和群里 经常有问包括 appium 的 在真机测试时都是需要先权限安装 Unlock 和 Appium Settings
怎么自动化的解决系统安装弹窗的问题,也有不少方案源码。
 --这是 macaca server 的情况-
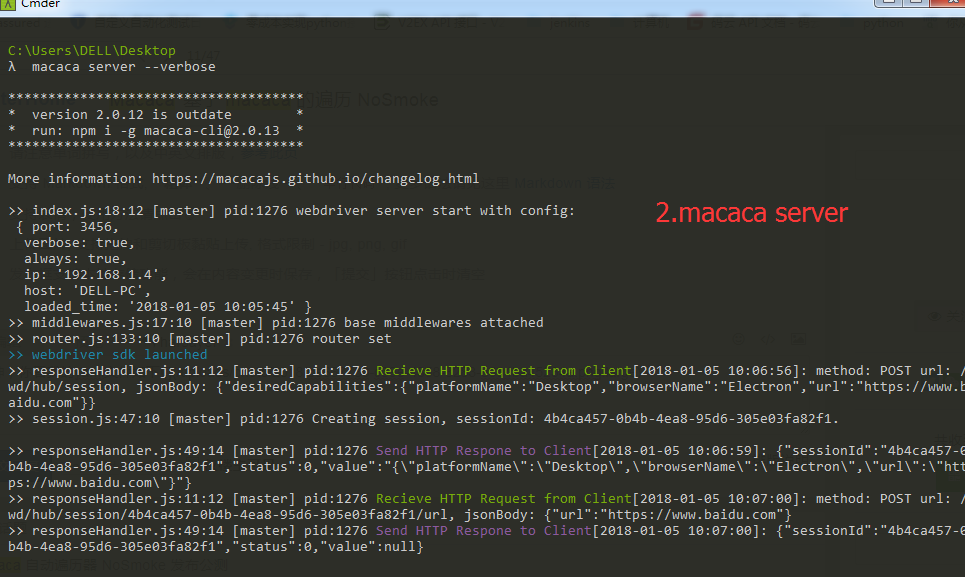 ------nosmoke 运行情况
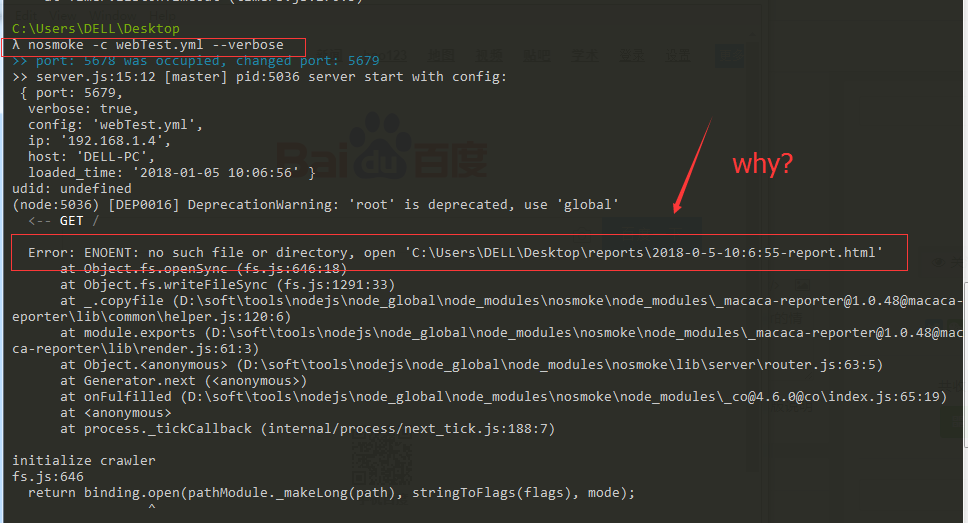 -------请大神指导【问题就是 Electron 打开了百度页面,输入和点击的操作不会执行】