开源地址
后端开源地址:https://github.com/tigerge000/FingerAppPublish.git
前端开源地址:https://github.com/tigerge000/static.git
引言
首先要感谢@xiaoluosun,自动打包平台的文章https://testerhome.com/topics/7724app 发布平台;本篇文章讲介绍整体实现思路以及对接 Jenkins 的方案,基于此思路,我这边自己编写
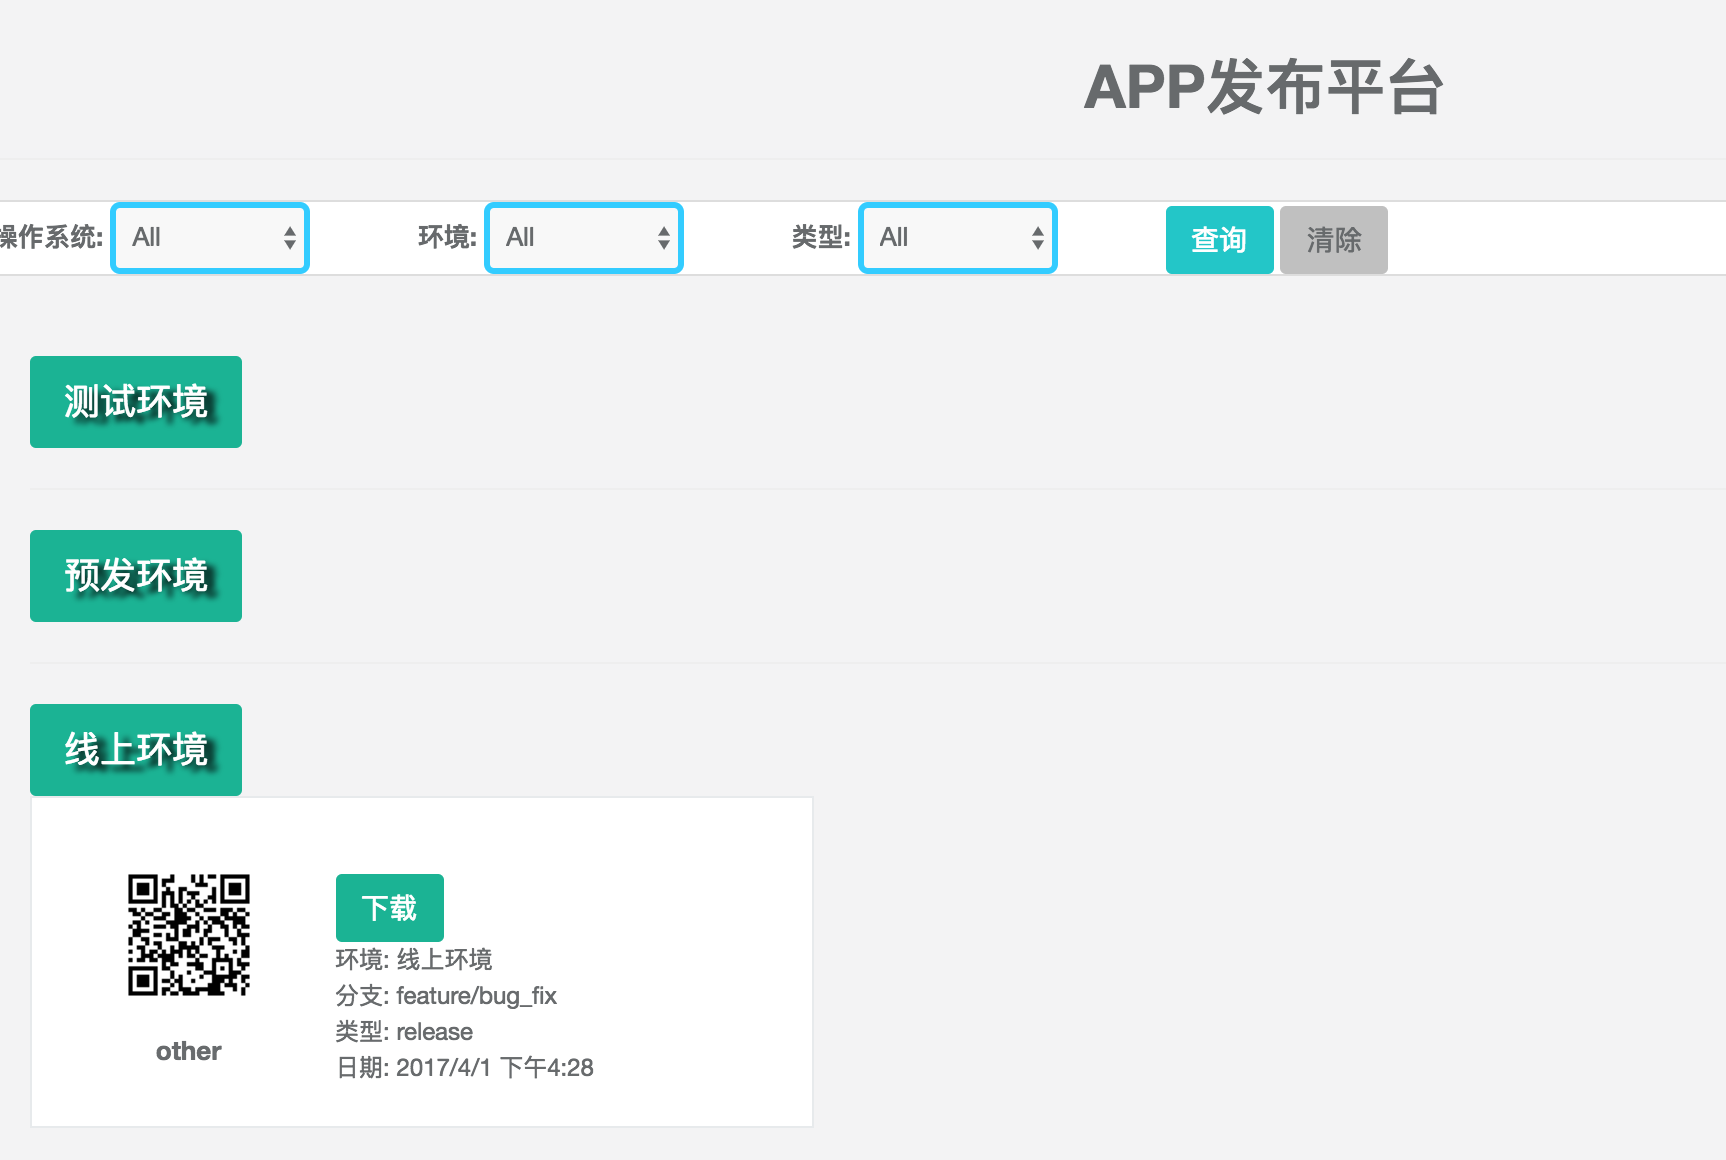
目标: 所有 iOS 和 Android 的版本包均展示到这个 APP 发布平台,支持 二维码扫码下载或点击 下载链接进行下载安装;
目前已在公司内部推行,并集成到了 Jenkins 上
效果
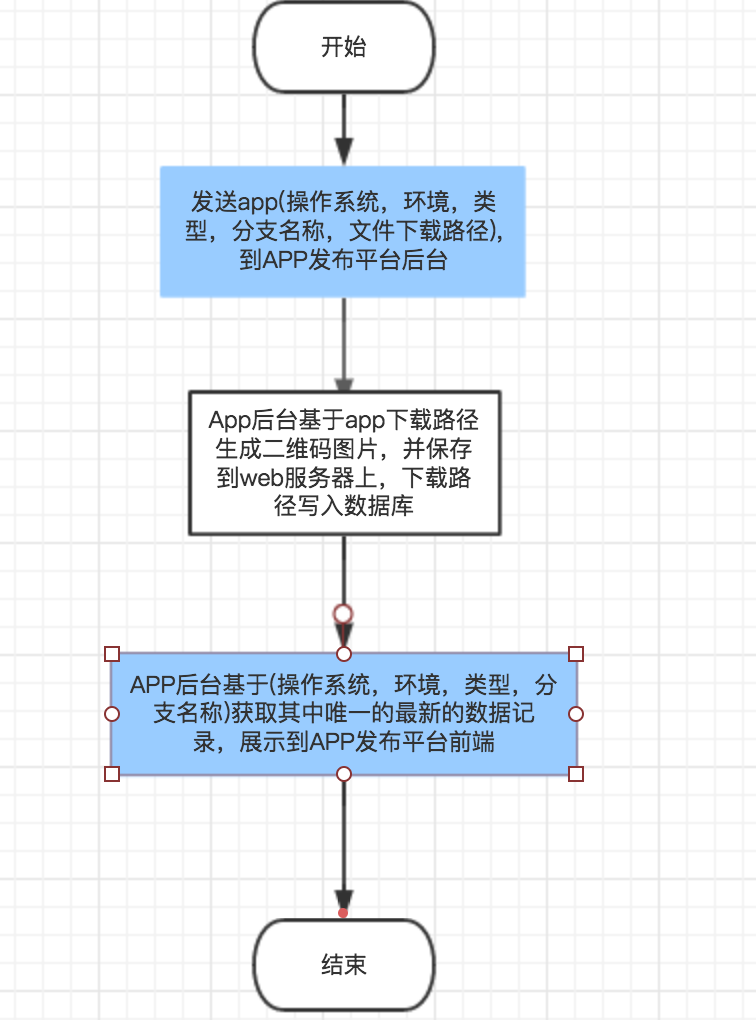
业务流
实现
## 创建本地数据库
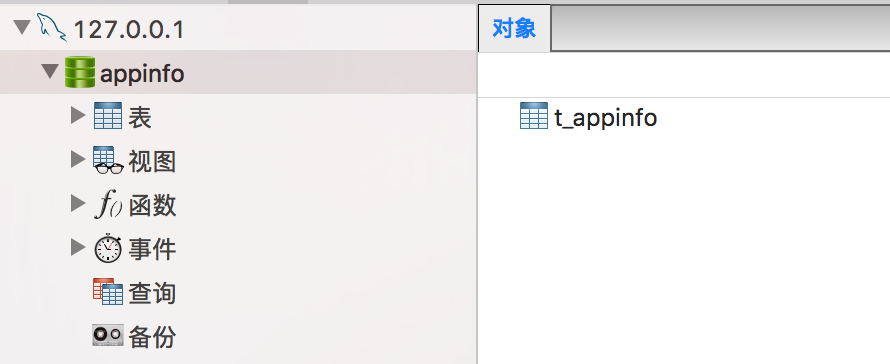
建表语句:
/*
 Navicat Premium Data Transfer

 Source Server         : 127.0.0.1
 Source Server Type    : MySQL
 Source Server Version : 50717
 Source Host           : 127.0.0.1
 Source Database       : appinfo

 Target Server Type    : MySQL
 Target Server Version : 50717
 File Encoding         : utf-8

 Date: 04/01/2017 15:45:12 PM
*/

SET NAMES utf8;
SET FOREIGN_KEY_CHECKS = 0;

-- ----------------------------
--  Table structure for `t_appinfo`
-- ----------------------------
DROP TABLE IF EXISTS `t_appinfo`;
CREATE TABLE `t_appinfo` (
  `id` bigint(15) NOT NULL AUTO_INCREMENT COMMENT '编号',
  `os` varchar(10) DEFAULT NULL COMMENT 'iOS,android,other',
  `env` varchar(10) DEFAULT NULL COMMENT '(环境)uat,beta,live',
  `appmode` varchar(10) DEFAULT NULL COMMENT 'debug,release',
  `version` int(15) DEFAULT NULL COMMENT '版本号',
  `branch_name` varchar(100) DEFAULT NULL COMMENT '分支名称',
  `des` varchar(100) DEFAULT NULL COMMENT '描述',
  `gmt_create` bigint(20) DEFAULT NULL COMMENT '修改时间',
  `qrcode_url` varchar(512) DEFAULT NULL,
  `file_url` varchar(512) DEFAULT NULL,
  PRIMARY KEY (`id`)
) ENGINE=InnoDB DEFAULT CHARSET=utf8;

SET FOREIGN_KEY_CHECKS = 1;
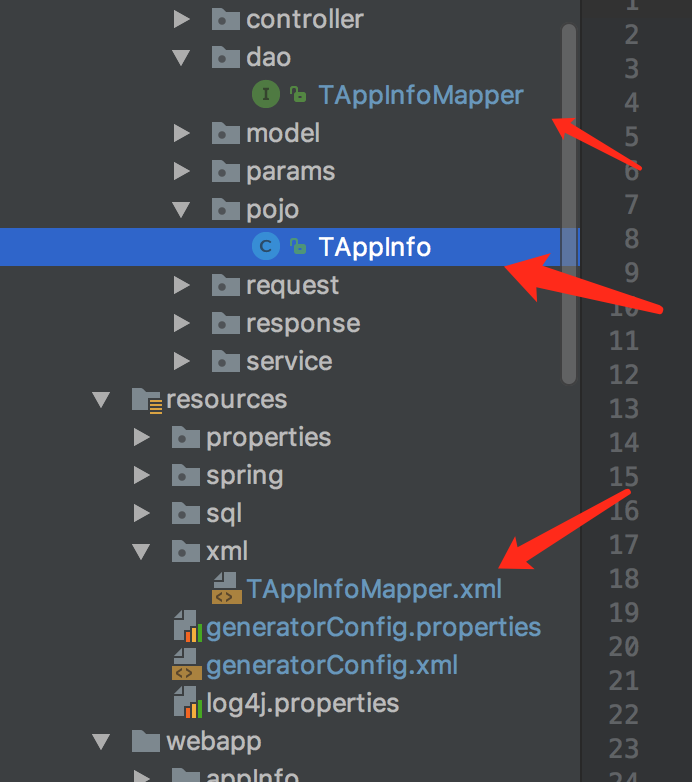
mybatis 生成器生成代码
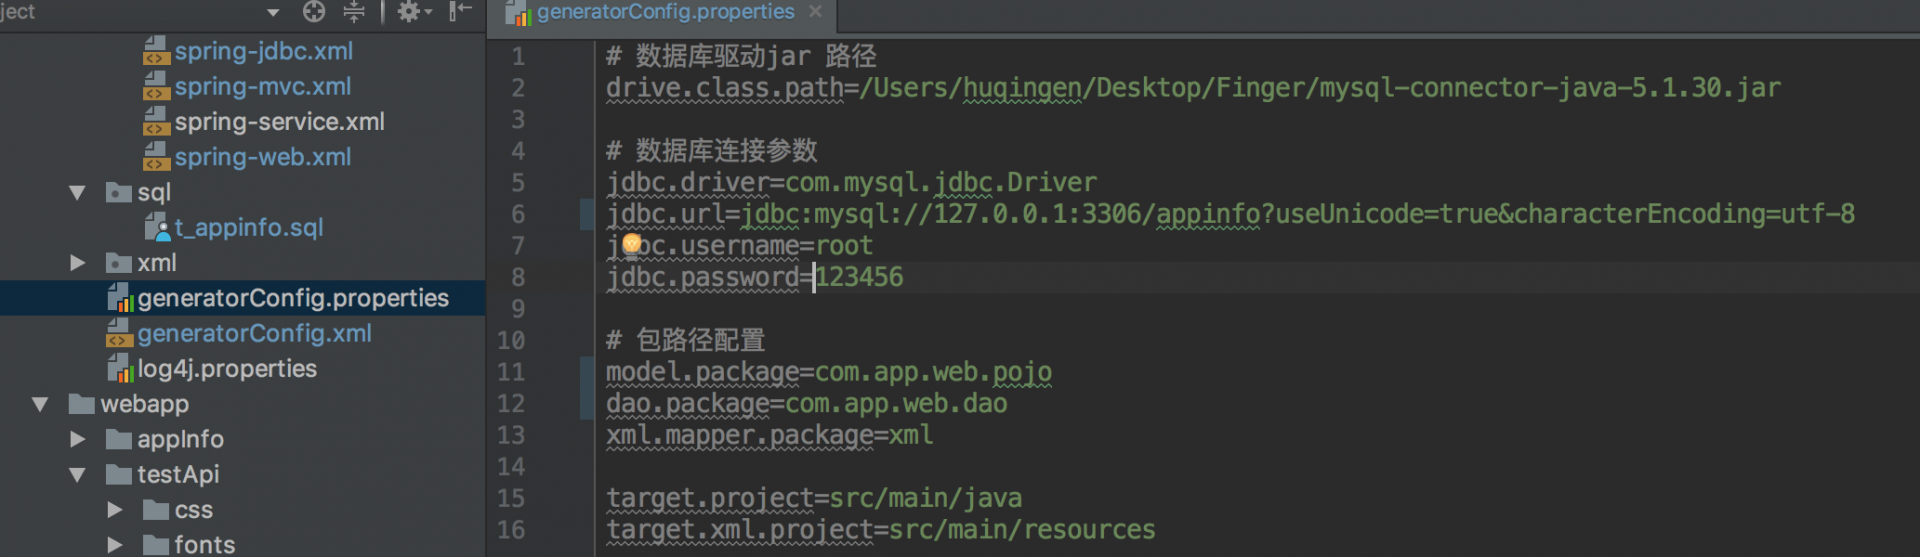
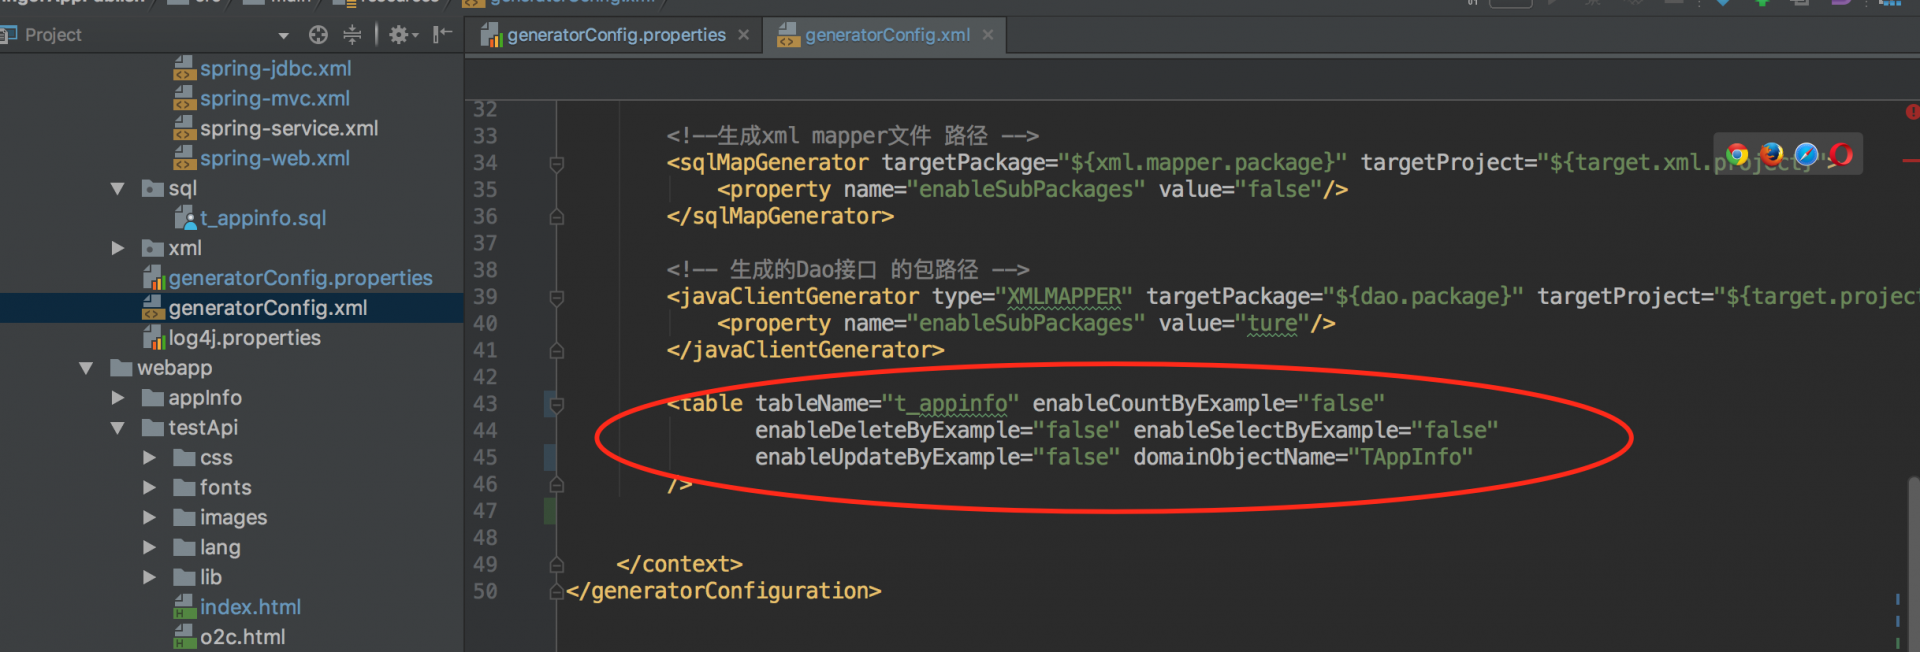
将生成 TAppInfoMapper.java,TAppInfoMapper.xml,TAppInfo.java 文件
基于下载路径,生成二维码
在 pom.xml 中添加:
<!-- https://mvnrepository.com/artifact/net.glxn.qrgen/javase -->
<dependency>
    <groupId>net.glxn.qrgen</groupId>
    <artifactId>javase</artifactId>
    <version>2.0</version>
</dependency>
二维码生成关键实现:
/**
     * 生成二维码地址
     * @return
     */
    public String generateQRCode(TAppInfo appInfo,Map<String,Object> requestInfo){
        String downloadUrl = appInfo.getFileUrl();
        String branchName = appInfo.getBranchName();
        String qrCodeUrl = null;
        if(branchName.contains("/")){
            branchName = branchName.replace("/","_");
        }
        String context = requestInfo.get("context").toString();
        String basePath = System.getProperty("user.dir");
        String picPath = basePath.replace(context,"") + "/imges/";
        String picName = appInfo.getOs() + "_" + branchName + "_" + appInfo.getEnv() + "_" + appInfo.getAppmode() + "_" +  appInfo.getVersion() + "_" + appInfo.getGmtCreate()+".png";
        qrCodeUrl = picPath + picName;
        File file = new File(qrCodeUrl);
        if (!file.getParentFile().exists()) {
            System.out.println("目标文件所在目录不存在,准备创建它!");
            if (!file.getParentFile().mkdirs()) {
                System.out.println("创建目标文件所在目录失败!");
            }
        }

        bizMethod.generateQRCode(downloadUrl,qrCodeUrl);

        String url = requestInfo.get("url").toString();

        String urlPath = url + "/imges/" + picName;

        return urlPath;
    }
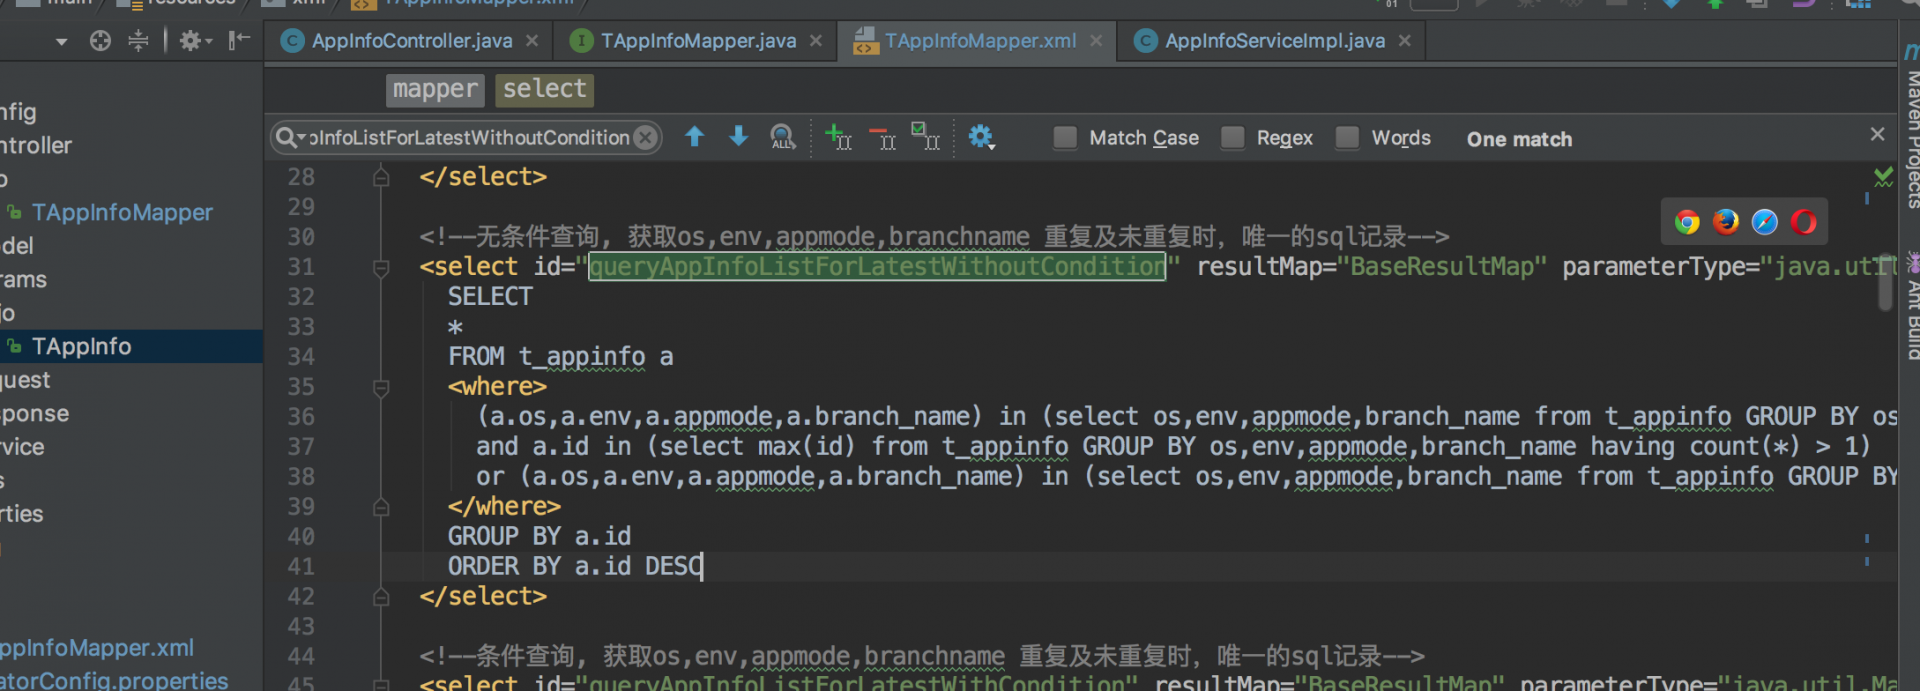
##App 数据去重展现
为保障每次生成的 APP 包是唯一最新的 (操作系统,环境, 分支名称, debug 或 release)
用了一种比较笨的方法,后续将优化这种方案;笨方法采用的是 sql 语句关键字去重方式
首先在 TAppInfoMapper 中增加方法
//无条件查询, 获取os,env,mode,branchname 重复及未重复时,唯一的sql记录
List<TAppInfo> queryAppInfoListForLatestWithoutCondition(Map<String, Object> queryMap);
//条件查询,获取os,env,mode,branchname 重复及未重复时,唯一的sql记录
List<TAppInfo> queryAppInfoListForLatestWithCondition(Map<String, Object> queryMap);
在 TAppInfoMapper.xml 添加 sql 语句 (实在不能 copy 语句,不然整个 chrome 就奔溃)
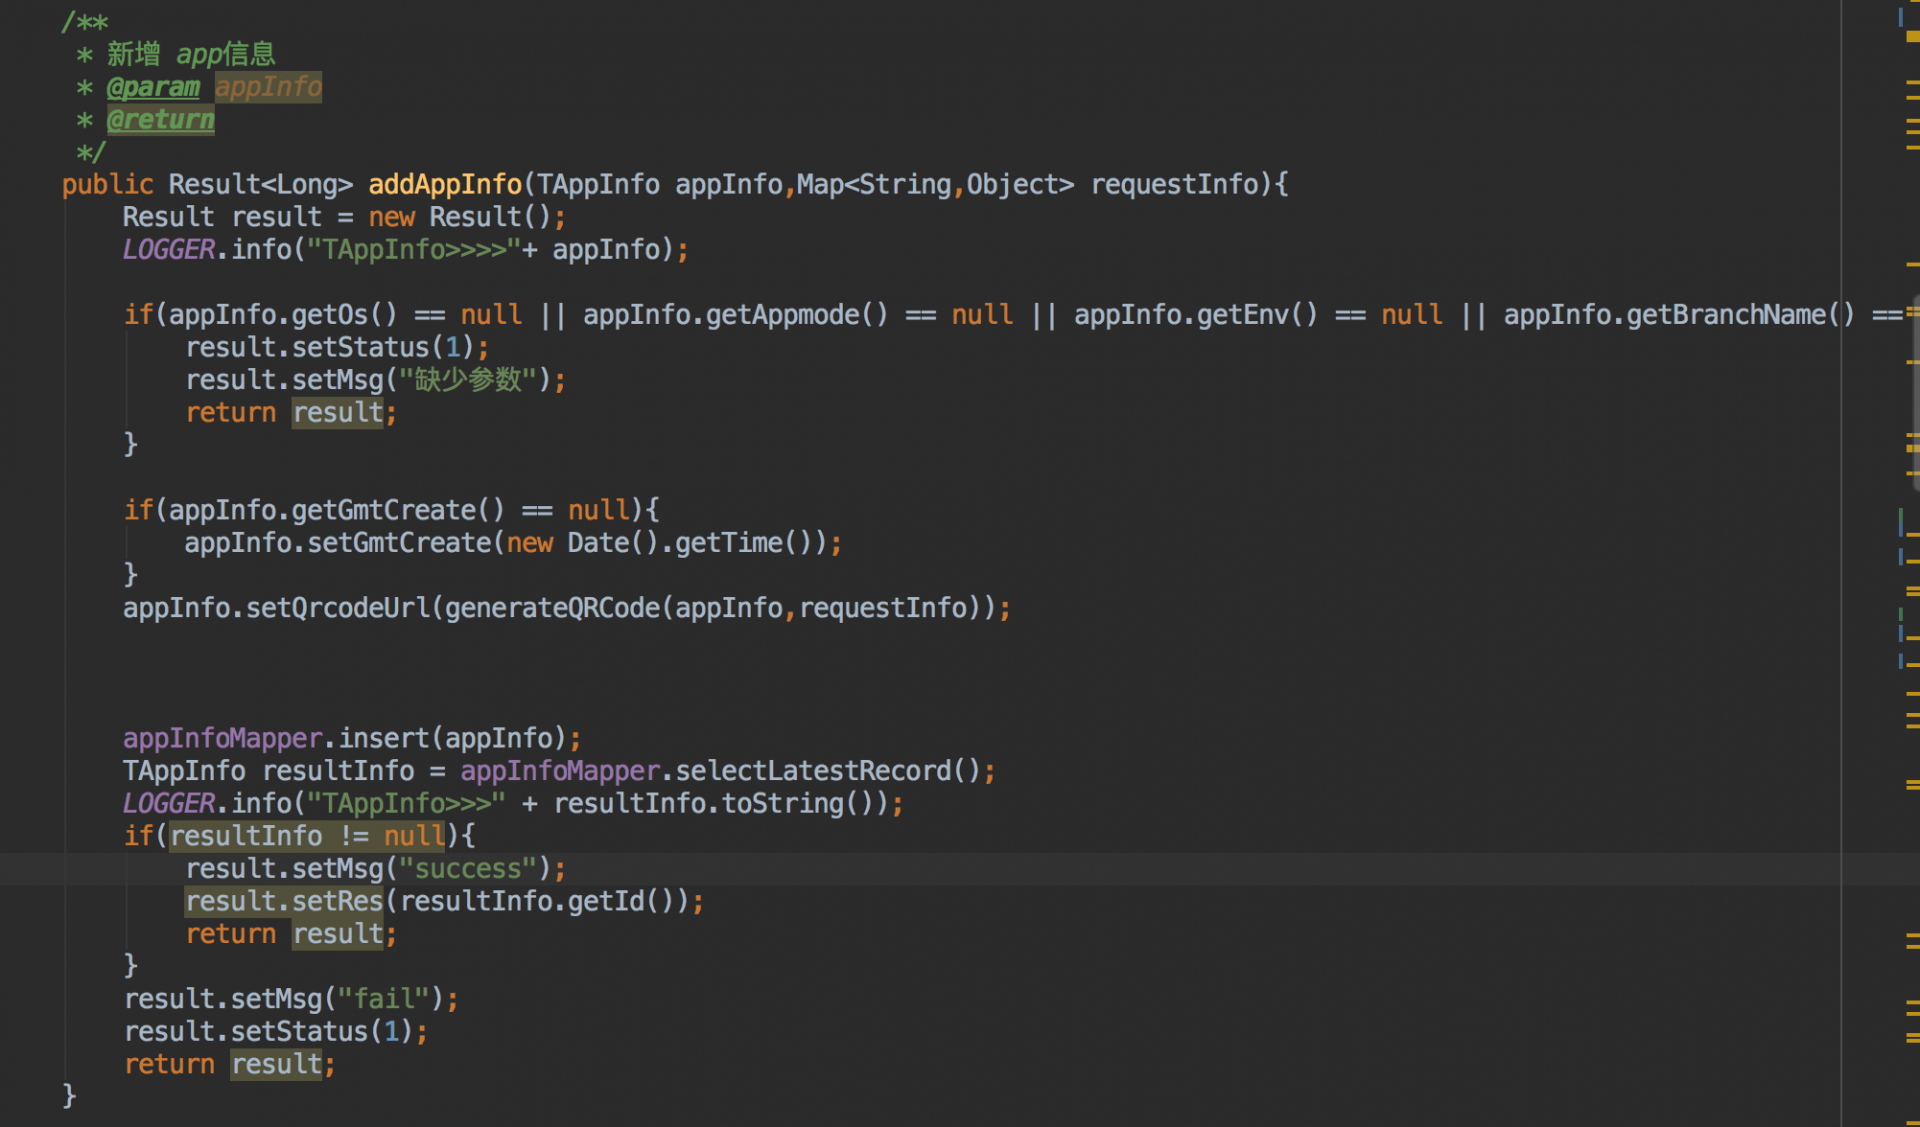
其他剩余的就是实现
新增 app 信息的实现代码
续开源:App 发布平台 -- 服务实现 01
实在没办法,只能搞个第二篇了,前一篇最后只要敲回车,浏览器马上崩溃
实现
查询最新去重的 App 信息实现
/**
  * 查找appInfo latest
  * 根据os,env,mode,分支名称 去重后,获取最新版本的信息
  */
 public Result<List<TAppInfo>> queryAppInfoForLatest(SearchAppInfo searchAppInfo){
     Result result = new Result();
     List<TAppInfo> appInfoList = new ArrayList<TAppInfo>();

     Map<String, Object> map = new HashMap<String, Object>();
     if(searchAppInfo == null || searchAppInfo.getSearchAll() == 0){
         result.setMsg("查询成功");
         appInfoList = appInfoMapper.queryAppInfoListForLatestWithoutCondition(map);
         result.setRes(appInfoList);
         return result;
     }

     map.put("env",searchAppInfo.getEnv());
     map.put("os",searchAppInfo.getOs());
     map.put("branchName",searchAppInfo.getBranchName());
     map.put("appmode",searchAppInfo.getAppmode());

     appInfoList = appInfoMapper.queryAppInfoListForLatestWithCondition(map);

     for(TAppInfo appInfo : appInfoList){
         LOGGER.info("appInfo>>>" + appInfo.toString());
     }

     result.setMsg("查询成功");
     result.setRes(appInfoList);

     return result;
 }
Controller 层实现
新增 App
这里也是比较关键的地方,考虑到生成的二维码图片存放路径,图片必须存在 web 容器上才能正常下载,因此我这边的处理是本项目的上一级目录作为存放地址
/**
     * 添加 app信息
     * @param requestAppInfo
     * @return
     */
    @ApiOperation(value = "添加app信息", notes = "添加app信息")
    @RequestMapping(value = "/addAppInfo",method = RequestMethod.POST)
    @ResponseBody
    public Result addAppInfo(@ApiParam(value = "创建AppInfo入参")@RequestBody RequestAppInfo requestAppInfo , HttpServletRequest request){

        String urlPath = request.getRequestURL().toString();
        String contextPath = request.getServletContext().getContextPath();
        String uri = request.getRequestURI();

        String resultUrl = urlPath.replace(uri,"");

        Map<String,Object> requestInfo = new HashMap<String,Object>();
        requestInfo.put("url",resultUrl);
        requestInfo.put("context",contextPath);

        TAppInfo appInfo = new TAppInfo();
        appInfo.setOs(requestAppInfo.getOs());
        appInfo.setEnv(requestAppInfo.getEnv());
        appInfo.setAppmode(requestAppInfo.getAppmode());
        appInfo.setFileUrl(requestAppInfo.getFileUrl());
        appInfo.setDes(requestAppInfo.getDes());
        appInfo.setBranchName(requestAppInfo.getBranchName());
        appInfo.setVersion(requestAppInfo.getVersion());

        return appInfoService.addAppInfo(appInfo,requestInfo);
    }
查询最新 App
/**
 * 查找最新AppInfo信息
 * @param searchAppInfo
 * @return
 */
@ApiOperation(value = "查找最新App信息", notes = "查找最新App信息")
@RequestMapping(value = "/getLatestAppInfo",method = RequestMethod.POST)
@ResponseBody
public Result<List<TAppInfo>> getLatestAppInfo(@ApiParam(value = "查找App信息入参")@RequestBody SearchAppInfo searchAppInfo){
    return appInfoService.queryAppInfoForLatest(searchAppInfo);
}
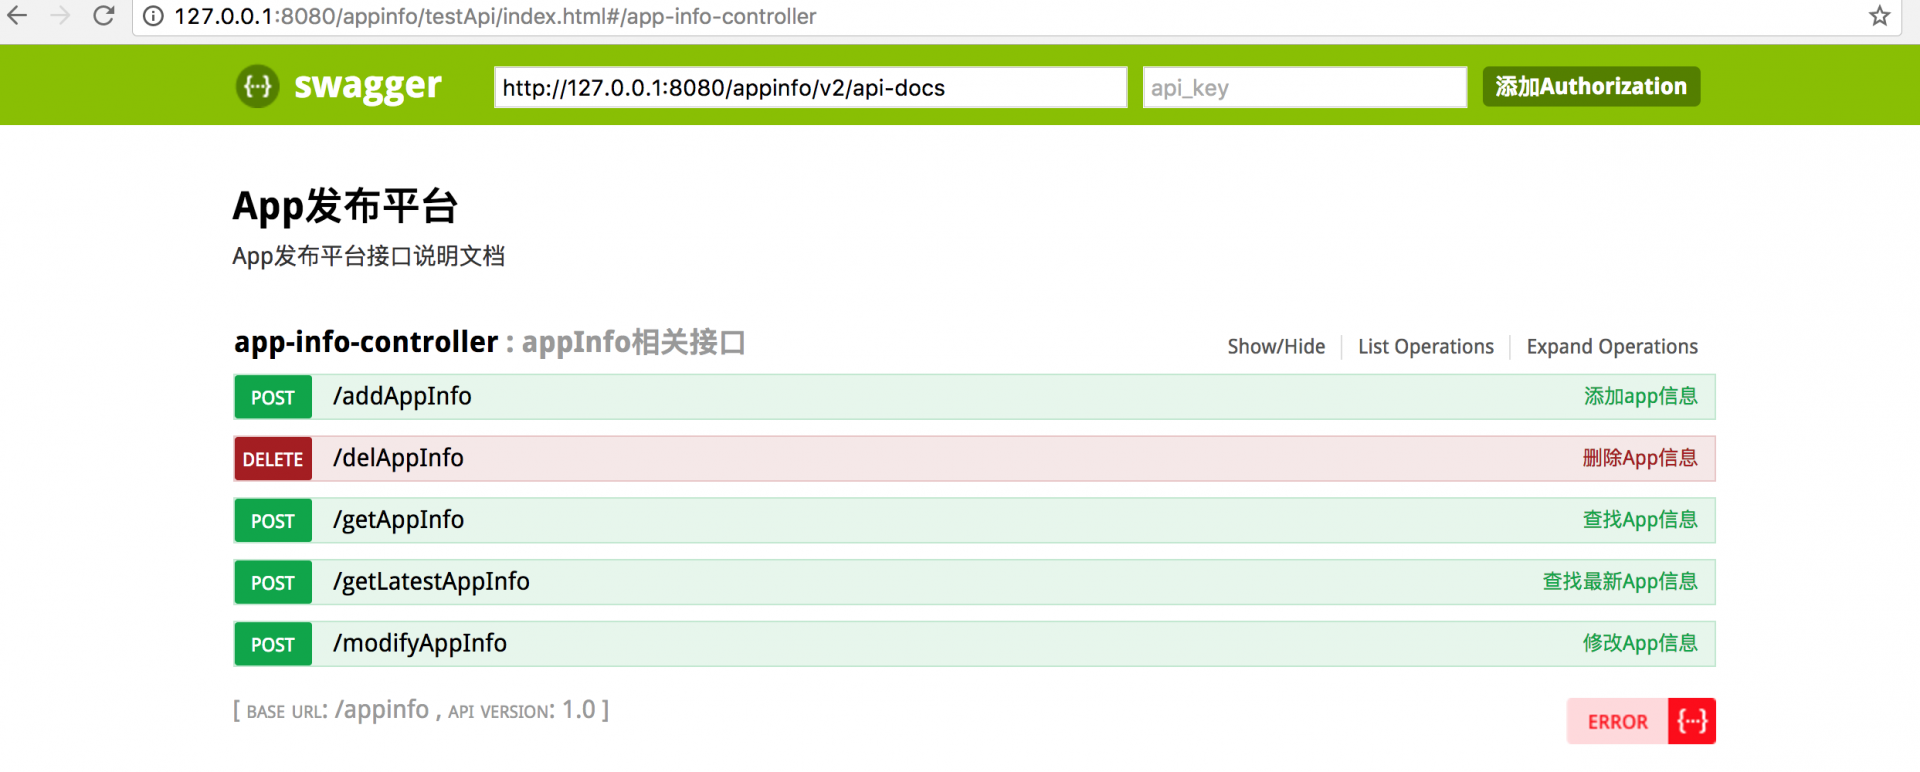
Swagger 配置
这里大家看到我比较喜欢用 swagger,给大家看下这个效果图,也可以参考我之前写的 springboot 集成 swaggerhttps://testerhome.com/topics/7304
本次配置是 maven+swagger
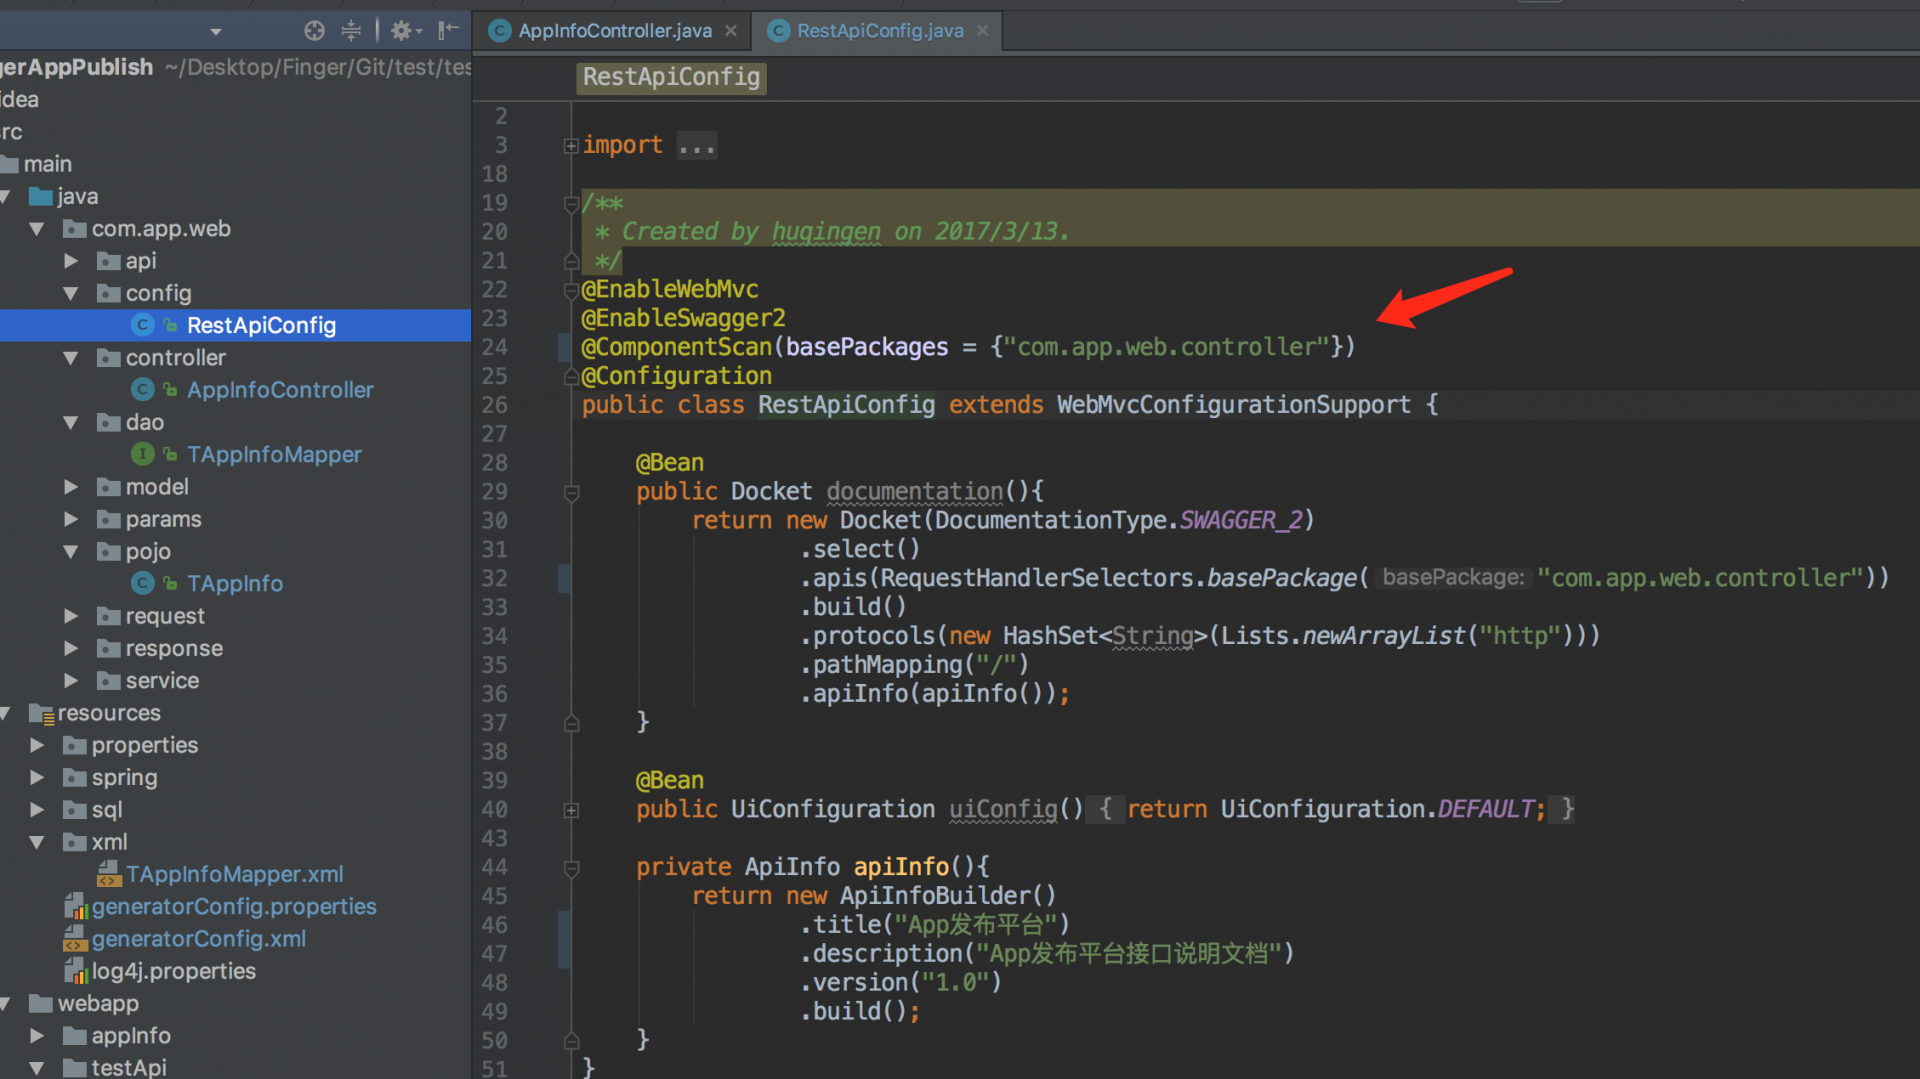
在代码的 config 路径下,编写 swagger 扫描路径
swagger 相关的前端文件
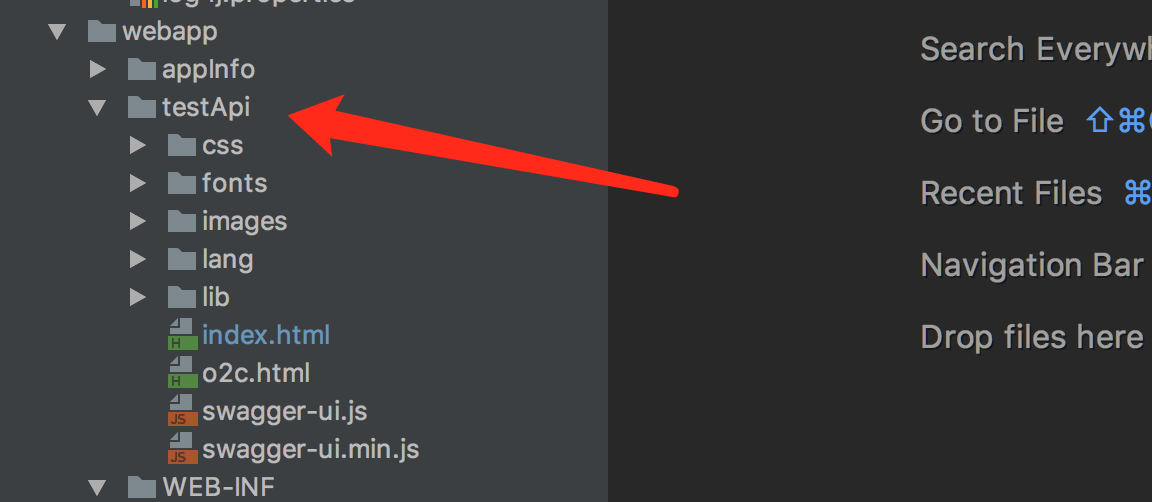
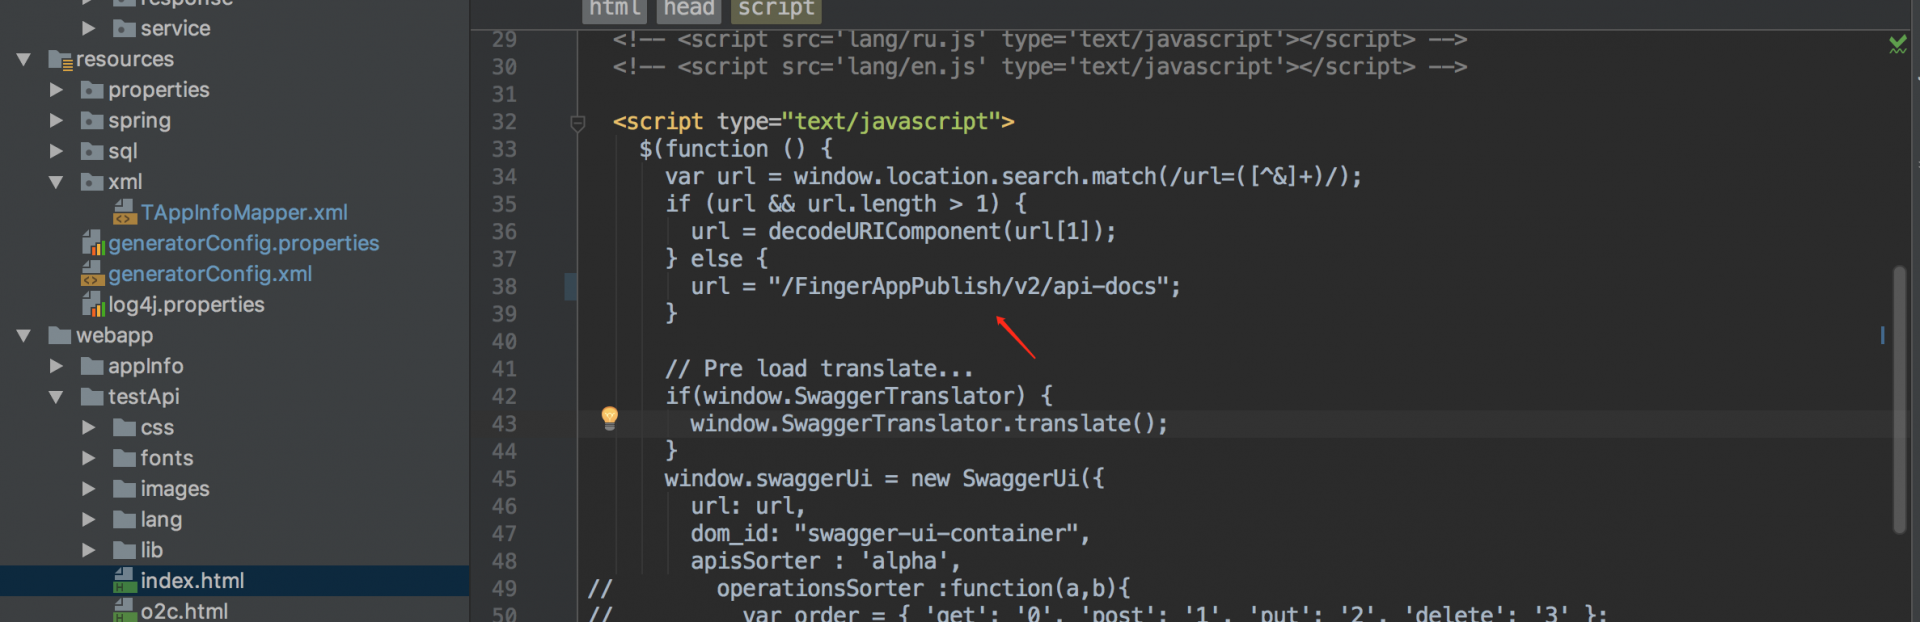
修改点 index.html,路径要与工程文件夹路径保持一致
spring-mvc.xml 中增加

编译
mvn clean && mvn package -P local -Dsolo.env=local -Dmaven.test.skip=true
打包好的 war 包路径:百度网盘 https://pan.baidu.com/s/1qYxzWbq
运行
把打包好的 war 包放置到 tomcat webapps 目录下
访问 http://你的 tomcat 地址和端口/FingerAppPublish/testApi/index.html
# 前端
实现前端,采用的处理是 前端和后端分离,不把代码柔和到一起
## 实现
appInfo.html
<!DOCTYPE html>
<html>
  <head>
    <meta charset="utf-8">
    <title>APP发布平台</title>
    <link rel="stylesheet" href="css/back.css">
    <link rel="stylesheet" href="css/selectBox.css">
    <link rel="shortcut icon" href="favicon.ico">
    <link href="css/bootstrap.min14ed.css?v=3.3.6" rel="stylesheet">
    <link href="css/font-awesome.min93e3.css?v=4.4.0" rel="stylesheet">
    <link href="css/animate.min.css" rel="stylesheet">
    <link href="css/style.min862f.css?v=4.1.0" rel="stylesheet">
  </head>
  <body class="gray-bg">
    <div class="page-header">
      <h1><strong>APP发布平台</strong></h1>
    </div>
    <div class="panel panel-default">
      <div class="center">
        <label>操作系统:</label>
        <select id="os" class="select_box">
            <option>All</option>
            <option>iOS</option>
            <option>Android</option>
        </select>
        <label>环境:</label>
        <select id="env" class="select_box">
            <option>All</option>
            <option>uat</option>
            <option>beta</option>
            <option>live</option>
        </select>
        <label>类型:</label>
        <select id="mode" class="select_box">
            <option>All</option>
            <option>debug</option>
            <option>release</option>
        </select>
        <button type="button" name="search" onclick="searchData()" class="btn btn-info" >查询</button>
        <input type="reset" id="reset" name="" class="btn btn-defaul" onclick="clearSearchInfo()"value="清除">
      </div>
    </div>
    <div class="wrapper wrapper-content animated fadeInRight">
        <!-- <button type="button" class="btn btn-primary btn-lg" style="text-shadow: black 5px 3px 3px;">
          全部
        </button>
        <div class="row" id="info">
        </div> -->
        <!-- <hr/> -->
        <button type="button" class="btn btn-primary btn-lg" style="text-shadow: black 5px 3px 3px;">
          测试环境
        </button>
        <div class="row" id="uatinfo">
        </div>
        <hr/>
        <button type="button" class="btn btn-primary btn-lg" style="text-shadow: black 5px 3px 3px;">
          预发环境
        </button>
        <div class="row" id="betainfo">
        </div>
        <hr/>
        <button type="button" class="btn btn-primary btn-lg" style="text-shadow: black 5px 3px 3px;">
          线上环境
        </button>
        <div class="row" id="liveinfo">
        </div>
        <hr/>
    </div>
    <script src="js/jquery.min.js?v=2.1.4"></script>
    <script src="js/bootstrap.min.js?v=3.3.6"></script>
    <script src="js/content.min.js?v=1.0.0"></script>
    <script src="js/appInfo.js"></script>
    <script>
        $(document).ready(function(){$(".contact-box").each(function(){animationHover(this,"pulse")})});
    </script>
  </body>
  <!-- <script type="text/javascript" src="js/date.js"></script> -->
</html>
js 实现:
$(function(){
  var queryInfo = {searchAll:0};
  fetchData(queryInfo);
});

function searchData(){
  $("#list").html('');
  var osValue = document.getElementById("os").value;
  var envValue = document.getElementById("env").value;
  var modeValue = document.getElementById("mode").value;

  if(osValue == "All" ){
    osValue = null;
  }

  if(envValue == "All" ){
    envValue = null;
  }

  if(modeValue == "All" ){
    modeValue = null;
  }

  var queryInfo = {os:osValue,env:envValue,appmode:modeValue,searchAll:1};
  fetchData(queryInfo);
}

function fetchData(query){
  $.ajax(
    {
      type:"POST",
      dataType:'json',
      cache:false,
      data:JSON.stringify(query),
          contentType: 'application/json; charset=utf-8',
      url:window.location.origin + "/FingerAppPublish/getLatestAppInfo",
      success: succFuction,
      error:errFuction
  }
  );
}

function errFuction(){
  $("#info").html('网络异常...');
}

function succFuction(tt){
  $("#list").html('');
  if(!tt.res){
    $("#info").html('哦哦,没数据咋办,凉拌吧!!');
    return;
  }
  var arrayList = eval(tt.res);
  // var htmlValue = '';
  var uathtmlValue = '';
  var betahtmlValue = '';
  var livehtmlValue = '';
  //var result = {tEnv:env,tHTML:html1};
  $.each(arrayList,function(index,item){
    var result = eval(eachValue(arrayList,index,item));
    if(result.tEnv == "uat"){
      uathtmlValue += result.tHTML;
    }
    if(result.tEnv == "beta"){
      betahtmlValue += result.tHTML;
    }
    if(result.tEnv == "live"){
      livehtmlValue += result.tHTML;
    }
    // htmlValue +=eachValue(arrayList,index,item);
    // $("#info").html($("#info").html() + html1);
  });
  // $("#info").html(htmlValue);
  $("#uatinfo").html(uathtmlValue);
  $("#betainfo").html(betahtmlValue);
  $("#liveinfo").html(livehtmlValue);
}

//遍历数据
function eachValue(arrayList,index,item){
  //{{picname}} {{osname}} {{envname}} {{branchname}} {{modename}} {{datename}} {{fileUrl}}
  var html1 = '<div class="col-sm-4"><div class="contact-box"><div class="col-sm-4"><div class="text-center"><img alt="image" class="img-circle m-t-xs img-responsive" src="{{picname}}"><div class="m-t-xs font-bold">{{osname}}</div></div></div><div class="col-sm-8"><br/><input type="button" id="download" name="download" class="btn btn-primary" value="下载" onclick=window.open("{{fileUrl}}")><br/><small>环境: {{envname}}</small><br><small>分支: {{branchname}}</small><br><small>类型: {{modename}}</small><br><small>日期: {{datename}}</small></div><div class="clearfix"></div></div></div>'
  var picname = arrayList[index].qrcodeUrl;
  var osname = arrayList[index].os;
  var env = arrayList[index].env;
  var fileUrl = arrayList[index].fileUrl;
  if(env === "uat"){
    var envname = "测试环境";
  }else if (env === "beta") {
    var envname = "预发环境";
  }else if (env === "live") {
    var envname = "线上环境";
  }else {
    var envname = "未知环境";
  }
  var branchname = arrayList[index].branchName;
  var modename = arrayList[index].appmode;
  var dateValue = arrayList[index].gmtCreate;
  var datename = getLocalTime(dateValue);

  if(picname != null){
    html1 = html1.replace("{{picname}}",picname);
  }else {
    html1 = html1.replace("{{picname}}","imges/logo.png");
  }
  if(osname != null){
    html1 = html1.replace("{{osname}}",osname);
  }else {
    html1 = html1.replace("{{osname}}","未知系统");
  }

  html1 = html1.replace("{{envname}}",envname);

  if(branchname != null){
    html1 = html1.replace("{{branchname}}",branchname);
  }else {
    html1 = html1.replace("{{branchname}}","未知分支");
  }

  if(modename != null){
    html1 = html1.replace("{{modename}}",modename);
  }else {
    html1 = html1.replace("{{modename}}","未知mode");
  }

  if(datename != null){
    html1 = html1.replace("{{datename}}",datename);
  }else {
    html1 = html1.replace("{{datename}}","时间未知");
  }

  if(fileUrl != null){
    html1 = html1.replace("{{fileUrl}}",fileUrl);
  }else {
    html1 = html1.replace("{{fileUrl}}","http://www.baidu.com");
  }

  var result = {tEnv:env,tHTML:html1};

  return result;
}


//清除查询
function clearSearchInfo(){
  document.getElementById("os").value = "All";
  document.getElementById("env").value = "All";
  document.getElementById("mode").value = "All";
}


//时间戳转换成日期
function getLocalTime(timestamp) {
   return new Date(parseInt(timestamp)).toLocaleString().replace(/:\d{1,2}$/,' ');
}