Macaca 参与到 macaca-wd.java 开发的一些感悟
本帖已被设为精华帖!
- 前言
- 很多天前就把 macaca 的环境搭建好了,一直在等待 java 版的正式发布,等了这么久终于等到了。开始上手,安装过程很顺利,没碰到任何问题,但是运行就出错了,发现只是个小问题,自己动手就能解决。解决了自然要分享给大家。正好也得到了@xdf的邀请将代码提交到 github,因此有幸成为 macaca-wd.java 代码的贡献者,写下此文,记录下我的一些感悟,同时也希望更多的大拿们都加入开源项目的贡献者阵营。
一、测试准备
- 下载 wd.java 的sample code进行试验
- maven 配置 setting.xml 和 pom.xml 准备
  <profiles>
    <profile>
        <repositories>
            <repository>
                <snapshots>
                    <enabled>false</enabled>
                </snapshots>
                <id>central</id>
                <name>bintray</name>
                <url>http://jcenter.bintray.com</url>
            </repository>
        </repositories>
        <pluginRepositories>
            <pluginRepository>
                <snapshots>
                    <enabled>false</enabled>
                </snapshots>
                <id>central</id>
                <name>bintray-plugins</name>
                <url>http://jcenter.bintray.com</url>
            </pluginRepository>
        </pluginRepositories>
        <id>bintray</id>
    </profile>
</profiles>
<activeProfiles>
    <activeProfile>bintray</activeProfile>
</activeProfiles>
<dependency>
     <groupId>macaca.webdriver.client</groupId>
     <artifactId>macacaclient</artifactId>
     <version>1.0.2</version>
 </dependency>
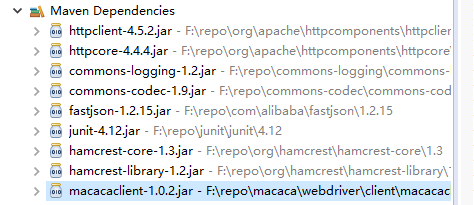
- 本来想通过官方提供的方法直接通过 maven 下载 jar,无奈执行 mvn -s settings.xml clean install 来下载太慢了,索性直接复制了 setting.xml 文件中的关键部分导入到本地的 maven-setting.xml 文件中,添加 macacaclinet 的 dependency 信息到 pom.xml 中,build 一下工程或 run as maven build,待 build 完成后就看到 macacaclient 已经在 Maven Dependencies 中了,接下来就可以正常的使用 sample code 中提供的测试代码了。这样修改后下载居然有速度了,这是奇怪。
二、运行测试
SampleTest.java类中是一个使用 electron 驱动的 web 测试项目
setup
- 初始化 driver 开打 electron 浏览器并导航到https://www.baidu.com
test_case_1
- 使用 id 搜索 macaca 并断言
- 使用 xpath 搜索 elementByXPath 并截图
test_case_2
- 使用 id 搜索 testerhome 并断言,然后截图
三、发现问题
- 运行完成后查看截图,满世界的找一了圈,发现都没有图片。没办法看 API 找找看把图片藏哪里了。
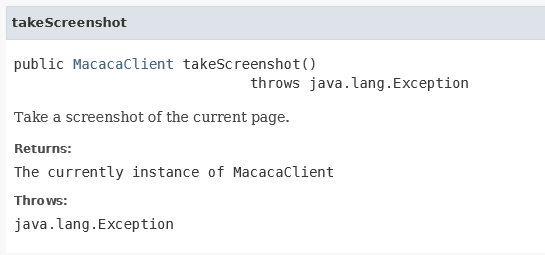
- 从 API 看好像此货没有保存图片文件,进一步研究源码
public void takeScreenshot() throws Exception {
        JSONObject jsonObject = new JSONObject();
        jsonObject.put("sessionId", driver.getSessionId());
        utils.request("GET", DriverCommand.SCREENSHOT, jsonObject);
    }
- 原来此货只是向 macaca 服务请求了一次 screenshot 的命令,连返回值都木有,有点坑有木有。此时在群里问了一下,也没得到具体答案。
四、给源码动动刀
自己来动手吧,估摸着跟 appium 一样请求 screenshot 得到一个 base64 的图像编码字符串,然后自行解码写入文件就可以了,说干就干,以前做 IOS 元素通过远程访问 appium 服务在 Windows 机器上展示的时候做过,直接代码 copy 过来,顺便改一下 takeScreenshot 方法将 base64 的字符串返回供新方法 saveScreenshot 调用。
ScreenShot.java
import java.io.FileOutputStream;
import java.io.OutputStream;
import sun.misc.BASE64Decoder;
public Object takeScreenshot() throws Exception {
        JSONObject jsonObject = new JSONObject();
        jsonObject.put("sessionId", driver.getSessionId());
        return utils.request("GET", DriverCommand.SCREENSHOT, jsonObject);
    }

public void saveScreenshot(String filename) throws Exception {
        BASE64Decoder decoder = new BASE64Decoder();
        try {
            // Decode Base64
            byte[] b = decoder.decodeBuffer(takeScreenshot().toString());
            for (int i = 0; i < b.length; ++i) {
                if (b[i] < 0) {// 调整异常数据
                    b[i] += 256;
                }
            }
            // generate the image file
            OutputStream out = new FileOutputStream(filename);
            out.write(b);
            out.flush();
            out.close();
        } catch (Exception e) {
            e.printStackTrace();
        }
    }
- MacacaClient.java
//saveScreenShot
/**
 * Save screenshot of the current page.
 * @param fileName The absolute path of the image filename
 * @return The currently instance of MacacaClient
 * @throws Exception
 */
public MacacaClient saveScreenshot(String fileName) throws Exception {
    return this;
}
- 开始测试
@Test
public void test_case_1() throws Exception {
System.out.println(driver.elementById("kw").getAttribute("name"));
driver
.elementById("kw")
.sendKeys("macaca")
.sleep(1000)
.elementById("su")
.click()
.sleep(3000);
String html = driver.source();
Assert.assertThat(html, containsString("<html>"));
driver
.elementByCss("#head > div.head_wrapper")
.elementByXPath("//*[@id=\"kw\"]")
.sendKeys(" elementByXPath")
.elementById("su")
.click()
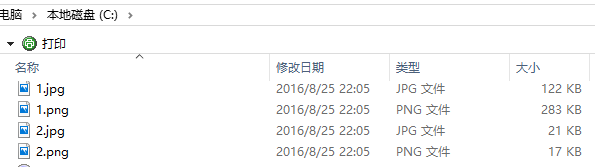
.saveScreenshot("C:/1.png")
.saveScreenshot("C:/1.jpg");
}
- 挺好用的,有木有 jpg、png 格式来者不拒。
- 本地测试通过,发到群里,@xdf 联系我让我 pr 到 github,内心有点小紧张,只从 github 下载过代码,在老东家也只是用 git 提交过文档(只有主干没有分支,so easy),这次要提代码还要建分支,小心脏跳得扑通扑通的,压力有点大啊。
五、github 分支提交
- clone master 的代码到本地
$ git clone https://github.com/adfghzhang/test.git
Cloning into 'test'...
remote: Counting objects: 3, done.
remote: Total 3 (delta 0), reused 0 (delta 0), pack-reused 0
Unpacking objects: 100% (3/3), done.
Checking connectivity... done.
- 切换到项目然后创建分支 “branch”
$ cd test
adfgh@QIANCHANG MINGW64 ~/Desktop/test (master)
$ ls
README.md
adfgh@QIANCHANG MINGW64 ~/Desktop/test (master)
$ git checkout -b branch
$ git branch//查看分支
 - branch//当前所在分支前面有*号
  master
Switched to a new branch 'branch'
- 修改 README.md 文件,然后提交到 github 中途会要求你输入 github 的用户名密码(也可以先设置用户名密码信息)。
$ ls
README.md
$ vi README.md
//add something in README.md
$ git add README.md
$ git commit -m "add branch"
[branch 5d21c08] add branch
 Committer: qian chang <qian chang>
Your name and email address were configured automatically based
on your username and hostname. Please check that they are accurate.
You can suppress this message by setting them explicitly:
    git config --global user.name "Your Name"
    git config --global user.email you@example.com
After doing this, you may fix the identity used for this commit with:
    git commit --amend --reset-author
 1 file changed, 1 insertion(+)
- push 分支的代码到 github
$ git push origin branch
Logon failed, use ctrl+c to cancel basic credential prompt.
Username for 'https://github.com/': adfghzhang@live.cn
error: unable to read askpass response from 'D:/Program Files/Git/mingw64/libexec/git-core/git-gui--askpass'
Password for 'https://adfghzhang@live.cn@github.com/':
Counting objects: 3, done.
Delta compression using up to 4 threads.
Compressing objects: 100% (2/2), done.
Writing objects: 100% (3/3), 261 bytes | 0 bytes/s, done.
Total 3 (delta 0), reused 0 (delta 0)
To https://github.com/adfghzhang/test.git
 - [new branch]      branch -> branch
- 最后提交到 github,达峰第一次构建失败了,少了几个 import(着急提交,用的 github 的网页直接提交的,忘了复制 import 部分的代码),内心崩溃 ing。
六、一点感触
- 回到家接着再来,下载代码加上少的 import,运行测试成功,提交代码。
- 没隔多久收到了 CI 构建成功的邮件,小心脏终于平复了,内心窃喜 (我也是参与过开源项目开发的一员了)。
- 虽然本次只是给 wd.java 项目加了一个截图功能并修改了一个小 bug,代码也不复杂,但做为迈出的第一步,内心还是挺激动的。
- 目前 macacaclient.jar 更新到了 1.0.2 版本,用 maven 的童鞋更新一下 dependency 即可。
如果觉得我的文章对您有用,请随意打赏。您的支持将鼓励我继续创作!
