安装与使用
安装
- 支持 pip 安装
pip install lounger
脚手架
lounger 支持命令生成 API 测试项目。
lounger --project-api myapi
2025-11-16 17:58:18 | INFO     | cli.py | Start to create new test project: myapi
2025-11-16 17:58:18 | INFO     | cli.py | CWD: D:\github\seldomQA\lounger

2025-11-16 17:58:18 | INFO     | cli.py | 📁 created folder: reports
2025-11-16 17:58:18 | INFO     | cli.py | 📄 created file: conftest.py
2025-11-16 17:58:18 | INFO     | cli.py | 📄 created file: pytest.ini
2025-11-16 17:58:18 | INFO     | cli.py | 📄 created file: test_api.py
2025-11-16 17:58:18 | INFO     | cli.py | 📄 created file: config/config.yaml
2025-11-16 17:58:18 | INFO     | cli.py | 📄 created file: datas/sample/test_sample.yaml
2025-11-16 17:58:18 | INFO     | cli.py | 📄 created file: test_dir/__init__.py
2025-11-16 17:58:18 | INFO     | cli.py | 📄 created file: test_dir/test_sample.py
2025-11-16 17:58:18 | INFO     | cli.py | 🎉 Project 'myapi' created successfully.
2025-11-16 17:58:18 | INFO     | cli.py | 👉 Go to the project folder and run 'pytest' to start testing.
- 目录结构如下
├─config
│  ├─config.yaml
├─datas    # 用YAML写用例
│  ├─sample
│  │   ├─test_sample.yaml
├─test_dir # 用code写用例
│  ├─test_sample.py
├─reports
├─conftest.py
├─pytest.ini
└─test_api.py
运行测试
- 进入项目,运行测试。
cd myapi
pytest
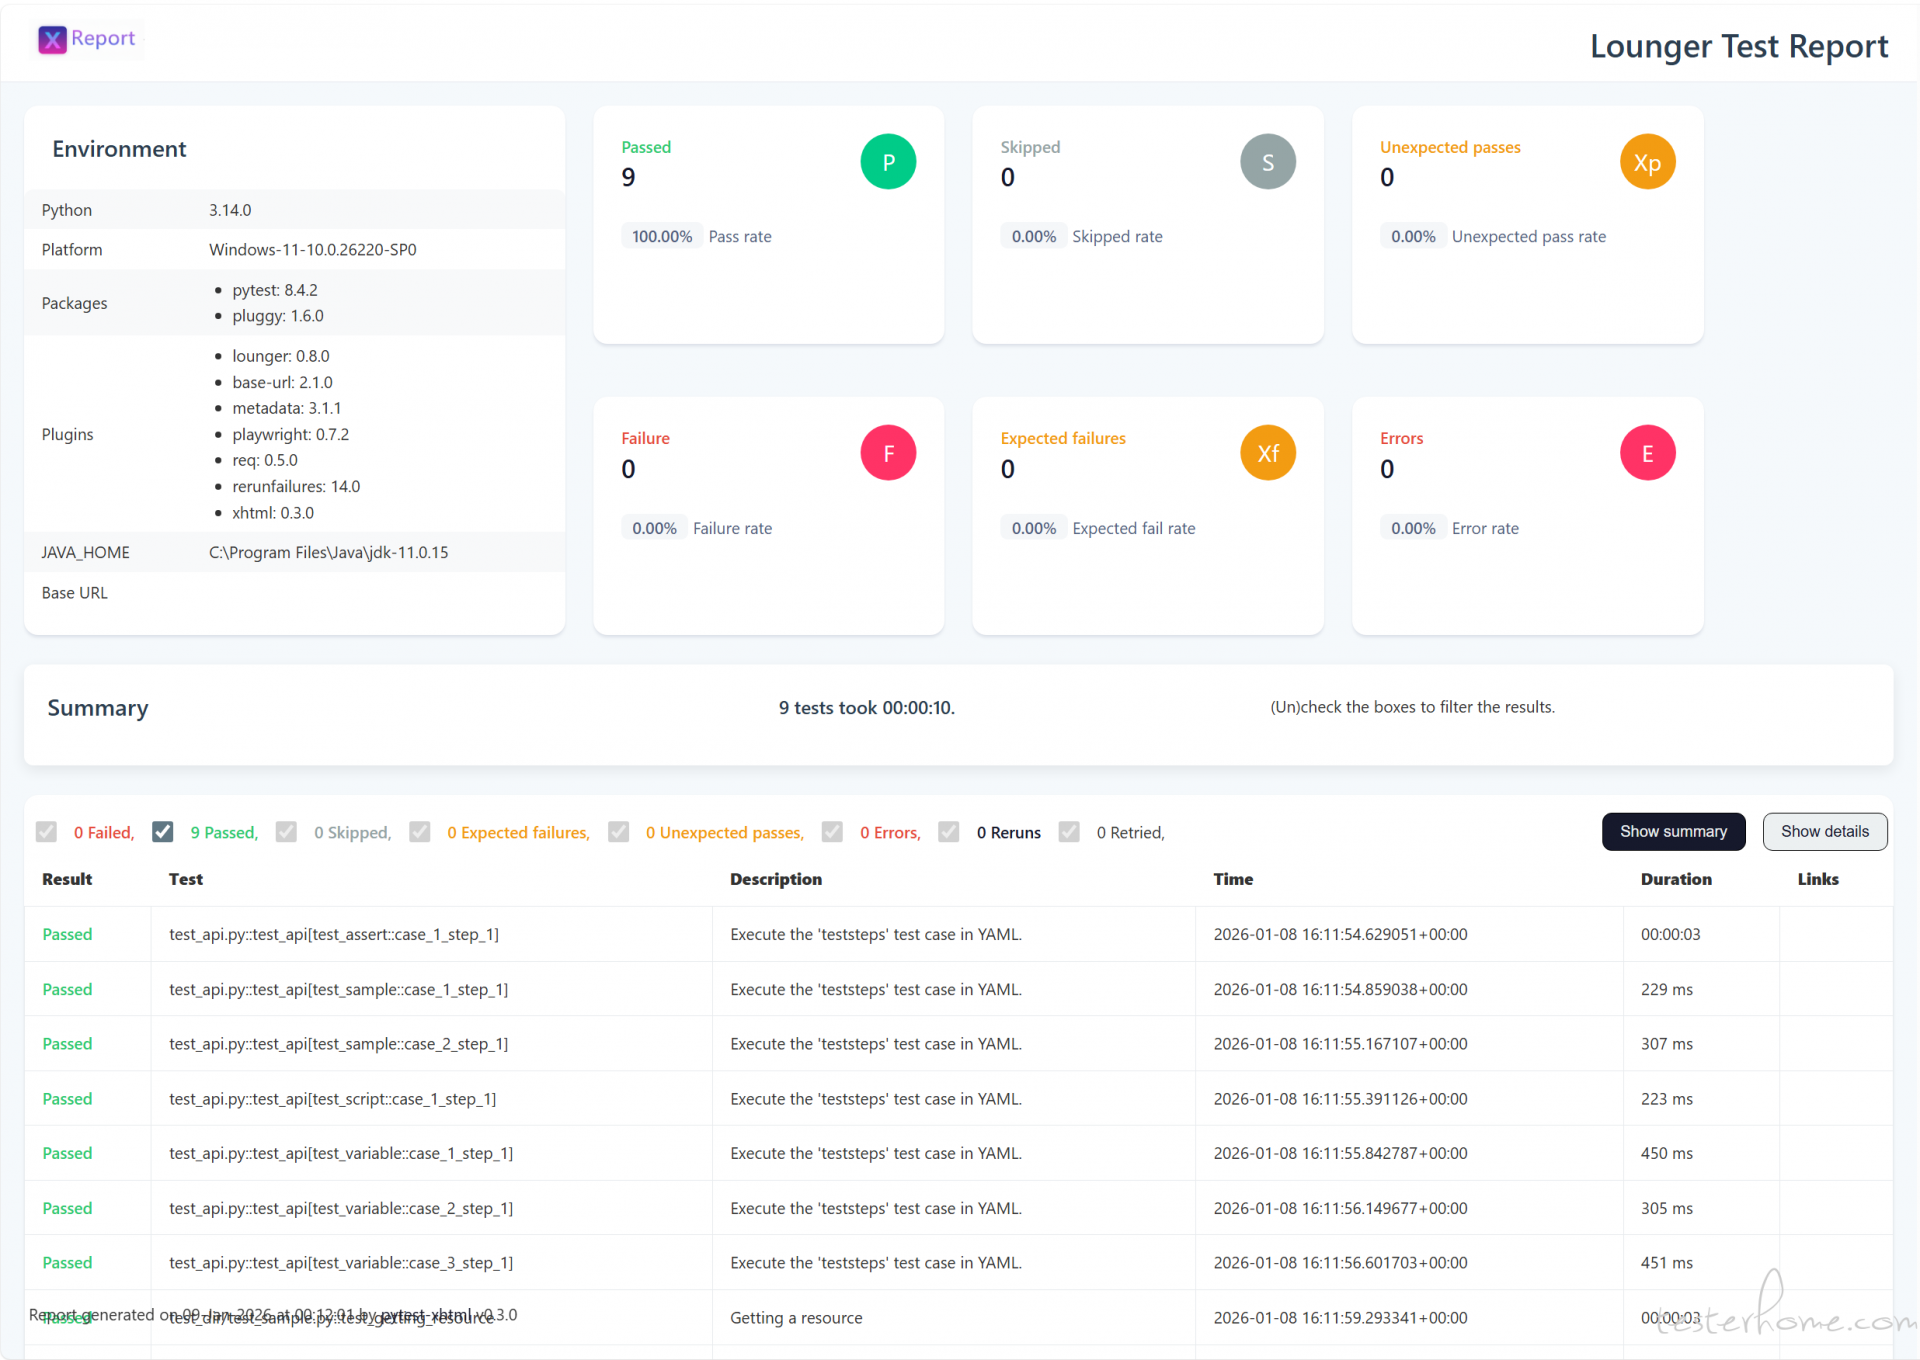
- 测试报告
基础概念
设计原则
约定大于配置:
pytest 对于这一设计理念体现的比较明显。
| 功能 | 约定(Convention) | 若不遵守 → 需要配置? |
|---|---|---|
| 测试文件 |
test_*.py 或 *_test.py
|
需用 -k、--ignore 等参数 |
| 测试函数/方法 | 名称以 test_ 开头 |
不会被收集 |
| Fixture 注入 | 参数名 = fixture 名 | 无法自动注入 |
| 共享配置 | 放在 conftest.py
|
需手动 import 或配置路径 |
高内聚低耦合。
- 高内聚:指一个模块内部各个元素之间的联系紧密,功能单一明确。高内聚的模块只负责一项任务,能够提高代码的可重用性和可理解性。
- 低耦合:指模块之间的依赖关系尽可能少,模块之间相对独立。低耦合的设计使得一个模块的变化不会影响到其他模块,从而提高系统的灵活性和可维护性。
简化配置:
- 为什么选择集成
pytest-xhtml报告,最重要的原因就是pytest-xhtml更加简单,虽然allure-pytest提供了更丰富的功能,但是,安装配置和具体的使用都更加复杂。 -
pytest-xhtml基于pytest-html的二次开发,已经提供了更加现代的设计风格,打印日志足够详细,使用方式与pytest-html保持一致,直接跟--html=xx.html参数即可。
YAML 编写规范
用例查找规范
-
config/config.py 必须配置项目目录。
test_project: sample: True # 查找该目录下的测试用例(文件) -
测试文件名遵循 test_xxx.yaml 或 xxx_test.yaml 。
├── datas
│ └── sample
│ │ ├── login.yaml # 不是用例
│ │ ├── get_resource_test.yaml # 是用例
│ └── test_get_resource.yaml # 是用例
一个测试用例包含多步骤
不管是功能用例还是接口用例,一个用例允许包含 N 个接口步骤。所以,一个接口可以是一条用例,一条用例可能包含多个接口。
- teststeps:
    - presteps:  # 前置步骤
      ...
    - step:      # 测试步骤
      ...
    - step:      # 测试步骤
      ...
    - step:      # 测试步骤
      ...
一个步骤核心要素
- teststeps:
    - step:      # 步骤名
      request:   # 请求
      extract:   # 变量提取
      validate:  # 断言
      sleep: 5 # 等待时间
一个 HTTP 请求参数
- teststeps:
    - step:      # 步骤名
      requests: # 请求
        method:  # 请求方法,如 'GET', 'POST' 等
        url:  # 请求地址(URL)
        params:  # (可选) 字典或字节流,用于添加查询参数(query string)
        data:  # (可选) 字典、元组列表、字节或文件对象,作为请求体发送
        headers:  # (可选) HTTP 请求头字典
        cookies:  # (可选) 字典或 CookieJar 对象,随请求发送
        files:  # (可选) 文件字典,用于上传文件(multipart/form-data)
        auth:  # (可选) 认证元组或可调用对象,用于 Basic/Digest/自定义认证
        timeout:  # (可选) 超时时间,单位为秒(可为浮点数或 (连接, 读取) 元组)
        allow_redirects:  # (可选) 是否允许重定向,默认为 True
        proxies:  # (可选) 代理配置字典,指定协议或主机对应的代理地址
        hooks:  # (可选) 钩子函数字典,如请求前后执行的回调
        stream:  # (可选) 是否延迟下载响应内容,默认为 False(立即下载)
        verify:  # (可选) 是否验证服务器 TLS 证书;True/False 或 CA 证书路径
        cert:  # (可选) SSL 客户端证书路径,或 ('证书文件', '密钥文件') 元组
        json:  # (可选) Json 格式数据。
接口断言方法
- teststeps:
    - step: get user info
      request:
      validate: # 断言
        equal: # 断言相等
          - [ "status_code", 200 ]
          - [ "body.code", 10200 ]
        not_equal: # 断言不相等
          - [ "body.data.name", "jack" ]
        contains: # 断言包含
          - [ "body.message", "succ" ]
        not_contains: # 断言不包含
          - [ "body.message", "access" ]
        "length": # 断言长度
          - [ "body.body", 158 ]
        "greater": # 大于
          - [ "body.id", 0 ]
        "greater_equal": # 大于等于
          - [ "body.id", 1 ]
        "less": # 小于
          - [ "body.id", 2 ]
        "less_equal": # 小于等于
          - [ "body.id", 1 ]
主运行文件
既然要实现 YAML 管理测试用例,为什么还要提供这么个代码文件,其实所谓无代码,只是利用了 pytest 的参数化,测试用例通过 YAML 数据文件描述,最终交给
@pytest.mark.parametrize()解析,然后,交由 pytest 运行。
在pytest看来,这就是一个使用参数化的测试用例。此外,这里相当于留了个口子,如果不懂代码,只运行这个文件就完了,如果有兴趣一探究竟,可以研究
@load_teststeps()装饰器是如何识别和加载用例的,execute_teststeps()又是如何执行用例的。
- 运行测试入口文件:
test_api.py
# test_api.py
from typing import Dict

from lounger.analyze_cases import load_teststeps
from lounger.case import execute_teststeps


@load_teststeps()
def test_api(teststeps: Dict) -> None:
    """
    Execute the 'teststeps' test case in YAML.
    """
    execute_teststeps(teststeps)
为什么不设计成一个命令来运行 YAML 文件?例如 lounger -r datas/sample/test_sample.yaml
存在两个问题:
- 命令行工具不适合运行大型自动化项目,例如,全局前置/后置依赖。
- 无法兼容,测试项目中一部分是 code 用例,一部分是 YAML 用例。
相反,使用 pytest 命令执行就非常灵活了,完全兼容pytest生态。
更多功能支持
变量提取&引用
在场景测试中,我们往往需要将 A 接口的返回值提取出来,作为 B 接口的参数。
- teststeps:
    - step: Listing all resources
      request:
        method: GET
        url: /posts
      extract:
        second_id: "[1].id"  # 提取变量
      validate:
        equal:
          - [ "status_code", 200 ]
    - step: Getting a resource
      request:
        method: GET
        url: /posts/${extract(second_id)}  # 使用提取变量
      validate:
        equal:
          - [ "status_code", 200 ]
全局测试变量
在配置文件config/config.yaml配置全局测试变量。
global_test_config:
  var_one: foo
  var_two: bar
在测试用例中使用 global_test_config 全局测试变量。
- teststeps:
    - step: Creating a resource
      request:
        method: POST
        url: /posts
        headers:
          Content-Type: application/json; charset=UTF-8
        json:
          title: '${config(var_one)}'  # 使用全局测试变量
          body: '${config(var_two)}'   # 使用全局测试变量
          userId: 1
      validate:
        equal:
          - [ "status_code", 201 ]
          - [ "body.userId", 1 ]
          - [ "body.title", "foo" ]
          - [ "body.body", "bar" ]
自定义函数
在实际的测试过程中,一些数据需要通过一些复杂的计算生成,例如日期、加密等。
借助于conftest.py文件可以定义任意计算函数。
# conftest.py

def age_add_one(age):
    return int(age) + int(1)
在测试用例当中使用。
- teststeps:
    - step: Getting a resource id=1+1
      request:
        method: GET
        url: /posts/${age_add_one(1)}  # 支持直接传值
      validate:
        equal:
          - [ "status_code", 200 ]
    - step: Getting a resource id=2+1
      request:
        method: GET
        url: /posts/${age_add_one($second_id)}  # 直接传变量
      validate:
        equal:
          - [ "status_code", 200 ]
支持前置步骤
在场景测试中,多条测试用例共用一个前置接口,例如,依赖登录接口获取 token。
首先,创建一个login.yaml接口调用。
# datas/steps/login.yaml
- teststeps:
    - step: user login api
      request:
        method: POST
        url: /login
        headers:
        data:
          username: admin
          password: pwd123
      extract:
        login_token: "data.token"  # 提取保存登录变量
      validate:
        equal:
          - [ "status_code", 200 ]
然后,在测试用例中引用login.yaml文件。
- teststeps:
    - presteps:
        - steps/login.yaml # 引用 login.yaml 作为前置接口。
    - step: get user info
      request:
        method: GET
        url: /id/1
        headers:
          Content-Type: application/json
          Authorization: ${extract(login_token)}
        params:
      extract:
        user_name: "data.name"
        user_age: "data.age"
      validate:
        equal:
          - [ "status_code", 200 ]
注意:presteps 支持多个前置步骤编排。
- presteps:
    - steps/aa.yaml
    - steps/bb.yaml
    - steps/cc.yaml
支持前置脚本
在某些特殊的情况下,测试用例执行前,必须要执行一些前置测试脚本。
首先,创建脚本scripts/init_db.py。
# scripts/init_db.py
from lounger.log import log


def init_db():
    log.info("this is init DB script")


init_db()
然后,在测试用例中引用脚本。
# datas/sample/test_script.yaml

- teststeps:
    - step: Getting a resource
      prescript: init_db.py # 引用前置脚本
      request:
        method: GET
        url: /posts/1
      validate:
        equal:
          - [ "status_code", 200 ]
支持全局 fixture
虽然,我们不建议设计用例之间的依赖,但是,有时候在用例的运行顺序上有一些要求,某些目录下面的测试用例先执行,某些目录下面的测试用例最后执行。可以创建
global_setup 和 global_teardown 测试目录控制用例的执行顺序。
- 目录结构如下
├─config
│  ├─config.yaml
├─datas
│  ├─global_setup  # 该目录下的用例最先执行
│  │   ├─test_login.yaml
│  ├─sample
│  │   ├─test_sample.yaml
│  ├─global_teardown  # 该目录下的用例最后执行
│  │   ├─test_logout.yaml
├─reports
├─conftest.py
└─test_api.py
-
config/config.yaml配置
#  test directory
test_project:
  global_setup: True    # --> /datas/global_setup/  最先执行
  sample: True          # --> /datas/sample/
  global_teardown: True # --> /datas/global_teardown/  最后执行
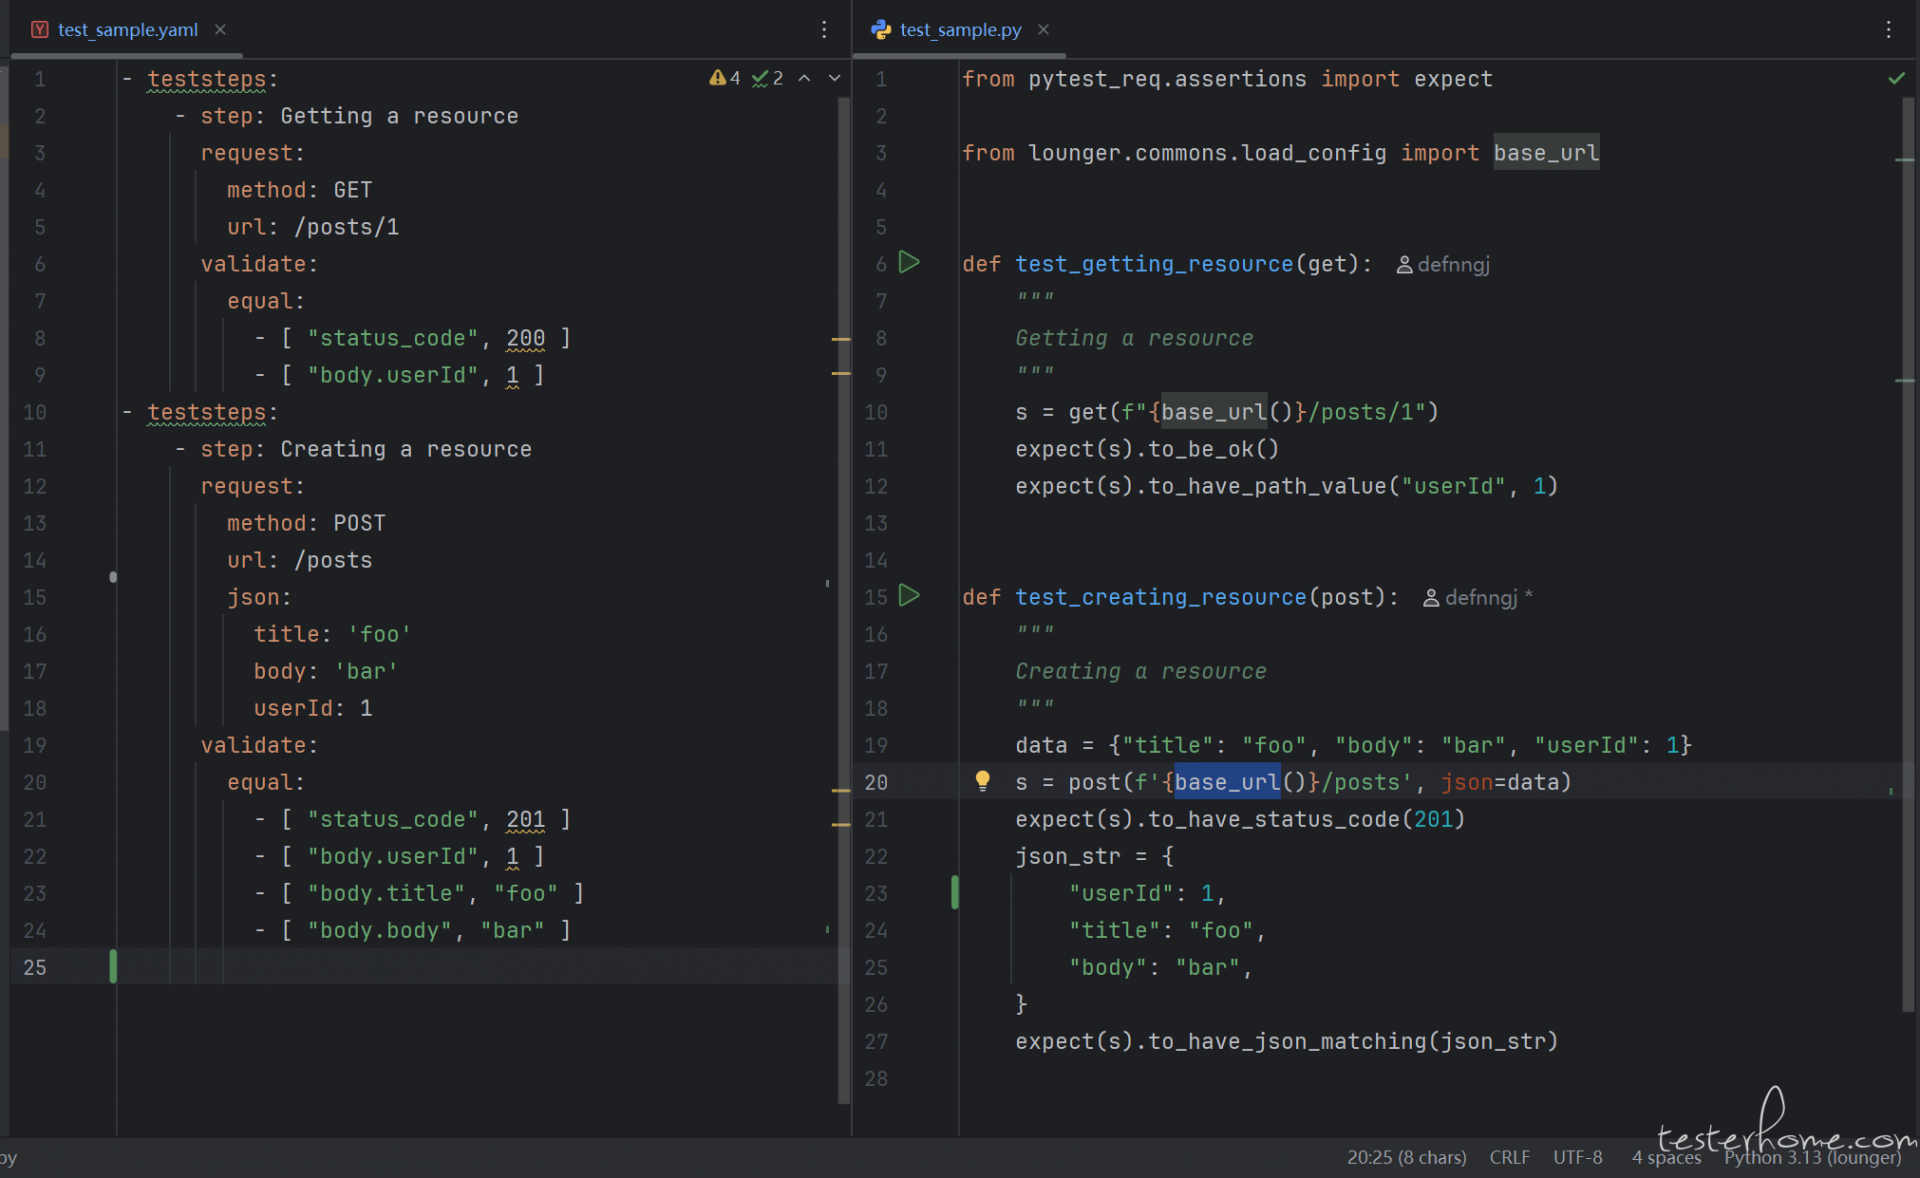
兼容 code 与 YAML 两种用例
在团队中存在不同技术背景的成员:一部分成员倾向于使用声明式的 YAML
格式编写测试用例,而另一部分则具备编程能力,习惯通过代码实现测试逻辑。为提升协作效率与工程一致性,需在统一的测试框架下同时支持这两种用例编写范式,实现声明式与程序化测试用例的共存、统一调度与结果聚合。
- 目录结构如下
├─config
│  ├─config.yaml
├─datas # 用YAML写用例
│  ├─sample
│  │   ├─test_sample.yaml
├─test_dir # 用code写用例
│  ├─test_sample.py
├─reports
├─conftest.py
└─test_api.py
- 两种测试用例对比
- 通过
pytest命令执行
pytest --html=reports/result.html
====================================== test session starts ======================================

test_api.py ..                                              [ 50%]
test_dir\test_sample.                                          [100%]

--------Generated html report: file:///D:/github/seldomQA/lounger/myapi/reports/result.html --------
======================================= 4 passed in 0.19s =======================================
- 查看测试报告
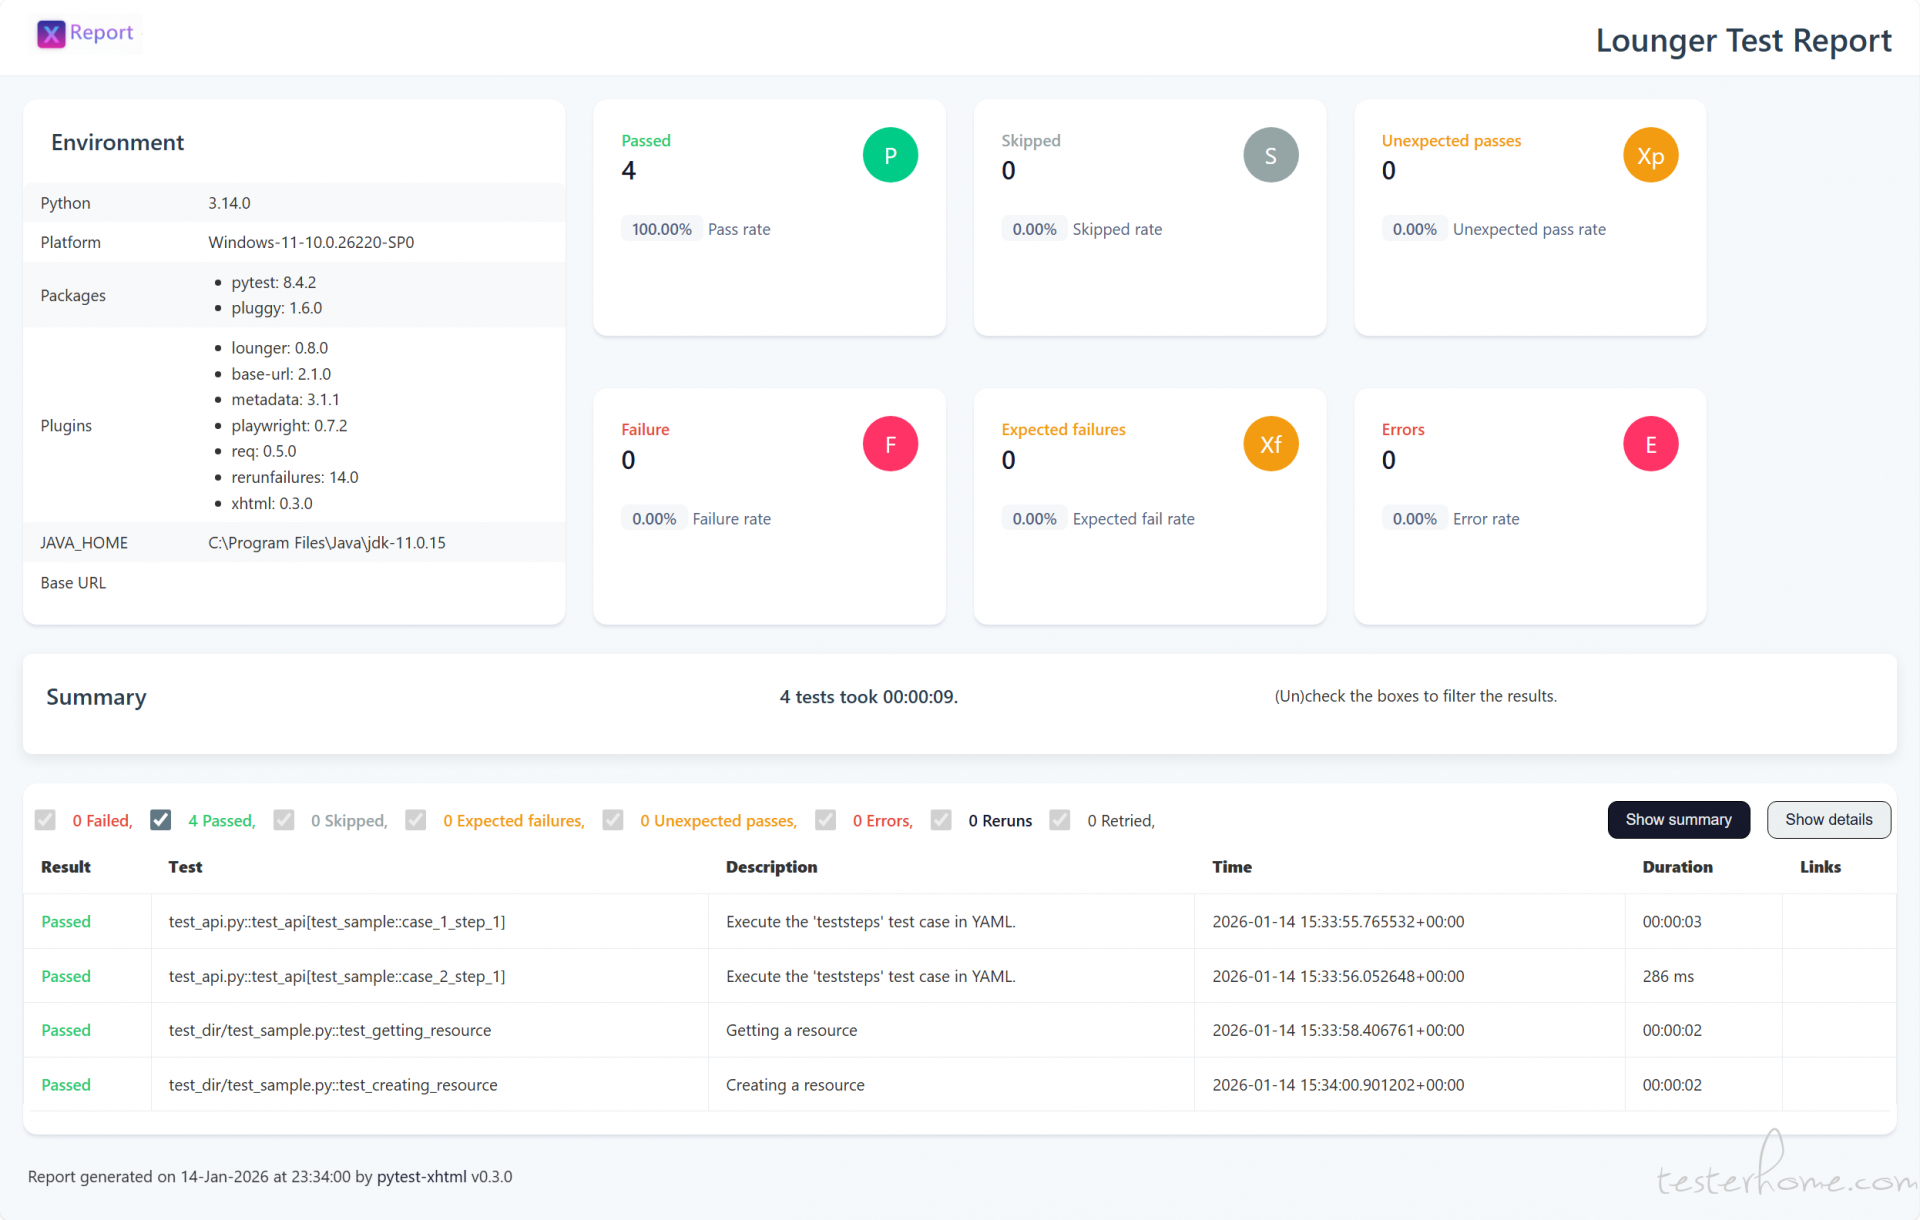
通过运行方式日志和测试报告可以看到,两者可以毫无违和感的一起执行。
补充的设计想法
为什么要兼容 YAML?
是的,我一直不太看得上 YAML/JSON 这种声明式用例,觉得没有写代码灵活,反正
YAML/JSON 也无法 100% 避免不写代码,为何不直接写代码。但是,我现在负责一个技术能力较弱的团队。保持他们的使用经验提供一种 YAML 声明式用例也挺好。算是一种过度方案。
为什么不直接使用现有 YAML 方案?
其实,我在设计 YAML 之前,调研了一些开源项目:
- https://github.com/taverntesting/tavern
- https://github.com/httprunner/httprunner.py
- https://github.com/svanoort/pyresttest
- https://github.com/cdent/gabbi
- https://gitee.com/yu_xiao_qi/pytest-auto-api2
老实说,七月的 pytest-auto-api2 压根不太看的上,把封装的框架代码和项目代码揉到一起是挺 low 的设计,不支持 pip 安装,没有版本号,会让项目代码显得很臃肿,也无法升级。
相比而言,httprunner确实要规范很多,但我觉得过于封闭了,通过hrp命令去执行 YAML/JSON 声明式用例,稍微复杂的用例都离不开
debugtalk.py,不还是得写 python 代码。
然而,lounger 对于用例得形式足够开放,不管是 YAML 用例,还是 code 用例,反正都是用 pytest 命令执行,都是一份 HTML 测试报告。
lounger 还远不止于此
lounger 是基于 pytest 提供了一整套 API\Web 自动化测试方案:数据文件驱动 、脚手架、DB操作、cache缓存、随机数、PO模式 等。
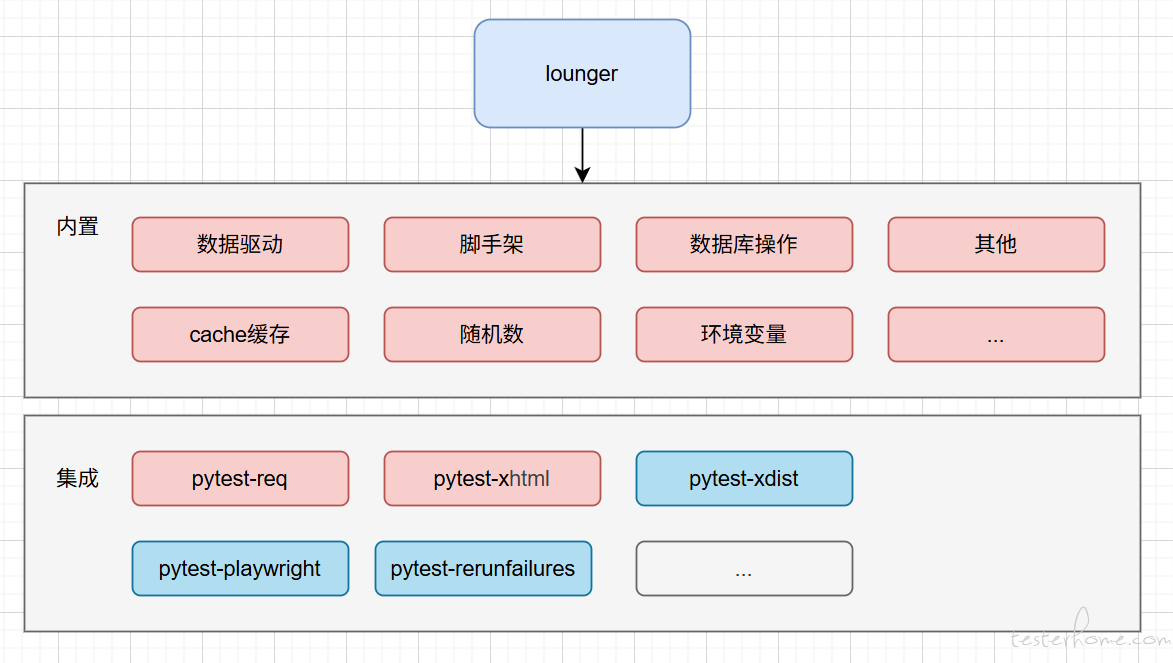
甚至为了使整套方案更完整。我自己有到单独开发 pytest 插件。
- pytest-req 用来封装 requests 库,更好的支持 pytest。
- pytest-xhtml 用来代替
pytest-html,而且 100% 兼容pytest-html用法。
pytest 视频
之前在推荐 seldom 框架的时候,因为底层用的 unittest,经常被嘲讽:很好,我继续用 pytest。
那我录制了一套 pytest 视频来证明我也会。无广告,放心观看。