通用技术 快速合并 commit 的方法:git cherry-pick + mergetool
Testerhome 的代码来自于 ruby-china 。而 ruby-china 一直保持着每周数十个 commit 的更新频率(真心佩服),在快速迭代的同时优化性能和修复已有 bug 。因此 Testerhome 也希望能同步这些 commit ,同步进行性能优化和 bug 修复。
但由于 Testerhome 自身也有在 ruby-china 上添加一些功能,同时 ruby-china 的一些修改并非 Testerhome 需要的,因此不能直接把所有 commit merge 到 Testerhome 上。
自己作为一个 ruby 新手,偶尔会帮忙挑一些 ruby-china 的 commit 手动 merge 到 Testerhome 上,但当遇到比较大的 feature 时工作量比较大,且效率太低(一行一行手动复制粘贴)。最近在合并一个超过 10 个 commit 的大 feature 时实在不能忍,于是找了一下快速合并其他 repo 的 commit 的方法,结果还真找到了。那就是 cherry-pick + mergetool。
第一步:git cherry-pick
cherry-pick 用来获得在单个提交(commit)中引入的变更,然后尝试将作为一个新的提交引入到你当前分支上。简单的说,你可以挑选任意一个已经存在的 commit 并应用到你的分支上。
使用示例:
假设目前需要把远端仓库 ruby-china 的一个 commit id 前八位为 8569b9f 和 321cf3a 的 commit 应用到本地仓库的 move-to-ActiveRecord 的最后一个 commit 上
# 确认 ruby-china 仓库已经加入 remote 列表
$ git remote -v
origin  https://github.com/chenhengjie123/testerhome.git (fetch)
origin  https://github.com/chenhengjie123/testerhome.git (push)
ruby-china  https://github.com/ruby-china/ruby-china.git (fetch)
ruby-china  https://github.com/ruby-china/ruby-china.git (push)
upstream    https://github.com/testerhome/testerhome.git (fetch)
upstream    https://github.com/testerhome/testerhome.git (push)

# 获取 ruby-china 的最新变更列表
$ git fetch ruby-china
git fetch ruby-china
remote: Counting objects: 101, done.
remote: Compressing objects: 100% (91/91), done.
remote: Total 101 (delta 49), reused 6 (delta 6), pack-reused 3
Receiving objects: 100% (101/101), 29.25 KiB | 0 bytes/s, done.
Resolving deltas: 100% (49/49), completed with 5 local objects.
From https://github.com/ruby-china/ruby-china
 * [new branch]      bundle-update-2016-02-15-201000 -> ruby-china/bundle-update-2016-02-15-201000
   a2aa101..1e5bbf3  master     -> ruby-china/master

# 确认目前处于 move-to-ActiveRecord 分支
$ git status
On branch move-to-ActiveRecord
...

# 进行 cherry-pick
$ git cherry-pick 8569b9f
[move-to-ActiveRecord 48e2e92] Add rails generate doorkeeper:application_owner
 Author: Jack <sjtusxmh@gmail.com>
 Date: Sun Jan 10 01:16:13 2016 +0800
 2 files changed, 14 insertions(+)
 create mode 100644 db/migrate/20160109171447_add_owner_to_application.rb

# 上面的 cherry-pick 很顺利,没有冲突,都自动合并了。然后试试第二个
$ git cherry-pick 321cf3a
error: could not apply 321cf3a... Pass all the api specs
hint: after resolving the conflicts, mark the corrected paths
hint: with 'git add <paths>' or 'git rm <paths>'
hint: and commit the result with 'git commit'

# 产生冲突了,需要解决后才能继续合并。
第二步:git mergetool
遇到冲突一直都是一件麻烦的事情。因为冲突时 git 会给冲突的文件在冲突位置添加标记,导致你冲突没解决时程序无法运行(这些标记不符合语言规范)。以往只会使用 vim 自己慢慢改,但遇到几十行的冲突真的要跪。
但这么低效的 merge 方法怎么会让懒惰的程序员就这么一直做下去?所以 git 提供了一个 mergetool(merge 和 tool 之间没有空格哦)的命令,用于调取你习惯的 merge 工具进行合并。我比较习惯用 kdiff3 ,所以以这个作为例子。
配置方法:
在 ~/.gitconfig 文件中加入以下内容:
[difftool "kdiff3"]
    path = /Applications/kdiff3.app/Contents/MacOS/kdiff3
    trustExitCode = false
[difftool]
    prompt = false
[diff]
    tool = kdiff3
[mergetool "kdiff3"]
    path = /Applications/kdiff3.app/Contents/MacOS/kdiff3
    trustExitCode = false
[mergetool]
    keepBackup = false
[merge]
    tool = kdiff3
使用实例:
回到我们前面的冲突。此时继续运行下面的命令:
$ git mergetool
Merging:
app/models/notification/node_changed.rb
app/models/notification/topic.rb
app/serializers/notification_serializer.rb
lib/api/v3/notifications.rb
lib/api/v3/topics.rb
lib/api/v3/users.rb
spec/api/topics_spec.rb

Normal merge conflict for 'app/models/notification/node_changed.rb':
  {local}: modified file
  {remote}: modified file
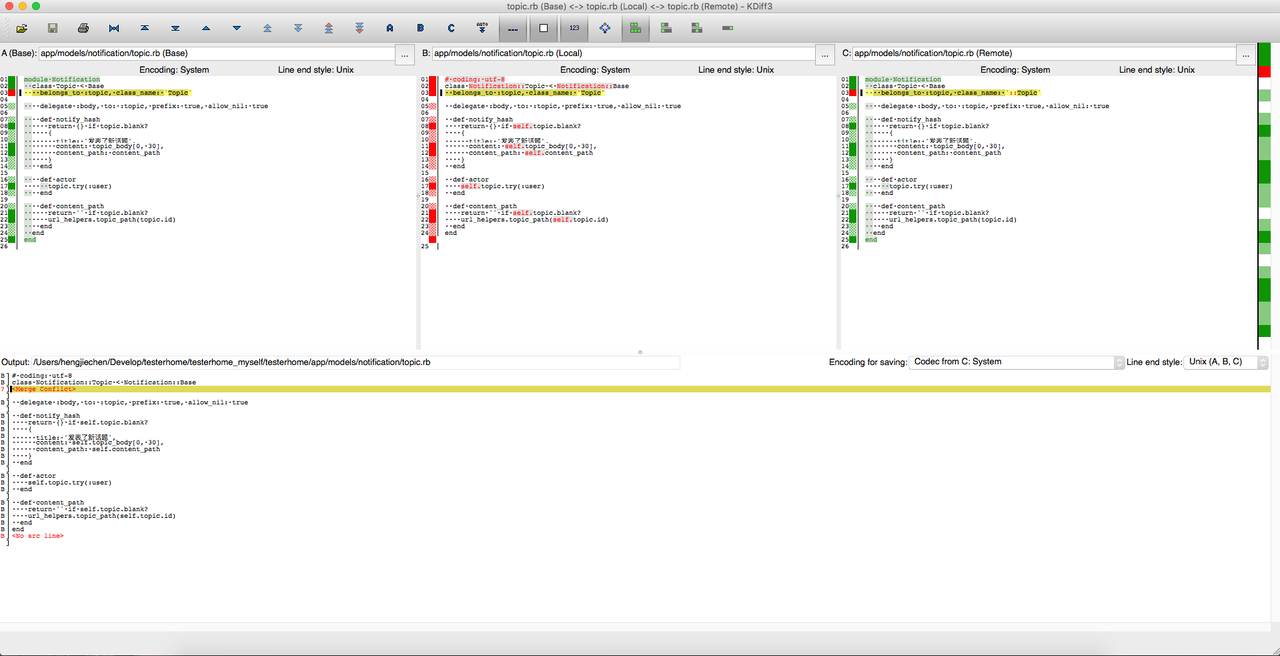
同时,kdiff3 工具自动被启动了:
(由于截图的时候这个冲突已经被解决了,所以用了另一个文件作为截图)

窗口上半部分是原始文件的内容,从左到右分别是: Base(我一般忽略), Local(本地仓库的文件内容), Remote(远程仓库文件内容)。
窗口下半部分是 merge 的操作及结果窗口。每一个变更行的左侧都会有 A、B、C 标记说明目前应用的是哪个原始文件的内容。而问号表示冲突(不知道应该用哪个文件)。
处理冲突很简单:
- 把光标移到冲突的位置(快捷键:command+ 上下方向键)
- 快速选择你想要哪个文件的内容。其中 command+1 表示用 A 文件,command+2 表示用 B 文件,如此类推。如果需要撤销其中一个文件的内容,把应用它的快捷键再敲一次即可。如果想同时应用两个文件的内容,按顺序敲一遍应用这两个文件的快捷键即可。
- 当全部冲突都解决(窗口下半部分的左侧没有问号)时,保存文件,然后直接关闭文件,对这个文件的 merge 就完成了!
- 如果接下来还有冲突的文件,会再弹出 kdiff3 让你处理冲突。如果没有,那就解决完冲突了。
第三步:git cherry-pick --continue
冲突解决后,离完成整个 cherry-pick 还有一步,就是使用 git cherry-pick continue 命令,继续我们的 cherry-pick 进程。
此时会弹出一个提交 commit 信息的编辑窗口,保存后就完成整个 cherry-pick 过程啦!
总结
使用此方法后,以往合并一个具有数十行变更的 commit 需要至少 5 分钟,现在只需几十秒。关键是基本不需要复制粘贴,降低了人工复制粘贴过程中的容易出现的各种问题。
此外,真正认识到 git 的强大之处。 mergetool 和 difftool 本质上相当于插件接口,通过这种方式能让 git 的复杂操作更方便简洁。而 cherry-pick 则让 commit 可以任意挑选合并,再也不用一次性合并一堆 commit ,而是可以挑着做了!
参考文章
How to Use Kdiff3 as a 3-way Merge Tool With Mercurial, Git, and Tower.app
git cherry-pick. 如何把已经提交的 commit, 从一个分支放到另一个分支