测试基础 XMind2TestCase 自定义测试用例设计模板
思维导图生成测试用例
背景
引用官方的说明
软件测试过程中,最重要、最核心就是测试用例的设计,也是测试童鞋、测试团队日常投入最多时间的工作内容之一。
然而,传统的测试用例设计过程有很多痛点:
- 使用 Excel 表格进行测试用例设计,虽然成本低,但版本管理麻烦,维护更新耗时,用例评审繁琐,过程报表统计难...
- 使用 TestLink、TestCenter、Redmine 等传统测试管理工具,虽然测试用例的执行、管理、统计比较方便,但依然存在编写用例效率不高、思路不够发散、在产品快速迭代过程中比较耗时等问题...
- 公司自研测试管理工具,这是个不错的选择,但对于大部分小公司、小团队来说,一方面研发维护成本高,另一方面对技术要有一定要求...
- ...
基于这些情况,现在越来越多公司选择使用思维导图这种高效的生产力工具进行用例设计,特别是敏捷开发团队。
事实上也证明,思维导图其发散性思维、图形化思维的特点,跟测试用例设计时所需的思维非常吻合,所以在实际工作中极大提升了我们测试用例设计的效率,也非常方便测试用例评审。
但是与此同时,使用思维导图进行测试用例设计的过程中也带来不少问题:
- 测试用例难以量化管理、执行情况难以统计;
- 测试用例执行结果与 BUG 管理系统难以打通;
- 团队成员用思维导图设计用例的风格各异,沟通成本巨大;
- ...
于是,这时候 XMind2TestCase 就应运而生了,该工具基于 Python 实现,通过制定测试用例通用模板, 然后使用 XMind 这款广为流传且开源的思维导图工具进行用例设计。 其中制定测试用例通用模板是一个非常核心的步骤(具体请看使用指南),有了通用的测试用例模板,我们就可以在 XMind 文件上解析并提取出测试用例所需的基本信息, 然后合成常见测试用例管理系统所需的用例导入文件。这样就将 XMind 设计测试用例的便利与常见测试用例系统的高效管理结合起来了!
当前 XMind2TestCase 已实现从 XMind 文件到 TestLink 和 Zentao(禅道) 两大常见用例管理系统的测试用例转换,同时也提供 XMind 文件解析后的两种数据接口(TestSuites、TestCases 两种级别的 JSON 数据),方便快速与其他测试用例管理系统打通。
示例展示
官方的示例
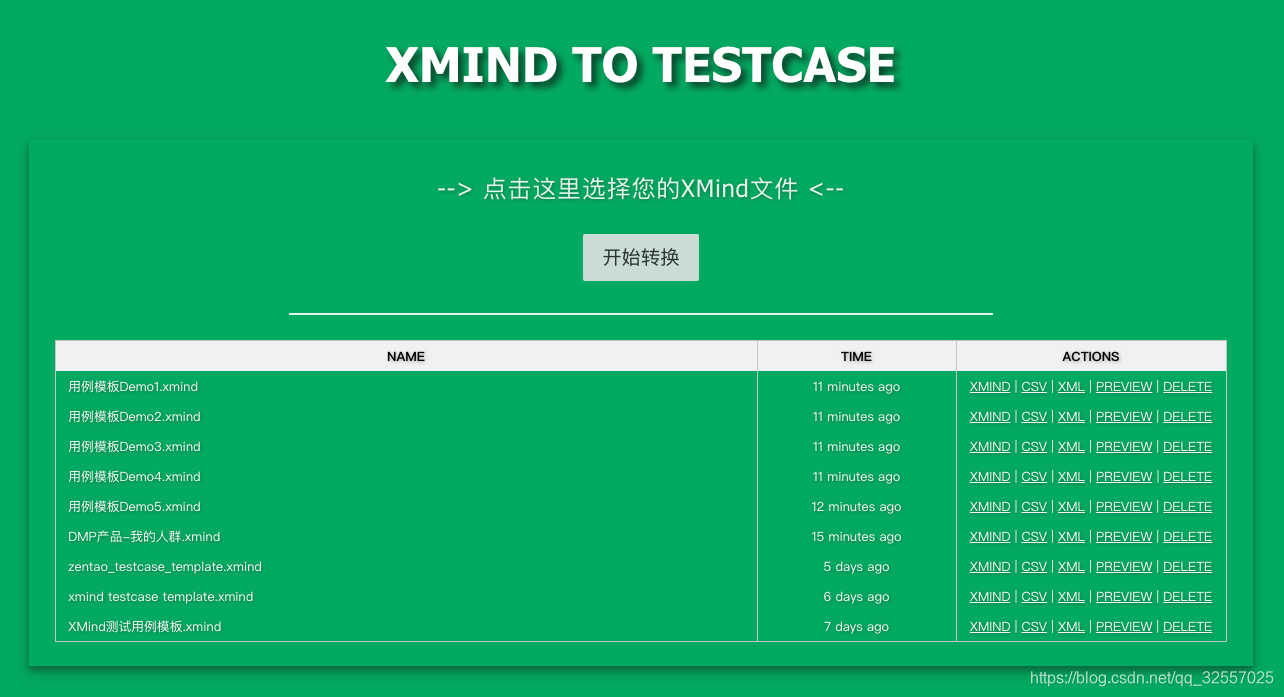
Web 转换工具
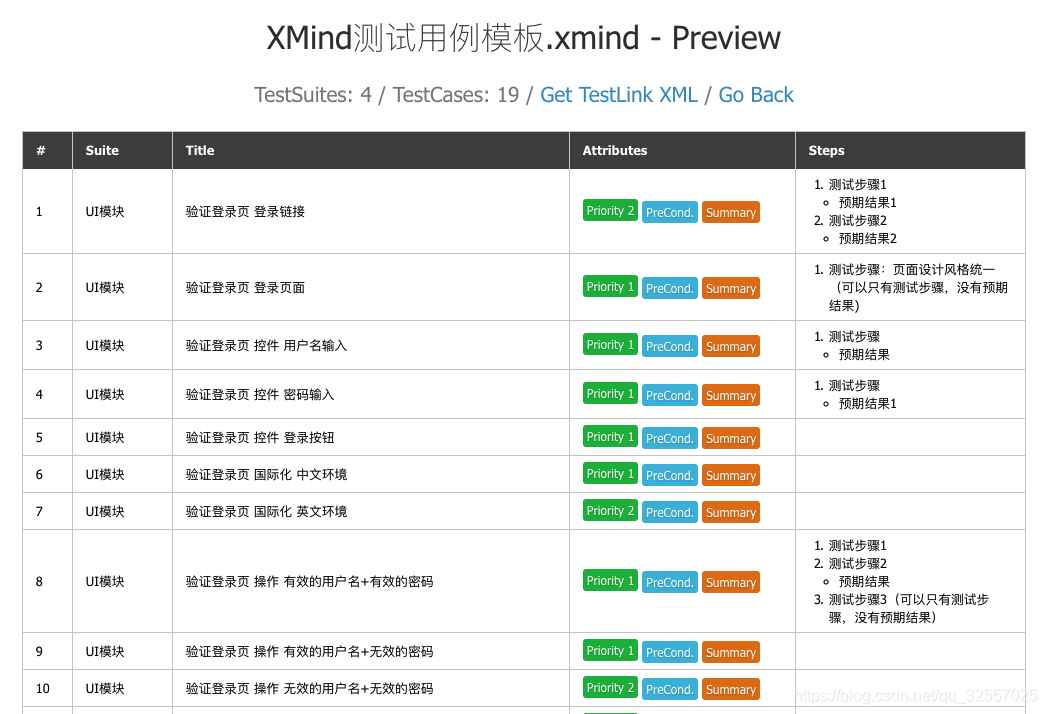
转换后用例预览
禅道(ZenTao)导入结果示例
安装 XMind2TestCase
pip3 install xmind2testcase
或者升级
pip3 install -U xmind2testcase
实践
在开始之前先定义咋们的测试用例模板,官方的用例模板不太适合我的书写习惯,所以我把它稍微改改,先看看官网的,适合你就不用改啦。
官方用例模板
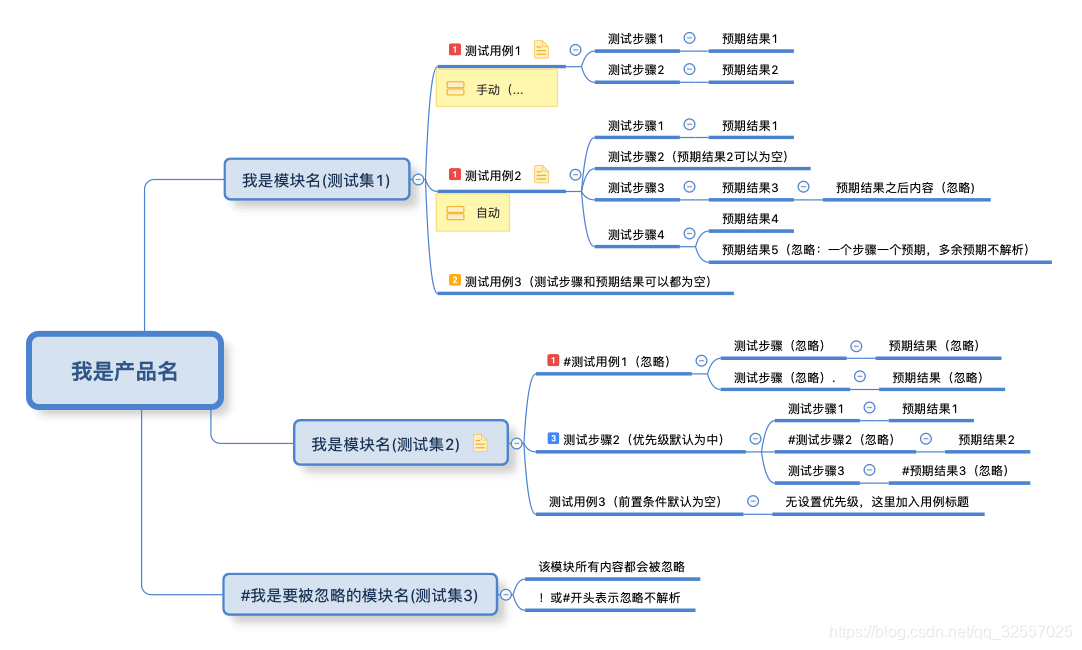
改动后的用例模板

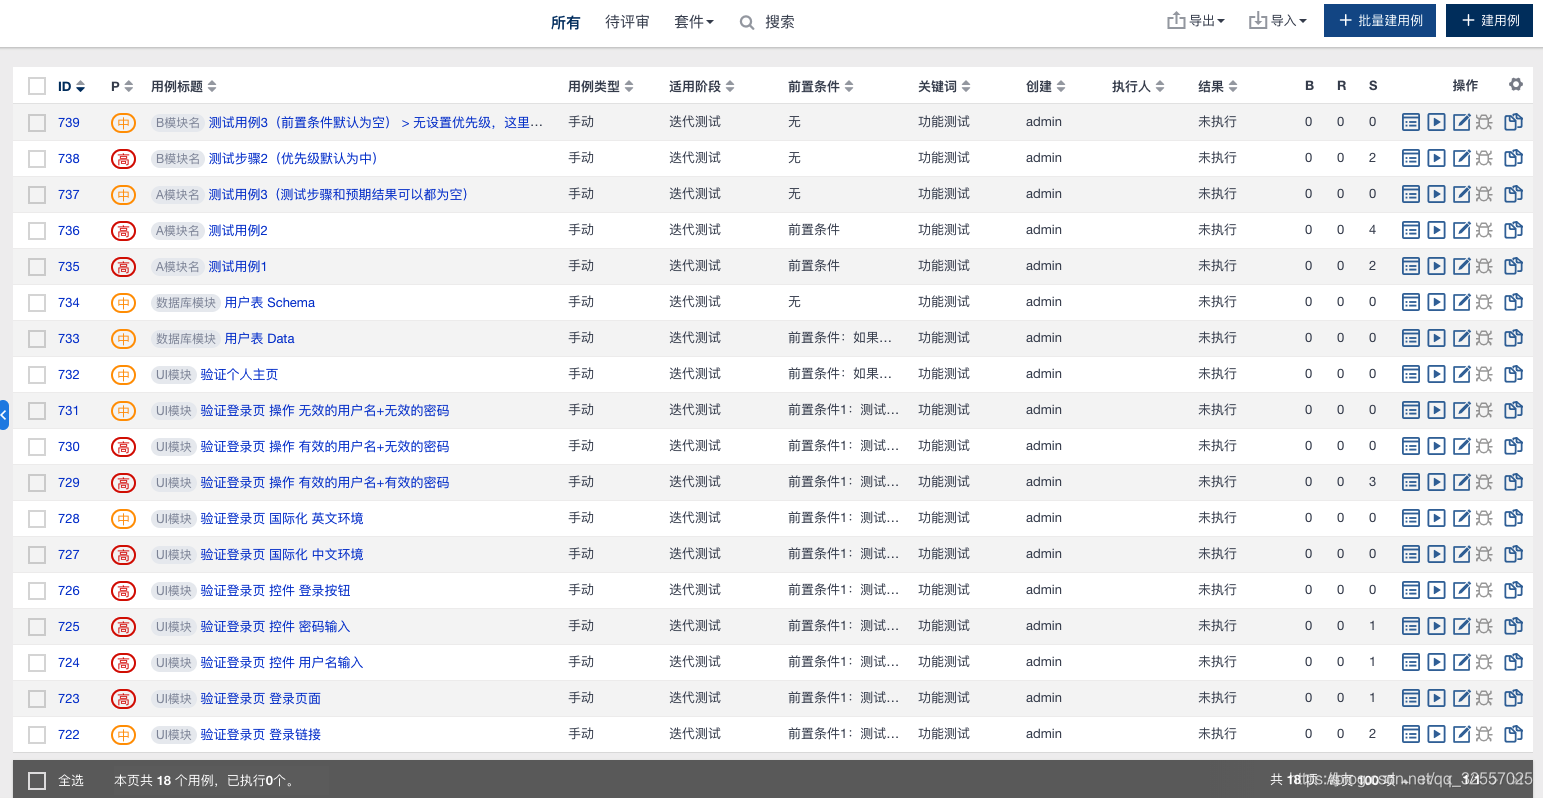
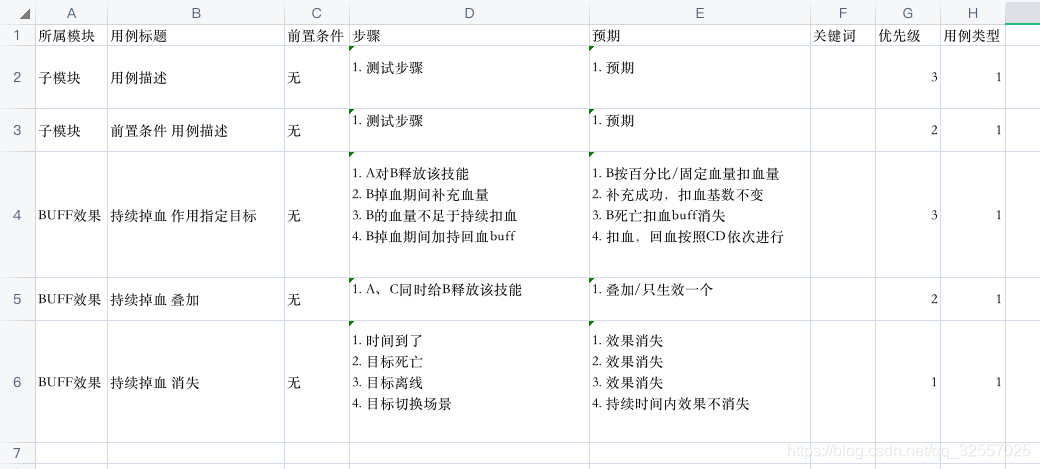
生成的测试用例
我本地没搭建禅道,用 Excel 表格来展示,跟禅道一致。
- 我这里用例标题集成了前置条件+用例描述,方便禅道执行多条用例时在用例标题里能看到前置条件,不然得点击进去用例详情才能看到,因人而异
- 大家都看到 1,2,3这些标识,它们有两个作用,1 是标记这里是测试用例描述,2 是标记优先级
- 一条测试用例对应一个期待结果
改源码
zentao 模块
1.case_apply_phase 属性:用例阶段我固定了功能测试
def gen_a_testcase_row(testcase_dict):
    case_module = gen_case_module(testcase_dict['suite'])
    case_title = testcase_dict['name']
    case_precontion = testcase_dict['preconditions']
    case_step, case_expected_result = gen_case_step_and_expected_result(testcase_dict['steps'])
    case_keyword = ''
    case_priority = gen_case_priority(testcase_dict['importance'])
    case_type = gen_case_type(testcase_dict['execution_type'])
    case_apply_phase = '功能测试'
    # case_apply_phase = gen_case_apply_phase(testcase_dict['summary'])
    '''生成测试用例的字段在这里'''
    row = [case_module, case_title, case_precontion, case_step, case_expected_result, case_keyword, case_priority, case_type, case_apply_phase]
    return row
测试阶段默认值转换
def gen_case_apply_phase(case_apply_phase):
    if case_apply_phase=='无':
        return '功能测试阶段'
    else:
        return case_apply_phase
2.把用例优先级的高中低换了下
# 没有定义用例优先级则默认3级
def gen_case_priority(priority):
    # mapping = {1: '高', 2: '中', 3: '低'}
    mapping = {1: 1, 2: 2, 3: 3,4:4}
    if priority in mapping.keys():
        return mapping[priority]
    else:
        return 3
parser 模块
1.把原先的产品名 (中心主题) 改为功能模块名,输出文件名字一致
def sheet_to_suite(root_topic):
    """convert a xmind sheet to a `TestSuite` instance"""
    suite = TestSuite()
    root_title = root_topic['title']
    separator = root_title[-1]

    if separator in config['valid_sep']:
        logging.debug('find a valid separator for connecting testcase title: %s', separator)
        config['sep'] = separator  # set the separator for the testcase's title
        root_title = root_title[:-1]
    else:
        config['sep'] = ' '

    suite.name = root_title
    # 直接用产品名字作为功能模块名
    global my_title
    my_title = root_title
    suite.details = root_topic['note']
    suite.sub_suites = []

    for suite_dict in root_topic['topics']:
        suite.sub_suites.append(parse_testsuite(suite_dict))

    return suite
def parse_testsuite(suite_dict):
    testsuite = TestSuite()
    #直接用产品名字作为模块名,在sheet_to_suite定义全局变量my_title
    testsuite.name = my_title
    testsuite.details = suite_dict['note']
    testsuite.testcase_list = []
    logging.debug('start to parse a testsuite: %s', testsuite.name)

    for cases_dict in suite_dict.get('topics', []):
        for case in recurse_parse_testcase(cases_dict):
            testsuite.testcase_list.append(case)

    logging.debug('testsuite(%s) parsing complete: %s', testsuite.name, testsuite.to_dict())
    return testsuite
3.用例类型和用例阶段设置
def parse_a_testcase(case_dict, parent):
    testcase = TestCase()
    topics = parent + [case_dict] if parent else [case_dict]

    testcase.name = gen_testcase_title(topics)

    preconditions = gen_testcase_preconditions(topics)
    testcase.preconditions = preconditions if preconditions else '无'

    summary = gen_testcase_summary(topics)
    '''testcase.summary:用例阶段,配合gen_testcase_type使用'''
    testcase.summary = summary if summary else '无'
    execution_type = gen_testcase_type(topics)
    '''testcase.execution_type:用例类型'''
    testcase.execution_type = execution_type if execution_type else '无'
    testcase.importance = get_priority(case_dict) or 2

    step_dict_list = case_dict.get('topics', [])
    if step_dict_list:
        testcase.steps = parse_test_steps(step_dict_list)

    # the result of the testcase take precedence over the result of the teststep
    testcase.result = get_test_result(case_dict['markers'])

    if testcase.result == 0 and testcase.steps:
        for step in testcase.steps:
            if step.result == 2:
                testcase.result = 2
                break
            if step.result == 3:
                testcase.result = 3
                break

            testcase.result = step.result  # there is no need to judge where test step are ignored

    logging.debug('finds a testcase: %s', testcase.to_dict())
    return testcase
def gen_testcase_type(topics):
    '''用例阶段调用'''
    labels = [topic['label'] for topic in topics]
    labels = filter_empty_or_ignore_element(labels)
    return config['type_sep'].join(labels)
我这里需要改动的代码到这里结束了
执行
API 调用
这里说下我这里执行,官网有比较详细的执行教程点这里跳转
这段代码加在 zentao.py 下运行即可
if __name__ == '__main__':
    xmind_file = '/Users/xxx/Downloads/xMind2testCase示例.xmind'
    zentao_csv_file = xmind_to_zentao_csv_file(xmind_file)
    print('Conver the xmind file to a zentao csv file succssfully: %s', zentao_csv_file)
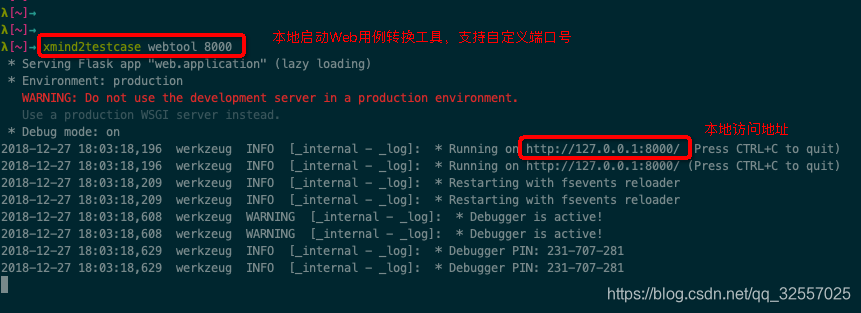
web 界面
使用命令,端口可自定义
xmind2testcase webtool 8000
命令行
用法:
xmind2testcase [path_to_xmind_file] [-csv] [-xml] [-json]
示例:
xmind2testcase /path/to/testcase.xmind        => output testcase.csv、testcase.xml、testcase.json
xmind2testcase /path/to/testcase.xmind -csv   => output testcase.csv
xmind2testcase /path/to/testcase.xmind -xml   => output testcase.xml
xmind2testcase /path/to/testcase.xmind -json  => output testcase.json
导入禅道
1.将 XMind 用例文件解析为禅道导入文件,用禅道的用例上传功能,把 xx.csv 上传即可
xmind2testcase XMind测试用例模板.xmind -csv ==> XMind测试用例模板.csv
2.将 XMind 用例文件转成 json 数据,用禅道的接口 post 上去,我本地没有环境,没法给出示例,有环境的小伙伴帮忙补充一下。
结语
以上是根据我个人使用习惯来自定义,不一定适合各位小伙伴,有自定义需求的小伙伴可以看看源码或者留言评论私信。