一、前言
说起 UI 自动化测试,尤其是移动端 UI 自动化,测试框架和技术层出不穷。经过多框架对比后,最终选择了 AirTest。
Airtest 主要有以下优势:
(1)UI 自动化基于 Airtest 和 PocoUI 进行,该框架是网易开源框架,专业团队开发维护,比较稳定。
(2)Airtest 基于图像识别算法,对图片进行模版匹配和特征点匹配,以此计算点击坐标,进行操作。
(3)PocoUI 基于 minitouch 进行操作,可通过 text/resouceid/name 等进行元素定位。
(4)支持多平台:Android、iOS、Windows、Unity、Cocos2dx、白鹭引擎、微信小程序
二、常用方法及推荐用法
1、前置用例引用
可以将一些通用的操作写在一个.air 脚本中,然后在其他脚本中 import 它。
from airtest.core.api import using
using("replace_install.air") # 需要使用相对路径,不然找不到.air
import replace_install
2、引用自定义的公共类或方法
在编写自动化的过程中,有一些自定义的方法或类,需要在.air 下的.py 中引用时候,需要将项目路径添加到环境变量中。
import sys
import os
# 必填,将项目目录添加到系统环境变量中
sys.path.append(‘项目路径’)
3、元素定位方式
(1)建议尽量使用 text 定位元素
# 定位一个元素
poco(text='立即清理')
# 如果text匹配多个元素,获取多个元素
ele_list = list(poco(text='立即清理').wait(5))
# 模糊定位,支持正则
poco(textMatches="'^据点.*$'")
(2)如果不能直接定位,建议使用局部布局
# 子元素
poco(text='main_node').child(text='list_item')
# 后代
poco(text='main_node').offspring(text='name')
# 父
poco(text='main_node').parent()
# 所有子元素
poco(text='main_node').children()
# 兄弟元素
poco(text='main_node').sibling(text='name')
# 同样resourceid的元素列表
list(poco(name='resourceid'))
备注:
因为 text 变化的概率相对较小,所以建议使用 text,且脚本易读;
resourceid 不建议,因为 release 版会混淆,除非公司对 resourceid 进行了统一设计和规划,且 release 版本不混淆。
4、元素操作
(1)点击元素的某一点
通过相对坐标,控制点击的具体位置。左上角 (0, 0),右下角 (1, 1),横坐标为 x,纵坐标为 y。
node = poco(text='main_node')
# 点击节点的中心点位置, 默认点击中心位置
node.focus('center').click()
# 点击节点的靠近左上角位置
node.focus([0.1, 0.1]).click()
# 点击节点的右下角位置
node.focus([1, 1]).click()
(2)等待元素出现或消失
实际写用例时,有一些扫描或缓冲场景,需要等待元素出现或消失,才能进行下一步操作。
# 当使用wait_for_appearance或wait_for_disappearance时,建议处理PocoTargetTimeout,并截图,以方便在报告中查看出错时的页面情况
try:
    poco(text='main_node').wait_for_appearance(timeout=10)
    poco(text='main_node').wait_for_disappearance(timeout=10)
except PocoTargetTimeout:
    snapshot(msg="元素出现或未出现")
(3)滑动和拖动
# 拖动
poco('star').drag_to(poco('shell'))
# 滑动
poco('Scroll View').swipe([0, -0.1])  # 滑动指定坐标
poco('Scroll View').swipe('up')  # 向上滑动
poco('Scroll View').swipe('down')  # 向下滑动

# 向量滑动
x, y = poco('Scroll View').get_position()
end = [x, y - 0.1]
dir = [0, -0.1]
poco.swipe([x, y], end)  # 从A点滑动到B点
poco.swipe([x, y], direction=dir)  # 从点A向给定方向和长度进行滑动
(4)获取元素信息
"""
attribute name, it can be one of the following or any other customized type implemented by SDK
                - visible: whether or not it is visible to user
                - text: string value of the UI element
                - type: the type name of UI element from remote runtime
                - pos: the position of the UI element
                - size: the percentage size [width, height] in range of 0~1 according to the screen
                - name: the name of UI element
                - ...: other sdk implemented attributes
"""
poco(text="text_content").attr("checkable")
poco(text="text_content").get_position()
poco(text="text_content").get_text()

....
(5)连续滑动与自定义滑动操作
from airtest.core.api import *
dev = device()  # 获取当前手机设备
# 手指按照顺序依次滑过3个坐标,可以用于九宫格解锁
dev.minitouch.swipe_along([(100, 100), (200, 200), (300, 300)])

# 自定义操作
# 实现两个手指同时点击的操作
from airtest.core.android.minitouch import *
multitouch_event = [
    DownEvent((100, 100), 0),  # 手指1按下(100, 100)
    DownEvent((200, 200), 1),  # 手指2按下(200, 200)
    SleepEvent(1),
    UpEvent(0), UpEvent(1)]  # 2个手指分别抬起

device().minitouch.perform(multitouch_event)

# 三只滑动操作
from poco.utils.track import *
tracks = [
    MotionTrack().start([0.5, 0,5]).move([0.5, 0.6]).hold(1).
    MotionTrack().start([0.5, 0,5]).move([0.5, 0.6]).hold(1).
    MotionTrack().start([0.5, 0,5]).move([0.5, 0.6]).hold(1)
]
poco.apply_motion_tracks(tracks)

# 手势操作
# 点击ui1保持1秒,拖动到ui2并保持1秒,然后抬起
ui1.start_gesture().hold(1).to(ui2).hold(1).up()
(6)点击元素偏移位置
# 点击, focus为偏移值,sleep_interval为点击后的间隔时间
poco(text="立即清理").click(focus=(0.1, 0.1), sleep_interval=5)
(7)隐性等待元素
# 隐形等待元素出现,元素出现后,wait()方法结束
poco(text="立即清理").wait(timeout=5)
(8)判断元素是否存在
# 判断元素是否存在,存在返回True
poco(text="立即清理").exists()
(9)UI 状态清除
# 在poco里选择出来的ui都是代理对象,在执行同一个用例里,一个ui控件选出来后能持续多长时间有效这个是要看android那回收ui资源的策略的,每个厂商的差异比较大.
# 对于cocos2d-x引擎的poco,由于使用的是快照模式,获取到UI状态后如果UI状态确实发生了改变,需要调用ui.invalidate()进行重新获取。
ui = poco(text="立即清理")
ui.click()
ui.invalidate()
ui.click()
(10)long click
# 长按操作
poco(text="立即清理").long_click(duration=2.0)
(11)两指挤压收缩操作
# 在给定的范围和持续时间下,在UI上两指挤压收缩操作
poco.pinch(direction='in', percent=0.6, duration=2.0, dead_zone=0.1)
(12)根据 UI 滑动
# 根据UI的给定高度或宽度,滑动距离的百分比
# 从底部上滑5秒
poco.scroll(direction='vertical', percent=1, duration=5)
# 从顶部下滑5秒
poco.scroll(direction='vertical', percent=-1, duration=5)
三、常见异常
(1)InvalidOprationException
这个异常特指无效的操作,或者不起作用的操作
try:
    poco.click([1.1, 1.1])  # click outside screen
except InvalidOperationException:
    snapshot(msg="出现异常")
(2)PocoNoSuchNodeException
如果从一个不存在的 UI 空间读取属性或操作,就会出现该异常。
node = poco("not existed node")
try:
    node.click()
except PocoNoSuchNodeException:
    snapshot(msg="出现异常")

try:
    node.attr('text')
except PocoNoSuchNodeException:
    snapshot(msg="出现异常")
(3)PocoTargetTimeout
这个异常只会在你主动等待 UI 出现或消失时抛出,和 PocoNoSuchNodeException 不一样,当你的操作速度太快,界面来不及跟着变化的话,你只会遇到 PocoNoSuchNodeException 而不是 PocoTargetTimeout ,其实就是在那个 UI 还没有出现的时候就想要进行操作。
try:
    poco(text="demo").wait_for_appearance(timeout=10)
except PocoTargetTimeout:
    snapshot(msg="出现异常")
(4)PocoTargetRemovedException
如果操作速度远远慢于 UI 变化的速度,很可能会出现这个异常。当且仅当访问或操作一个刚才存在现在不在的 UI 元素时,才会出现,并且一般不会出现。
try:
    poco(text="demo").click()
except PocoNoSuchNodeException:
    snapshot(msg="出现异常")
四、拓展用法
(1)滚动查找元素 (poco_swipe_to)
滚动查找元素,当找到元素后,滑动元素到页面中间。
用法:poco_swipe_to(text=None, textMatches=None, poco=None)
# 滚动查找元素
def poco_swipe_to(text=None, textMatches=None, poco=None):
    find_ele = False
    find_element = None
    if poco is None:
        raise Exception("poco is None")
    if text or textMatches:
        swipe_time = 0
        snapshot(msg="开始滚动查找目标元素")
        if text:
            find_element = poco(text=text)
        elif textMatches:
            find_element = poco(textMatches=textMatches)
        while True:
            snapshot(msg="找到目标元素结果: " + str(find_element.exists()))
            if find_element.exists():
                # 将元素滚动到屏幕中间
                position1 = find_element.get_position()
                x, y = position1
                if y < 0.5:
                    # 元素在上半页面,向下滑动到中间
                    poco.swipe([0.5, 0.5], [0.5, 0.5+(0.5-y)], duration=2.0)
                else:
                    poco.swipe([0.5, 0.5], [0.5, 0.5-(y-0.5)], duration=2.0)
                snapshot(msg="滑动元素到页面中间: " + str(text) + str(textMatches) )
                find_ele = True
                break
            elif swipe_time < 30:
                poco.swipe([0.5, 0.8], [0.5, 0.4], duration=2.0)
                # poco.swipe((50, 800), (50, 200), duration=500)
                swipe_time = swipe_time + 1
            else:
                break
    return find_ele
(2)观察者函数 (watcher)
说明:利用子进程对页面元素进行监控,发元素后,自动操作。
适用场景:多用于不可预测的弹窗或元素
用法:watcher(text=None, textMatches=None, timeout=10, poco=None)
def loop_watcher(find_element, timeout):
    """
    循环查找函数:每隔一秒,循环查找元素是否存在. 如果元素存在,click操作
    :param find_element: 要查找元素,需要是poco对象
    :param timeout: 超时时间,单位:秒
    :return:
    """
    start_time = time.time()
    while True:
        # find_element.invalidate()
        if find_element.exists():
            find_element.click()
            print("观察者:发现元素")
            break
        elif (time.time() - start_time) < timeout:
            print("--------------------观察者:等待1秒")
            time.sleep(1)
        else:
            print("观察者:超时未发现")
            break

def watcher(text=None, textMatches=None, timeout=10, poco=None):
    """
    观察者函数: 根据text或textMatches定位元素,用子进程的方式循环查找元素,直到超时或找到元素
    :param text: 元素的text
    :param textMatches: 元素的textMatches,正则表达式
    :param timeout: 超时时间
    :param poco: poco实例
    :return:
    """
    print("观察者:启动")
    # 目标元素
    find_element = None
    if poco is None:
        raise Exception("poco is None")
    if text or textMatches:
        if text:
            find_element = poco(text=text)
        elif textMatches:
            find_element = poco(textMatches=textMatches)

    # 定义子线程: 循环查找目标元素
    from multiprocessing import Process
    p = Process(target=loop_watcher, args=(find_element, timeout,))
    p.start()
(3)等待任一元素出现 (poco.wait_for_any)
poco.wait_for_any(),等待到任一元素出现,返回UIObjectProxy。

check_list = [poco(text="可清理"), poco(text = '手机很干净')]

poco.wait_for_any(check_list, timeout=20)
(4)等待所有元素 (poco.wait_for_all)
poco.wait_for_all(),等待所有元素出现。
check_list = [poco(text="可清理"), poco(text = '手机很干净')]
poco.wait_for_all(check_list, timeout=20)
(5)用 swipe_along() 接口滑个圈圈
swipe_along 接口可以 实现连续划过一系列坐标 ,因此我们可以使用这个接口实现一些连续滑动的操作,比如手机屏幕的 滑动解锁 等。
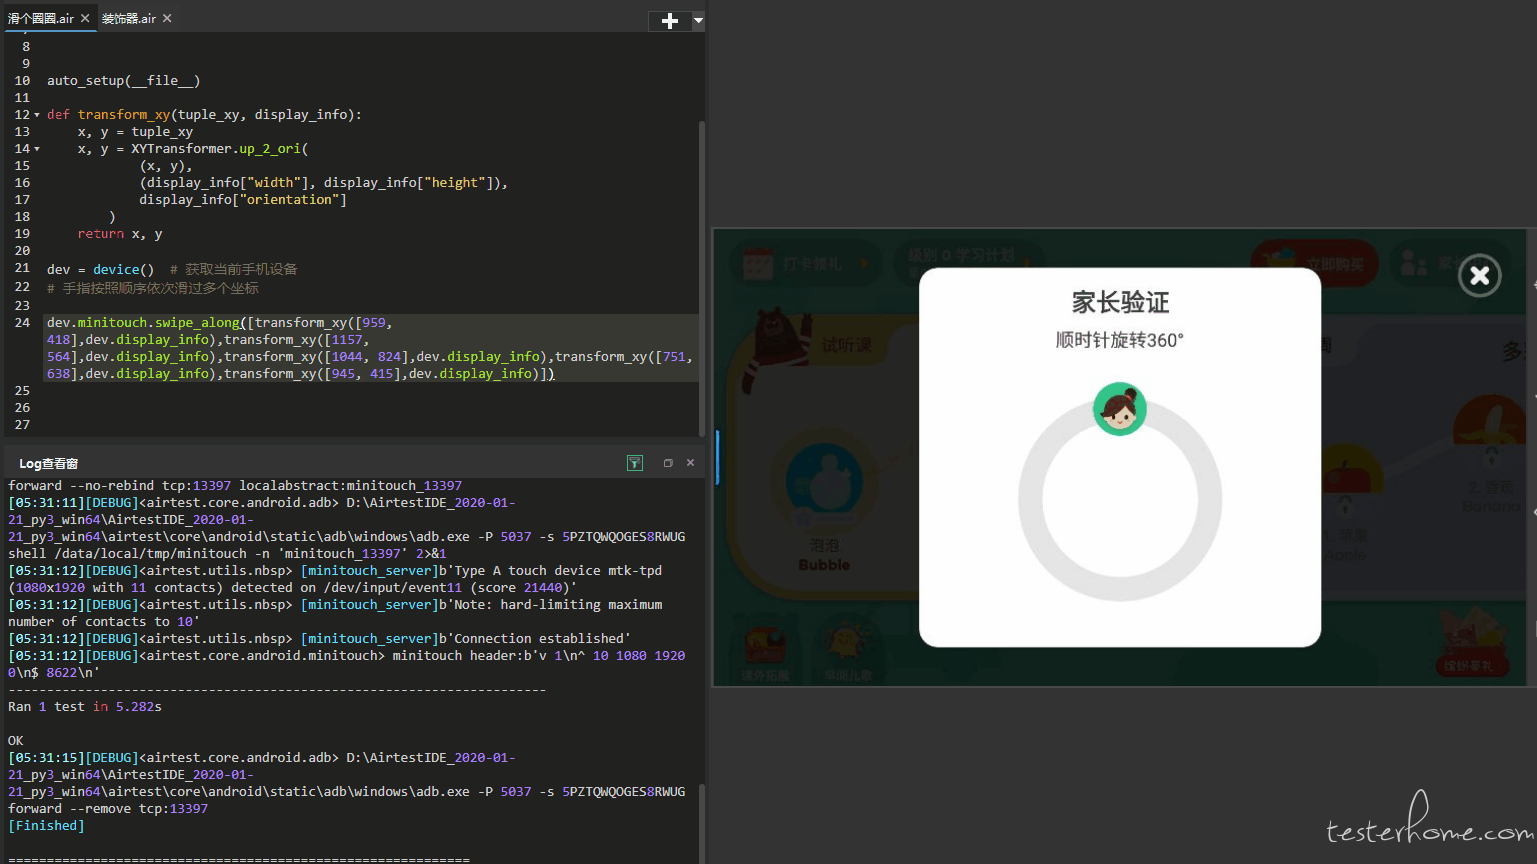
以应用 “叽里呱啦 app” 为例,在首页右上角的 “家长中心” 中,我们需要滑动 1 个 360°的圆圈才能够完成认证:

特别需要注意的是,在 airtest1.1.3 版本,该接口在 Android.minitouch 下,所以我们在使用时,就需要这么调用: dev.minitouch.swipe_along()。
# -*- encoding=utf8 -*-
# airtest版本为1.1.3
__author__ = "AirtestProject"

from airtest.core.api import *
from airtest.core.android.minitouch import *
from airtest.core.android.rotation import XYTransformer

auto_setup(__file__)

# 横竖屏坐标转换
def transform_xy(tuple_xy, display_info):
    x, y = tuple_xy
    x, y = XYTransformer.up_2_ori(
            (x, y),
            (display_info["width"], display_info["height"]),
            display_info["orientation"]
        )
    return x, y

dev = device()  # 获取当前手机设备
# 手指按照顺序依次滑过多个坐标

dev.minitouch.swipe_along([transform_xy([959, 418],dev.display_info),transform_xy([1157, 564],dev.display_info),transform_xy([1044, 824],dev.display_info),transform_xy([751, 638],dev.display_info),transform_xy([945, 415],dev.display_info)])
而在 airtest1.1.4 版本中,该接口可以 在 Android 层面直接调用,即这么调用即可: dev.swipe_along() 。(注意 1.1.4 版本帮我们做了坐标转换,所以在这里我们可以省略转换的操作):
# -*- encoding=utf8 -*-
__author__ = "AirtestProject"

from airtest.core.api import *
# from airtest.core.android.minitouch import *
from airtest.core.android.rotation import XYTransformer

auto_setup(__file__)

# 获取当前手机设备
dev = device()
# 手指按照顺序依次滑过多个坐标
dev.swipe_along([[959, 418],[1157, 564],[1044, 824],[751, 638],[945, 415]])
(6)双指缩放操作
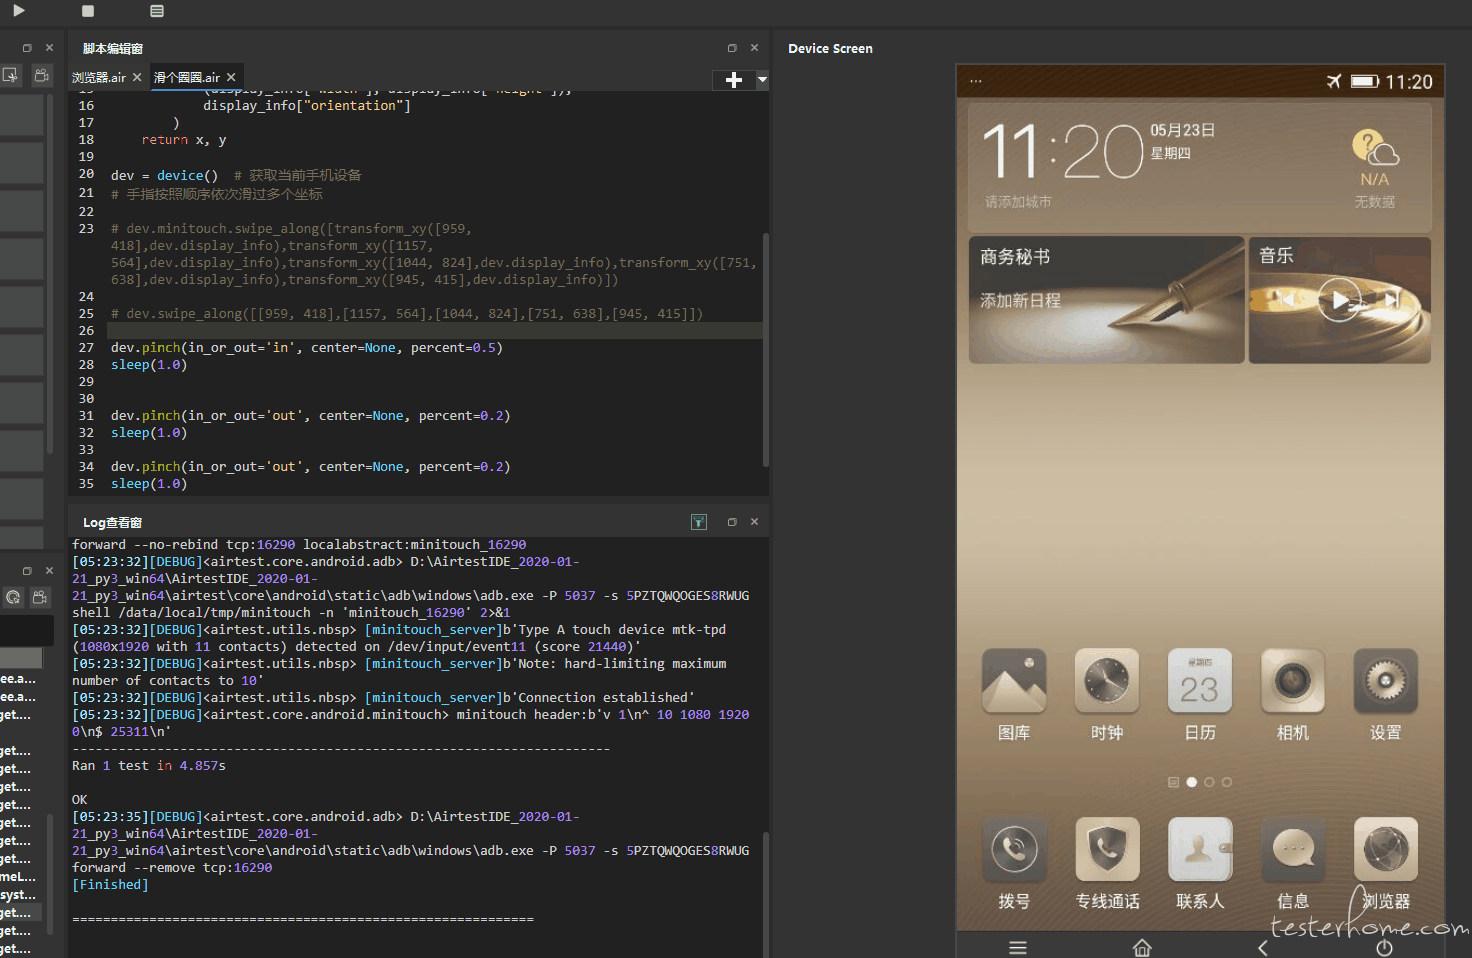
打开手机相册,随意选取一张图片,然后我们用这张图片来示范双指捏合操作,实现放大缩小图片的效果:

# 获取当前手机设备
dev = device()

# 向内捏合
dev.pinch(in_or_out='in', center=None, percent=0.5)
sleep(1.0)

# 向外捏合
dev.pinch(in_or_out='out', center=None, percent=0.2)
sleep(1.0)

dev.pinch(in_or_out='out', center=None, percent=0.2)
sleep(1.0)
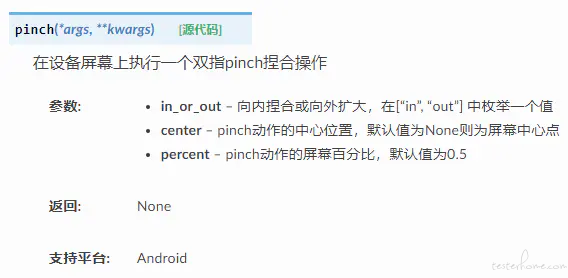
pinch() 接口的参数

常见问题
ImportError: sys.meta_path is None, Python is likely shutting down
参考:https://github.com/AirtestProject/Poco/issues/52
当调用了 poco().children() 和 poco().offspring() 时,中途会创建出大量的 UIProxy 临时对象,这很容易导致远程对象释放异常,可以尝试下下面的写法。
frozen_poco = poco.freeze()
for child in frozen_poco('xxx').children():
    pass