KIF 的全称是 Keep it functional。它是一个建立在 XCTest 的 UI 测试框架,通过 accessibility 来定位具体的控件,再利用私有的 API 来操作 UI。由于是建立在 XCTest 上的,所以你可以完美的借助 XCode 的测试相关工具。
一,测试环境搭建
KIF 框架依赖工程源码进行测试的,所以要能从开发处拿到被测试工程的源码,然后在搭建相应的测试环境。
1,命令行安装 pod:
sudo gem install cocoapods
2,修改或创建工程的 pod 文件 :Podfile,
如下所示:
# Uncomment the next line to define a global platform for your project
# platform :ios, '9.0'

target 'TenMinDemo' do
    # Uncomment the next line if you're using Swift or would like to use dynamic frameworks
    #  use_frameworks!

    # Pods for CYXText
    pod 'AFNetworking', '~> 3.0'
    pod "SDWebImage"
    pod "MJExtension"
    pod "MJRefresh"
    pod 'SVProgressHUD'
    pod 'ReactiveObjC'

end

target 'TenMinDemoTests' do
    use_frameworks!
    pod 'KIF', '~> 3.5.1'
end
其中如下一段内容为新添加的:
target 'TenMinDemoTests' do //测试工程名
use_frameworks!
pod 'KIF', '~> 3.5.1'
end
3,执行安装命令:
pod install
安装相应的内容。
4,在现有工程中添加 Target 实现
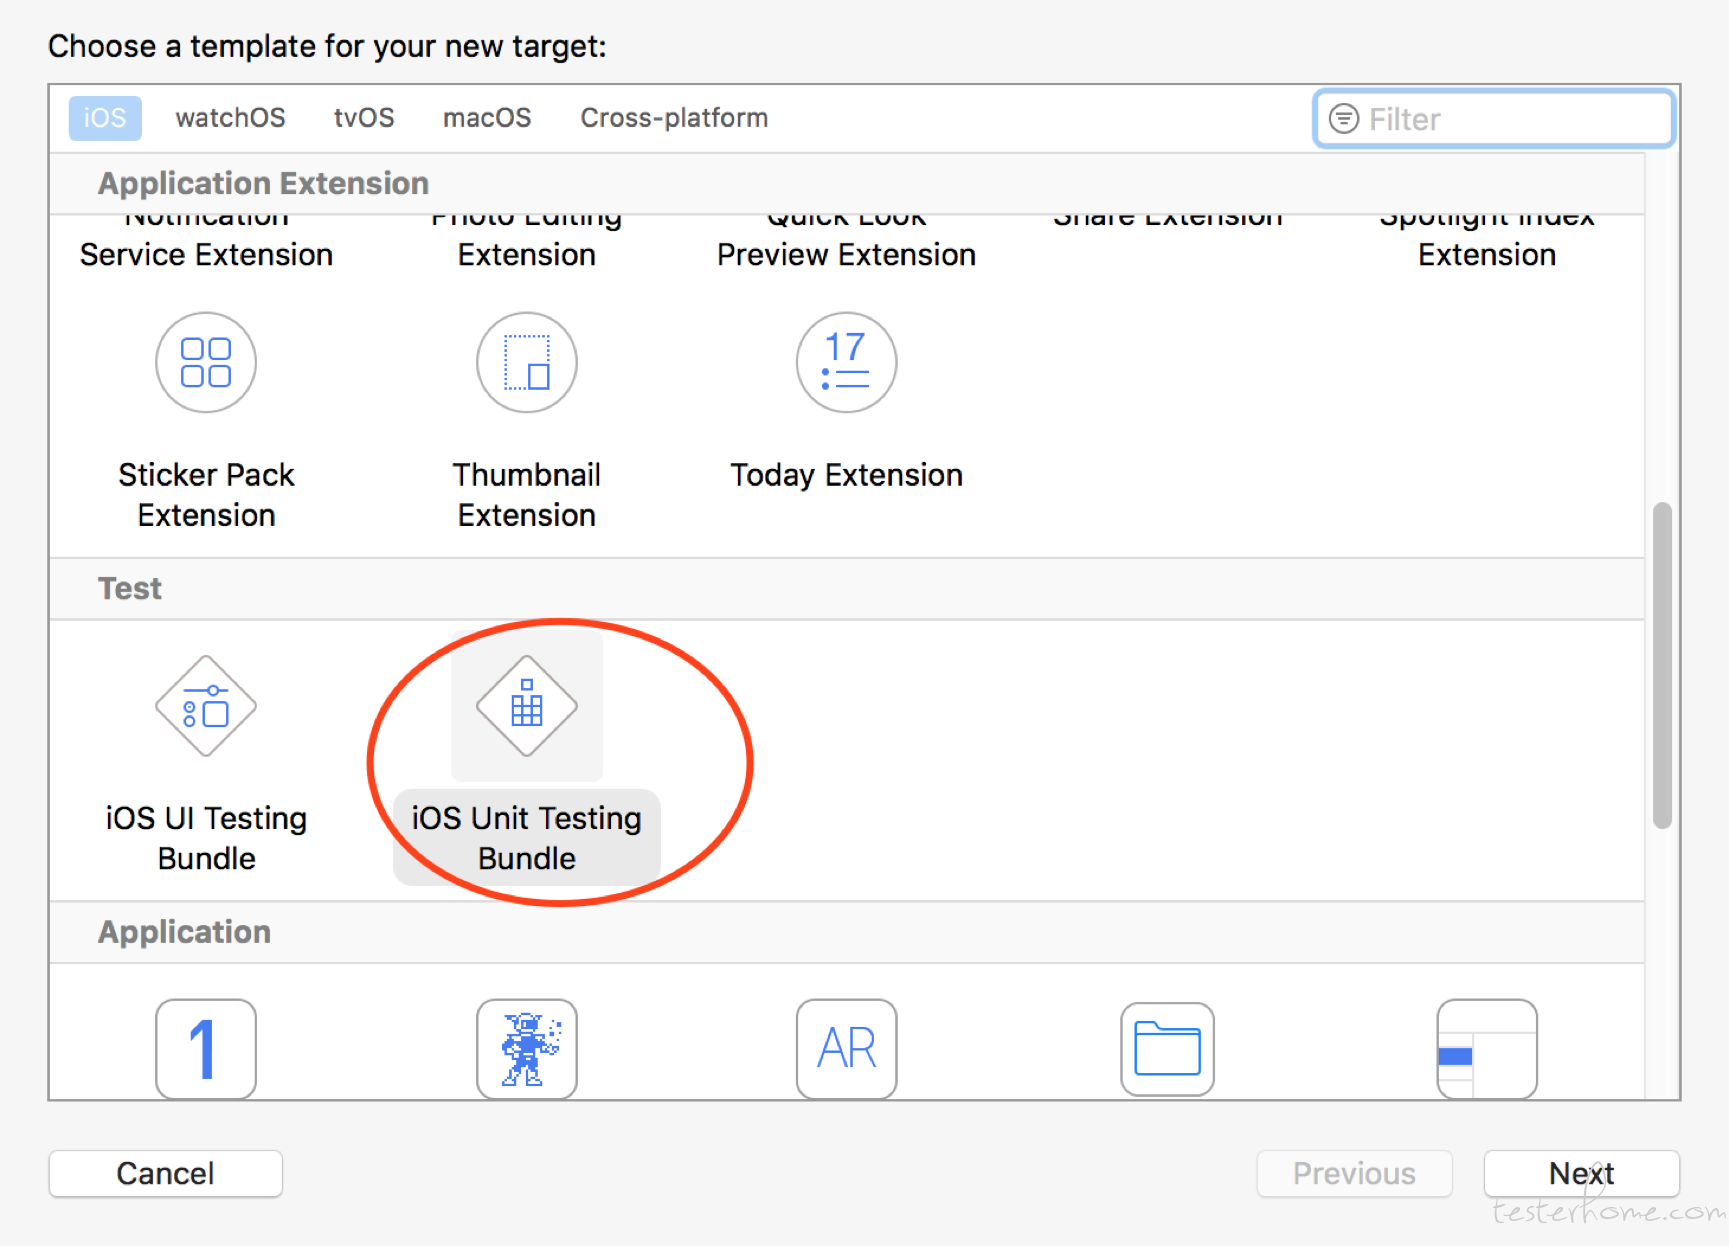
选择 File→New→Target…菜单项, 从中选择 iOS→Other 中的 Cocoa Touch Unit Testing Bundle 模板.如下图所示:

单击下一步,进行相应的设置页:
5,设置测试工程相关项:

● Product Name:KIF 测试工程名,可以自由命名,最好是测试工程名 +” Tests”。
● Organization Name, Organization identifier, Bundle identifier,根据需要自行全名即可。
● Language:编码语言,有 Objective-C 和 Swift,默认选择 OC.
● Project 和 Target to be Tested:为对应的要测试的工程名,一定要保证是正确的。
● 单击 “Finish” 创建完成。
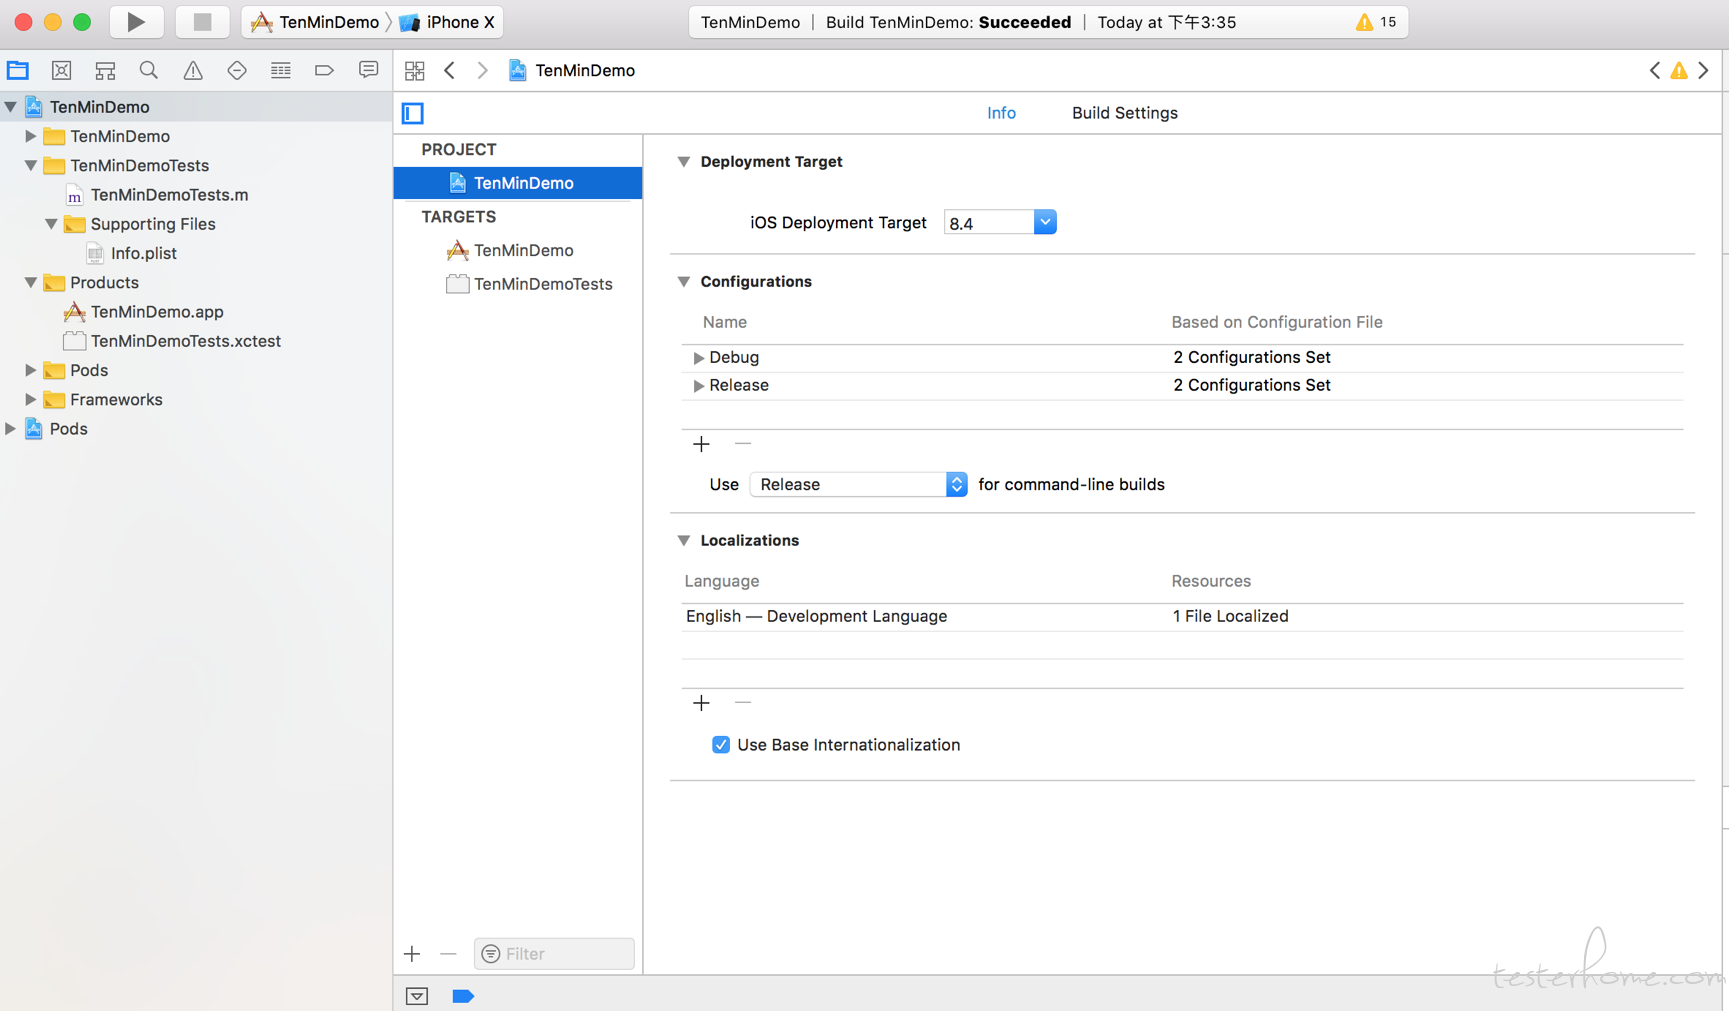
● 工程创建完成,如下所示:

** 生成 TenMinDemoTests 工程,同时生成 TenMinDemoTests.m 文件和 info.plist 文件。
*在 Products 文件夹中生成 “TenMinDemoTests.xctest” 文件。
**TenMinDemoTests.m 文件内容如下:
//
//  TenMinDemoTestsB.m
//  TenMinDemoTestsB
//  Created by GrowingIO on 2018/5/30.
//  Copyright © 2018年 SXF. All rights reserved.
//

#import <XCTest/XCTest.h>
@interface TenMinDemoTests : XCTestCase
@end
@implementation TenMinDemoTests
- (void)setUp {
    [super setUp];
    // Put setup code here. This method is called before the invocation of each test method in the class.
}
- (void)tearDown {
    // Put teardown code here. This method is called after the invocation of each test method in the class.
    [super tearDown];
}
- (void)testExample {
    // This is an example of a functional test case.
    // Use XCTAssert and related functions to verify your tests produce the correct results.
}
- (void)testPerformanceExample {
    // This is an example of a performance test case.
    [self measureBlock:^{
        // Put the code you want to measure the time of here.
    }];
}
@end
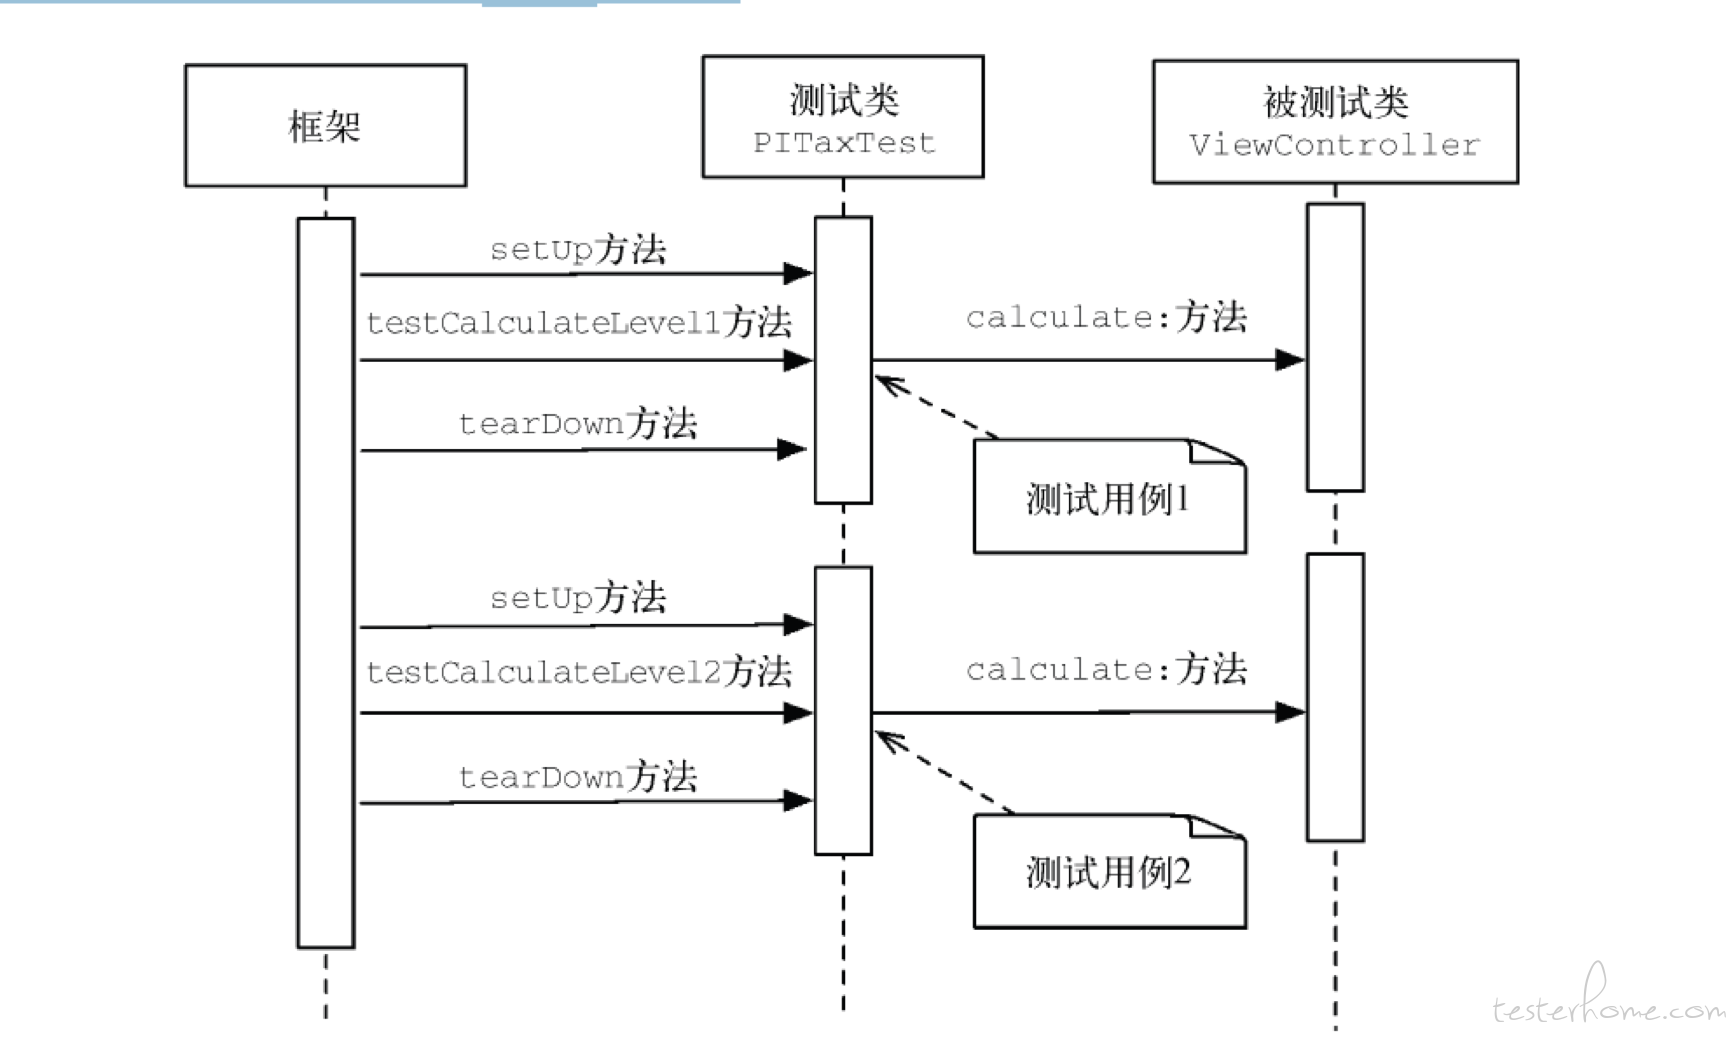
各个函数相互作用及执行顺序如下图所示:

二,测试用例编写
KIF 和其他测试框架类似,通过 OC 编写代码实现我们的测试步骤,进而去检测操作完成的结果。下面我们以一个简单而完整的用例来说明一下测试用例如何编写:
1,手工用例步骤介绍:
(1)我从网上下载的一个 Demo,工程名为 TenMinDemo,选择其中的一个功能,登录:打开 app,选择 “博文” 项
(2)输入用户名:dingdone 和密码:123456,单击 “登录” 按钮,登录成功。
(3)检测是否进入到了列表页。
2,代码测试用例如下:
//LoginTests.m
//
//  LoginTest.m
//  TenMinDemoTests
//
//  Created by GrowingIO on 2018/5/31.
//  Copyright © 2018年 SXF. All rights reserved.
//

#import "LoginTest.h"

@implementation LoginTest
- (void)setUp {
// Put setup code here. This method is called before the invocation of each test method in the class.
}
- (void)tearDown {
// Put teardown code here. This method is called after the invocation of each test method in the class.

}
- (void)testLogin {
    //单击“博文”
    [tester tapViewWithAccessibilityLabel:@"博文"];
    //输出用户名和密码
    [tester clearTextFromViewWithAccessibilityLabel:@"usename"];
    [tester enterText:@"dingdone\n" intoViewWithAccessibilityLabel:@"usename"];
    [tester clearTextFromViewWithAccessibilityLabel:@"password"];
    [tester enterText:@"123456\n" intoViewWithAccessibilityLabel:@"password"];
    //等待1秒
    [tester waitForTimeInterval:1];
    //单击登录按钮
    [tester tapViewWithAccessibilityLabel:@"login"];
    [tester waitForTimeInterval:5];
    //获取列表页view
    UITableView *utable=[tester waitForViewWithAccessibilityLabel:@"tableView"];
    //获取tableview第二行
    NSIndexPath *index = [NSIndexPath indexPathForRow:1 inSection:0];
    UITableViewCell *utvc=[tester waitForCellAtIndexPath:index inTableView:utable];
    if (@available(iOS 11.0, *)) {
        //判断第二行的内容是否符合预期
        //NSLog(@"Cell Content:%@",utvc.textLabel.text);
        XCTAssertEqualObjects(utvc.textLabel.text, @"第2行");
    } else {
        // Fallback on earlier versions
    }
}
@
上面的代码添加了详细的注释,内容也比较简单,就不逐步介绍了。注意:KIF 是基于 XCText 的,基本的判断语句都是 XCTest 的。
3,KIF API 简介
KIF API 相关的介绍挺多,只是不太全面,下面我介绍几个不错的网站:
(1)KIF API 的中文翻译https://www.jianshu.com/p/87bbbb798926,
感觉好像不太全;
(2)官网上的源码及其介绍:https://github.com/kif-framework/KIF.
(3)KIFUITestActor Doc:http://cocoadocs.org/docsets/KIF/3.2.1/Classes/KIFUITestActor.html,这个网站内容比较全面,只是英文的,不 *** 能不能打开还不清楚。
很多新的技术都有一个特点,就是相关的文档非常少,这也没有办法;可是换个想法来看,如果相关技术文档到处都是,这项技术学了也没有什么优势了。
三,测试用例集及命令行执行
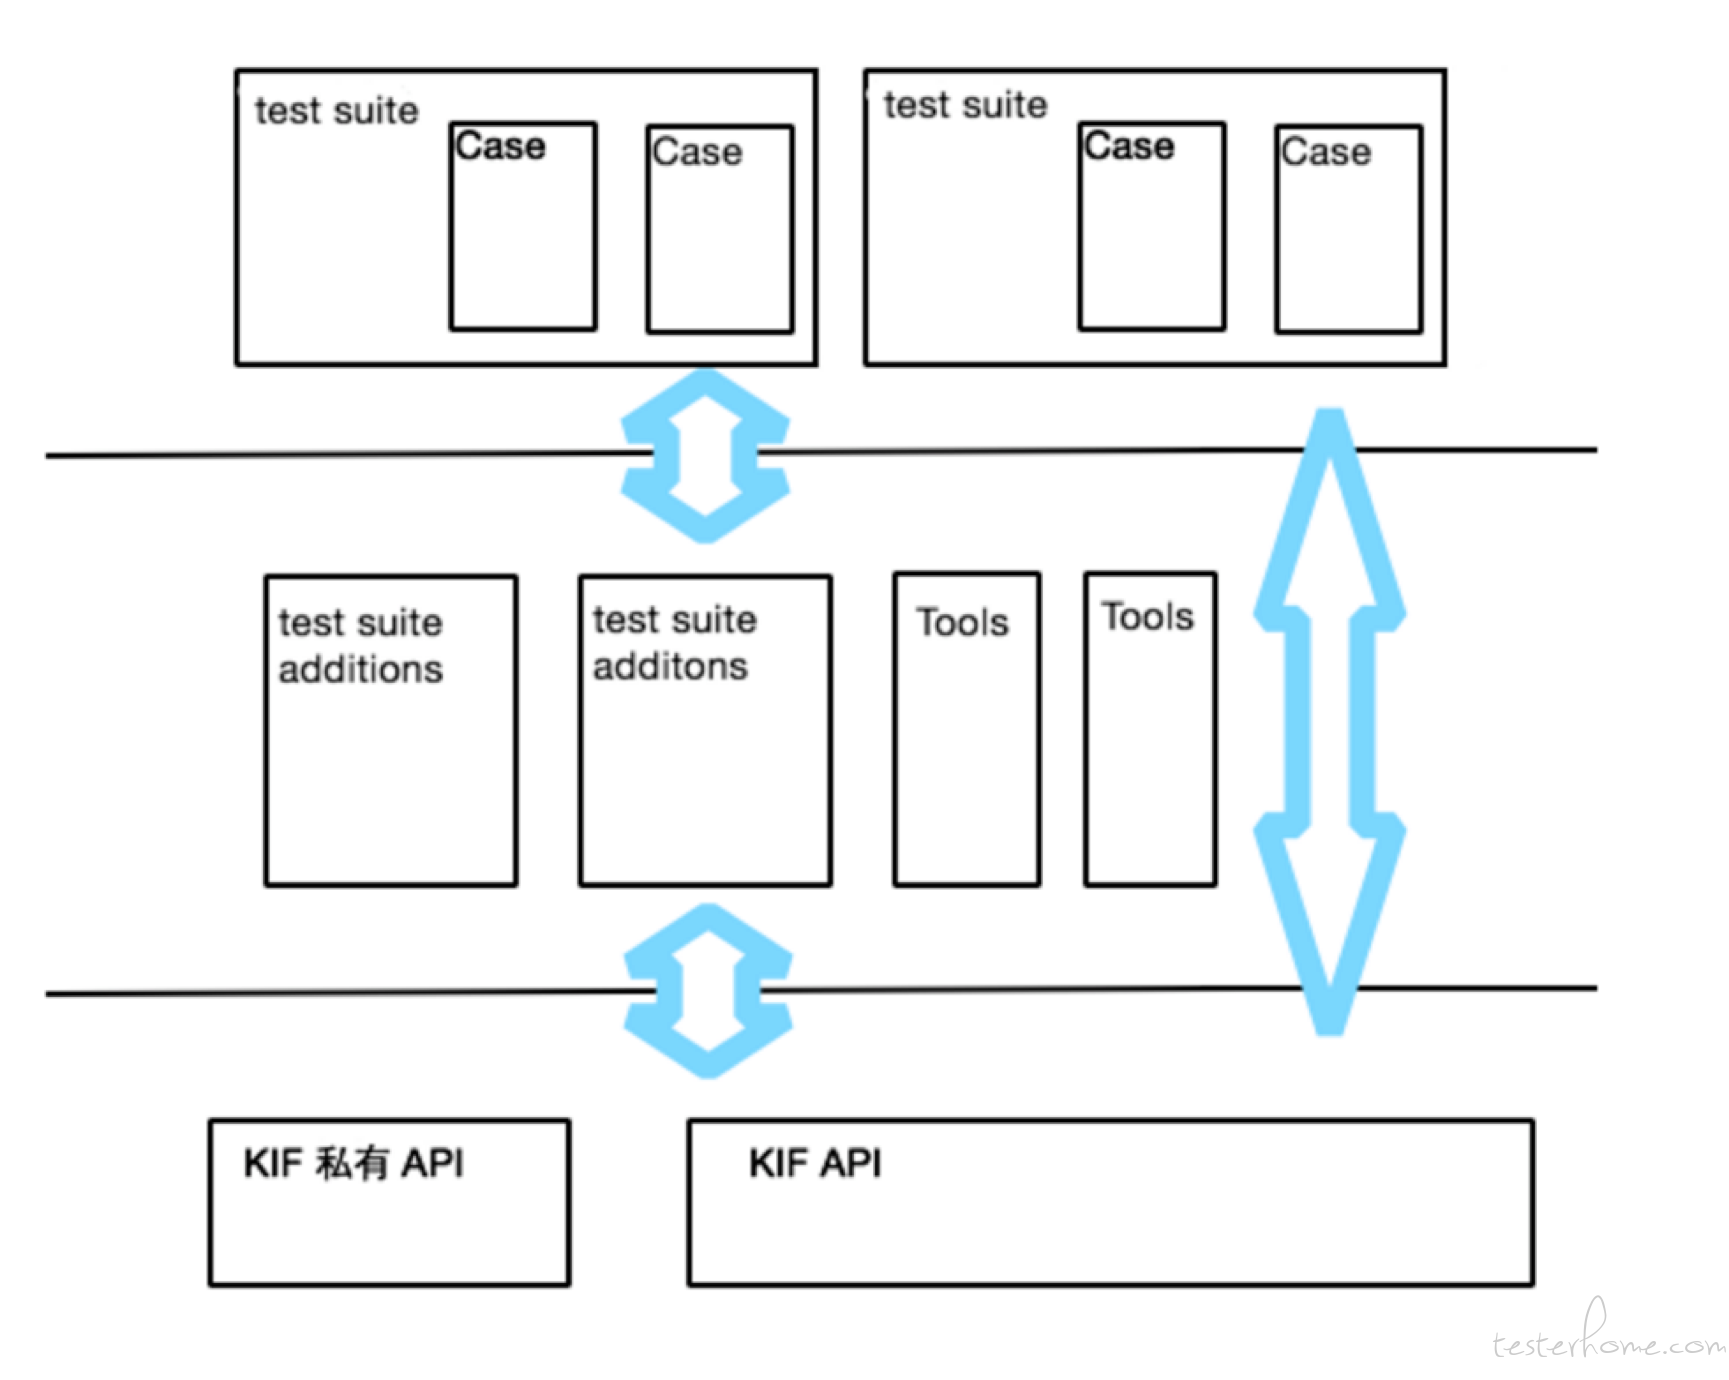
目前 KIF 一个 Kiftestcase 类就相当于一个测试用例集,我们可以简单地利用类的方式来组织测试用例,类中的每个以 test**** 开头的函数均是一个测试用例。当然基于 KIF 开源的特性,我们可以开发其他的用例集管理方式或是工具,如下图所示:

(图片来源于:https://tech.meituan.com/iOS-UITest-KIF.html)
任何自动化测试最终的归宿都是 CI(持续化集成),当然我们的 KIF 自动化也需要做持续化集成。而在做持续化集成前,需要调研如何通过命令行来执行测试用例?
(1)将项目设置成 shared
从 product->Scheme->manage schemes,查看项目是否是 shared,如果不是,则选中后面的复选框将其共享。

(2)借助于 xctool 来执行测试用例
Xctool 源码地址:https://github.com/facebook/xctoolhttps://blog.csdn.net/jeikerxiao/article/details/51669451,可以去查看一下如何安装和使用:
而运行我们的示例代码应该是:
xctool -workspace XXX.xcworkspace –schem XXYYY run-tests XXXtests:测试用例集 -sdk "iphonesimulator11.3"
同时可以通过-only 来指定运行某个用例
(a) 运行单个测试用例
xctool -workspace TenMinDemo.xcworkspace -scheme TenMinDemo run-tests -only TenMinDemoTests:LoginTest/testlogin -sdk "iphonesimulator11.3"
(b) 运行一个测试用例集
xctool -workspace TenMinDemo.xcworkspace -scheme TenMinDemo run-tests TenMinDemoTests:LoginTest -sdk "iphonesimulator11.3"