-
大厂面试总结 at 2021年09月09日
感觉很牛逼了。
-
appium 启动真机应用时报错 at 2018年02月08日
加个"automationName": "UiAutomator2",试试。
-
app-inspector 连接安卓真机出错 Internal Server Error at 2018年02月08日
删除%userprofile%\AppData\Roaming\npm\node_modules\app-inspector\node_modules 下边的 uiautomatorwd 文件夹,然后执行:npm i uiautomatorwd@1.0.45 -g
-
Appium 文档翻译计划 2017 完成! at 2017年08月22日
https://github.com/appium/appium/blob/master/docs/cn/writing-running-appium/default-capabilities-arg.md, 里边有一行翻译错误:Windows 用户在命令行传递 JSON 时记得去掉引号,实际应该为:Windows 用户在命令行中使用时需要转义 JSON 中的引号。
-
Appium 九宫格 手势解锁 at 2017年08月22日
这个移动的是偏移量真的很坑,函数提示里边只有:Move the pointer from the previous point to the element or point specified(将指针从上一个点移动到指定的元素或点),最后在官方 github 帮助文档上找到是移动偏移量。
-
[已解决] 在做自动化时,怎么对没有 resource-id 和 text 的标签做 duanya at 2017年08月21日
难道不可以定位到当前元素前边或后边有 resource-id 或 text 的元素,再用 xpath 中的 preceding-sibling 或者 following-sibling 方法定位到当前元素进行判断吗?或者使用 UiSelectors 或 UiScrollable。
-
Appium 最新版服务启动后不可用 at 2017年06月22日
两个都有,两个都能用。
-
Appium 最新版服务启动后不可用 at 2017年06月22日
2.7,刚试了分号能运行,可能有强迫症。
-
Appium 最新版服务启动后不可用 at 2017年06月22日
我的新版是正常的,不知道你那一点出错,发现你里边出现 3 个错误,你可以修改试一下。
1、每句代码后不加分号。
2、最好导入 from appium import webdriver,而不是 from selenium import webdriver。
3、远程地址应该为:driver = webdriver.Remote('http://localhost:4723/wd/hub', desired_caps) -
这个帖子不错,解决所有问题,app-inspector 又可以跑起来了。
-
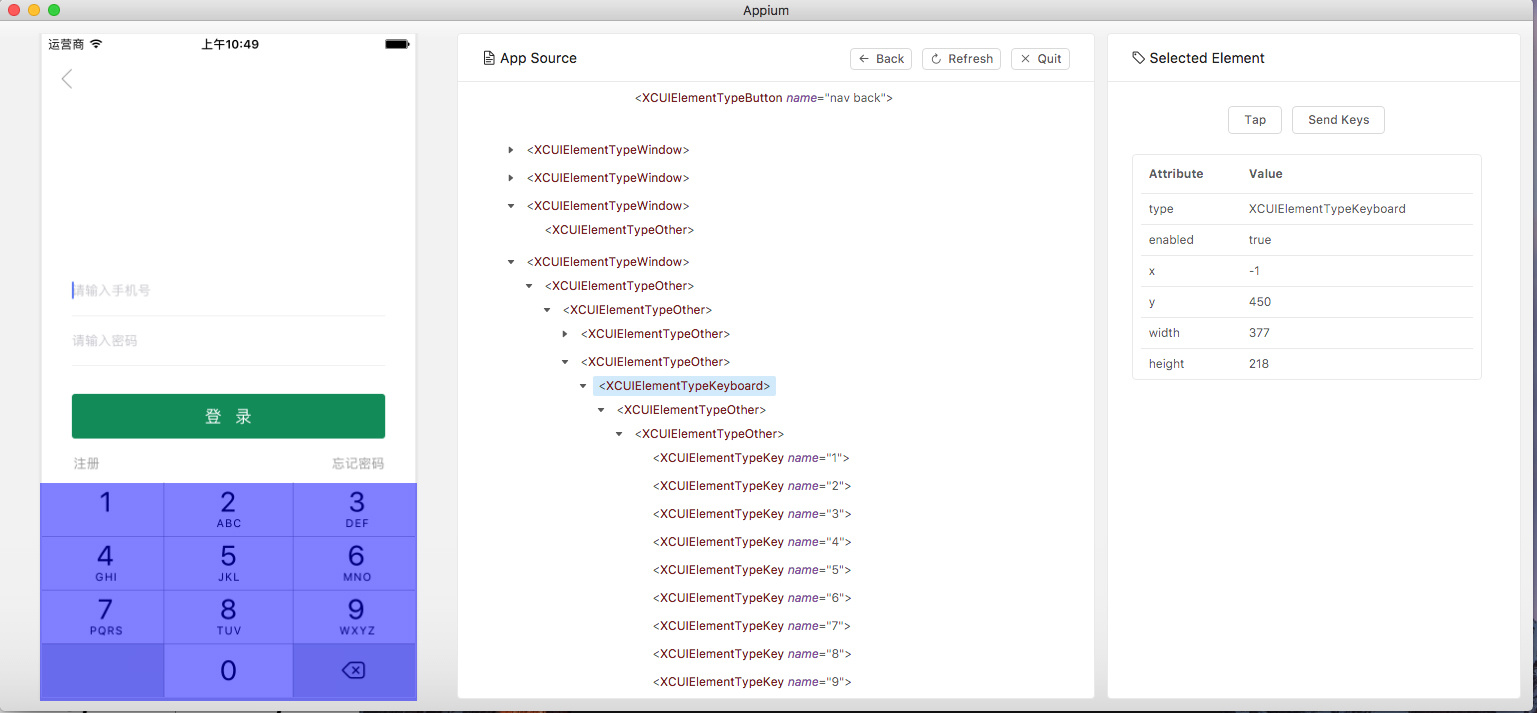
WebDriverAgent 不支持数字键盘 sendkeys 的解决方法 at 2017年03月10日
我们公司自己的 app。
-
WebDriverAgent 不支持数字键盘 sendkeys 的解决方法 at 2017年03月10日
可能用的语言不一样,python 写的 send_keys 正常。
-
WebDriverAgent 不支持数字键盘 sendkeys 的解决方法 at 2017年03月09日
刚在 10.2 模拟器上试了可以 send_keys 呀,1.6.3 版本。
-
Appium Desktop 简单介绍 —— xcodebuild failed with code 65 解决 at 2017年03月08日
已下载试用,感觉还不错。
-
今天在真机上试时也遇到这个问题,主要是真机上没有安装 WebDriverAgent,查找文档终于搞定:
前提:先安装 brew install libimobiledevice --HEAD、npm install -g ios-deploy
1、终端:which apium,找到 appium 安装路径,比如:/usr/local/bin/appium
2、切换到 WebDriverAgent 工程文件夹,比如:/usr/local/lib/node_modules/appium/node_modules/appium-xcuitest-driver/WebDriverAgent
3、执行 :
mkdir -p Resources/WebDriverAgent.bundle
./Scripts/bootstrap.sh -d
3、打开 Finder,用 command+shift+g,定位到这个文件夹,用 xcode 打开这个文件夹下的 WebDriverAgent.xcodeproj 工程。
4、对于 WebDriverAgentLib 和 WebDriverAgentRunner 选择 “自动签名”,Team 选择自己公司的,build 一下看是否正常。
5、替换自己设备的 udid,执行命令:xcodebuild -project /usr/local/lib/node_modules/appium/node_modules/appium-xcuitest-driver/WebDriverAgent/WebDriverAgent.xcodeproj -scheme WebDriverAgentRunner -destination 'id=udid' test
6、安装成功后,结果应该为:
Test Suite 'All tests' started at 2017-01-23 15:49:12.585
Test Suite 'WebDriverAgentRunner.xctest' started at 2017-01-23 15:49:12.586
Test Suite 'UITestingUITests' started at 2017-01-23 15:49:12.587
Test Case '-[UITestingUITests testRunner]' started.
t = 0.00s Start Test at 2017-01-23 15:49:12.588
t = 0.00s Set Up -
求助:使用 appium 中 set_network_connection 方法设置手机网络,实际无效果 at 2017年03月03日
这个方法针对安卓手机,试了试是有效果的。
print driver.network_connection
driver.set_network_connection(1) //1、飞行模式 2、wifi 4、数据连接 6、wifi+ 数据连接
print driver.network_connection -
求助:python 测试 APP 如何切换到 webview,可以分享一下吗 at 2017年03月01日
很无语了,下边报错提示都说明了,google 翻译一下。
-
求助:python 测试 APP 如何切换到 webview,可以分享一下吗 at 2017年03月01日
#coding=utf-8
from appium import webdriver
from selenium.webdriver.common.keys import Keys
from appium.webdriver.webdriver import WebDriverWait
from appium.webdriver.common.mobileby import MobileBy
from appium.webdriver.switch_to import MobileSwitchTo
from appium.webdriver.common.touch_action import TouchAction
from selenium.webdriver.support import expected_conditions as EC
from time import sleepop = {}
op['platformName'] = 'Android'
op['deviceName'] = 'Android Emulator'
op['appPackage'] = 'com.sina.book'
op['appActivity'] = '.ui.activity.splash.SplashActivity'
op['unicodeKeyboard'] = True
op['resetKeyboard'] = True
op['newCommandTimeout'] = 10
op['noReset'] = True
driver = webdriver.Remote('http://localhost:4723/wd/hub,op')
WebDriverWait(driver, 10).until(EC.presence_of_element_located((MobileBy.XPATH,'//android.widget.TextView[@text="书城"]')))
driver.find_element_by_xpath('//android.widget.TextView[@text="书城"]').click()
driver.switch_to.context('WEBVIEW')
driver.find_element_by_css_selector('.main-nav > a:nth-child(1)').click() -
appium,元素定位 at 2017年03月01日
用 id 或者 content-desc。
-
求助:python 测试 APP 如何切换到 webview,可以分享一下吗 at 2017年03月01日
driver.switch_to.context('WEBVIEW') # 切换到 webview
driver.find_element_by_class_name('goods1').click() # 点击 webview 里边的元素,一个 m 站的网页元素。
driver.switch_to.context('NATIVE_APP') # 切换到原生 app我代码就是这样的,亲测可用。
-
Appium 安装卡在 Downloading Selendroid at 2017年02月06日
本机或者虚拟机弄个 www 服务环境,把 http://repo1.maven.org/maven2/io/selendroid/selendroid-standalone/0.17.0/selendroid-standalone-0.17.0-with-dependencies.jar 这个文件下载下来,本机 hosts 中新建一条 repo1.maven.org 指向本机或者虚拟机 ip,然后在 www 环境下新建目录 maven2/io/selendroid/selendroid-standalone/0.17.0 ,把 selendroid-standalone-0.17.0-with-dependencies.jar 拷贝进去。最后再进行安装。