白盒测试 用 hook 做测试之 Binder 跨进程通信
上篇 用 hook 做测试之静态 hook 提到了 hook 所涉及的一些技术。hook 也分静态和动态,那在说动态 hook 之前,先得了解一下 Android 中的跨进程通信
引言
跨进程通信几乎发生在 android 各大组件生命周期的所有阶段,所以,简单的了解一下跨进程的通信机制也是挺有必要的,本篇的结构如下:
- 进程间通信的 demo
- Binder 原理(点到为止版)
- 结合 Binder,再看 demo
跨进程通信 demo
官网的例子在这:https://developer.android.google.cn/guide/components/aidl.html
跨进程通信,所以至少有两个进程;通信,即 A 能调用 B 的方法,能成功 get/set
- 假如一个 app 只有一个进程的话,那就需要至少两个 app
- 假如只有一个 app,那这个 app 除了主进程之外,应该还有另外的进程。 这种情况其实很常见,例如,我们经常需要把自己写的 Service 运行在一个单独的进程,在 manifest 里用 process = “XXXProcess” 来标记它。这种方式通常作为一种 workaround(比如突破 android 6.0+ 的 doze 模式)
我们采用第一种,即两个 app 之间的通信,下面是两个 app 的项目结构:
app 是服务端,为了要声明它可以提供的服务,需要定义一个 aidl 的接口,这里的步骤就不赘述了,详见官网,完成后,声明的接口如下:
interface IAppServiceRemoteBinder {
    /**
     * Demonstrates some basic types that you can use as parameters
     * and return values in AIDL.
     */
    void basicTypes(int anInt, long aLong, boolean aBoolean, float aFloat,
            double aDouble, String aString);

    void setData(String data);
}
作为服务端,app 里面需要定义一个 Service 类,即app.MyService,代码如下:
package com.fenfenzhong.aboutaidl;

import android.app.Service;
import android.content.Intent;
import android.os.IBinder;
import android.os.RemoteException;
import android.os.SystemClock;

public class MyService extends Service {
    public MyService() {
    }

    private String data = "default";

    public void setData(String data) {
        this.data = data;
    }

    public String getData() {
        return data;
    }

    @Override
    public IBinder onBind(Intent intent) {
        // TODO: Return the communication channel to the service.
        System.out.println("service binded");
        return new  IAppServiceRemoteBinder.Stub() {
            @Override
            public void basicTypes(int anInt, long aLong, boolean aBoolean, float aFloat, double aDouble, String aString) throws RemoteException {

            }

            @Override
            public void setData(String data) throws RemoteException {
                MyService.this.setData(data);
            }
        };
    }

    @Override
    public boolean onUnbind(Intent intent)
    {
        System.out.println("service unbinded");
        return true;
    }

    @Override
    public void onCreate() {
        super.onCreate();
        serviceRunning = true;
        System.out.println("service created");

        new Thread() {
            @Override
            public void run() {
                super.run();
                while(serviceRunning) {
                    System.out.println(data);
                    SystemClock.sleep(1000);
                }
            }
        }.start();
    }

    @Override
    public void onDestroy() {
        super.onDestroy();
        System.out.println("service destroyed");
        serviceRunning = false;
    }

    private boolean serviceRunning = false;
}
可见,当 onBind 回调发生时,即有客户端绑定到该 Service 时,会 return 一个 IApplicationRemoteBinder.Stub() 的实例,它重写了上述接口里定义的两个方法,这个我们下面细说
除此之外,为了方便之后看到通信的效果,在 Service onCreate 时我们另起了一个线程,不断输出 data 变量
anotherapp 是客户端,它里面只有一个 Activity,即anotherapp.MainActivity,代码如下:
package com.fenfenzhong.anotherapp;

import android.content.ComponentName;
import android.content.Intent;
import android.content.ServiceConnection;
import android.os.Bundle;
import android.os.IBinder;
import android.os.Binder;
import android.os.RemoteException;
import android.support.v7.app.AppCompatActivity;
import android.view.View;
import android.widget.Button;
import android.widget.EditText;

import com.fenfenzhong.aboutaidl.IAppServiceRemoteBinder;

public class MainActivity extends AppCompatActivity implements View.OnClickListener, ServiceConnection {

    private Button startServiceBtn;
    private Button stopServiceBtn;
    private Button bindServiceBtn;
    private Button unbindServiceBtn;
    private Intent i ;
    private Button syncBtn;
    private EditText etAnother;
    private IAppServiceRemoteBinder binder;


    @Override
    protected void onCreate(Bundle savedInstanceState) {
        super.onCreate(savedInstanceState);
        setContentView(R.layout.activity_main);
        startServiceBtn = (Button) findViewById(R.id.startServiceBtn);
        stopServiceBtn = (Button) findViewById(R.id.stopServiceBtn);
        bindServiceBtn = (Button) findViewById(R.id.bindServiceBtn);
        unbindServiceBtn = (Button) findViewById(R.id.unbindServiceBtn);
        etAnother = (EditText) findViewById(R.id.etAnother);
        syncBtn = (Button) findViewById(R.id.syncBtn);
        i = new Intent();
        i.setComponent(new ComponentName("com.fenfenzhong.aboutaidl","com.fenfenzhong.aboutaidl.MyService"));
        startServiceBtn.setOnClickListener(this);
        stopServiceBtn.setOnClickListener(this);
        bindServiceBtn.setOnClickListener(this);
        unbindServiceBtn.setOnClickListener(this);
        syncBtn.setOnClickListener(this);
    }

    @Override
    public void onClick(View v) {
        switch (v.getId()){
            case R.id.startServiceBtn:
                startService(i);
                break;
            case R.id.stopServiceBtn:
                stopService(i);
                break;
            case R.id.bindServiceBtn:
                bindService(i,this,BIND_AUTO_CREATE);
                break;
            case R.id.unbindServiceBtn:
                unbindService(this);
                break;
            case R.id.syncBtn:
                String str = etAnother.getText().toString();
                if(binder!=null) {
                    try {
                        binder.setData(str);
                    } catch (RemoteException e) {
                        e.printStackTrace();
                    }
                }

        }
    }

    @Override
    public void onServiceConnected(ComponentName name, IBinder service) {

        binder = IAppServiceRemoteBinder.Stub.asInterface(service);

    }
}
anotherapp.MainActivity 实现了 ServiceConnection,并重写了它的 onServiceConnected 方法,这个方法是客户端连接上服务端之后的回调,一般在这里我们初始化可以跨进程通信的对象,即 binder,然后便可以调用 binder.setData(),来改变 app 里的 data 值,看下界面:
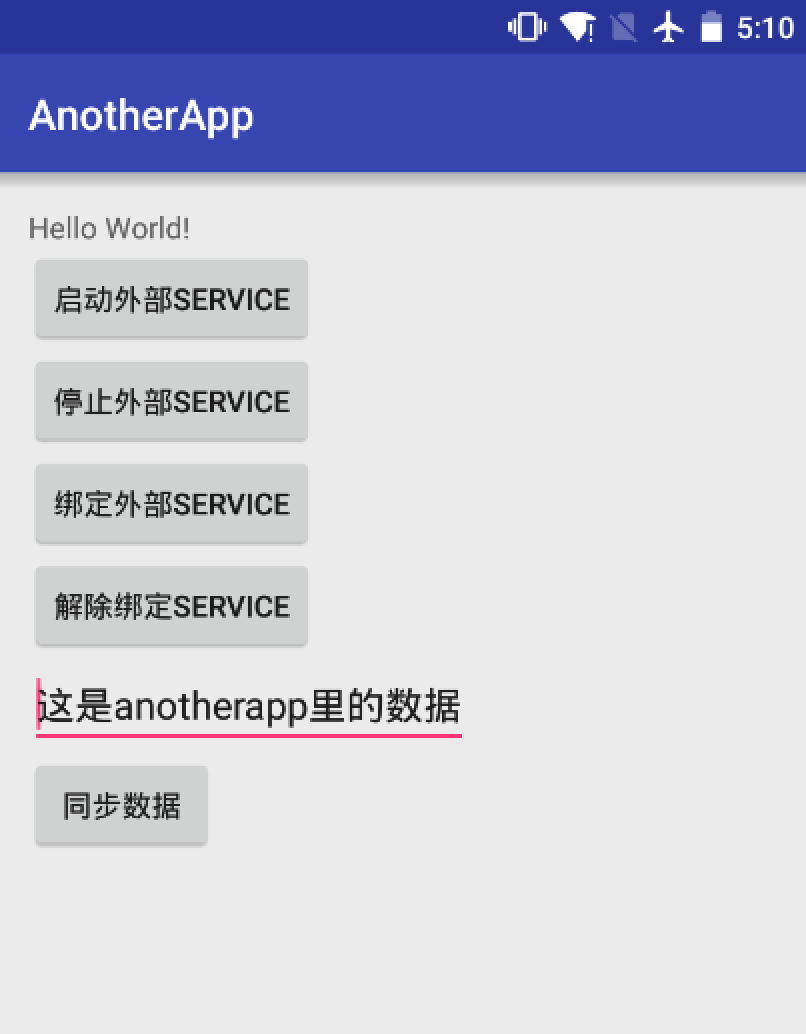
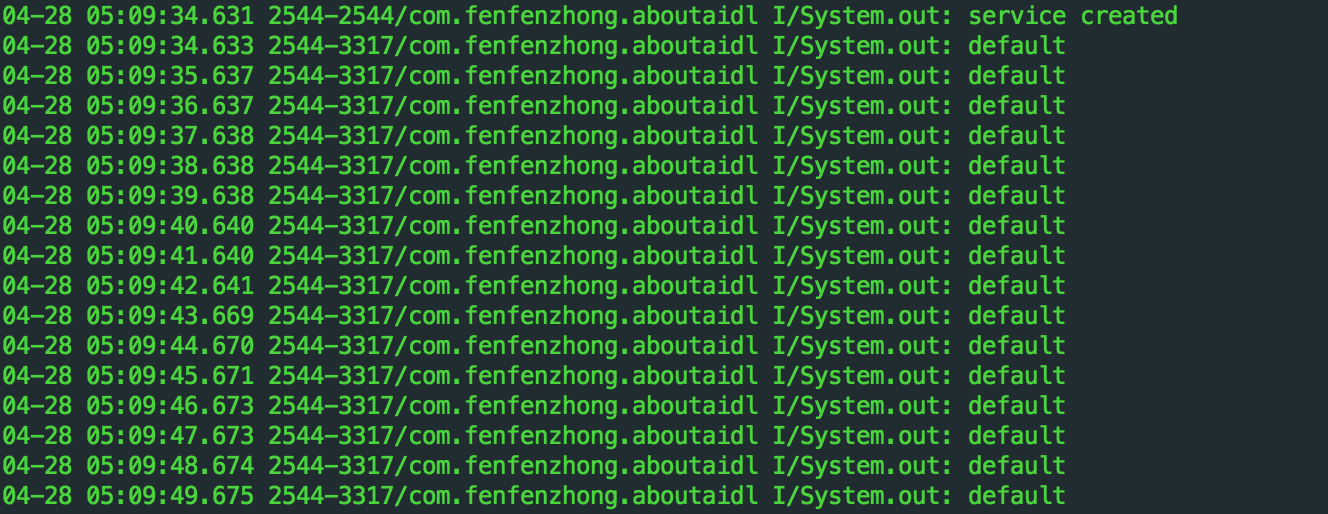
在 anotherapp 里启动外部 SERVICE 之后,可以看到 app 里的日志如下:
然后,绑定外部 SERVICE,并同步数据:
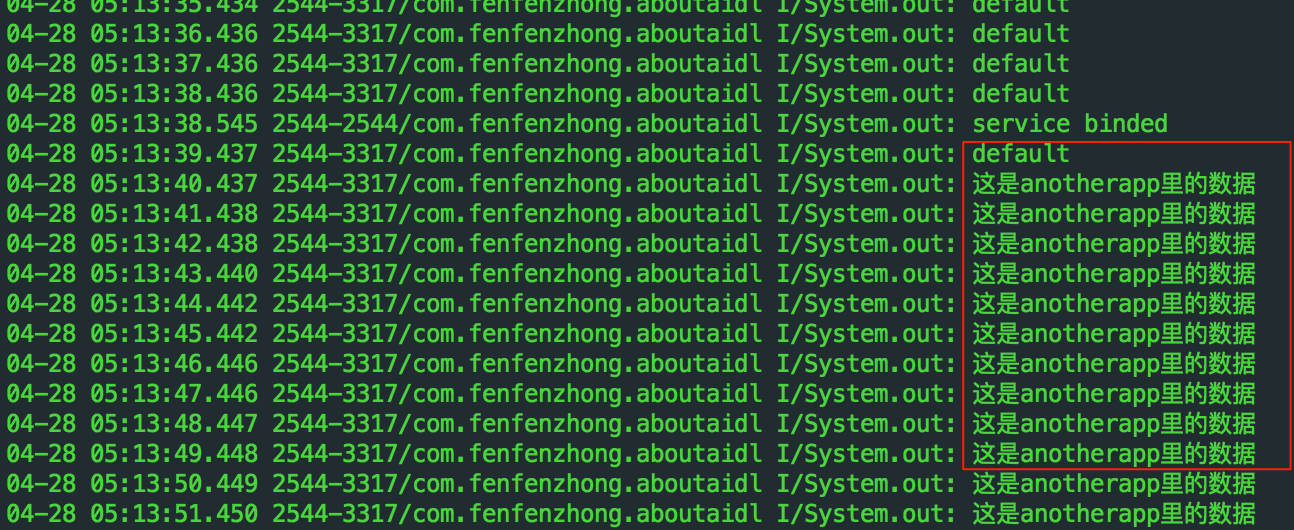
OK,出现以上日志,说明 anotherapp 成功的调用了 setData 更改了 app 里的 data 值,即最简单的跨进程通信
Binder
上面已经提到了 binder,关于 Binder 通信机制的分析,网上有一大堆,深入的看的云里雾里,我觉得可以不用看那么细,因为看了不用也是忘
推荐这篇: http://weishu.me/2016/01/12/binder-index-for-newer/ 和本篇,了解大概,点到为止
首先,Binder 是 Android 系统特有的跨进程通信机制,是机制,这种机制是建立在 C/S 架构上的
大家都知道 Android 是基于 Linux 的,原本 Linux 就有很多进程间通信机制了,比如 socket,管道,但是 Android 自己因为安全性、高效性等原因,自己又造了一个,也就是 Binder,Binder 最重要的工作模块,是 Binder 驱动,它运行于 Linux 的 Kernel Space,如下图:

Process A 不可能在用户空间直接与 Process B 交换信息,他们之间的通信需要经过系统调用,就是数据会流经 Kernel Space,在内核态接受这个数据的,就是 Binder 驱动
现在,系统里面可能有茫茫多的 Client 和 Server,Android 为了方便他们的管理,在他们之间建立了一个 ServiceManager,听名字就都知道是用来管理各个 Service 的。Server 先向 ServiceManager 注册,表示自己可以提供哪些 Service,Client 需要访问 Server 时,先向 ServiceManager 查询是否有对应的 Server。 因此这里有 3 个 C/S 的关系:
- Client(C) ------ ServiceManager(S)
- Server(C)------ ServiceManager(S)
- Client(C)----- Server(S)
最关键的,他们之间的通信,都是 Binder, 下面用一张图来表示 Binder 驱动在上述过程中起到的作用(既然都是 Binder,那搞清楚一边就行,我省去了 Server 到 ServiceManager 中间的 Binder 驱动)
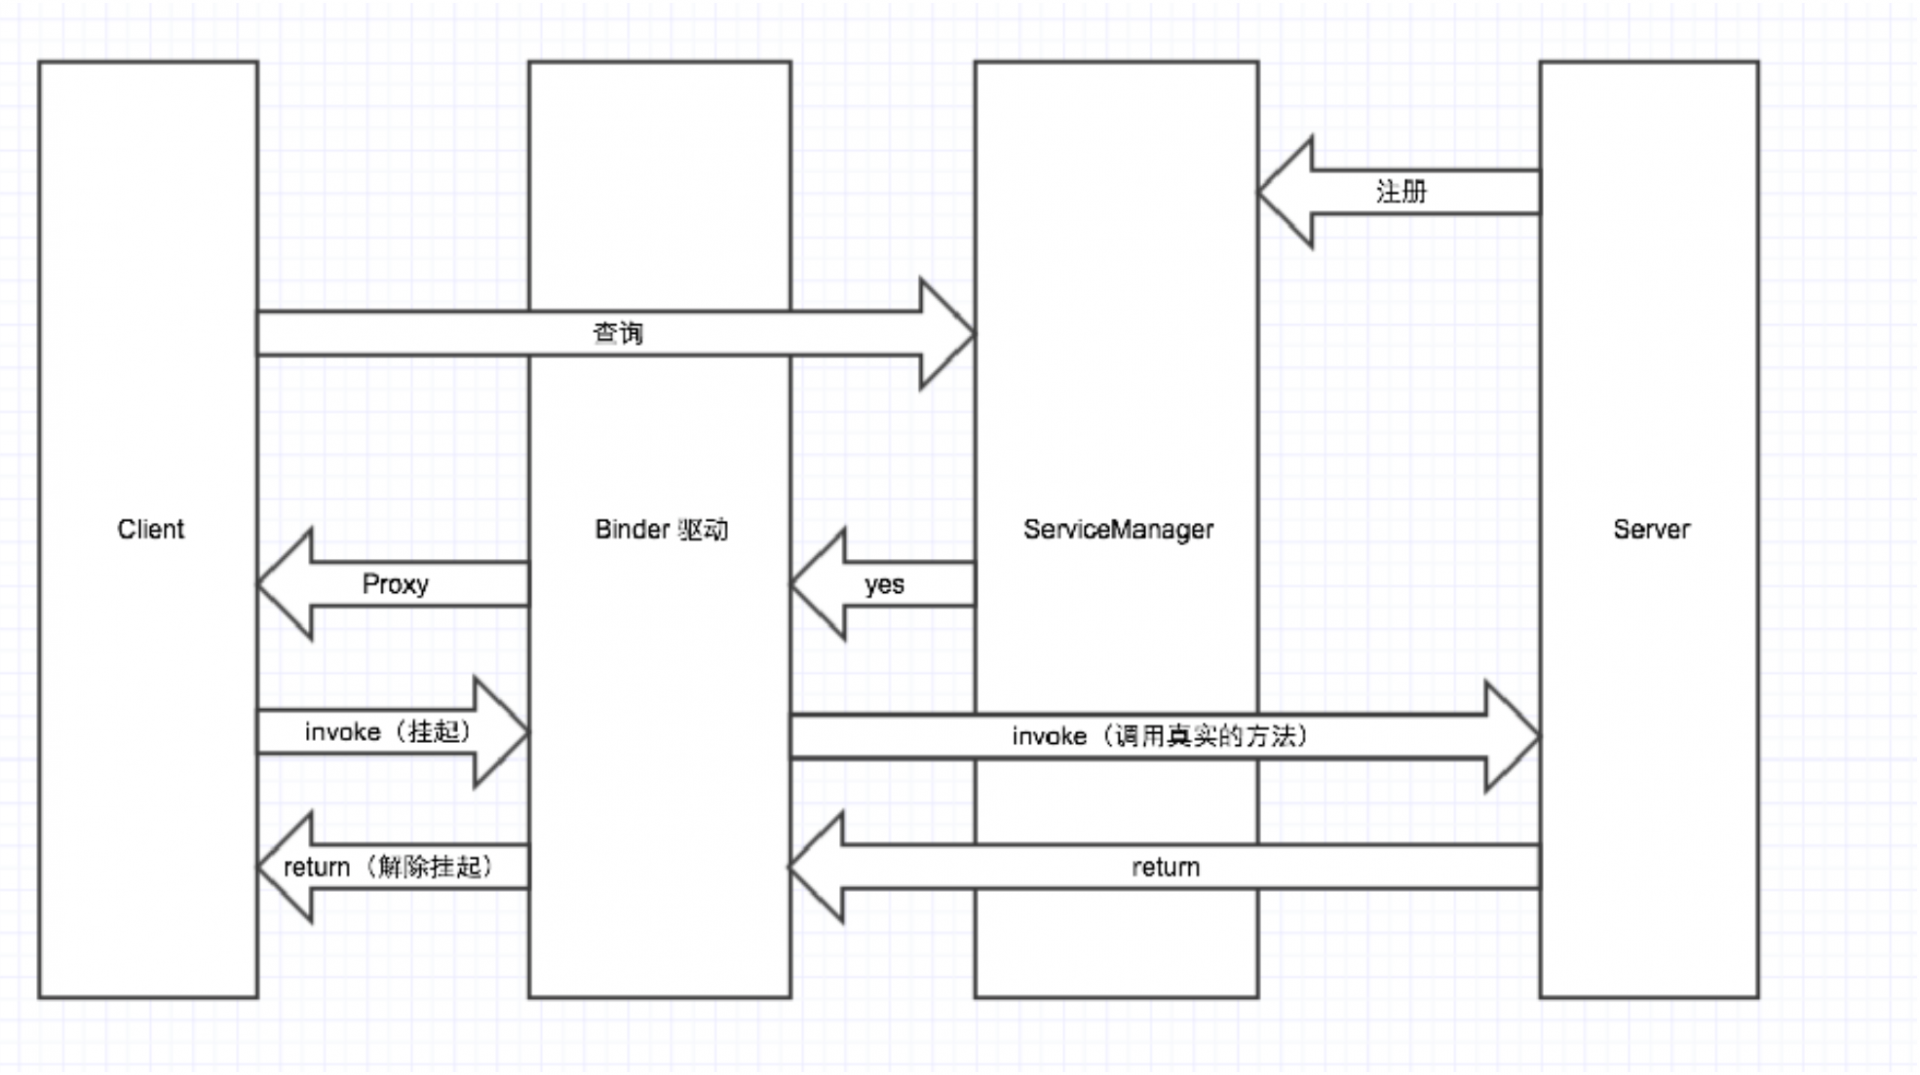
上图的几个关键处:
- Client, ServiceManager, Server 通常处于不同的进程,它们的通信都是跨进程通信,也就是要用到 Binder
- Client 向 ServiceManager 查询服务,如果命中,SM 会 返回 yes 给 Binder 驱动
- 而 Binder 会返回一个 Proxy 对象给 Client(非常重要,整篇核心),并记录 Proxy 与 Server 的对应关系,这个 Proxy 和真实的 service 实例结构完全相同,参数也一样
- Client 并不关心这个 Proxy 只是一个傀儡(或者说根本不用关心 ,他以为此时就是在与 real Server 打交道),发起调用,这个调用也经过 Binder 驱动,先挂起,再由 Binder 驱动向 real Server 发起真正的调用(注意,也是 Binder 跨进程,我省去了),调用结果返回之后,解除挂起
so,结合上述的 demo,我们可以得出一些结论:
- 在 Server onBind 时,返回 binder 对象给 Binder 驱动,然后驱动就可以用它来跨进程通信
- 在 Client onServiceConnected 时,在本地初始化一个 binder 对象(即一个 proxy),然后用这个 binder 跨进程通信
- 上述的 1 和 2,说明了 binder 事实上是高度的抽象,它代表了一种跨进程传输的能力,所以对于 binder 的使用者,根本不用在意中间的 Binder 驱动,拿到它,知道能跨进程就行
- Server 进程,持有的是 Binder 本地对象,这个对象所有系统只有一个
- Client 进程,持有的是 Binder 代理对象,这个对象星罗棋布,有非常多
Demo again
回过头来再看 Demo,最开始,我们在服务端那边,定义了一个 aidl 接口,用来声明它所具有的能力,来看下在项目中它被编译后的结果:
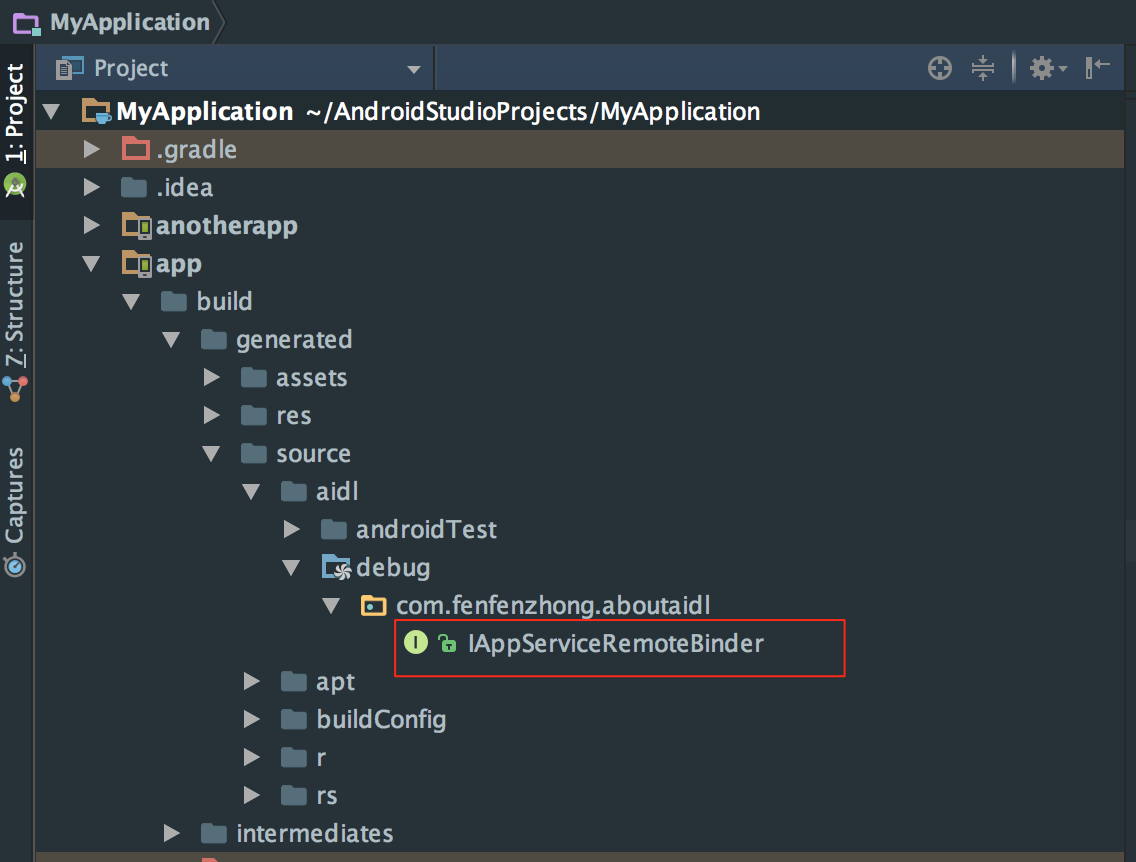
ok,点进去,format 一下代码,来印证我们上述关于 Binder 的一些观点:
- 首先 IAppServiceRemoteBinder 继承自 android.os.IInterface,那么,可以认为 IInterface 是用于描述 Server 具有何种能力的
- 在服务端(app),onBind 时,返回了一个 IAppServiceRemoteBinder.Stub() 类,这个类是 IAppServiceRemoteBinder 接口中的内部类,代表 Server 端持有的 Binder 本地对象。它继承了 Binder,并实现了 IAppServiceRemoteBinder 接口,所以既有跨进程上传输的能力,也有服务端声明的能力
- 在客户端(anotherapp),onServiceConnected 时,调用了 IAppServiceRemoteBinder.Stub.asInterface(service) , 参数 service 我们知道,肯定是 Binder 驱动返回的,看下 Stub.asInterface()做了什么:
public static com.fenfenzhong.aboutaidl.IAppServiceRemoteBinder asInterface(android.os.IBinder obj)  {
     if ((obj == null))
            {
                return null;
            }
            android.os.IInterface iin = obj.queryLocalInterface(DESCRIPTOR);
            if (((iin != null) && (iin instanceof com.fenfenzhong.aboutaidl.IAppServiceRemoteBinder)))
            {
                return ((com.fenfenzhong.aboutaidl.IAppServiceRemoteBinder) iin);
            }
            return new com.fenfenzhong.aboutaidl.IAppServiceRemoteBinder.Stub.Proxy(obj);
}
可见,它是在判断参数 obj 是不是本地的对象,如果是,就返回自己,如果不是,就 new 一个 Proxy 并返回! 所以,客户端 anotherapp 拿到的,必定是一个 Proxy:
- Proxy 类又是 Stub 的子类,完整路径是 IAppServiceRemoteBinder.Stub.Proxy(),代表 Client 持有的 Binder 代理对象
- 它只实现了 IAppServiceRemoteBinder 接口,说明它具有服务端声明的能力(回顾一下,Client 拿到 Proxy 后,它认为此时就在与 real Server 打交道,直接调用方法,只不过会被 Binder 驱动挂起),它内部有一个 mRemote,是 Binder 类型的变量,说明它把跨进程的能力封装在了内部
结语
Android 的 Binder 跨进程通信就到这里,主要为了动态 hook(下篇说)做铺垫。