前言
在第一章里,主要以 gtest 自带的 samples 为例,简单阐述了为普通的成员函数,以及类中的成员函数进行单元测试,在这部分主要介绍如何利用 gtest 中的固件以及超级固件来优化单元测试工作。在现在的互联网企业对底层模块(C++ 编写)进行单元测试的并不多见,大家习惯从上层来覆盖底层的功能,这样有好的地方也有不好的地方,这个后续再说吧。本篇文章分成两个部分,第一部分是介绍固件以及超级固件,第二部分是实践以及感悟,如果对第一部分的介绍不感兴趣,可以跳过直接看第二部分
一、中级
- 测试固件 主要包含两个文件,sample3-inl.h 以及 sample3_unittest.cc
/*sample3-inl.h*/
#ifndef GTEST_SAMPLES_SAMPLE3_INL_H_
#define GTEST_SAMPLES_SAMPLE3_INL_H_

#include <stddef.h>


// Queue is a simple queue implemented as a singled-linked list.
// Queue类是一个由单链表构建的队列
// The element type must support copy constructor.
// 队列中的元素必须支持拷贝构造函数
template <typename E>  // E is the element type
class Queue;

// QueueNode is a node in a Queue, which consists of an element of
// type E and a pointer to the next node.
//
// 队列节点由类型为E的元素,以及指向下一个节点的指针所构成
template <typename E>  // E is the element type
class QueueNode {
  friend class Queue<E>;

 public:
  // Gets the element in this node.
  // 获取节点中元素的值
  const E& element() const { return element_; }

  // Gets the next node in the queue.
  // 获取下一个节点
  QueueNode* next() { return next_; }
  const QueueNode* next() const { return next_; }

 private:
  // Creates a node with a given element value.  The next pointer is
  // set to NULL.
  // 对于给定的值生成一个节点,其指向下个节点的指针被设为空
  explicit QueueNode(const E& an_element) : element_(an_element), next_(NULL) {}

  // We disable the default assignment operator and copy c'tor.
  // 我们将默认的赋值构造函数以及拷贝构造函数设置为无效
  const QueueNode& operator = (const QueueNode&);
  QueueNode(const QueueNode&);

  E element_;
  QueueNode* next_;
};

template <typename E>  // E is the element type.E是元素的类型
class Queue {
 public:
  // Creates an empty queue.
  // 生成一个空的队列
  Queue() : head_(NULL), last_(NULL), size_(0) {}

  // D'tor.  Clears the queue.
  ~Queue() { Clear(); }

  // Clears the queue.
  // 清空队列
  void Clear() {
    if (size_ > 0) {
      // 1. Deletes every node.
      // 删除每一个节点
      QueueNode<E>* node = head_;
      QueueNode<E>* next = node->next();
      for (; ;) {
        delete node;
        node = next;
        if (node == NULL) break;
        next = node->next();
      }

      // 2. Resets the member variables.
      // 重置成员变量
      head_ = last_ = NULL;
      size_ = 0;
    }
  }

  // Gets the number of elements.
  // 获取队列中元素的数目
  size_t Size() const { return size_; }

  // Gets the first element of the queue, or NULL if the queue is empty.
  // 获取队列中的第一个元素,如果队列为空,则返回NULL
  QueueNode<E>* Head() { return head_; }
  const QueueNode<E>* Head() const { return head_; }

  // Gets the last element of the queue, or NULL if the queue is empty.
  // 获取队列中的最后一个元素,如果队列为空,则返回NULL
  QueueNode<E>* Last() { return last_; }
  const QueueNode<E>* Last() const { return last_; }

  // Adds an element to the end of the queue.  A copy of the element is
  // created using the copy constructor, and then stored in the queue.
  // Changes made to the element in the queue doesn't affect the source
  // object, and vice versa.
  //
  // 向队列的末尾添加一个元素。这个元素由拷贝构造函数生成,并被存储到队列中
  // 对队列中元素的改变,不会影响到原先的对象,反之亦然
  void Enqueue(const E& element) {
    QueueNode<E>* new_node = new QueueNode<E>(element);

    if (size_ == 0) {
      head_ = last_ = new_node;
      size_ = 1;
    } else {
      last_->next_ = new_node;
      last_ = new_node;
      size_++;
    }
  }

  // Removes the head of the queue and returns it.  Returns NULL if
  // the queue is empty.
  // 将队列的头元素移除,并返回它的值,如果为空,则返回NULL
  E* Dequeue() {
    if (size_ == 0) {
      return NULL;
    }

    const QueueNode<E>* const old_head = head_;
    head_ = head_->next_;
    size_--;
    if (size_ == 0) {
      last_ = NULL;
    }

    E* element = new E(old_head->element());
    delete old_head;

    return element;
  }

  // Applies a function/functor on each element of the queue, and
  // returns the result in a new queue.  The original queue is not
  // affected.
  //
  // 将函数应用于队列中的元素,并将产生的结果存入新的队列中,原始的队列不受影响
  template <typename F>
  Queue* Map(F function) const {
    Queue* new_queue = new Queue();
    for (const QueueNode<E>* node = head_; node != NULL; node = node->next_) {
      new_queue->Enqueue(function(node->element()));
    }

    return new_queue;
  }

 private:
  QueueNode<E>* head_;  // The first node of the queue. 队列的头元素
  QueueNode<E>* last_;  // The last node of the queue.  队列的尾元素
  size_t size_;  // The number of elements in the queue.队列中元素的个数

  // We disallow copying a queue.
  // 我们不允许对队列进行拷贝
  Queue(const Queue&);
  const Queue& operator = (const Queue&);
};

#endif  // GTEST_SAMPLES_SAMPLE3_INL_H_
/*sample3_unittest.cc*/
// In this example, we use a more advanced feature of Google Test called
// test fixture.
//
// A test fixture is a place to hold objects and functions shared by
// all tests in a test case.  Using a test fixture avoids duplicating
// the test code necessary to initialize and cleanup those common
// objects for each test.  It is also useful for defining sub-routines
// that your tests need to invoke a lot.
//
// 在这个例子中,我们将会用到Google Test一个更为高级的特性,被称为测试固件。
// 测试固件的用途主要用于存放所有测试集都要使用的对象或者函数。
//
// 使用测试固件避免了重复一些代码,而这些代码对于初始化或者清除测试用例中
// 的对象又是必须的。同时,测试固件对于定义你测试中需要调起的子例程也很有帮助
// <TechnicalDetails>
//
// The tests share the test fixture in the sense of code sharing, not
// data sharing.  Each test is given its own fresh copy of the
// fixture.  You cannot expect the data modified by one test to be
// passed on to another test, which is a bad idea.
//
// The reason for this design is that tests should be independent and
// repeatable.  In particular, a test should not fail as the result of
// another test's failure.  If one test depends on info produced by
// another test, then the two tests should really be one big test.
//
// The macros for indicating the success/failure of a test
// (EXPECT_TRUE, FAIL, etc) need to know what the current test is
// (when Google Test prints the test result, it tells you which test
// each failure belongs to).  Technically, these macros invoke a
// member function of the Test class.  Therefore, you cannot use them
// in a global function.  That's why you should put test sub-routines
// in a test fixture.
//
//技术细节:
//
//这些测试用例测试固件,在一定意义上是指的代码的共享,和不是数据的共享。
//这样设计的原因是,测试用例应该是独立以及可重复的。特别是当一个测试失败时
//不应该影响其他测试的执行。如果一个测试依赖于另一个测试所产生的结果,那么
//这两个测试应该合并为一个大的测试。
//
//指示测试成功(EXPECT_TRUE)或者失败(EXPECT_FAIL)的宏需要知道当前的测试是那
//一个测试用例(当Goole Test 打印失败的结果时,它告诉你这个失败从属于那个测试),
//从技术的角度来说,这些宏将调用一个Test类的成员函数。因此你不能在全局的函数中
//使用这些宏,这就是你为什么要把测试子例程放入测试固件中的原因。
//
// </TechnicalDetails>

#include "sample3-inl.h"
#include "gtest/gtest.h"

// To use a test fixture, derive a class from testing::Test.
// 为了使用测试固件,须从Test类中派生一个类
//
class QueueTest : public testing::Test {
 protected:  // You should make the members protected s.t. they can be
             // accessed from sub-classes.
             // 你应该将成员变量声明为保护类型,这样它们将只能被子类访问

  // virtual void SetUp() will be called before each test is run.  You
  // should define it if you need to initialize the varaibles.
  // Otherwise, this can be skipped.
  //
  // 虚函数Setup(),在每一个测试运行之前就被调用,所以如果你需要初始化一些
  // 变量,你应该在这个地方进行定义,不需要可以跳过
  virtual void SetUp() {
    q1_.Enqueue(1);
    q2_.Enqueue(2);
    q2_.Enqueue(3);
  }

  // virtual void TearDown() will be called after each test is run.
  // You should define it if there is cleanup work to do.  Otherwise,
  // you don't have to provide it.
  //
  // virtual void TearDown() {
  // }
  //
  // 虚函数TearDown()在每一个测试运行之后被调用,如果你需要做一些清理工作
  // 可以在这个函数中定义。否则你可以忽略它

  // A helper function that some test uses.
  // 帮助函数用于测试
  static int Double(int n) {
    return 2*n;
  }

  // A helper function for testing Queue::Map().
  // 帮助函数用于测试 Queue::Map()
  //
  void MapTester(const Queue<int> * q) {
    // Creates a new queue, where each element is twice as big as the
    // corresponding one in q.
    // 生成一个新的队列,队列中的元素是原队列元素的两倍
    const Queue<int> * const new_q = q->Map(Double);

    // Verifies that the new queue has the same size as q.
    // 判断元队列与新队列是否有相同的大小
    ASSERT_EQ(q->Size(), new_q->Size());

    // Verifies the relationship between the elements of the two queues.
    // 验证两个队列中,元素的关系
    for ( const QueueNode<int> * n1 = q->Head(), * n2 = new_q->Head();
          n1 != NULL; n1 = n1->next(), n2 = n2->next() ) {
      EXPECT_EQ(2 * n1->element(), n2->element());
    }

    delete new_q;
  }

  // Declares the variables your tests want to use.
  // 声明测试中需要用到的变量
  Queue<int> q0_;
  Queue<int> q1_;
  Queue<int> q2_;
};

// When you have a test fixture, you define a test using TEST_F
// instead of TEST.
// 当你定义了测试固件时,应该使用TEST_F来代替TEST

// Tests the default c'tor.
// 测试默认构造函数
TEST_F(QueueTest, DefaultConstructor) {
  // You can access data in the test fixture here.
  EXPECT_EQ(0u, q0_.Size());
}

// Tests Dequeue().
// 测试出队列
TEST_F(QueueTest, Dequeue) {
  int * n = q0_.Dequeue();
  EXPECT_TRUE(n == NULL);

  n = q1_.Dequeue();
  ASSERT_TRUE(n != NULL);
  EXPECT_EQ(1, *n);
  EXPECT_EQ(0u, q1_.Size());
  delete n;

  n = q2_.Dequeue();
  ASSERT_TRUE(n != NULL);
  EXPECT_EQ(2, *n);
  EXPECT_EQ(1u, q2_.Size());
  delete n;
}

// Tests the Queue::Map() function.
// 测试队列中的Map()函数
TEST_F(QueueTest, Map) {
  MapTester(&q0_);
  MapTester(&q1_);
  MapTester(&q2_);
}
测试固件在单元测试中用到的非常多,因为它提供了一种数据共享的方法,同时也保证了各测试用例之间并不会相互影响。例如在本例中,每次在进行测试时,都需要构建测试数据,也就是将数据插入队列中,如果没有测试固件,则需要在每个测试用例中都重复这个操作。
可以看到测试固件的使用简化了单元测试的复杂性,在实际应用中,如果可以使用测试固件就尽量使用测试固件,有一点需要注意的是,如果使用测试固件,则对应的宏应该使用 TEST_F,并且第一个参数应该为测试固件的名字。
- 超级测试固件 本例中主要包含 sample1.h,sample1.cc,sample3-inl.h,sample5_unittest.cc
/*sample5_unittest.cc*/
// This sample teaches how to reuse a test fixture in multiple test
// cases by deriving sub-fixtures from it.
//
// 这个例子主要用于展示,如何通过从测试固件中派生子固件,在多重测试中重用
// 测试固件。
//
// When you define a test fixture, you specify the name of the test
// case that will use this fixture.  Therefore, a test fixture can
// be used by only one test case.
//
// 当你定义一个测试固件时,你确定这个使用测试固件的测试用例集的名称,因此
// 一个测试固件只能够被一个测试用例集所使用
//
// Sometimes, more than one test cases may want to use the same or
// slightly different test fixtures.  For example, you may want to
// make sure that all tests for a GUI library don't leak important
// system resources like fonts and brushes.  In Google Test, you do
// this by putting the shared logic in a super (as in "super class")
// test fixture, and then have each test case use a fixture derived
// from this super fixture.
//
// 有些时候,不止一个测试用例集需要使用相同或者有细微差异的测试固件。例如
// 你想确定,针对一个GUI库的所有测试用例集都没有泄漏重要的系统资源,如字体
// 和画刷。在Google Test中,你可以把共享的逻辑放在一个超级测试固件中,然后
// 每一个测试用例集所使用的测试固件都可以从这个超级测试固件类中派生。

#include <limits.h>
#include <time.h>
#include "sample3-inl.h"
#include "gtest/gtest.h"
#include "sample1.h"

// In this sample, we want to ensure that every test finishes within
// ~5 seconds.  If a test takes longer to run, we consider it a
// failure.
//
// We put the code for timing a test in a test fixture called
// "QuickTest".  QuickTest is intended to be the super fixture that
// other fixtures derive from, therefore there is no test case with
// the name "QuickTest".  This is OK.
//
// Later, we will derive multiple test fixtures from QuickTest.
//
// 在这里例子中,我们需要确保每一个测试都在5s内结束。如果一个测试运行的时间
// 长于5s,我们就认为这个测试失败了
//
// 我们在测试固件中放置计算测试花费时间的代码,并将其称为QuickTest。QuickTest
// 作为超级测试固件而存在,而后续的测试固件都从其派生。所以并没有测试用例集所
// 绑定的测试固件被命名为QuickTest,之后我们将从QuickTest类中派生出多个测试固件
//
class QuickTest : public testing::Test {
 protected:
  // Remember that SetUp() is run immediately before a test starts.
  // This is a good place to record the start time.
  // SetUp()函数,在一个测试开始之前执行,所以在其内部可以用来记录开始时间
  //
  virtual void SetUp() {
    start_time_ = time(NULL);
  }

  // TearDown() is invoked immediately after a test finishes.  Here we
  // check if the test was too slow.
  //
  // TearDown()函数在一个测试结束之后被调起,所以在这里我们检测一个测试是否太慢
  //
  virtual void TearDown() {
    // Gets the time when the test finishes
    const time_t end_time = time(NULL);

    // Asserts that the test took no more than ~5 seconds.  Did you
    // know that you can use assertions in SetUp() and TearDown() as
    // well?
    //
    // 下面是断言的结果
    EXPECT_TRUE(end_time - start_time_ <= 5) << "The test took too long.";
  }

  // The UTC time (in seconds) when the test starts
  // 超级固件定义的开始时间成员变量
  time_t start_time_;
};


// We derive a fixture named IntegerFunctionTest from the QuickTest
// fixture.  All tests using this fixture will be automatically
// required to be quick.
//
// 我们从QuickTest超级固件中派生出一个名为IntergerFunctionTest的测试固件
// 所有使用这个测试固件的测试,都将自动计算测试运行所花费的时间
//
class IntegerFunctionTest : public QuickTest {
  // We don't need any more logic than already in the QuickTest fixture.
  // Therefore the body is empty.
  // 由于不需要添加新的测试逻辑,所以此函数体为空
  //
};


// Now we can write tests in the IntegerFunctionTest test case.
// 现在在IntegerFunctionTest测试集中,编写测试用例
//
// Tests Factorial()
TEST_F(IntegerFunctionTest, Factorial) {
  // Tests factorial of negative numbers.
  //sleep(6);
  EXPECT_EQ(1, Factorial(-5));
  EXPECT_EQ(1, Factorial(-1));
  EXPECT_GT(Factorial(-10), 0);

  // Tests factorial of 0.
  EXPECT_EQ(1, Factorial(0));

  // Tests factorial of positive numbers.
  EXPECT_EQ(1, Factorial(1));
  EXPECT_EQ(2, Factorial(2));
  EXPECT_EQ(6, Factorial(3));
  EXPECT_EQ(40320, Factorial(8));
}


// Tests IsPrime()
TEST_F(IntegerFunctionTest, IsPrime) {
  // Tests negative input.
  EXPECT_FALSE(IsPrime(-1));
  EXPECT_FALSE(IsPrime(-2));
  EXPECT_FALSE(IsPrime(INT_MIN));

  // Tests some trivial cases.
  EXPECT_FALSE(IsPrime(0));
  EXPECT_FALSE(IsPrime(1));
  EXPECT_TRUE(IsPrime(2));
  EXPECT_TRUE(IsPrime(3));

  // Tests positive input.
  EXPECT_FALSE(IsPrime(4));
  EXPECT_TRUE(IsPrime(5));
  EXPECT_FALSE(IsPrime(6));
  EXPECT_TRUE(IsPrime(23));
}


// The next test case (named "QueueTest") also needs to be quick, so
// we derive another fixture from QuickTest.
//
// The QueueTest test fixture has some logic and shared objects in
// addition to what's in QuickTest already.  We define the additional
// stuff inside the body of the test fixture, as usual.
//
// 同样,可以从超级固件中派生出另一个测试固件用于队列测试,QueueTest固件
// 还有一些其他的逻辑,以及共享的对象除了计算测试时间之外,所以我们像平常
// 一样在测试固件内部进行定义
//
class QueueTest : public QuickTest {
 protected:
  virtual void SetUp() {
    // First, we need to set up the super fixture (QuickTest).
    // 首先需要调用超级固件的setup,这个地方由于不是指针或者引用调用,所以
    // 不涉及多态
    QuickTest::SetUp();

    // Second, some additional setup for this fixture.
    q1_.Enqueue(1);
    q2_.Enqueue(2);
    q2_.Enqueue(3);
  }

  // By default, TearDown() inherits the behavior of
  // QuickTest::TearDown().  As we have no additional cleaning work
  // for QueueTest, we omit it here.
  //
  // 之前已有翻译,这里不再赘述
  //
  // virtual void TearDown() {
  //   QuickTest::TearDown();
  // }

  Queue<int> q0_;
  Queue<int> q1_;
  Queue<int> q2_;
};


// Now, let's write tests using the QueueTest fixture.
// 现在,让我们使用QueueTest 测试固件来写测试用例

// Tests the default constructor.
TEST_F(QueueTest, DefaultConstructor) {
  EXPECT_EQ(0u, q0_.Size());
}

// Tests Dequeue().
TEST_F(QueueTest, Dequeue) {
  int* n = q0_.Dequeue();
  EXPECT_TRUE(n == NULL);

  n = q1_.Dequeue();
  EXPECT_TRUE(n != NULL);
  EXPECT_EQ(1, *n);
  EXPECT_EQ(0u, q1_.Size());
  delete n;

  n = q2_.Dequeue();
  EXPECT_TRUE(n != NULL);
  EXPECT_EQ(2, *n);
  EXPECT_EQ(1u, q2_.Size());
  delete n;
}

// If necessary, you can derive further test fixtures from a derived
// fixture itself.  For example, you can derive another fixture from
// QueueTest.  Google Test imposes no limit on how deep the hierarchy
// can be.  In practice, however, you probably don't want it to be too
// deep as to be confusing.
//
// 如果必要的话,你也可以从已派生的固件进行再次派生。例如你可以从QueueTest
// 这个固件中再次派生。GoogleTest对你究竟从中派生多少次并没有限制,但是派生的
// 层次太深,则容易使人迷惑
本例中定义了一个超级固件用来计算测试用例运行的时间,每个需要计算运行时间的测试用例都可以从这个超级固件中派生。把测试固件中的共有特性抽取出来组成超级固件,不管从测试 case 管理的角度,还是代码的简化都有很好的效果。在实际应用中,测试固件和超级测试固件应用的最多,这并不是说其他的特性不重要,只是我现在还没有用到,关于其他特性大家可以去参考 samples 中其他 sample 的介绍。关于 Gtest 的入门介绍部分就到这了,后面介绍实际应用过程中遇到的问题,以及思考。
二、实践应用以及思考
1、如何将 Gtest 应用到现有的 C++ 工程中?
实际的项目工程要比上面两个部分介绍的 sample 要复杂的多,甚至某些开发都只是负责其中的某一块,对其他的模块可能也知之甚少,如果拿到一个这样的项目要怎么入手是刚开始碰到的第一个难题。
首先如果这个大的项目可以拆分成一个一个独立的模块,各模块之间的联系是通过 RPC 或者单纯的套接字来交互,那么可以按照模块的方式来分别进行单元测试。如果无法进行拆分,其左右一个整体而存在,或者即使可以拆分成模块,但是这个模块对于单元测试还是太大,这个时候可能就需要从整体来考虑,按照以下的步骤进行:
要对整体或者模块的 Makefile 文件非常的熟悉,因为只有这样,才能明白整体或者模块的文件依赖关系,才能知道哪些是可以拆分出来,哪些不可以。
判断是否需要自定义 main() 函数,如果需要在 main() 函数中进行一些全局变量的声明或者其他的操作,那么可需要自定义 main 函数,如果不需要则可使用 gtest 自带的 main 函数
如果使用将整体或者模块的 main() 函数,那么将 main() 函数中所有的内容清空,或者删除原有的 Main 文件,重新新建一个文件,并编写 main 函数。需要注意的是,如果是自己新建包含 main() 函数的文件,那么相应的 makefile 文件也需要进行改变,否则无法编译通过
链接 gtest 静态库,在上述的例子中每次 gtest.a 和 gtest_main.a 都是重新生成,在实际应用中,可以事先将静态库生成,然后在 makefile 中进行链接。在之前强调过一次,如果使用自定义的 main 函数,那么链接的是 gtest.a 静态库,否则链接的是 gtest_main.a 静态库
最后一步就是 make 并运行
思考:其实在整个单元测试实践的过程中,这一步是最难的。因为需要对整个项目或者模块都比较了解,特别是需要对原有的 makefile 文件非常的熟悉。有些时候工程特别大,makefile 文件不止一个,可能会在公有的 makefile 文件中,调用子模块的 makefile 文件,这个时候就需要有耐心把 makefile 中的调用关系理清楚,然后在合适的地方添加静态链接库。有些 makefile 中包含了很多并不常用的特性,比如 makefile 的命令前缀、makefile 的条件判断、makefile 中的字符串函数等等可能都需要有一定的了解。如果不熟悉的童鞋,可以点击makefile 学习链接事先学习一下。
2、对模块依赖以及函数依赖的思考
如果测试某一个模块,或者函数,那么首先需要做的就是熟悉特测试的模块或者文件。熟悉的过程是编写单元测试用例的前提条件,如果原有的代码都不熟悉,那么单元测试更是无从谈起了。这个时候才开始真正单元测试的编写过程,但是又有一个问题出现了,模块依赖或者函数依赖。
当真正的开始编写时就会发现,gtest 示例中所带的 samples 都是在非常理想的情况下,也就是说函数或者模块依赖关系很少或者根本就不存在依赖关系,这种情况下编写最简单,samples 示例就是例子。但是在现实的项目或者模块中,会发现,即使已经将原有的代码拆分成模块,但是模块内部的依赖关系也非常的复杂。可能一个函数依赖模块中 80% 的代码(极端的情况下),模块中的代码高度耦合。
在这种高耦合模块中,如果将待测函数代码所在的文件提出来,添加单元测试框架真的是一项很费力的活,需要花费很多时间。这是由于框架中各个文件的依赖关于特别复杂,所以很难直接抽取出这一个文件,因为如果只抽取一个文件,运行过程中可能调用多个别的文件中的数据,这样很难将工程按照模块单独独立出来测试。
解决的办法有两种:
如果模块耦合度虽然较高,但是也不至于到极端的情况,比如依赖模块小于 30% 的代码,这个时候可以将所依赖的文件单独抽取出来,重新根据这些文件构造新的 makefile 文件,这种情况下工作量也是很大的
模块之间的耦合度特别高,超过 50%。那么这个时候就不要考虑单独抽取了,依赖原先的 makefile 文件吧,从整体来进行测试
3、依赖关系的 Mock 实现
关于依赖关系的 Mock,每个人都有自己的理解。很多人认为只有对外部资源比如数据库、缓存等的 Mock 才算是真正的 Mock,或者说类似 GoogleMock 的用法才是正统的 mock 方法。这么说可能也没有错,因为每个人的理解不同,但是我理解的 Mock 并不仅限于对外部资源,或者通过 googleMock 来实现,并且 googleMock 的应用范围也是有局限的,需要配合虚函数和类继承来完成。关于 googleMock 的用法并不在本次论述之内,有兴趣的大家可以自己找来看一下。
在测试实践中,更多的是依赖于工程项目或者模块原有的代码来进行 mock 封装,解决依赖关系
以下面的代码举个例子吧
#include "../src/BiddingHeaders.h"
#include "Constant.h"

//定义文件读取及解析类
class DataConfig{
    public:
            DataLoader* data_loader_;
            DataCenter* instance_ptr;
            int load_data_file(const char* file);
            //construct function
            DataConfig();
};
/*
 * DataConfig.cpp
 */
#include "BiddingHeaders.h"
#include "DataConfig.h"

DataConfig::DataConfig(){
    //DataCenter中定义了标签所对应的函数
    instance_ptr= DataCenter::instance();
    data_loader_=instance_ptr->get_data_loader();
}

//set to default value

int DataConfig::load_data_file(const char * file)
{
    if (file == NULL)
    {
        LOG_ERROR("[DataCenter][load_data_file] file name null");
        return -1;
    }

    FILE *fp = fopen (file, "r");
    if (fp == NULL)
    {
        LOG_ERROR("[DataCenter][load_data_file] error to open file: %s", file);
        return -2;
    }

    int num = 0;
    char buffer[MSG_BUF_LEN * 200 + 1] = {0};
    // 对相应的标签注册响应函数,比如文件中有A标签,那么会调用DataCenter函数中change_A函数
    data_loader_->register_op("A", static_cast<DataLoader::DATA_OP_FUNC>(&DataCenter::change_A));
    data_loader_->register_op("B",static_cast<DataLoader::DATA_OP_FUNC>(&DataCenter::change_B));
    data_loader_->register_op("C",static_cast<DataLoader::DATA_OP_FUNC>(&DataCenter::change_C));

    while (fgets(buffer, sizeof(buffer), fp))
    {
        char *p = strstr(buffer, "\n");
        if (p == NULL)
        {
            LOG_WARNING("[DataCenter][load_data_file] message too long");
            continue;
        }
        *p = 0;

    //process_msg函数用于读取标签标记文档,并调用相对应的函数
        if (data_loader_->process_msg(buffer) == 0)
            num++;
    }

    fclose(fp);
    LOG_INFO("[DataCenter][load_data_file] num: %d", num);
    return 0;
}
上述代码中调用了两个类,data_loader 类,以及 DataCenter 类,data_loader 作为类成员变量从属于 DataCenter 类,该代码的作用是处理文本,并根据文本中的标签,调用相关的处理函数。其中 data_loader 类和 DataCenter 类为原有项目的文件,其相关的头文件包含在名为 BiddingHeaders.h 的文件中。
现在假设需要测试的模块,依赖于 DataCenter::change_A,那么如何解决呢?
如果 DataCenter 的文件,依赖关系比较简单,可以直接将 change_A 函数抽取出来,并重新封装成一个文件供调用。
如果 change_A 函数的依赖关系比较复杂,比如需要依赖 DataCenter 中某些全局的 Hash,或者公有模块,那么单独将某一个函数抽取出来就并不合适,这时可以考虑直接依赖整个 DataCenter 文件,而不是进行单独函数的抽取,来完成单元测试
如果是依赖整个 DataCenter 文件,那么又有一个问题出现,现有的通过 data_loader 来调用 DataCenter 中的 change_A 函数是无法成功的,原因是 change_A 在 DataCenter 中为私有成员变量,无法在外部被调用。源代码之所以可以成功,因为 data_loader 本身就作为 DataCenter 的成员变量,所以可以调用 change_A 函数,那么问题又来了,如果在外部成功的调用 change_A 函数呢?
对于私有成员变量的调用也是有响应的解决办法,总体来说分为侵入式和非侵入式两种,如下所示:
对于侵入式,也就是需要添加响应的代码到源文件中,声明现有的类为 DataCenter 的友元类 (friend),这样便可以访问私有成员。由于需要改动在原先的代码中进行改动,破坏了原有的完整性,并且不利于持续集成,所以我个人并不推荐侵入式方式
对于非侵入式,其实这个比起侵入式要简单很多,需要通过 shell 或者 python 脚本,将原有的 private 成员修改为 public 成员即可。虽然对原有的代码有改动,但是只是改动成员函数的属性,并无代码添加,所以个人推荐这种方式
思考:这样我们就构建起了一个 Mock 的实现,利用的是原有模块程序的代码。可能有童鞋觉得这样也是很复杂的。确实这样做也比较复杂,但是相对于直接根据待测的模块构建依赖关系要简单的多。如果不这样做,如何构建依赖关系呢?首先 change_A 的功能,是根据文本的标签,向全局的某 hash 表中插入相对应标签的数据,那么我们先是要构造需要插入 hash 表的数据,如果这个数据比较简单还好一些,如果需要插入 hash 表的数据非常负责,那么单单构建数据这一步,就已经花费了大量的时间。其次,自己编写 insert 函数,将构造的数据插入 hash 表中,每次处理不同的标签,都要分别编写不同的函数。其实这相当于把 DataCenter 原有的功能又简化的重新实现了一遍,这样做的时间成本实在是太大了,两者相比,取其轻!所以最大的利用现有的代码数据,构造 mock 实例,是一种相对高效的做法。
上述所说是 Mock 的一种情况,那就是所测单元高度依赖全局的变量,比如例子中的全局 hash。那么如果所测模块对全局变量依赖较低,但是依赖的范围比较广呢?比如某一个模块可能依赖多个类。这种情况下,可以直接构建这些类的实例,通过编写 set_X 函数,对类中的成员变量进行赋值,这在所依赖的类耦合度不高的情况下还是比较有效的,但是如果所依赖的类耦合度较高,类之间关联性明显,则需要根据特定的情况进行分析,并非使用 set_X 函数就可以解决,这样只能具体问题具体分析了。
4、杂谈
(1)运行和调试
当完成单元测试的编写,后面就是运行调试的阶段。没有人可以保证写的单元测试每次不调试都可正常运行,出错是很正常的。其实对于错误的调试方法,和普通的 C++ 程序基本相同。如果在项目本身日志比较完善的情况下,可以通过日志来排查错误;其次,可以在 makefile 编译的时候添加-g 选项,通过 gdb 调试器来单步执行调试,gdb 调试是非常高效的,也是我最长使用的工具,对 gdb 不熟悉的同学可以了解一下。
在运行过程中,可能会出现 Segment fault,这种情况下要重点检查,字符串数组是否越界,是否存在空指针。数组越界和空指针是碰到最多的情况。
(2)检测点
单元测试,并非只是验证函数或者模块的正常功能是否可以走通,更多的是验证异常情况,验证代码的异常执行路径。如果只是检测函数的正常功能,完全可以通过更高层次来验证,没必要从底层来验证。其实这和接口类测试有些相似,如果只是验证接口的正常功能,从 web 端或手机端就可以完成验证过程,为什么非要进行接口测试呢?其功能主要都是验证异常的情况,编写测试用例时,异常的情况一定要考虑充足。可能有童鞋会问,怎么样才算考虑充足呢?就是让你的测试用例集覆盖函数的所有执行路径,在测试过程中,结合 lcov 代码覆盖率检查工具,可以让你清楚的知道,你现在编写的单元测试代码覆盖了哪些路径,这两者的搭配绝对是最佳的搭档
(3)适应性
对于一些高耦合度项目或者模块,可能并不适合进行单元测试。自己应该对可进行单元测试的模块或者代码有一个清晰的认识,不能为了单元测试而进行单元测试。一般偏基础类的服务是适合做单元测试的,偏业务类的可能会不太适合,自己要做好判断,免得事倍功半。相对于实现的成本来说,上次的功能自动化测试的实现成本相比于单元测试要容易很多,所以如果可以从功能自动化进行覆盖,就没有必要再进行单元测试。具体是否适合还要自己根据项目需求进行判断
(4)整合
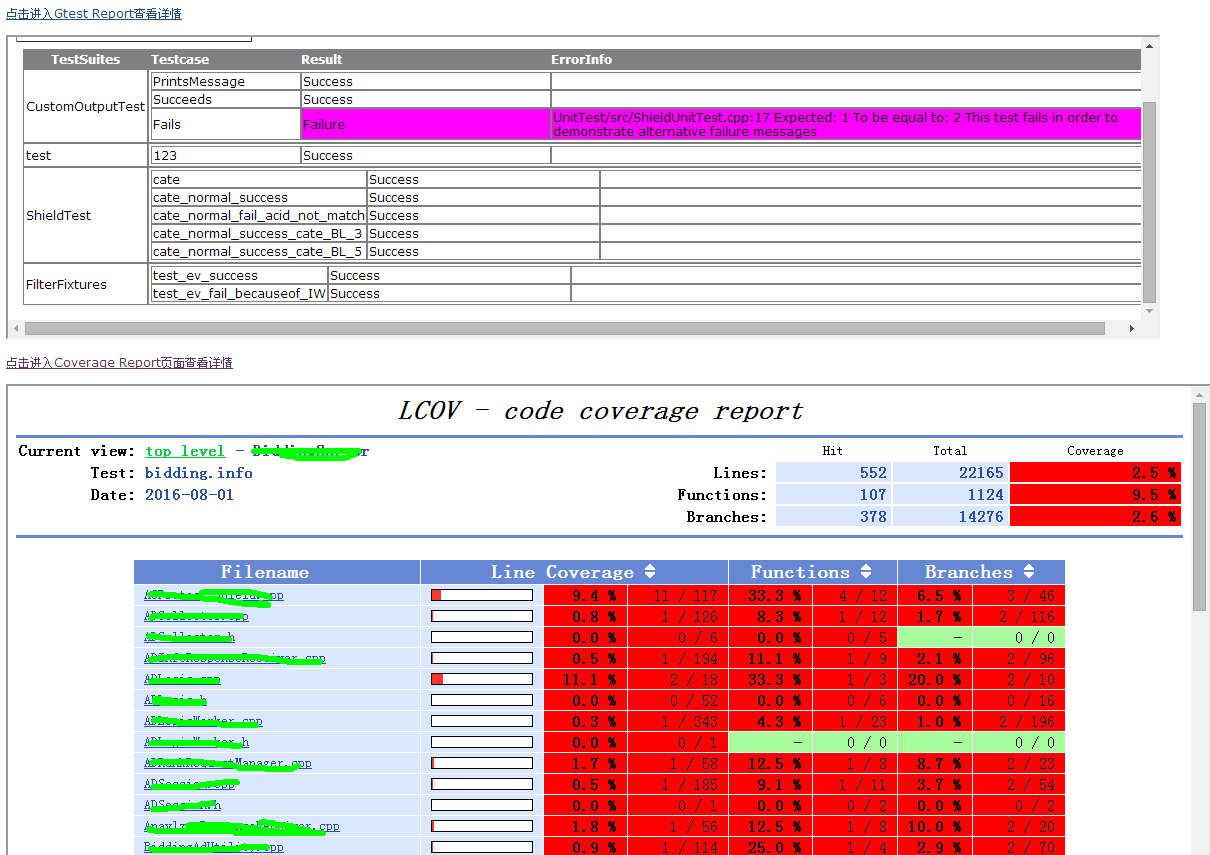
我们希望每次代码有更新的时候,就会进行一次单元测试,并输出相关的测试报告。gtest 的输出报告支持普通的文本,以及 xml 格式。将 gtest 与 Jenkins 进行结合,并整合 lcov 代码覆盖检查,这样每次有新的代码提交都会运行,并输出测试报告,这对于测试人员查看报告是非常方便的,下面是我这边所做的截图:
后记:
单元测试的内容还是太多,我也就算刚入门,需要学习的东西还有很多,上面算是初做单元测试的感悟吧,希望对有需要的同学有所帮助,同时也欢迎 c++ 单元测试高手交流经验~