1.简介
我们绝大多数使用的都是 Windows 操作系统,因此在 Windows 系统上安装 JMeter 已经成了家常便饭,而且安装也相对简单,但是服务器为了安全、灵活小巧,特别是前几年的勒索病毒,现在绝大多数的服务器都是 Linux 系统,因此就需要我们在 Linux 系统上安装 JMeter。因此,宏哥今天讲解和分享学习下如何在 Linux 下安装 Jmeter,因为 Jmeter 是 Java 开发的,需要依赖 JDK 环境,因此我们需提前安装好 JDK。宏哥这里安装的安装包都是在线下载安装包,而不是从 Windows 系统下载好安装包,然后再上传到 Linux 系统中,最后解压安装,因此宏哥这种方法适合懒人,当然了勤奋的人那就更适合了哈。
2.查看是否安装好 JDK
首先我们需要在 Linux 系统上安装 JDK,因为 Jmeter 是 JAVA 语言开发的。有时候 Linux 系统的虚拟机默认已经安装的 JDK,不过是 1.4 版本或者其他版本,但是由于我们用的 Jmeter 版本和 JDK 的版本相匹配才能使用,所以我们先卸载之前的 JDK(不卸载也行),再重新安装 JDK 并配置环境变量。
2.1 检查 Linux 系统中 JDK 版本
第一种方法:依次输入 java -version、java、javac,不会出现报错并且显示出 jdk 版本号及 java/javac 相关命令参数说明界面。
[admin@oftpclient202 ~]$ java -version
java version "1.8.0_333"
Java(TM) SE Runtime Environment (build 1.8.0_281-b09)
Java HotSpot(TM) 64-Bit Server VM (build 25.281-b09, mixed mode)
[admin@oftpclient202 ~]$ java
Usage: java [-options] class [args...]
           (to execute a class)
   or  java [-options] -jar jarfile [args...]
           (to execute a jar file)
where options include:
    -d32          use a 32-bit data model if available
    -d64          use a 64-bit data model if available
    -server       to select the "server" VM
                  The default VM is server.

    -cp <class search path of directories and zip/jar files>
    -classpath <class search path of directories and zip/jar files>
                  A : separated list of directories, JAR archives,
                  and ZIP archives to search for class files.
    -D<name>=<value>
                  set a system property
    -verbose:[class|gc|jni]
                  enable verbose output
    -version      print product version and exit
    -version:<value>
                  Warning: this feature is deprecated and will be removed
                  in a future release.
                  require the specified version to run
    -showversion  print product version and continue
    -jre-restrict-search | -no-jre-restrict-search
                  Warning: this feature is deprecated and will be removed
                  in a future release.
                  include/exclude user private JREs in the version search
    -? -help      print this help message
    -X            print help on non-standard options
    -ea[:<packagename>...|:<classname>]
    -enableassertions[:<packagename>...|:<classname>]
                  enable assertions with specified granularity
    -da[:<packagename>...|:<classname>]
    -disableassertions[:<packagename>...|:<classname>]
                  disable assertions with specified granularity
    -esa | -enablesystemassertions
                  enable system assertions
    -dsa | -disablesystemassertions
                  disable system assertions
    -agentlib:<libname>[=<options>]
                  load native agent library <libname>, e.g. -agentlib:hprof
                  see also, -agentlib:jdwp=help and -agentlib:hprof=help
    -agentpath:<pathname>[=<options>]
                  load native agent library by full pathname
    -javaagent:<jarpath>[=<options>]
                  load Java programming language agent, see java.lang.instrument
    -splash:<imagepath>
                  show splash screen with specified image
See http://www.oracle.com/technetwork/java/javase/documentation/index.html for more details.
[admin@oftpclient202 ~]$ javac
Usage: javac <options> <source files>
where possible options include:
  -g                         Generate all debugging info
  -g:none                    Generate no debugging info
  -g:{lines,vars,source}     Generate only some debugging info
  -nowarn                    Generate no warnings
  -verbose                   Output messages about what the compiler is doing
  -deprecation               Output source locations where deprecated APIs are used
  -classpath <path>          Specify where to find user class files and annotation processors
  -cp <path>                 Specify where to find user class files and annotation processors
  -sourcepath <path>         Specify where to find input source files
  -bootclasspath <path>      Override location of bootstrap class files
  -extdirs <dirs>            Override location of installed extensions
  -endorseddirs <dirs>       Override location of endorsed standards path
  -proc:{none,only}          Control whether annotation processing and/or compilation is done.
  -processor <class1>[,<class2>,<class3>...] Names of the annotation processors to run; bypasses default discovery process
  -processorpath <path>      Specify where to find annotation processors
  -parameters                Generate metadata for reflection on method parameters
  -d <directory>             Specify where to place generated class files
  -s <directory>             Specify where to place generated source files
  -h <directory>             Specify where to place generated native header files
  -implicit:{none,class}     Specify whether or not to generate class files for implicitly referenced files
  -encoding <encoding>       Specify character encoding used by source files
  -source <release>          Provide source compatibility with specified release
  -target <release>          Generate class files for specific VM version
  -profile <profile>         Check that API used is available in the specified profile
  -version                   Version information
  -help                      Print a synopsis of standard options
  -Akey[=value]              Options to pass to annotation processors
  -X                         Print a synopsis of nonstandard options
  -J<flag>                   Pass <flag> directly to the runtime system
  -Werror                    Terminate compilation if warnings occur
  @<filename>                Read options and filenames from file

[admin@oftpclient202 ~]$
第二种方法:输入命令:rpm -qa | grep java,这里可能检查到的 JDK 是 1.4,系统默认安装的;有些可能搭建 JAVA 环境,查询出来是 1.7,或者查询不到,都没关系。
[admin@bbajit202 ~]$ rpm -qa|grep java
java-1.8.0-openjdk-headless-1.8.0.262.b10-0.el8_2.x86_64
javapackages-filesystem-5.3.0-1.module_el8.0.0+11+5b8c10bd.noarch
tzdata-java-2020a-1.el8.noarch
java-1.8.0-openjdk-1.8.0.262.b10-0.el8_2.x86_64
[admin@bbajit301 ~]$
从上边可以看出宏哥已经安装好了 JDK。如果没有安装好 JDK 的童鞋或者小伙伴们可以参考宏哥的另一篇文章进行安装,同样是在 Linux 系统直接下载安装包,解压安装:传送门。
2.2 卸载 JDK
输入命令:rpm -e --nodeps + 上边命令查到的 jdk 安装包名字 开始卸载,卸载完成再查看已没有。
[admin@oftpclient202 ~]$ rpm -qa|grep java
[admin@oftpclient202 ~]$
3.宏哥环境
1.查看 Linux 环境输入命令:lsb_release -a
[admin@oftpclient202 ~]$ lsb_release -a
LSB Version:    :core-4.1-amd64:core-4.1-noarch:cxx-4.1-amd64:cxx-4.1-noarch:desktop-4.1-amd64:desktop-4.1-noarch:languages-4.1-amd64:languages-4.1-noarch:printing-4.1-amd64:printing-4.1-noarch
Distributor ID: CentOS
Description:    CentOS Linux release 7.9.2009 (Core)
Release:        7.9.2009
2.查看 JDK 环境命令:java -version
[admin@oftpclient202 ~]$ java -version
java version "1.8.0_333"
Java(TM) SE Runtime Environment (build 1.8.0_281-b09)
Java HotSpot(TM) 64-Bit Server VM (build 25.281-b09, mixed mode)
[admin@oftpclient201 ~]$
4.下载 Jmeter 安装包
4.1 安装包地址
1.Jmeter 是开源的工具,我们直接到官网下载即可,本次安装的版本是 5.4(宏哥一般都是安装最新的,除非有特殊要求)。
最新版本下载地址:https://jmeter.apache.org/download_jmeter.cgi
历史版本下载地址:https://archive.apache.org/dist/jmeter/binaries/

下载后缀为 .tgz 或 .zip 都是可以的,我们可以在 Linux 通过 wget 命令下载 Jmeter 安装包,或者下载后再传到 Linux。
我这里下载的安装包版本是 :apache-jmeter-5.4.tgz 。
4.2Linux 下载安装包
Windows 下载 Jmeter 安装包宏哥在这里就做赘述了,直接点击就可以下载,宏哥在这里说一下 Linux 如何下载 Jmeter 安装包。
1.wget 下载 Jmeter 安装包
方法:wget+ 安装包下载链接(选中安装包右键,点击复制链接地址),如下图所示:

2.在 Linux 系统运行命令:wget+ 安装包下载链接 ,如下图所示:

4.3 查看安装包大小
有了上次安装 JDK 的经验,宏哥首先看一下是否真的下载成功,不要向上一次安装 JDK 一样,拷贝过去解压的时候才发现下载的安装包不完整(下载不成功)查看安装包大小,如下图所示:

从上图中我们可以看出安装包大小和下载页面显示的安装包大小差不多,说明安装包下载成功。那么下一步便是在准备安装的目录将此安装包解压。
5.解压安装包
创建一个文件夹,用于存放 Jmeter 安装包,然后解压到该目录下。
创建文件夹:mkdir -p /usr/SoftWare/Jmeter
进入文件夹:cd /usr/SoftWare/Jmeter
将下载好的压缩文件剪贴到创建好的文件夹下:mv apache-jmeter-5.4.tgz /usr/SoftWare/Jmeter
解压:tar -zxvf /usr/SoftWare/Jmeter/apache-jmeter-5.4.tgz

可以看到,本次解压到了目录 /usr/SoftWare/Jmeter/apache-jmeter-5.4下。
6.配置环境
解压完成之后,我们要配置下环境变量,通过 vi 命令修改配置文件 /etc/profile 来设置环境变量。
vi /etc/profile
1.在 Linux 系统终端输入上边的命令行,进入 vi 的一般模式了。请注意,记得 vi 后面一定要加文件名,不管该文件存在与否!如下图示:

2.输入 G 到文件最后一行,输入 i 进入编辑模式,添加以下内容,然后按 Esc 退出编辑模式,再输入 :wq 保存并退出。
#Jmeter环境变量配置
export JMETER_HOME=/usr/SoftWare/Jmeter/apache-jmeter-5.4
export PATH=${JMETER_HOME}/bin:$PATH
添加完成,如下图所示:

3.查看编辑保存是否成功,vi /etc/profile,再次进入 vi 的一般模式,输入 G 到文件最后一行,可以查看到宏哥刚刚配置 JMeter 环境变量添加的内容,如下图所示:

4.查看 JMeter 的环境变量是否配置成功,输入命令:jmeter -version,如下图所示:

从上图可以看出还没有配置成功。这个是因为环境变量还没有生效了。
5.设置完之后,如果要使环境变量立即生效,需要通过输入命令:source /etc/profile,重新加载配置文件。最后,通过 jmeter --version 查看安装的 Jmeter 版本,验证安装成功。

OK,出现上图界面恭喜你,到这里,大功告成,Jmeter 已经安装完成,你就可以开始使用了!
7.小结
1.Linux 通过 wget 命令下载安装包的时候,宏哥这个觉得有点慢时间有点长(可能宏哥的网速引起的吧),着急的童鞋和小伙伴们可以用 Windows 下载然后上传到 Linux 系统中。
2.细心的童鞋或者小伙伴们可能已经发现在验证环境变量输入命令在 version 前边注意是两个中划线(-)。懒人妙招:输入:jmeter -v 即可。

3.这里宏哥为啥不用 vim 而是用 vi 了,宏哥告诉你哈,宏哥用了但是不幸的是宏哥的 Linux 系统没有安装 vim,所以宏哥就偷懒了一下。直接用系统自带的 vi 了。看看宏哥用 Vim 后,Linux 系统提示如下图所示:

那为什么 Vi 可以而 Vim 就不可以了,那是因为宏哥的这个 Linux 系统没有安装 Vim。我这么空口白牙一说,有些较真的小伙伴或者童鞋们可能不相信。那宏哥就让你看一下。
一般我们 Linux 系统中执行的命令都在 bin 目录下,宏哥带你看一下 bin 目录下以字母 V 开头的所有文件,能查看到 vi,却看不到 vim,如下图所示:

其次还有一个原因就是宏哥的登录 Linux 系统的用户身份现在不是 root 而是 admin。一般来说安装这种命令都需要在 root 用户登录。不信的小伙伴后者同学们可以看下,如下图所示:

从上图可以看出需要 root 用户登录才可以安装 vim,那宏哥在这里就切换一下用户到 root,输入命令:su - ,然后继续安装 vim,如下图所示:

切换到 root 后,安装 vim,输入命令: yum install vim ,如下图所示:


中间输入 Y(为了避免中间输入 Y,可以输入命令:yum install -y vim),最后 vim 安装成功。宏哥再带童鞋们或者小伙伴们去 bin 目录查看下是否有 vim,如下图所示:

然后我们就可以用 vim 了,这次编辑输入:vim /etc/porfile,就不会报错了,如下图所示:

8.拓展
linux 的命令行前面的 root@linux~ # 中的每个部分代表什么意思?
"root":表示当前的登录的用户

"@":可以理解为是一个分隔符号

"linux":应该是你的主机名

"~":表示你当前所在的目录

"#":表示你当前登录用户的身份是root超级用户
所有的 Unix Like 系统都会内建 vi 文书编辑器,其他的文书编辑器则不一定会存在。
但是目前我们使用比较多的是 vim 编辑器。
vim 具有程序编辑的能力,可以主动的以字体颜色辨别语法的正确性,方便程序设计。
8.1 什么是 vim?
Vim 是从 vi 发展出来的一个文本编辑器。代码补完、编译及错误跳转等方便编程的功能特别丰富,在程序员中被广泛使用。
简单的来说, vi 是老式的字处理器,不过功能已经很齐全了,但是还是有可以进步的地方。 vim 则可以说是程序开发者的一项很好用的工具。
连 vim 的官方网站 (http://www.vim.org) 自己也说 vim 是一个程序开发工具而不是文字处理软件。
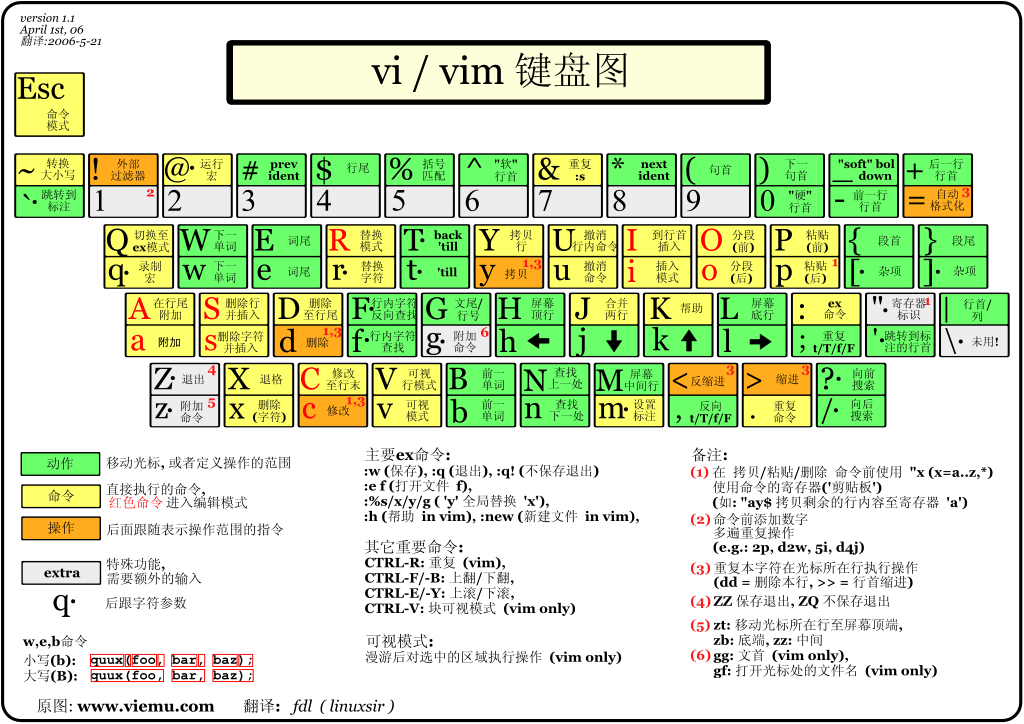
vim 键盘图:
8.2vi/vim 的使用
基本上 vi/vim 共分为三种模式,分别是命令模式(Command mode),输入模式(Insert mode)和底线命令模式(Last line mode)。 这三种模式的作用分别是:
8.2.1 命令模式:
用户刚刚启动 vi/vim,便进入了命令模式。
此状态下敲击键盘动作会被 Vim 识别为命令,而非输入字符。比如我们此时按下 i,并不会输入一个字符,i 被当作了一个命令。
以下是常用的几个命令:
- i 切换到输入模式,以输入字符。
- x 删除当前光标所在处的字符。
- : 切换到底线命令模式,以在最底一行输入命令。
若想要编辑文本:启动 Vim,进入了命令模式,按下 i,切换到输入模式。
命令模式只有一些最基本的命令,因此仍要依靠底线命令模式输入更多命令。
8.2.2 输入模式
在命令模式下按下 i 就进入了输入模式。
在输入模式中,可以使用以下按键:
- 字符按键以及 Shift 组合,输入字符
- ENTER,回车键,换行
- BACK SPACE,退格键,删除光标前一个字符
- DEL,删除键,删除光标后一个字符
- 方向键,在文本中移动光标
- HOME/END,移动光标到行首/行尾
- Page Up/Page Down,上/下翻页
- Insert,切换光标为输入/替换模式,光标将变成竖线/下划线
- ESC,退出输入模式,切换到命令模式
8.2.3 底线命令模式
在命令模式下按下:(英文冒号)就进入了底线命令模式。
底线命令模式可以输入单个或多个字符的命令,可用的命令非常多。
在底线命令模式中,基本的命令有(已经省略了冒号):
- q 退出程序
- w 保存文件
按 ESC 键可随时退出底线命令模式。
8.3Vim/Vi 工作模式图形总结
简单的说,我们可以将这三个模式想成底下的图标来表示:

8.4linux 文件颜色代表的含义
在 linux 中,不同颜色的文件代表不同的含义,下面是 linux 中不同颜色的文件代表的含义:
# 白色:普通的文件
# 蓝色:目录
# 绿色:可执行的文件
# 红色:压缩文件或者包文件
# 青色:连接文件
# 黄色:设备文件
# 灰色:其他的文件