最近公司多了很多 AI 的业务,大多数都是原有业务 +AI,都要搞 AI Agent,做知识库啊,快速问答啊。搞 AI 成为比较时髦的事情。那对于测试同学来说,要测试 AI Agent,至少得知道 AI Agent 是什么,知道怎么构建一个 AI Agent。作为刚入门 AI 测试的小学生,我在网上找了挺多资料的,本着能 copy from github 的原则,最后找到了一个比较靠谱的教学,我也在本地跑了起来,效果还算可以。如果代码能力比较好,AI 也有些基础的可以直接看 github 库:https://github.com/lihuazhang/ai-agents-with-llama3,顺便也致敬下 Ransaka/ai-agents-with-llama3
感谢通义灵码,帮我解读代码的时候,还能翻译英文,厉害了!
背景
让我们假设一个场景,你想购买一些东西。你前往一个电子商务网站,使用搜索功能来找到你需要的商品。也许你还有一堆其他商品也需要购买。所以这个过程不是很高效,对吧?现在想象一下这样的场景:你打开一个应用,用简单的英语描述你想要的东西,然后按下回车键。所有的搜索和价格比较都会自动为你完成。是不是很酷?—— 现在的购物软件其实也想做这个导购,其实真能解决很多问题,比如中午吃什么的灵魂问题,让 AI 为你做主。
这正是我们在本教程中将要构建的内容。
先来看一些例子。

这个例子就是问导购 AI Agent,我想给娃买把十字弩,给自己买个宝可梦,顺便搞个拼图游戏。Agent 回答的有模有样的,“我帮你娃找到了一把十字弩,给你找到了宝可梦,给你的家人找了个解谜游戏,下面是细节:十字弩是咋样的,宝可梦是咋样的,拼图是咋样的,吧啦吧啦”,直接省去了大家自己搜索的麻烦,分类啊、选型啊、价格啊等等。
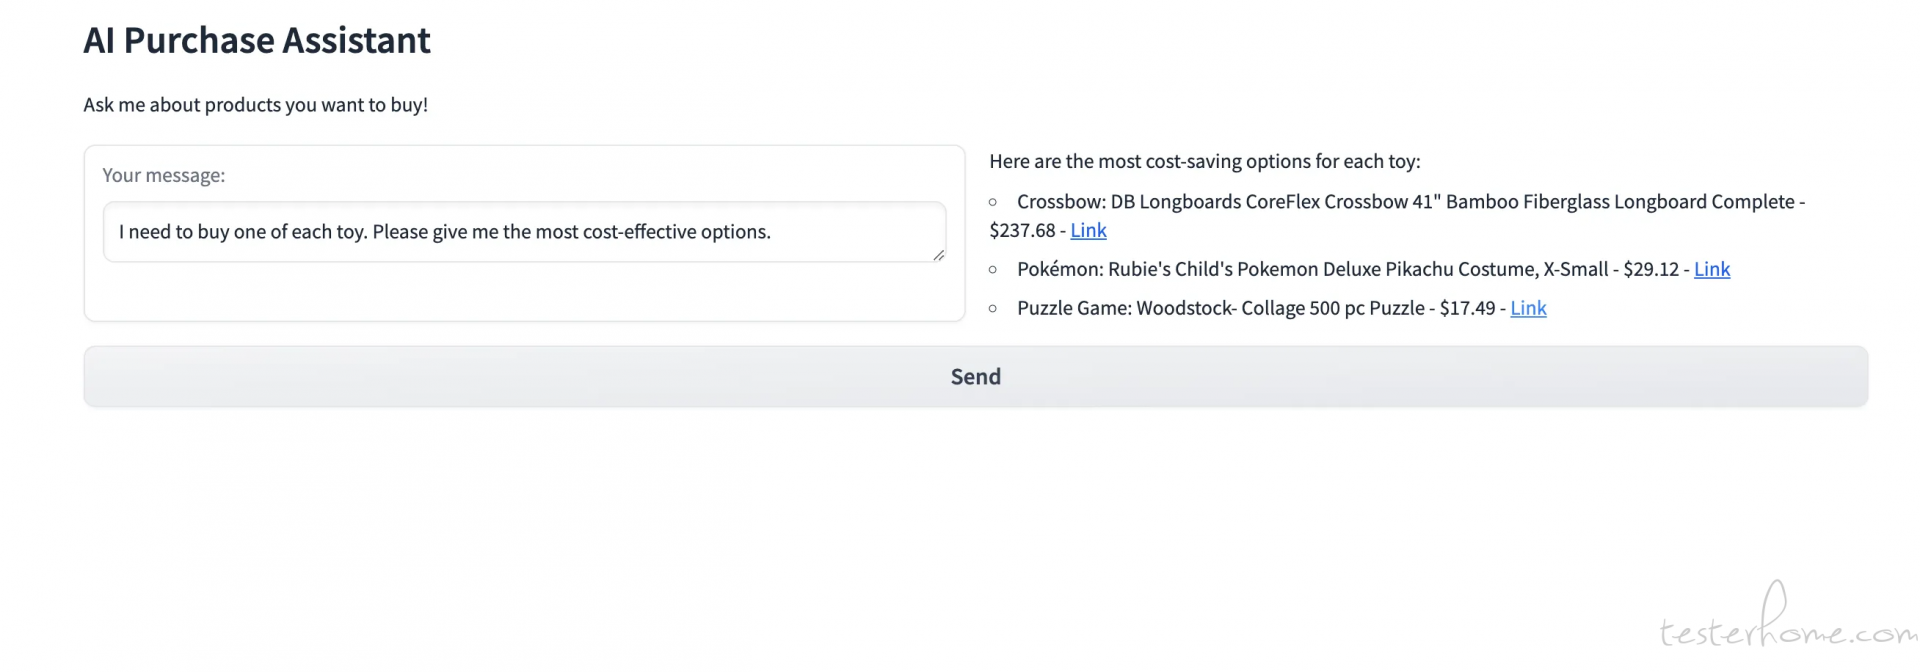
这个例子就更加人性化了,我想每个买一样,请给我最划算的选项。Agent 直接给出了答案,这简直是自动比价网啊。
那么我们就一起看看怎么实现这个 Agent。在这里,我们将使用 Meta 的 Llama 3.1 模型,该模型具备调用函数的能力。根据他们的公告,3.1 版本的模型能够更有效地使用工具和函数。这些模型支持多语言,并且具有长达 128K 的上下文长度、最先进的工具使用能力以及整体更强的推理能力。
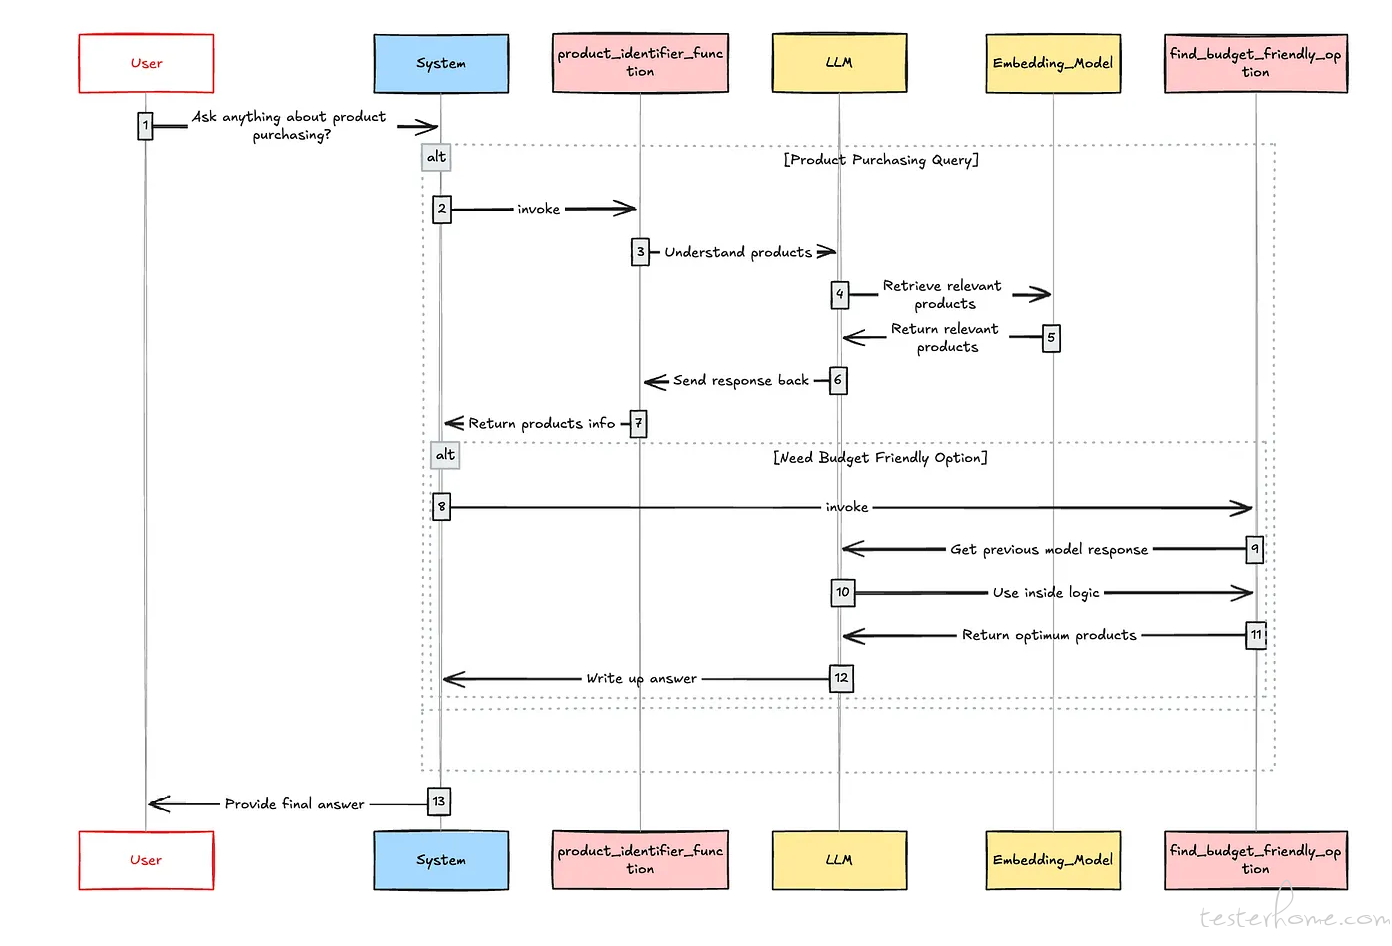
然而,在这篇文章中,我将使用 Groq Cloud,因此我会使用他们的 Groq/Llama-3-Groq-70B-Tool-Use 模型。根据这个应用的初始工作流程,它应该包括一个嵌入模型、一个检索器和两个主要工具,用于处理用户的购买兴趣和成本相关的问题。长话短说,先看看流程图:
现在我们需要使用一个 LLM(大语言模型)编排框架。为此,我选择我一直以来的最爱,Haystack。(老外的最爱,中文用户超级不友好,国内文章还很少)
好了,我们已经准备好了所需的一切。让我们开始真正的工作吧!
加载和索引数据
注意哦:代码库里有一个 csv 数据文件:amazon_product_sample.csv
由于我们有一个 RAG(Retrieval-Augmented Generation)管道,我们应该首先构建一个文档索引服务。(这里得解释下,因为大模型肯定不知道仓库里有哪些货物和东西,大模型的信息是滞后的,所以这里要挂一个 RAG,来提供更多和更及时的信息)。因为这是一个演示,我将使用 Haystack 提供的内存向量数据库。请注意,我们向量数据库中的每个文档包含以下内容:
- content — 用于执行相似性搜索的内容
- Id — 唯一标识符
- Price — 产品价格
- URL — 产品 URL
让我们看看如何实现这一点。
注意:老外用的是 jupyter notebook,所以是一个个 code block。
# 加载环境和依赖
from dotenv import load_dotenv
import re
from pprint import pprint
from ast import literal_eval
from typing import List
import json
import pandas as pd
from haystack import Pipeline, Document
from haystack.document_stores.in_memory import InMemoryDocumentStore
from haystack.components.writers import DocumentWriter
from haystack.components.embedders import SentenceTransformersDocumentEmbedder
from haystack.components.generators import OpenAIGenerator
from haystack.utils import Secret
from haystack.components.generators.chat import OpenAIChatGenerator
from haystack.components.builders import PromptBuilder
from haystack.components.embedders import SentenceTransformersTextEmbedder
from haystack.components.retrievers.in_memory import InMemoryEmbeddingRetriever
from haystack.dataclasses import ChatMessage
load_dotenv()
# GROQ 需要自己翻墙去配置下,非常简单
generator = lambda : OpenAIGenerator(
    api_key=Secret.from_env_var("GROQ_API_KEY"),
    api_base_url="https://api.groq.com/openai/v1",
    model="llama-3.1-70b-versatile",
    generation_kwargs = {"max_tokens": 512}
)

get_chat_generator = lambda **kwargs: OpenAIChatGenerator(
    api_key=Secret.from_env_var("GROQ_API_KEY"),
    api_base_url="https://api.groq.com/openai/v1",
    model="llama3-groq-70b-8192-tool-use-preview",
    generation_kwargs={"max_tokens": 512},
    **kwargs
)
df = pd.read_csv("amazon_product_sample.csv")

document_store = InMemoryDocumentStore()
documents = [
    Document(
        content=item.product_name,
        meta={
            "id":item.uniq_id,
            "price":item.selling_price,
            "url":item.product_url
            }
        ) for item in df.head(10).itertuples()
    ]

indexing_pipeline = Pipeline()

# sentence-transformers/all-MiniLM-L6-v2 这个模型默认是从huggingface去拉的,如果搞不下来,需要自己处理下
indexing_pipeline.add_component(
    instance=SentenceTransformersDocumentEmbedder(model="sentence-transformers/all-MiniLM-L6-v2"), name="doc_embedder"
)

indexing_pipeline.add_component(instance=DocumentWriter(document_store= document_store), name="doc_writer")

indexing_pipeline.connect("doc_embedder.documents", "doc_writer.documents")

indexing_pipeline.run({"doc_embedder": {"documents": documents}})
太好了,我们完成了 AI Agent 的第一步。现在是时候构建产品识别工具了。为了更好地理解产品识别的主要任务,让我们考虑以下示例。
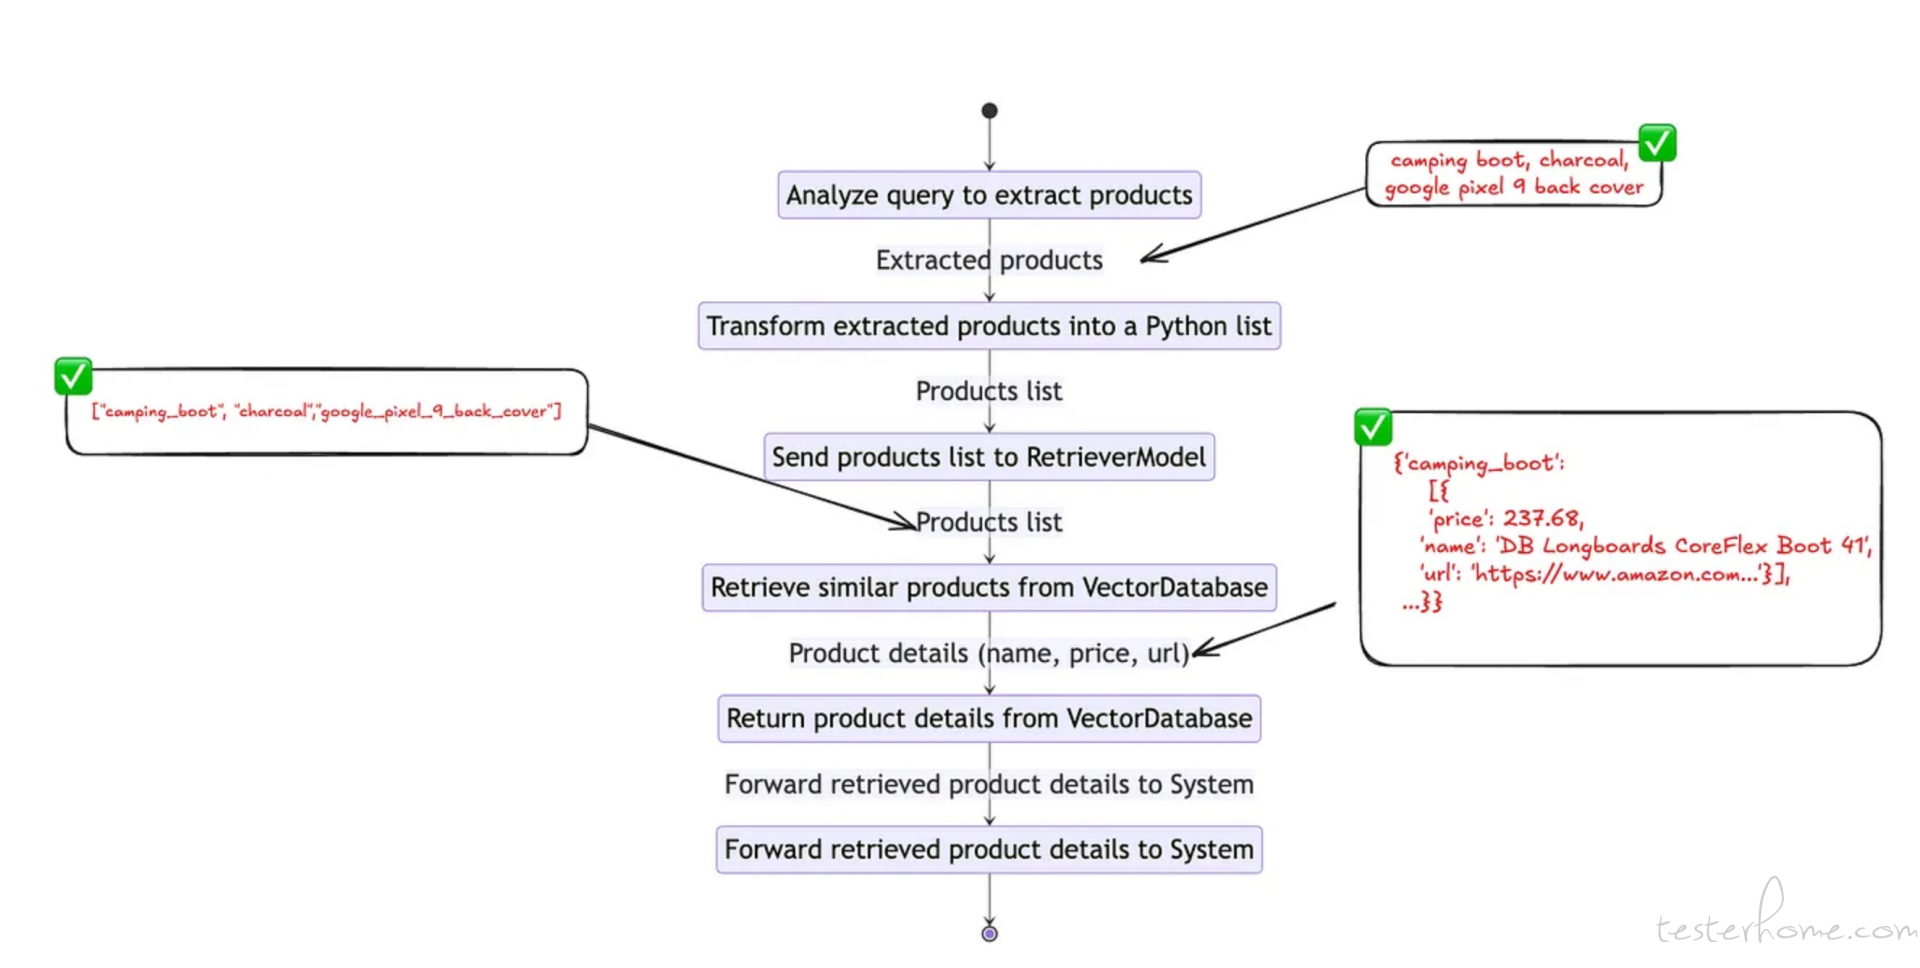
用户查询:我想买一双露营靴、一些木炭和一个谷歌 Pixel 9 的后壳。让我们来了解一下我们理想的产品识别功能的工作流程。
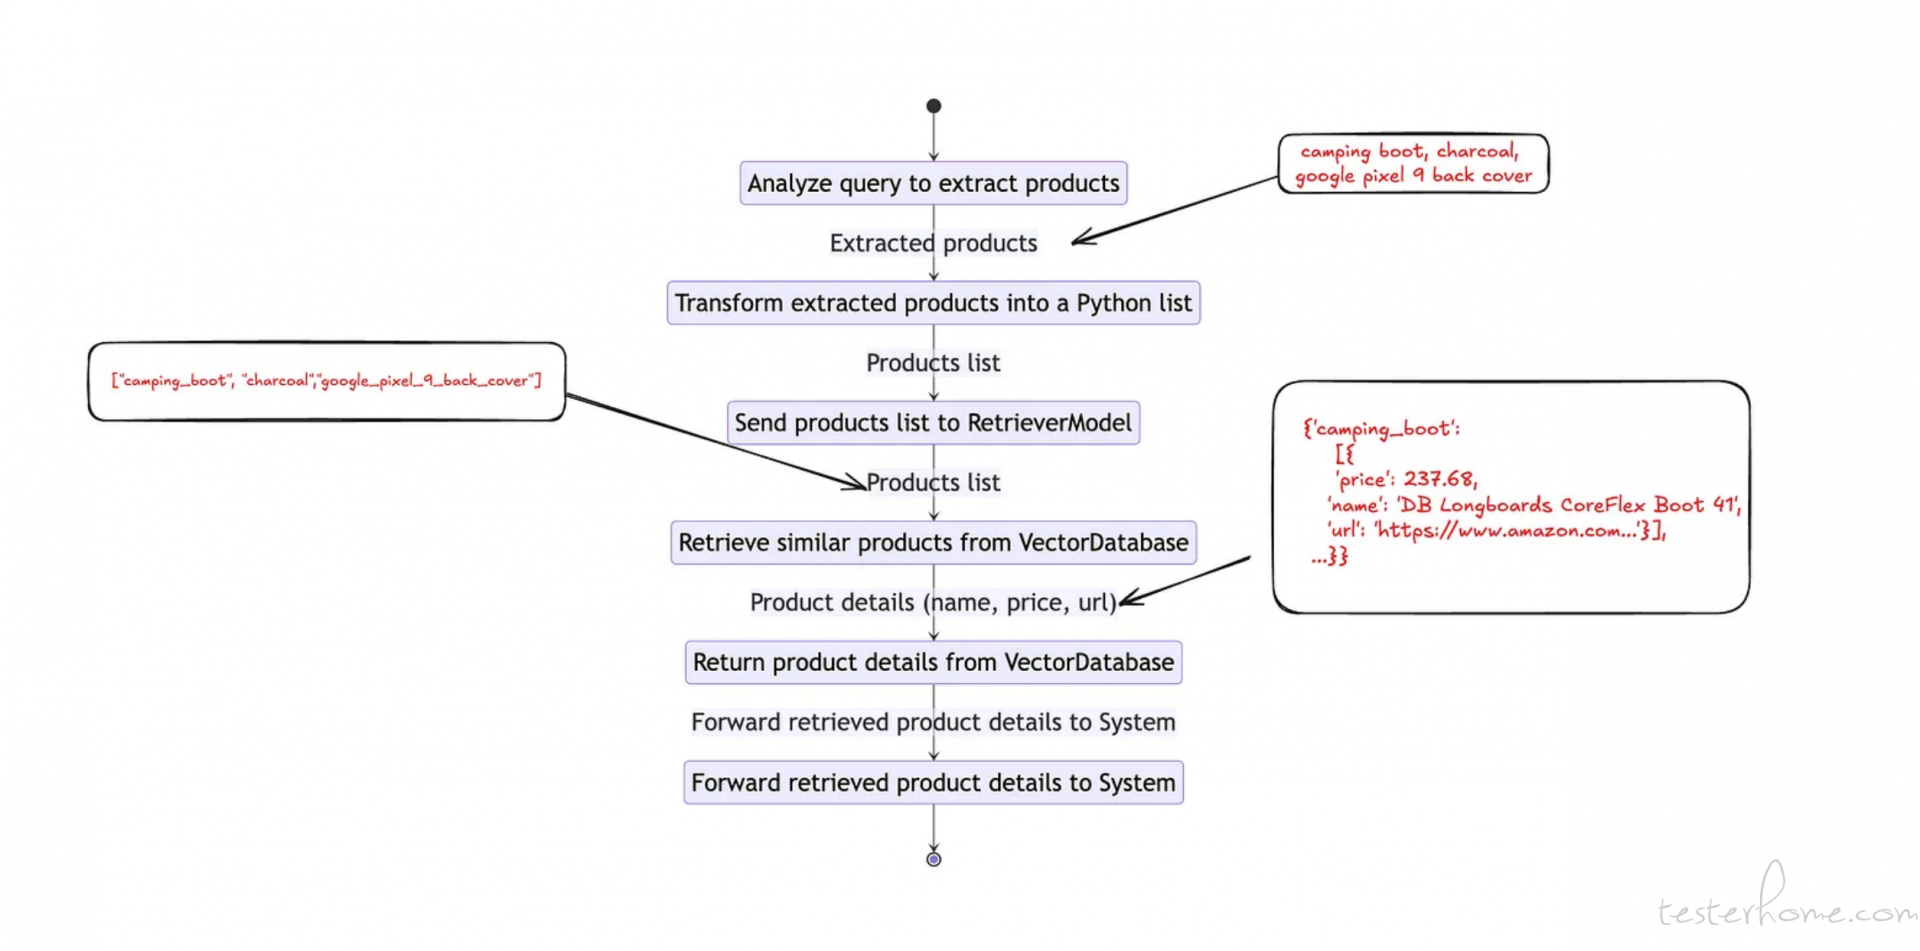
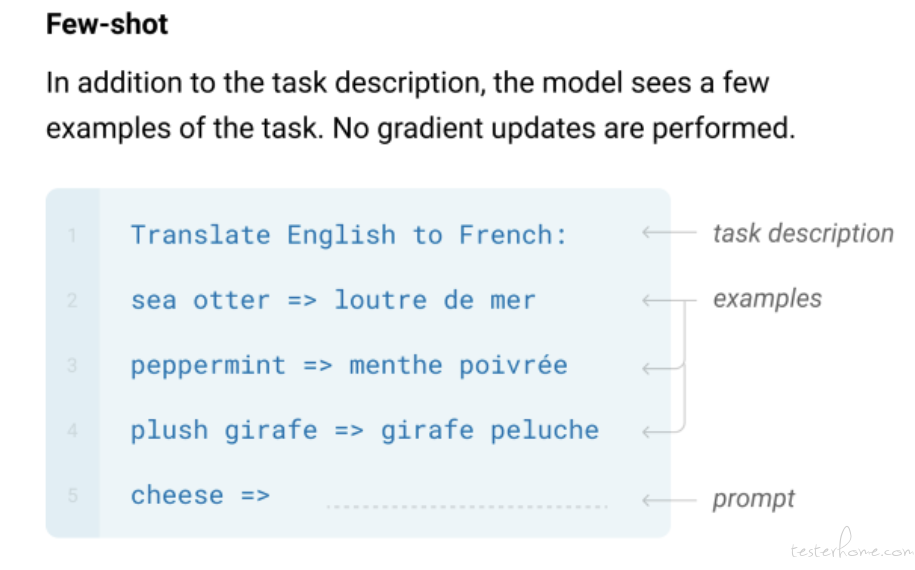
首先,我们需要创建一个工具来分析用户的查询,并识别用户感兴趣的产品。我们可以使用以下代码片段来构建这样一个工具。这个其实是用 prompt 工程来分析用户查询,用了few-shot。
构建用户查询分析器
template = """
Understand the user query and list of products the user is interested in and return product names as list.
You should always return a Python list. Do not return any explanation.
Examples:
Question: I am interested in camping boots, charcoal and disposable rain jacket.
Answer: ["camping_boots","charcoal","disposable_rain_jacket"]
Question: Need a laptop, wireless mouse, and noise-cancelling headphones for work.
Answer: ["laptop","wireless_mouse","noise_cancelling_headphones"]
Question: {{ question }}
Answer:
"""
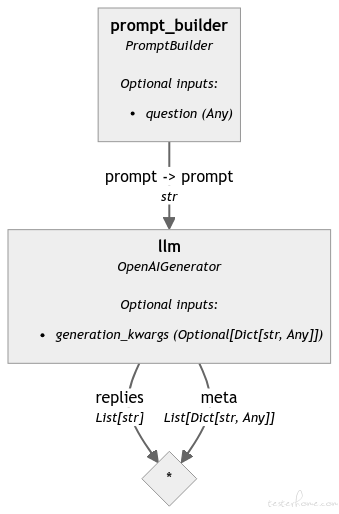
product_identifier = Pipeline() # 这里是构建一条管道,类似langchain的那种,如果你在jupyter notebook跑到这里的话,就会有下面那个图
product_identifier.add_component("prompt_builder", PromptBuilder(template=template))
product_identifier.add_component("llm", generator())
product_identifier.connect("prompt_builder", "llm")
好的,现在我们已经完成了第一个函数的一半,现在是时候通过添加 RAG 管道来完成这个函数了。

# testing product identifier tool
query = "I want crossbow and woodstock puzzle"
product_identifier.run({"prompt_builder": {"question": query}})
测试下:
{'llm': {'replies': ['["crossbow","woodstock_puzzle"]'],
  'meta': [{'model': 'llama-3.1-70b-versatile',
    'index': 0,
    'finish_reason': 'stop',
    'usage': {'completion_tokens': 10,
     'prompt_tokens': 153,
     'total_tokens': 163,
     'queue_time': 0.164865912,
     'prompt_time': 0.040748536,
     'completion_time': 0.04,
     'total_time': 0.080748536}}]}}
构建 RAG 管道
template = """
Return product name, price, and url as a python dictionary.
You should always return a Python dictionary with keys price, name and url for single product.
You should always return a Python list of dictionaries with keys price, name and url for multiple products.
Do not return any explanation.

Legitimate Response Schema:
{"price": "float", "name": "string", "url": "string"}
Legitimate Response Schema for multiple products:
[{"price": "float", "name": "string", "url": "string"},{"price": "float", "name": "string", "url": "string"}]

Context:
{% for document in documents %}
    product_price: {{ document.meta['price'] }}
    product_url: {{ document.meta['url'] }}
    product_id: {{ document.meta['id'] }}
    product_name: {{ document.content }}
{% endfor %}
Question: {{ question }}
Answer:
"""

rag_pipe = Pipeline()
rag_pipe.add_component("embedder", SentenceTransformersTextEmbedder(model="sentence-transformers/all-MiniLM-L6-v2"))
rag_pipe.add_component("retriever", InMemoryEmbeddingRetriever(document_store=document_store, top_k=5))
rag_pipe.add_component("prompt_builder", PromptBuilder(template=template))
rag_pipe.add_component("llm", generator())

rag_pipe.connect("embedder.embedding", "retriever.query_embedding")
rag_pipe.connect("retriever", "prompt_builder.documents")
rag_pipe.connect("prompt_builder", "llm")
经过这一阶段,我们已经完成了 RAG 和查询分析器管道。现在是时候将它们转换成一个工具了。为此,我们可以使用如下面所示的常规函数声明。这里,为 Agent 创建一个工具与创建一个 Python 函数没有区别。如果你有疑问,
Agent 是如何调用这个函数的?
答案很简单:通过使用特定于模型的工具模式。我们将在后续步骤中实现这一点。目前,我们需要创建一个包装函数,该函数同时使用查询分析器和 RAG 管道。
把 产品识别器集成到 RAG 管道中来
def product_identifier_func(query: str):
    product_understanding = product_identifier.run({"prompt_builder": {"question": query}})

    try:
        product_list = literal_eval(product_understanding["llm"]["replies"][0])
    except:
        return "No product found"

    results = {}

    for product in product_list:
        response = rag_pipe.run({"embedder": {"text": product}, "prompt_builder": {"question": product}})
        try:
            results[product] = literal_eval(response["llm"]["replies"][0])
        except:
            results[product] = {}

    return results
至此,我们完成了 Agent 的第一个工具。让我们看看它是否如预期那样工作。
## Testing functions
product_identifier_func(query)
测试一下:
{'crossbow': {'price': 237.68,
  'name': 'DB Longboards CoreFlex Crossbow 41" Bamboo Fiberglass Longboard Complete',
  'url': 'https://www.amazon.com/DB-Longboards-CoreFlex-Fiberglass-Longboard/dp/B07KMVJJK7'},
 'woodstock_puzzle': {'price': 17.49,
  'name': 'Woodstock-Collage 500 pc Puzzle',
  'url': 'https://www.amazon.com/Woodstock-Collage-500-pc-Puzzle/dp/B07MX21WWX'}}
成功了!!不过,值得注意的是返回的输出模式。你可以看到下面的一般模式:
{
    "product_key": {
        "name": "string",
        "price": "float",
        "url": "string"
    }
}
这正是我们在 RAG 管道中指导模型生成的输出形式。作为下一步,让我们构建一个可选工具,名为 find_budget_friendly_option。
def find_budget_friendly_option(selected_product_details):
    budget_friendly_options = {}

    for category, items in selected_product_details.items():
        if isinstance(items, list):
            lowest_price_item = min(items, key=lambda x: x['price'])
        else:
            lowest_price_item = items

        budget_friendly_options[category] = lowest_price_item

    return budget_friendly_options
好的,现在我们来到了这个应用最关键的部分,即允许 Agent 在必要时使用这些函数。正如我们之前讨论的,这是通过一个特定于模型的工具模式实现的。所以我们需要找到适用于所选模型的工具模式。幸运的是,在 Groq/Llama-3-Groq-70B-Tool-Use 的模型卡片中提到了这一点。让我们将其适配到我们的用例中。
把聊天的模板定下来
chat_template = '''<|start_header_id|>system<|end_header_id|>

You are a function calling AI model. You are provided with function signatures within <tools></tools> XML tags. You may call one or more functions to assist with the user query. Don't make assumptions about what values to plug into functions. For each function call return a json object with function name and arguments within <tool_call></tool_call> XML tags as follows:
<tool_call>
{"name": <function-name>,"arguments": <args-dict>}
</tool_call>

Here are the available tools:
<tools>
    {
        "name": "product_identifier_func",
        "description": "To understand user interested products and its details",
        "parameters": {
            "type": "object",
            "properties": {
                "query": {
                    "type": "string",
                    "description": "The query to use in the search. Infer this from the user's message. It should be a question or a statement"
                }
            },
            "required": ["query"]
        }
    },
    {
        "name": "find_budget_friendly_option",
        "description": "Get the most cost-friendly option. If selected_product_details has morethan one key this should return most cost-friendly options",
        "parameters": {
            "type": "object",
            "properties": {
                "selected_product_details": {
                    "type": "dict",
                    "description": "Input data is a dictionary where each key is a category name, and its value is either a single dictionary with 'price', 'name', and 'url' keys or a list of such dictionaries; example: {'category1': [{'price': 10.5, 'name': 'item1', 'url': 'http://example.com/item1'}, {'price': 8.99, 'name': 'item2', 'url': 'http://example.com/item2'}], 'category2': {'price': 15.0, 'name': 'item3', 'url': 'http://example.com/item3'}}"
                }
            },
            "required": ["selected_product_details"]
        }
    }
</tools><|eot_id|><|start_header_id|>user<|end_header_id|>

I need to buy a crossbow<|eot_id|><|start_header_id|>assistant<|end_header_id|>

<tool_call>
{"id":"call_deok","name":"product_identifier_func","arguments":{"query":"I need to buy a crossbow"}}
</tool_call><|eot_id|><|start_header_id|>tool<|end_header_id|>

<tool_response>
{"id":"call_deok","result":{'crossbow': {'price': 237.68,'name': 'crossbow','url': 'https://www.amazon.com/crossbow/dp/B07KMVJJK7'}}}
</tool_response><|eot_id|><|start_header_id|>assistant<|end_header_id|>
'''
现在只剩下几个步骤了。在做任何事情之前,让我们先测试一下我们的 Agent。
## Testing template
messages = [
    ChatMessage.from_system(
        chat_template
    ),
    ChatMessage.from_user("I need to buy a crossbow for my child and Pokémon for myself."),
]

chat_generator = get_chat_generator()
response = chat_generator.run(messages=messages)
pprint(response)
输出值:
{'replies': [ChatMessage(content='<tool_call>\n'
                                 '{"id": 0, "name": "product_identifier_func", '
                                 '"arguments": {"query": "I need to buy a '
                                 'crossbow for my child"}}\n'
                                 '</tool_call>\n'
                                 '<tool_call>\n'
                                 '{"id": 1, "name": "product_identifier_func", '
                                 '"arguments": {"query": "I need to buy a '
                                 'Pok\\u00e9mon for myself"}}\n'
                                 '</tool_call>',
                         role=<ChatRole.ASSISTANT: 'assistant'>,
                         name=None,
                         meta={'finish_reason': 'stop',
                               'index': 0,
                               'model': 'llama3-groq-70b-8192-tool-use-preview',
                               'usage': {'completion_time': 0.237215982,
                                         'completion_tokens': 75,
                                         'prompt_time': 0.041193075,
                                         'prompt_tokens': 561,
                                         'queue_time': 0.0011405149999999947,
                                         'total_time': 0.278409057,
                                         'total_tokens': 636}})]}
到这里差不多好了。你可能在上面的响应中注意到的一点是,工具调用被封装在 XML 标签 中。因此,我们需要构建一种机制来提取 tool_call 对象。
## For extracting tool calls
def extract_tool_calls(tool_calls_str):
    json_objects = re.findall(r'<tool_call>(.*?)</tool_call>', tool_calls_str, re.DOTALL)

    result_list = [json.loads(obj) for obj in json_objects]

    return result_list

available_functions = {
    "product_identifier_func": product_identifier_func,
    "find_budget_friendly_option": find_budget_friendly_option
    }
完成这一步后,当 Agent 调用工具时,我们可以直接访问其响应。现在唯一剩下的就是获取工具调用对象并相应地执行函数。让我们也完成这部分内容。
messages.append(ChatMessage.from_user(message))
response = chat_generator.run(messages=messages)

if response and "<tool_call>" in response["replies"][0].content:
    function_calls = extract_tool_calls(response["replies"][0].content)
    for function_call in function_calls:
        # Parse function calling information
        function_name = function_call["name"]
        function_args = function_call["arguments"]

        # Find the corresponding function and call it with the given arguments
        function_to_call = available_functions[function_name]
        function_response = function_to_call(**function_args)

        # Append function response to the messages list using `ChatMessage.from_function`
        messages.append(ChatMessage.from_function(content=json.dumps(function_response), name=function_name))
        response = chat_generator.run(messages=messages)
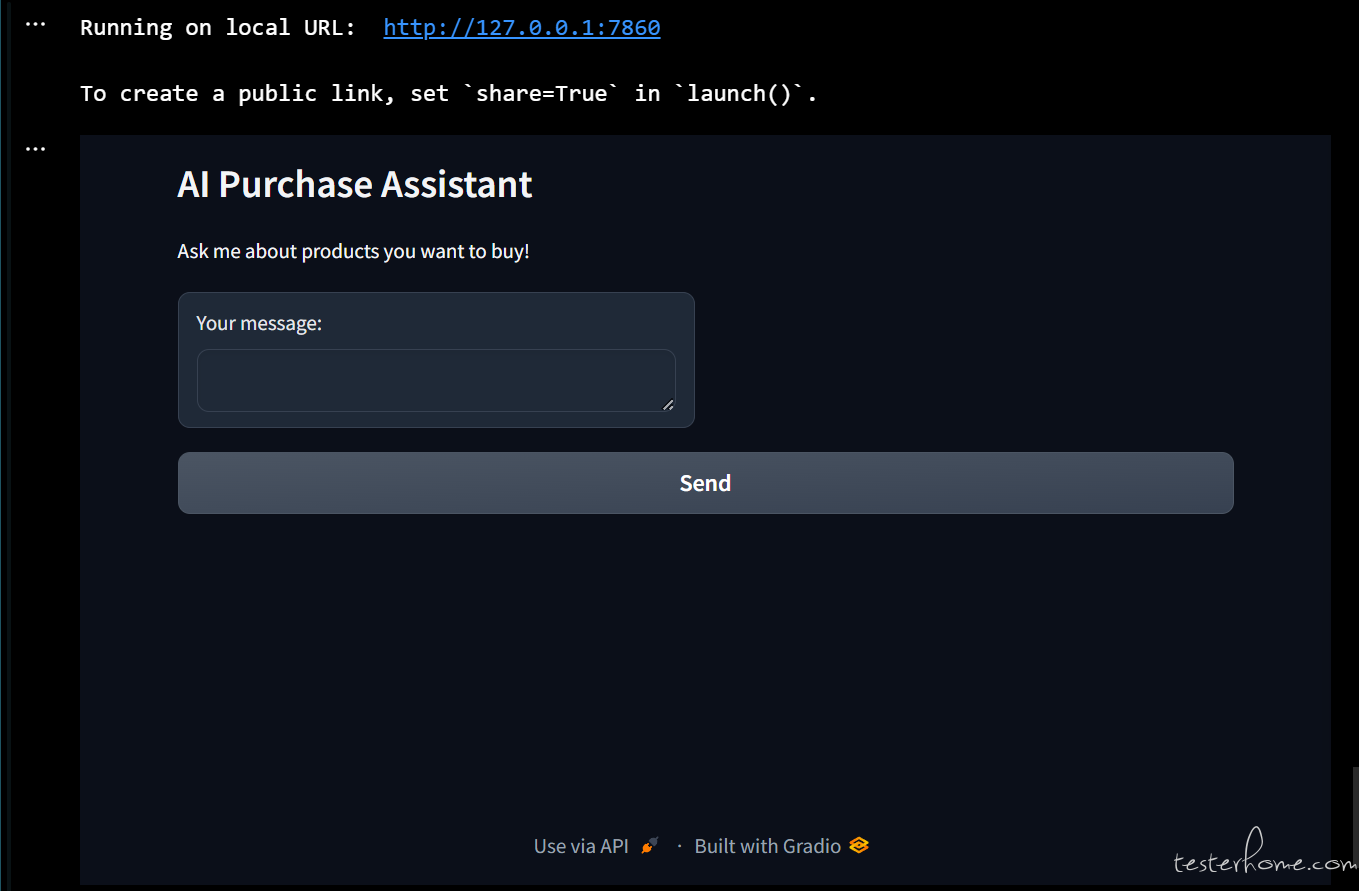
现在是时候将各个组件组合在一起,构建一个完整的聊天应用了。为此,我将使用 gradio。(这里得安装 gradio pip install gradio)
import gradio as gr

import os
from urllib.request import getproxies

# 下面这段很重要,因为Groq Cloud需要代理,但是gradio有代理启动不起来。
proxies = getproxies()
os.environ["HTTP_PROXY"]  = os.environ["http_proxy"]  = proxies["http"]
os.environ["HTTPS_PROXY"] = os.environ["https_proxy"] = proxies["https"]
os.environ["NO_PROXY"]    = os.environ["no_proxy"]    = "localhost, 127.0.0.1/8, ::1"

messages = [ChatMessage.from_system(chat_template)]
chat_generator = get_chat_generator()

def chatbot_with_fc(message, messages):
    pprint("开始处理!")
    messages.append(ChatMessage.from_user(message))
    response = chat_generator.run(messages=messages)

    while True:
        if response and "<tool_call>" in response["replies"][0].content:
            function_calls = extract_tool_calls(response["replies"][0].content)
            for function_call in function_calls:
                # Parse function calling information
                function_name = function_call["name"]
                function_args = function_call["arguments"]

                # Find the corresponding function and call it with the given arguments
                function_to_call = available_functions[function_name]
                function_response = function_to_call(**function_args)

                # Append function response to the messages list using `ChatMessage.from_function`
                messages.append(ChatMessage.from_function(content=json.dumps(function_response), name=function_name))
                response = chat_generator.run(messages=messages)

        # Regular Conversation
        else:
            messages.append(response["replies"][0])
            break
    return response["replies"][0].content

# Define Gradio interface function
def chatbot_interface(user_input, state):
    response_content = chatbot_with_fc(user_input, state)
    return response_content, state

# Gradio app
with gr.Blocks() as demo:
    gr.Markdown("# AI Purchase Assistant")
    gr.Markdown("Ask me about products you want to buy!")

    state = gr.State(value=messages)

    with gr.Row():
        user_input = gr.Textbox(label="Your message:")
        response_output = gr.Markdown(label="Response:")

    user_input.submit(chatbot_interface, [user_input, state], [response_output, state])
    gr.Button("Send").click(chatbot_interface, [user_input, state], [response_output, state])


demo.launch()
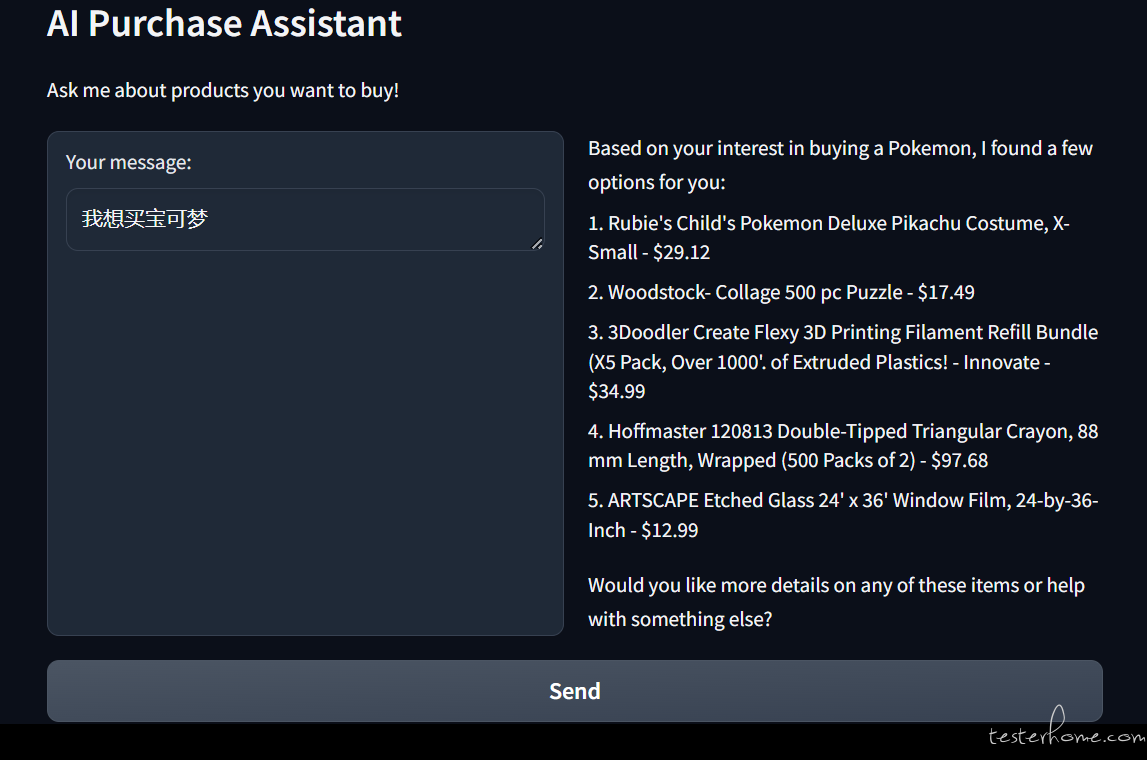
我们运行起来,就像下面一样:
发现中文也可以哈:
Done
至此,都可以跑起来了,看起来很简单,中间过程还比较坎坷,因为我想用自己部署的 ollma,但是 ollma generator 问题很多,也不支持 tool calling,然后也试了 qwen2,发现人家的生态里对国内 llm 支持的非常不友好,看来国货当自强。