性能测试工具 【COSBench 系列】4. COSBench 开发一个适配器
0. 前言
COSBench 系列的前三篇文章,讲解了它是什么为什么怎么用、开发环境、源码解读。在这最后一篇文章里,咱们来开发一个 bundle(storage)以便后续进行 SDK 版本更新,代码逻辑修改等。
1. 新建一个 bundle
我们可以新建一个 plug-in 项目(选 osgi),也可以选择一个偷懒的办法(选择一个近似的 bundle 进行拷贝后改造),这里我们选择后者。
a. 我们对 cosbench-s3 目录做一份拷贝,并进行重命名(我这里命名为了 cosbench-news3)
b. 修改 cosbench-news3 目录中的 .project 文件中的那么为 cosbench-news3
c. eclipse 中导入此 bundle:File -> Import -> General -> Existing projects into Workspace -> Next,如下图所示
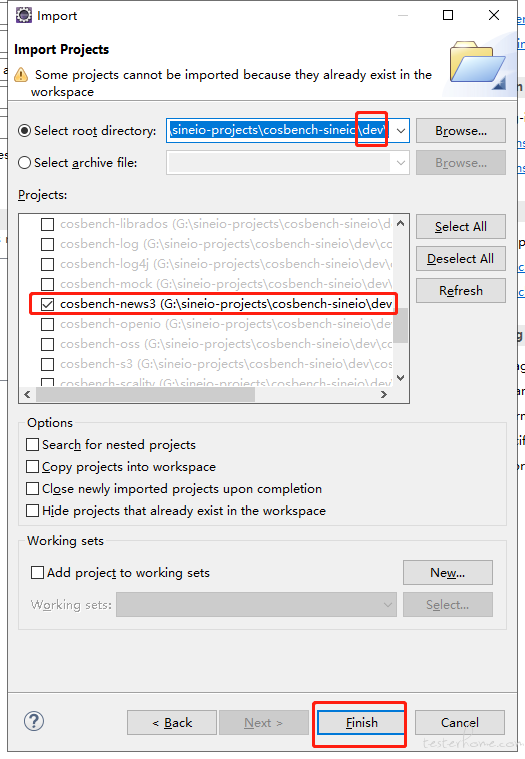
至此,新 bundle 改造完毕。
2. 定制化
2.1 修改 Java 环境为 Java-1.8
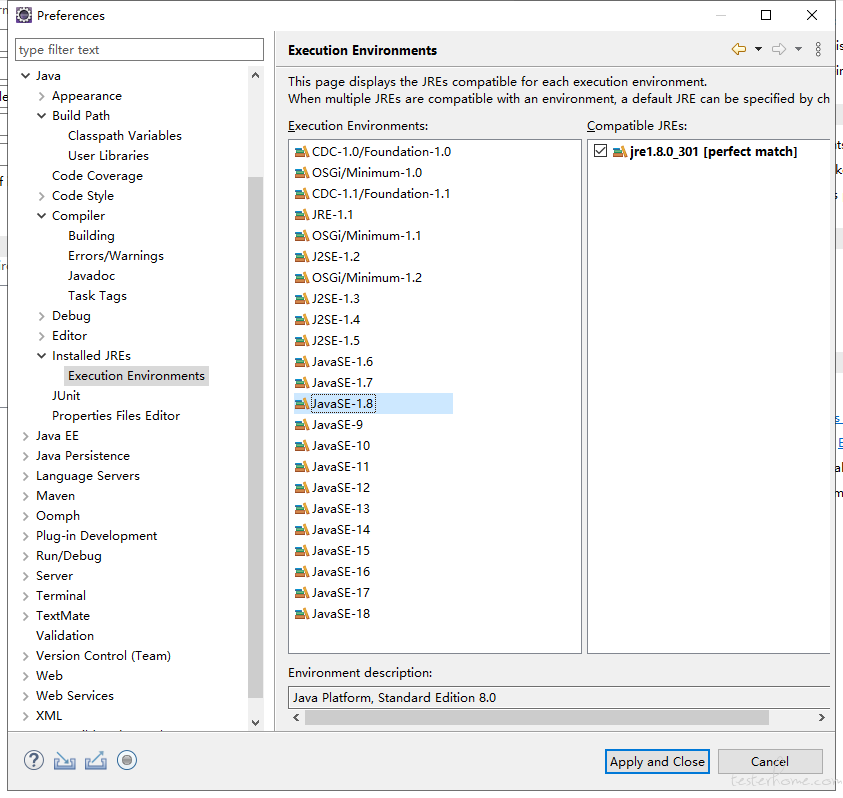
我们后续会升级 aws-sdk-java 的版本,因为升级后的 SDK 都升级了 Java 版本,所以咱在这里进行添加。Window -> Preferences -> Java -> Installed JREs -> Execution Environments 里选择 JavaSE-1.8 后,勾选 Compatible JREs 里的 jre(我这里是 1.8.0_301)
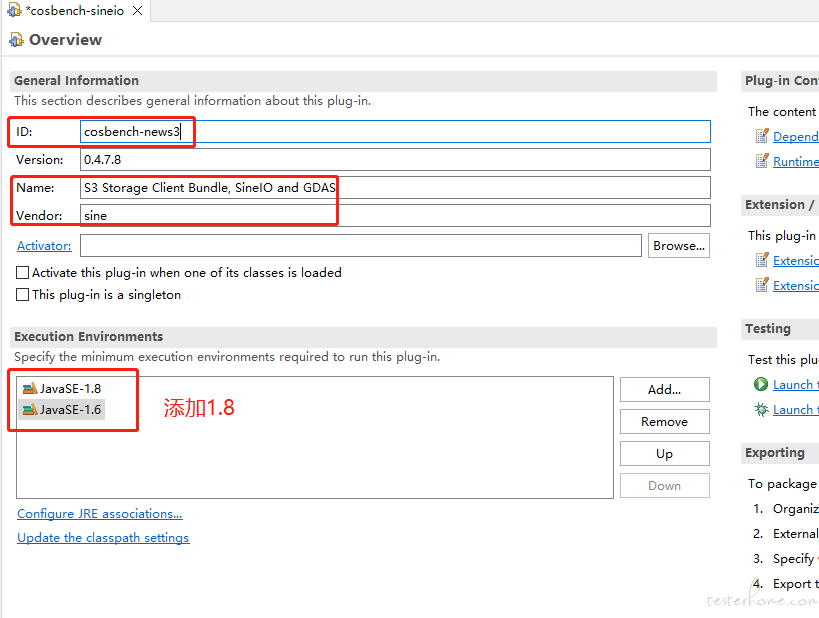
修改 bundle 的相关信息(ID 等字段、Execution Environments 里添加 JavaSE-1.8)
2.2 升级 aws-jdk-java
建议新建个 maven 项目,然后使用 maven 进行相关 jar 包下载,我这里为了演示方便,直接把 cosbench-news3 直接转换为 maven 项目了。示例 pom.xml 如下(SDK 版本可自行修改):
<project xmlns="http://maven.apache.org/POM/4.0.0" xmlns:xsi="http://www.w3.org/2001/XMLSchema-instance" xsi:schemaLocation="http://maven.apache.org/POM/4.0.0 https://maven.apache.org/xsd/maven-4.0.0.xsd">
  <modelVersion>4.0.0</modelVersion>
  <groupId>cosbench-news3</groupId>
  <artifactId>cosbench-news3</artifactId>
  <version>0.4.7.8</version>
  <build>
    <sourceDirectory>src</sourceDirectory>
    <plugins>
      <plugin>
        <artifactId>maven-compiler-plugin</artifactId>
        <version>3.8.1</version>
        <configuration>
          <source>1.6</source>
          <target>1.6</target>
        </configuration>
      </plugin>
    </plugins>
  </build>
  <dependencyManagement>
    <dependencies>
      <dependency>
        <groupId>com.amazonaws</groupId>
        <artifactId>aws-java-sdk-bom</artifactId>
        <version>1.12.312</version>
        <type>pom</type>
        <scope>import</scope>
      </dependency>
    </dependencies>
  </dependencyManagement>

  <dependencies>
    <dependency>
      <groupId>com.amazonaws</groupId>
      <artifactId>aws-java-sdk-s3</artifactId>
    </dependency>
  </dependencies>
</project>
当 maven 将依赖包下载完毕后,我们对照 Maven Dependencies 里的 jar 包路径,将其均拷贝到 cosbench-news3 目录下,并删掉之前的版本,结果如下:
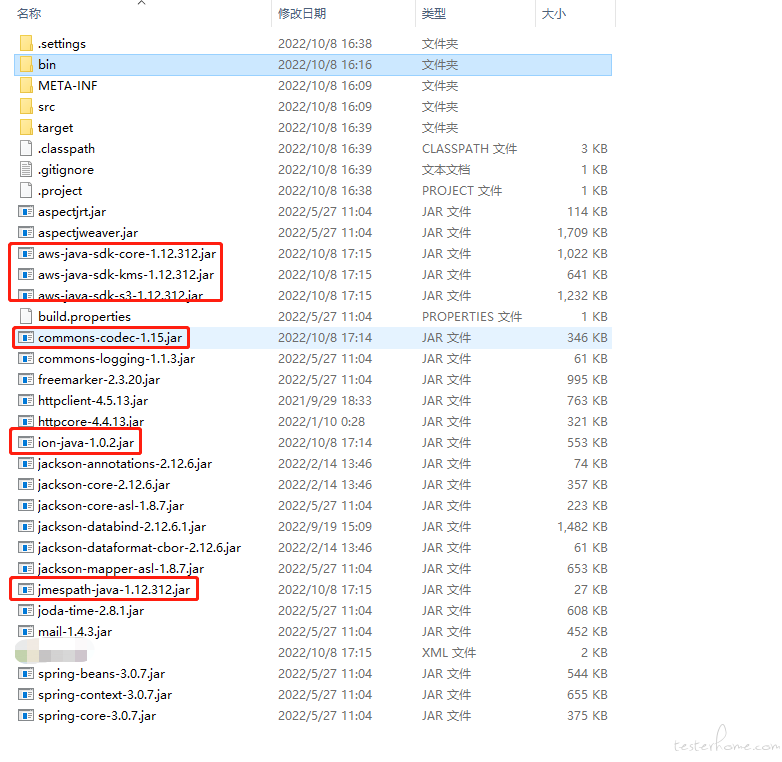
对 cosbench-news3 项目进行右键刷新,然后修改 META-INF 里面的 MANIFEST.MF 文件,如下图所示:
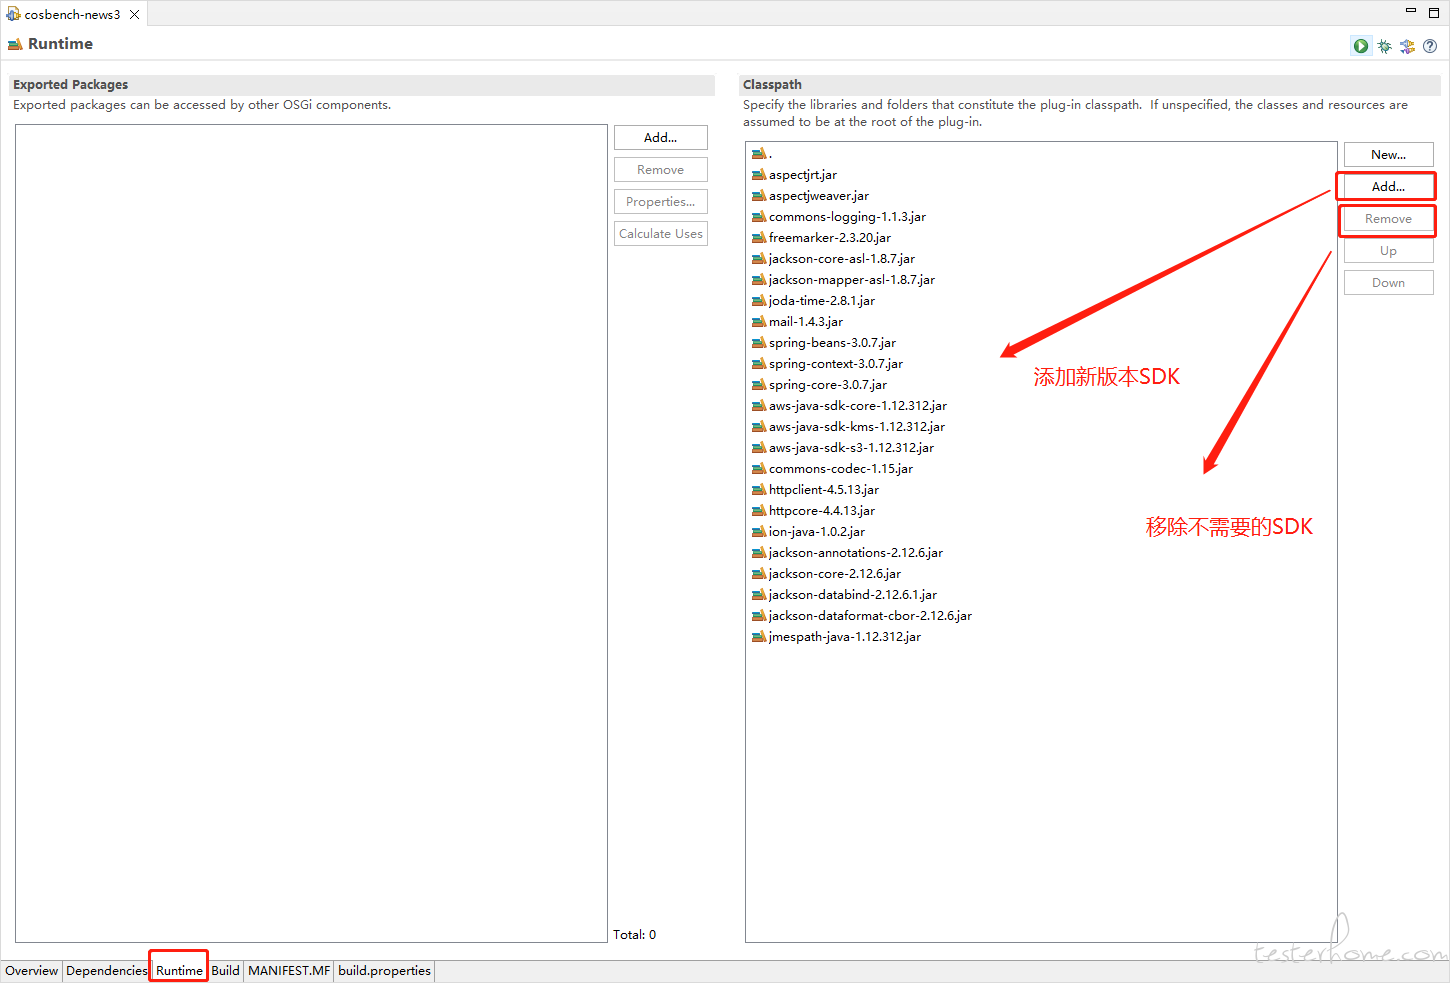
此时,SDK 升级完毕。
2.3 编码
接下来,我们进行 bundle 开发。
2.3.1 修改包名和文件名
对要进行修改的包或文件进行右键 -> Refactor -> Rename,修改成自定义的。我修改的如下图:

通过 Eclipse,它会直接将类名也进行修改,接下来我们来看一下:
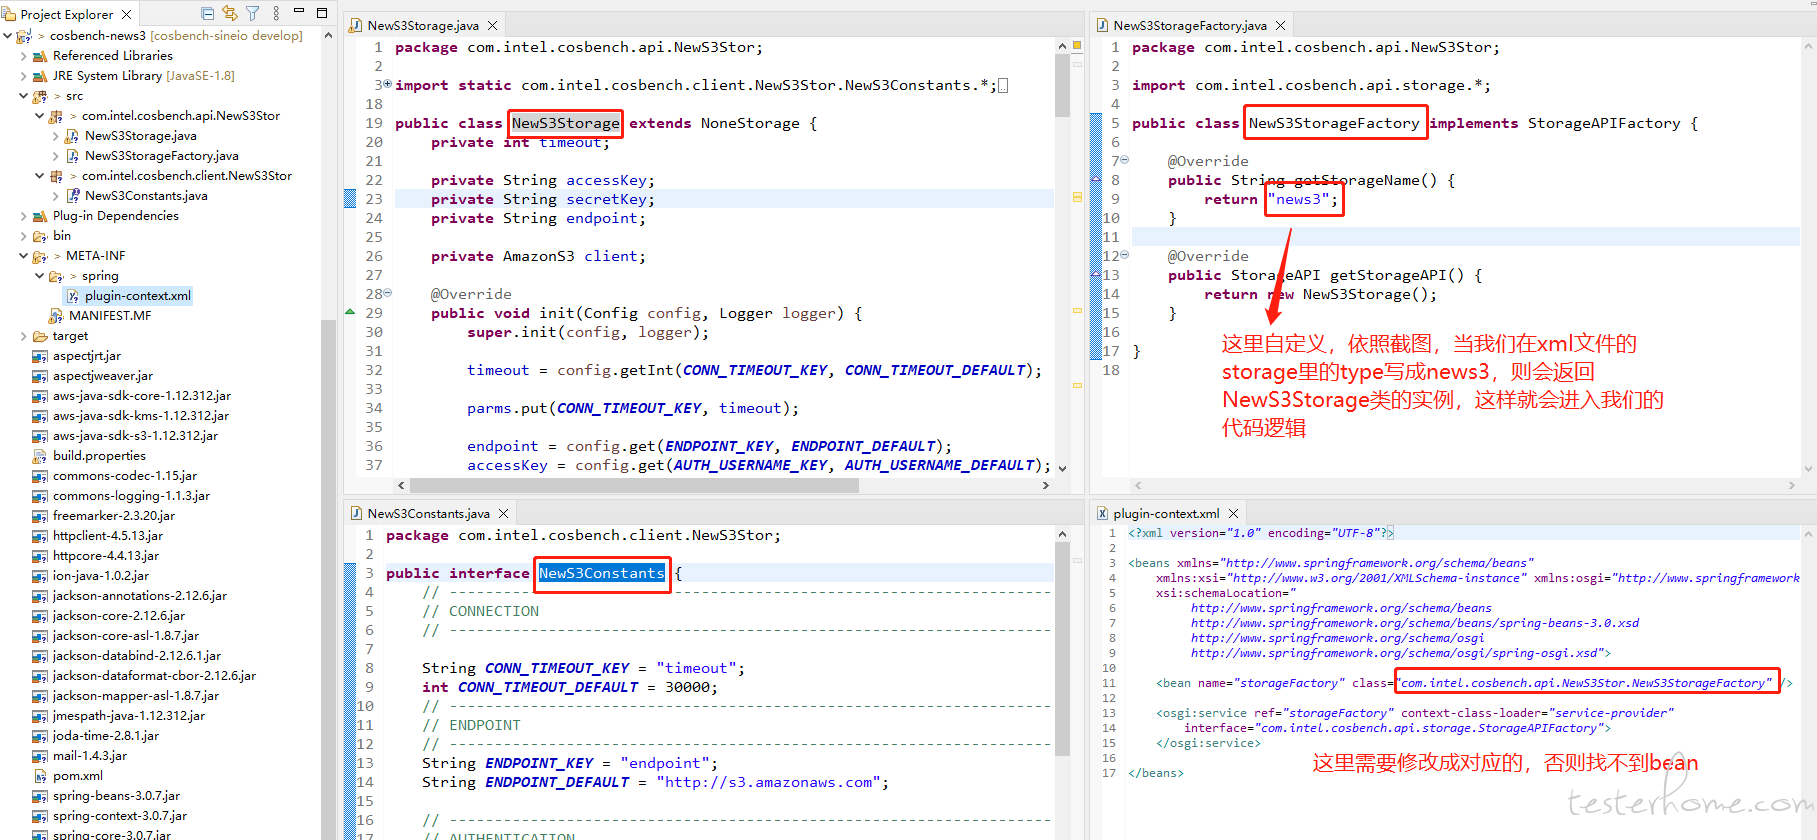
基础工作修改完毕,后续就是有需求后进行 coding 了。
大家记住 NewS3Storage.java 这个文件,我们经常与它打交道
2.3.2 需求定制
我们使用以下三种需求,来依次讲解一下,这三个需求难度依次递增。
2.3.2.1 需求 1:跳过 HTTPS 的 SSL 验证
a. 添加配置参数
// NewS3Constants.java

// 添加下面两行配置
String NO_VERIFY_SSL_KEY = "no_verify_ssl";
boolean NO_VERIFY_SSL_DEFAULT = false;
b. 添加代码逻辑
// NewS3Storage.java

// init方法内部添加如下逻辑
boolean noVerifySSL = config.getBoolean(NO_VERIFY_SSL_KEY, NO_VERIFY_SSL_DEFAULT);
if (noVerifySSL) {
    System.setProperty(SDKGlobalConfiguration.DISABLE_CERT_CHECKING_SYSTEM_PROPERTY, "true");
}
至此,需求 1 就开发完毕了,至于如何使用,请看章节 3
2.3.2.2 需求 2:修改 Java 文件中过期的代码
这里只修改 init 方法中提示过期的部分,其余的请自行参照官网进行修改(如:doesBucketExist ---> doesBucketExistV2)。
// init方法
// 删除下面三行
client = new AmazonS3Client(myCredentials, clientConf);
client.setEndpoint(endpoint);
client.setS3ClientOptions(new S3ClientOptions().withPathStyleAccess(pathStyleAccess));
// 添加下面几行代码
client = AmazonS3ClientBuilder.standard().withCredentials(new AWSStaticCredentialsProvider(myCredentials))
        .withClientConfiguration(clientConf).withEndpointConfiguration(new EndpointConfiguration(endpoint, ""))
        .withPathStyleAccessEnabled(pathStyleAccess).build();
至此,我们将 SDK 中过期的用法替换为了新的使用方法。
2.3.2.3 需求 3:添加 restore 接口
我们添加一个新接口,需要修改几个 bundle,我们依次来进行修改。
cosbench-api
// StorageAPI.java
// 添加一个restore接口

/**
 * Restore an object from a container.
 *
 * @param container - the name of a container.
 * @param object    - the name of an object to be restored.
 * @param config    - the configuration used for this operation.
 */
public void restoreObject(String container, String object, Config config);

// NoneStorage.java
// 对接口进行实现

@Override
public void restoreObject(String container, String object, Config config) {
    if (logging) {
        logger.info("performing RESTORE(restore-object) at /{}/{}", container, object);
    }
}
cosbench-news3
// NewS3Constants.java

// 添加一个参数:取回天数
String RESTORE_DAYS_KEY = "restore_days";
int RESTORE_DAYS_DEFAULT = 1;
// NewS3Storage.java

// 0. 在添加公共参数
private AmazonS3 restoreClient;
private boolean pathStyleAccess;
private String proxyHost;
private String proxyPort;
private boolean noVerifySSL;
private int restoreDays;

// 1. 修改init方法如下
@Override
public void init(Config config, Logger logger) {
    super.init(config, logger);

    timeout = config.getInt(CONN_TIMEOUT_KEY, CONN_TIMEOUT_DEFAULT);
    endpoint = config.get(ENDPOINT_KEY, ENDPOINT_DEFAULT);
    accessKey = config.get(AUTH_USERNAME_KEY, AUTH_USERNAME_DEFAULT);
    secretKey = config.get(AUTH_PASSWORD_KEY, AUTH_PASSWORD_DEFAULT);

    pathStyleAccess = config.getBoolean(PATH_STYLE_ACCESS_KEY, PATH_STYLE_ACCESS_DEFAULT);

    proxyHost = config.get(PROXY_HOST_KEY, "");
    String proxyPort = config.get(PROXY_PORT_KEY, "");
    parms.put(PROXY_PORT_KEY, proxyPort);

    noVerifySSL = config.getBoolean(NO_VERIFY_SSL_KEY, NO_VERIFY_SSL_DEFAULT);
    if (noVerifySSL) {
        System.setProperty(SDKGlobalConfiguration.DISABLE_CERT_CHECKING_SYSTEM_PROPERTY, "true");
    }

    restoreDays = config.getInt(RESTORE_DAYS_KEY, RESTORE_DAYS_DEFAULT);

    initClient();
    initRestoreClient();
}

// 2. 在NewS3Storage类里面添加如下3个方法
private ClientConfiguration getDefaultClientConfiguration(String signType) {

    ClientConfiguration defaultClientConfiguration = new ClientConfiguration();
    // Set connection timeout for initially establishing a connection.
    defaultClientConfiguration.setConnectionTimeout(timeout);
    // Set socket timeout for data to be transferred.
    defaultClientConfiguration.setSocketTimeout(timeout);

    // use expect continue HTTP/1.1 header.
    defaultClientConfiguration.withUseExpectContinue(false);
    // Set Signer type.
    defaultClientConfiguration.withSignerOverride(signType);

    if ((!proxyHost.equals("")) && (!proxyPort.equals(""))) {
        defaultClientConfiguration.setProxyHost(proxyHost);
        defaultClientConfiguration.setProxyPort(parms.getInt(PROXY_PORT_KEY));
    }

    return defaultClientConfiguration;
}

private AmazonS3 initClient() {
    logger.debug("initialize S3 client with storage config: {}", parms);

    ClientConfiguration clientConf = getDefaultClientConfiguration("S3SignerType");

    AWSCredentials myCredentials = new BasicAWSCredentials(accessKey, secretKey);

    EndpointConfiguration myEndpoint = new EndpointConfiguration(endpoint, "");

    client = AmazonS3ClientBuilder.standard().withCredentials(new AWSStaticCredentialsProvider(myCredentials))
            .withClientConfiguration(clientConf).withEndpointConfiguration(myEndpoint)
            .withPathStyleAccessEnabled(pathStyleAccess).build();

    logger.debug("S3 client has been initialized");

    return client;
}

private AmazonS3 initRestoreClient() {

    logger.debug("initialize S3 Restore client with storage config: {}", parms);

    ClientConfiguration clientConf = getDefaultClientConfiguration("AWSS3V4SignerType");

    AWSCredentials myCredentials = new BasicAWSCredentials(accessKey, secretKey);

    EndpointConfiguration myendpoint = new EndpointConfiguration(endpoint, "");
    restoreClient = AmazonS3ClientBuilder.standard()
            .withCredentials(new AWSStaticCredentialsProvider(myCredentials)).withClientConfiguration(clientConf)
            .withEndpointConfiguration(myendpoint)
            .withPathStyleAccessEnabled(pathStyleAccess).build();

    logger.debug("S3 Restore client has been initialized");

    return restoreClient;
}
// NewS3Storage.java

// 在NewS3Storage类中添加取回方法

@Override
public void restoreObject(String container, String object, Config config) {
    super.restoreObject(container, object, config);
    try {
        RestoreObjectRequest request = new RestoreObjectRequest(container, object, restoreDays);
        restoreClient.restoreObjectV2(request);

        ObjectMetadata response = restoreClient.getObjectMetadata(container, object);
        Boolean restoreFlag = response.getOngoingRestore();
        logger.info(object + " at bucket -> " + container + " | Restore days: " + restoreDays
                + ", and ongoing-request status is: " + restoreFlag);

    } catch (Exception e) {
        throw new StorageException(e);
    }
}
cosbench-driver
// Operators.java

// createOperator方法里添加restore判断
if (StringUtils.equals(type, Restorer.OP_TYPE)) {
    return new Restorer();
}
// 在com.intel.cosbench.driver.operator包里新建一个java文件(Restorer.java)
// 内容如下:
package com.intel.cosbench.driver.operator;

import java.util.Date;

import com.intel.cosbench.bench.*;
import com.intel.cosbench.config.Config;
import com.intel.cosbench.driver.util.ObjectPicker;
import com.intel.cosbench.service.AbortedException;
import com.intel.cosbench.api.storage.StorageException;
import com.intel.cosbench.api.storage.StorageInterruptedException;


class Restorer extends AbstractOperator {

    public static final String OP_TYPE = "restore";

    private ObjectPicker objPicker = new ObjectPicker();

    public Restorer() {
        /* empty */
    }

    @Override
    protected void init(String id, int ratio, String division, Config config) {
        super.init(id, ratio, division, config);
        objPicker.init(division, config);
    }

    @Override
    public String getOpType() {
        return OP_TYPE;
    }

    @Override
    protected void operate(int idx, int all, Session session) {
        String[] path = objPicker.pickObjPath(session.getRandom(), idx, all);
        Sample sample = doRestoreV2(path[0], path[1], config, session, this);
        session.getListener().onSampleCreated(sample);
        Date now = sample.getTimestamp();
        Result result = new Result(now, getId(), getOpType(), getSampleType(), getName(), sample.isSucc());
        session.getListener().onOperationCompleted(result);
    }

    public static Sample doRestoreV2(String conName, String objName, Config config, Session session, Operator op) {

        if (Thread.interrupted())
            throw new AbortedException();

        long start = System.nanoTime();

        try {
            session.getApi().restoreObject(conName, objName, config);
        } catch (StorageInterruptedException sie) {
            doLogErr(session.getLogger(), sie.getMessage(), sie);
            throw new AbortedException();
        } catch (StorageException se) {
            String msg = "Error restore-object " + conName + "/" + objName + " " + se.getMessage();
            doLogWarn(session.getLogger(), msg);

            return new Sample(new Date(), op.getId(), op.getOpType(), op.getSampleType(), op.getName(), false);
        } catch (Exception e) {
            isUnauthorizedException(e, session);
            errorStatisticsHandle(e, session, conName + "/" + objName);

            return new Sample(new Date(), op.getId(), op.getOpType(), op.getSampleType(), op.getName(), false);
        }

        long end = System.nanoTime();

        return new Sample(new Date(), op.getId(), op.getOpType(), op.getSampleType(), op.getName(), true,
                (end - start) / 1000000, 0L, 0L);
    }

}
至此,“需求 3” 就开发完毕,接下来在第三章节,咱们进行配置修改,修改完配置后,就可以打包进行验证了。
3. 修改配置
cd cosbench-sineio/release/conf/.driver
vi config.ini # 或者直接使用nodepad++等类似编辑器打开
# 添加如下配置:
plugins/cosbench-news3@7\:start,\
cd cosbench-sineio/release
vi start-driver.sh # 或者直接使用nodepad++等类似编辑器打开
# 大约45行,添加 cosbench-news3_${VERSION}
OSGI_BUNDLES="... cosbench-s3_${VERSION} cosbench-news3_${VERSION} ... cosbench-driver-web_${VERSION}"
4. 打包验证
打包流程请参考第二篇文章,这里按下不表,直接说部署新包后进行验证。
当我们将新版本部署好后,可以使用下面的 xml 配置来进行验证。
<?xml version="1.0" encoding="UTF-8" ?>
<workload name="s3 test" description="xxx">

  <storage type="news3" config="endpoint=https://ip:port;accesskey=xxx;secretkey=xxx;no_verify_ssl=true;restore_days=1;path_style_access=true;timeout=60000" />

  <workflow>
    <workstage name="create bucket">
      <work type="init" workers="1" config="cprefix=bkt0;containers=r(1,1)" />
    </workstage>

    <workstage name="prepare example">
      <work type="prepare" workers="1" config="cprefix=bkt0;containers=r(1,1);objects=r(1,10);sizes=c(64)KB" />
    </workstage>

    <workstage name="restore object example">
      <work name="restore test" workers="5" totalOps="10">
        <operation type="restore" ratio="100" config="cprefix=bkt0;containers=c(1);objects=r(1,10)" />
      </work>
    </workstage>
  </workflow>
</workload>
注意以下几点点:
- storage 的 type 修改为 news3
- storage 的 config 里添加配置 no_verify_ssl 和 restore_days
这样就会使用咱们新建的 storage,并且使用咱们配置的参数
5. 结尾
第四篇是终章,本系列到了说再见的时候了。
这系列文章难度逐步递进,我把它整理出来,供大家参考。
如果可以,欢迎在 GitHub 上给我的项目来个 Star ,这将给予我极大的动力和精神鼓励。也非常欢迎提交 PR 和 issue,谢谢。
朋友们,江湖再见。