MeterSphere MeterSphere 二次开发——自定义 JIRA 提交表单
背景
最近在进行 MeterSphere 深度使用的调研,发现提交 bug 同步到 Jira 的功能总是报错。debug 发现我们项目有些自定义的必填项,ms-server 并未处理。且管理员也无法自定义默认值,另外有个比较难受的是,由于 ms-server 最终 bug 都是用管理员账号同步提交到 Jira 的,提交人总是管理员。由于以上导致很难去实际应用于我们的项目测试。
结合之前自己对 jira api 的使用,于是便有了自定义一个 bug 提交模块的想法。模块已经开发完成,需要的自取。
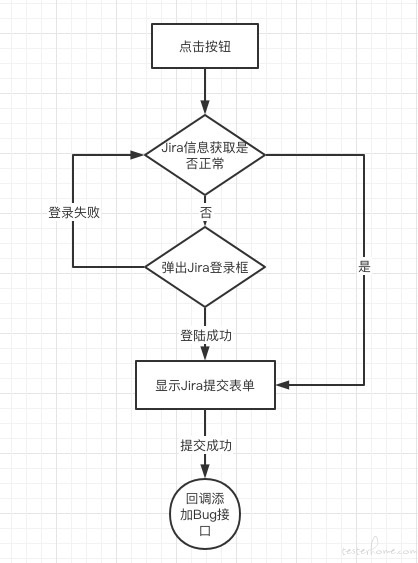
流程设计

实现功能
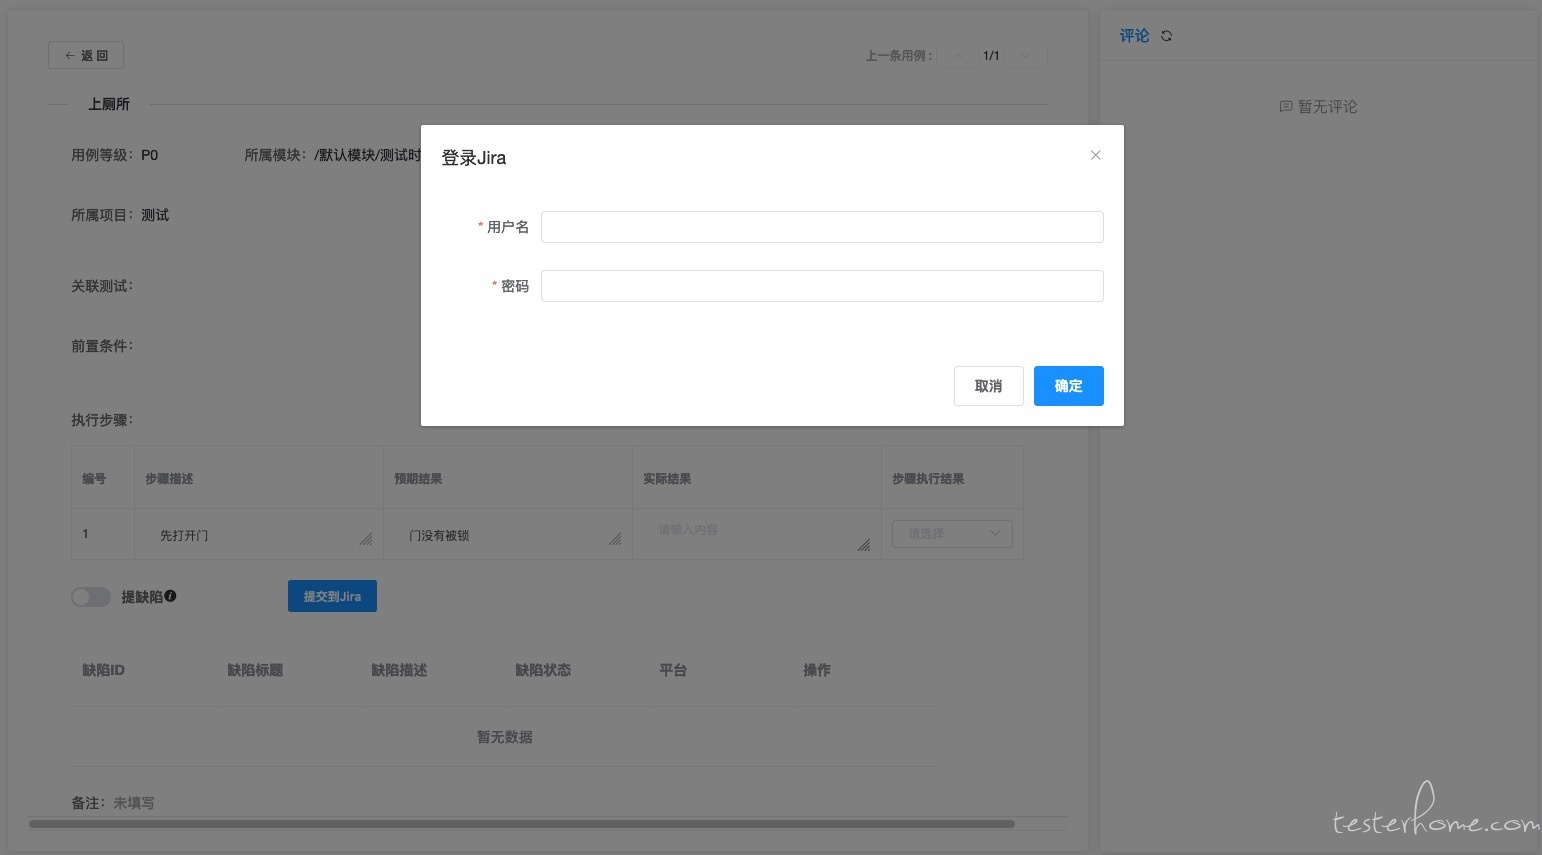
- 支持通过账号密码登录个人 Jira
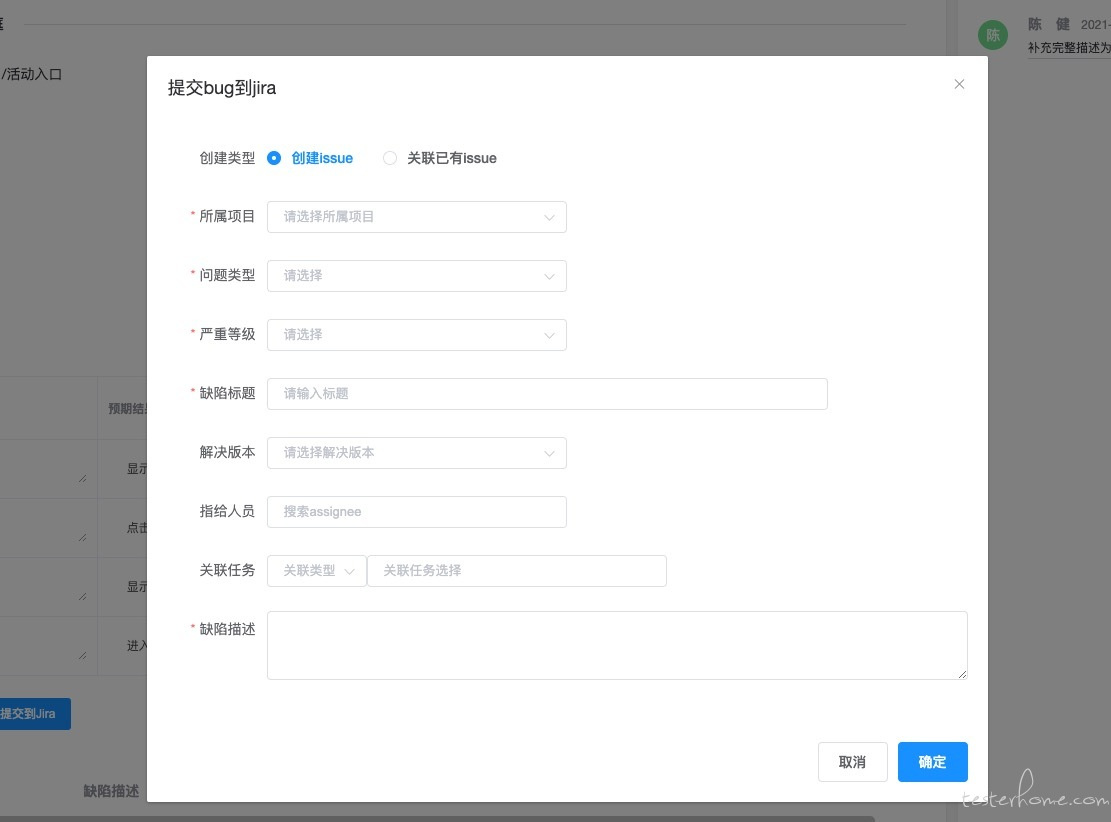
- 支持自定义必选项的筛选(如果必填文本项欢迎反馈数据类型)
- 支持常用项的自定义(指给人、关联项)
- 支持已有任务、Bug 的关联
效果演示


核心代码示例
这个功能设计的核心是通过 nginx 反向代理 jira 的请求到公司 jira,以解决跨域的问题。基本是纯前端功能,后端只是改了对前端提交issueKey的兼容。
前端部分主要是 VUE 的表单 +Jira Api 的交互:
1.前端增加一个独立组件
2.请求封装中增加对 Jira 和自定义请求头的支持
Vue.prototype.$get = function (url, success, isJira=false, headers=false) {
      let result = {loading: true};
      if (!headers){
        if (!success) {
          return axios.get(url);
        } else {
          axios.get(url).then(response => {
            then(success, response, result, isJira);
          }).catch(error => {
            exception(error, result, url, success, isJira);
          });
          return result;
        }
      }else {
        if (!success) {
          return axios.get(url, { headers: headers});
        } else {
          axios.get(url, { headers: headers}).then(response => {
            then(success, response, result, isJira);
          }).catch(error => {
            exception(error, result, url, success, isJira);
          });
          return result;
        }
      }
    };
3.用例页面启用 Jira 组件
引用组件并启用FunctionalTestCaseEdit
增加对前端生成的 issueKey 的提交
saveIssues(title=null, content=null, issueKey=null) {
      if(!title || !content){
        if (!this.testCase.issues.title || !this.testCase.issues.content) {
          this.$warning(this.$t('test_track.issue.title_description_required'));
          return;
        }
      }
      let param = {};
      param.title = title? title:this.testCase.issues.title;
      param.content = content? content:this.testCase.issues.content;
      param.testCaseId = this.testCase.caseId;
      param.tapdUsers = this.testCase.tapdUsers;
      param.zentaoBuilds = this.testCase.zentaoBuilds;
      param.zentaoUser = this.testCase.zentaoAssigned;
      param.issueKey = issueKey;
      this.result = this.$post("/issues/add", param, () => {
        this.$success(this.$t('commons.save_success'));
        this.getIssues(param.testCaseId);
      });
      this.issuesSwitch = false;
      this.testCase.issues.title = "";
      this.testCase.issues.content = "";
      this.testCase.tapdUsers = [];
      this.testCase.zentaoBuilds = [];
      this.testCase.zentaoAssigned = "";
    },
4.服务端增加对前端传值的支持
JiraPlatform.java
这里主要是根据是否传了 issueKey 来判断,是否要走原有的服务端同步流程。
5.nginx 反向代理
这一步实际在官方原有的部署方式上再加一个 nginx 代理,从而解决跨域问题。我是通过 docker 起了个 nginx 容器来处理的,反代配置如下:
location /jira/ {
        proxy_set_header Host jira.test.com;
        proxy_set_header Origin http://jira.test.com;
        proxy_pass http://jira.test.com/;
    }

location / {
    proxy_pass http://192.168.1.101:8081;
        proxy_set_header Host 192.168.1.101:8081;
        proxy_set_header Origin http://192.168.1.101:8081;
        proxy_connect_timeout 300;
        proxy_send_timeout 300;
        proxy_read_timeout 300;
        proxy_http_version 1.1;
        proxy_set_header Upgrade $http_upgrade;
        proxy_set_header Connection "upgrade";
        proxy_set_header Host $host;
        proxy_set_header X-Real-IP $remote_addr;
        proxy_set_header X-Forwarded-For $proxy_add_x_forwarded_for;
        proxy_set_header X-NginX-Proxy true;
    }
以上是我在 MeterSphere 中增加自定义 Jira 的主要核心步骤,代码都在https://github.com/t880216t/metersphere里了,需要的自取。
结语
本人平时主要是 reactjs+python 的技术栈开发,首次针对 VUE+java 项目进行二开,后续将把我已经实现的 MeterSphere 接入 SSO 登录功能做个总结。代码不一定优雅,抛砖引玉,给有需求的同志参考下,有建议和想法的欢迎补充留言。