其他测试框架 基于 python--selenium 与 requests 的 web ui/ 接口融合测试框架
一、序
接触自动化测试已经好多年,也好多年停留在哪里。
最开始跟大部分同学一样,是从 @ 虫师那里了解到并入门的,那时候 python 还没这么流行
最开始的时候还是用 java 跟 ruby 写的,想想种种过往也无奈感叹,为啥当时就不能好好学习一下 java;
说到底还是当初太年轻,好了废话不多说,我们开始吧!
二、开始
对于 UI 类型的自动化我一直不太感冒,可以说不支持;
去年年初两个月写了大几百条 UI 自动化,半年后只有一半凑合使用
(业务发展太快就不要用了 UI,当时痛定思痛编写 WEB 遍历工具 接下来也会跟大家分享!)
今年下任务编写 UI 自动化时,通过不断思考,将 UI 与接口相结合能更好的在业务发生较大变化时,及时响应,及时调整;
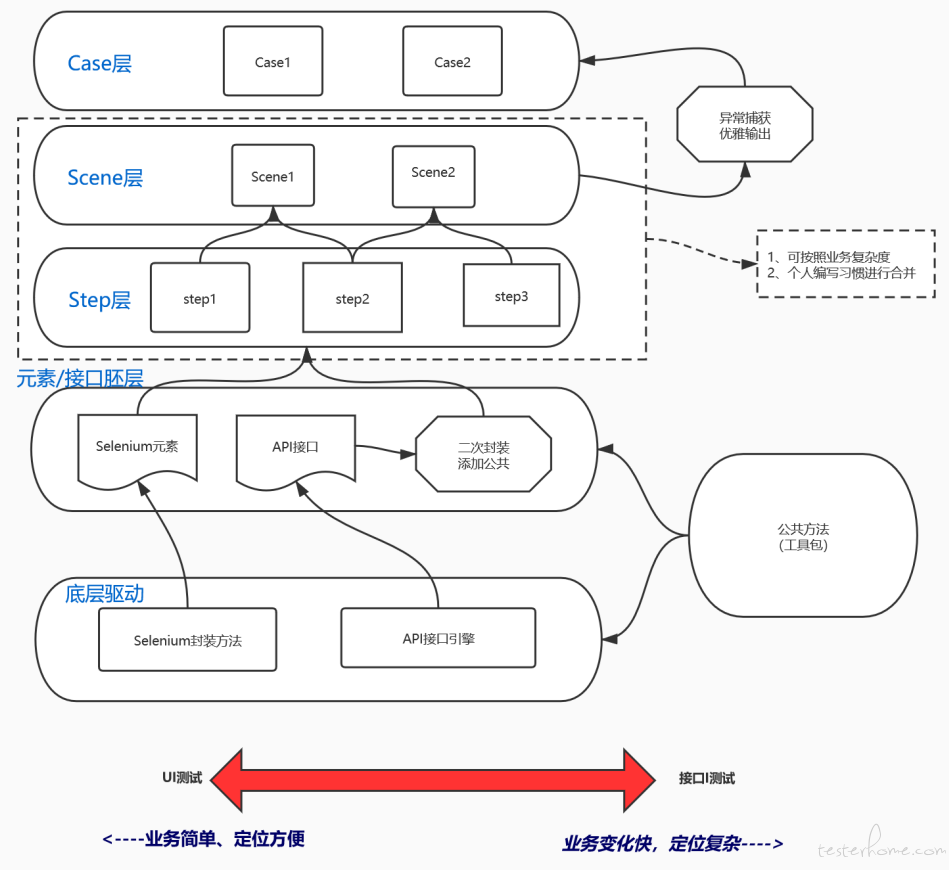
# 三、代码原理图

共计分为 5 层:
1、底层驱动 ------ 可以随意切换底层驱动【UI 底层框架-selenium,接口底层驱动--requests】
2、元素/接口胚层【存储元素及接口 yaml 文件;接口 yaml 数据进行初始化】
3、Case 层
4、Scene 层
5、TestCase 层
其中 Scene 层和 Case 层可按照业务复杂度及个人编写爱好进行整合。
四、TestCase 层代码
- 每个 TestCase 都可以独立运行;
- 每个 Scene 方法会返回 True 或 False;
- 通过 self.assertTrue() 判断是否执行正确
class TestCaseRoleAdd(unittest.TestCase):

    def setUp(self):
        self.sm_first = SceneRoleAdd()

    def test_1_role_add_delete(self):
        self.assertTrue(self.sm_first.login_erp())
        self.assertTrue(self.sm_first.add_role())
        self.assertTrue(self.sm_first.allocate_function_button())
        self.assertTrue(self.sm_first.delete_role())
        print("Test finished-noReport:Pass")

    def tearDown(self):
        self.sm_first.close()

if __name__ == '__main__':
    testSuite1 = unittest.TestLoader().loadTestsFromTestCase(TestCaseRoleAdd)
    suite = unittest.TestSuite(testSuite1)
    unittest.TextTestRunner(verbosity=2).run(suite)
五、Scene 层代码
- 主要对 Case 层代码进行拼接组合;
- 此层的出现主要是让 Case 层能够实现 PO,这样出现问题时,能够快速查找。
class SceneRoleAdd():
    step_role = StepRole()
    step_ERP_login = StepERPLogin()

    # 登录ERP系统
    @catch_exception
    def login_erp(self):
        self.step_ERP_login.login()

    # 添加角色
    @catch_exception
    def add_role(self):
        self.step_role.into_role()
        self.step_role.add_role()

    # 角色添加功能及按钮
    @catch_exception
    def allocate_function_button(self):
        role_name = self.step_role.role_name
        self.step_role.search_role(role_name)
        self.step_role.allocate_function()
        self.step_role.search_role(role_name)
        self.step_role.allocate_button()

    # 删除角色
    @catch_exception
    def delete_role(self):
        role_name = self.step_role.role_name
        self.step_role.search_role(role_name)
        self.step_role.delete_role()
        self.step_role.delete_role_verify(role_name)

    # 退出浏览器
    @catch_exception
    def close(self):
        self.step_role.close()


if __name__ == '__main__':
    pass
装饰器 -- 捕获 Scene 层异常
mLog = log.Log()
mTag = 'base_scene'

# 采集操作日志,捕获异常
+ 捕获异常的同时进行截图操作

def catch_exception(origin_func):
    def wrapper(self, *args, **kwargs):
        try:
            print(f"Test---{origin_func.__name__} start")
            origin_func(self, *args, **kwargs)
            print(f"Test---{origin_func.__name__} end")
            return True
        except Exception as err:
            traceback.print_exc()
            self.step_ERP_login.sc_shot(origin_func.__name__)
            mLog.log(mTag, f"Test---{origin_func.__name__} err:" + str(err))
            return False
    return wrapper
六、Case 层代码
- 每个 Case 层方法会继承一个 Base_step,以便通过 Base_step 类型进行方法扩展
- Case 是此框架中的核心所有的错误均需定位到此层
class StepRole(Base_step):
    role_name = "test" + datetime.today().strftime("%Y%m%d%H%M%S")
    loginName = None

    def __init__(self):
        super(StepRole,self).__init__()

    @property
    def userId(self):
        return self.yaml_config_data.get_key_by_str_list(self.env_name + '.TEST_ERP.userId')

    def into_role(self):
        self.into_menu(menu_role)
        self.isElementExistXpathByName(menu_depot_assert)
        self.switch_to_frame(1)

    def add_role(self):
        # 增加按钮
        self.id_click(role_add_btn)
        #
        self.xpath_input(role_add_role_name, self.role_name)
        # 保存
        self.id_click(role_add_save_btn)

    def allocate_function(self):
        self.id_click(role_allocate_func_btn)
        # self.switch_to_default()
        self.xpath_await_visibility(role_allocate_frame)
        self.xpath_switch_to_frame(role_allocate_frame)
        self.xpath_click(role_allocate_all)
        self.id_click(role_allocate_save_btn)
        self.xpath_click(role_allocate_assure_btn)
        self.switch_to_parent_frame()
七、元素及接口层
1. 元素层
1.1 Selenum 驱动
- 所有的 selenium 方法在此层进行封装以便将来选择其他框架是能够快速更换。
class BaseSelenium(object):
    driver = webdriver.Chrome()
    driver.maximize_window()
    driver.implicitly_wait(10)

    @base_log_aop
    def xpath_input(self, value, input=''):
        self.input_data('xpath', value, input)

    @base_log_aop
    def xpath_click(self, value):
        self.click('xpath', value=value)

    @base_log_aop
    def xpath_text_click(self, value):
        value = f'//*[text()="{value}"]'
        self.click('xpath', value=value)

    @base_log_aop
    def xpath_double_click(self, value):
        self.double_click('xpath', value=value)

    @base_log_aop
    def elements_index_click(self, locate_type, value, index):
        self.get_element_from_elements(locate_type, value, index).click()

    @base_log_aop
    def xpath_elements_click(self, value):
        locate_elements = self.locate_elements('xpath', value)
        for i in locate_elements:
            i.click()

# 装饰器保存相关底层操作
def base_log_aop(origin_func):
    def wrapper(self, *args, **kwargs):
        mLog.log("BaseSelenium", f"{origin_func.__name__}:" + ','.join([str(i) for i in args]))
        return origin_func(self, *args,  **kwargs)
    return wrapper
1.2 定位元素
- 定位元素建议使用一种类型就可以,当前系统中使用 id 进行定位越来越少,CSS 或 xpath 选一种吧。
menu_role = ['系统', '角色管理']
menu_role_assert = '角色列表'

role_add_btn = "addRole"
# 角色名称
role_add_role_name = '//form[@id="role"]//tr//span/input[1]'
role_add_save_btn = "saveRole"
# 分配功能
role_allocate_frame = '//iframe[@class="cboxIframe"]'
role_allocate_func_btn = "btnSetFunctions"
role_allocate_all = '//ul[@id="tt"]/li/div/span[3]'
role_allocate_save_btn = 'btnOK'
role_allocate_assure_btn = '//span[text()="确定"]'
# 分配按钮
role_allocate_button_btn = "btnSetPushBtn"
role_allocate_button_pos = '//input[@type="checkbox"]'
2. 接口层
2.1 接口底层驱动
- 这个接口方法已经使用很长时间了,没毛病
def request_fun(http, api_path, json_p, change_dict, special=1):
    api_data = ERPYaml(api_path)
    mode = api_data.get_key_by_str_list('request.method')
    url = api_data.get_key_by_str_list('request.url')
    postData = api_data.get_key_by_str_list('request.json')
    headers = api_data.get_key_by_str_list('request.headers')
    if change_dict != {} and change_dict is not None:
        # url = str_change_data(url, change_dict)
        #
        if special == 1:
            postData = dict_change_data(postData, change_dict)
            url = str_change_data(url, change_dict)
        #
        elif special == 2:
            postData = special_1_postdata(postData, change_dict)
            url = str_change_data(url, change_dict)
        #
        elif special == 3:
            postData = dict_change_data(postData, change_dict)
            url = str2_change_data(url, change_dict)
        elif special == 4:
            postData = special_2_postdata(postData, change_dict)
            url = str_change_data(url, change_dict)
        else:
            pass
        headers = dict_change_data(headers, change_dict)
    url = http + url
    #  先区分数据发送方式(json or para)
    # 再区分是GET or POST
    mLog.log("request_fun", "mode:%s" % mode)
    mLog.log("request_fun","url:%s" % url)
    mLog.log("request_fun", "postData:%s" % postData)
    mLog.log("request_fun", "headers:%s" % headers)
    if json_p == 1 or json_p == '1':
        postData = json.dumps(postData)
        if mode == 'POST':
            reponse_data = requests.post(url=url, data=postData, headers=headers)
        elif mode == "GET":
            reponse_data = requests.get(url=url, data=postData, headers=headers)
        else:
            raise AttributeError(u'mode输入错误,mode=%s' % mode)
    elif json_p == 0 or json_p == '0':
        if mode == 'POST':
            reponse_data = requests.post(url=url, params=postData, headers=headers)
        elif mode == "GET":
            reponse_data = requests.get(url=url, params=postData, headers=headers)
        else:
            raise AttributeError(u'mode输入错误,mode=%s' % mode)
    else:
        raise AttributeError(u'json_p输入错误,json_p=%s' % json_p)
    # 获取接口返回数据中的数据,进行全局化(
    # 添加接口时需要添加参数名称(global_name)及正在表达式(regular_input)
    mLog.log("request_fun", f"reponse_data:{reponse_data.text}")
    return reponse_data
2.2 接口底层封装
- 这里相当于对 yaml 中保存的 http 接口进行初始化
class APIRealization(BaseAPI):
    api_path = mAPIPathERP
    yaml_path = mYaml
    role_add = api_path + os.sep + 'a5_role_add.yml'
    role_add_functions = api_path + os.sep + 'a6_role_add_functions.yml'

    # 添加角色
    def response_role_add(self, change_dict):
        change_dict.update(self.local_change_dict)
        return request_fun(self.url_header, self.role_add, 0, change_dict, 2)

    # 角色添加功能
    def response_role_add_functions(self, change_dict):
        change_dict.update(self.local_change_dict)
        return request_fun(self.url_header, self.role_add_functions, 0, change_dict, 2)
2.3 yaml 文件
- 保存 http 接口的文件,yaml 文件作为配置文件使用的频率越来高,主要还是好用。
request:
    url: /role/add
    method: POST
    headers:
        Content-Type: "application/x-www-form-urlencoded"
        Cookie: $Cookie
    json:
      info: "{\"name\":\"$role_name\"}"