好久木写啦!!!好久木写啦!!!
心血来潮分享点小白的东西!!!
废话少说直接干货!!!
本文核心是将如何从数据驱动开始,以报告结尾的形式来实现 “很多刚入行朋友们” 所需要的接口自动化
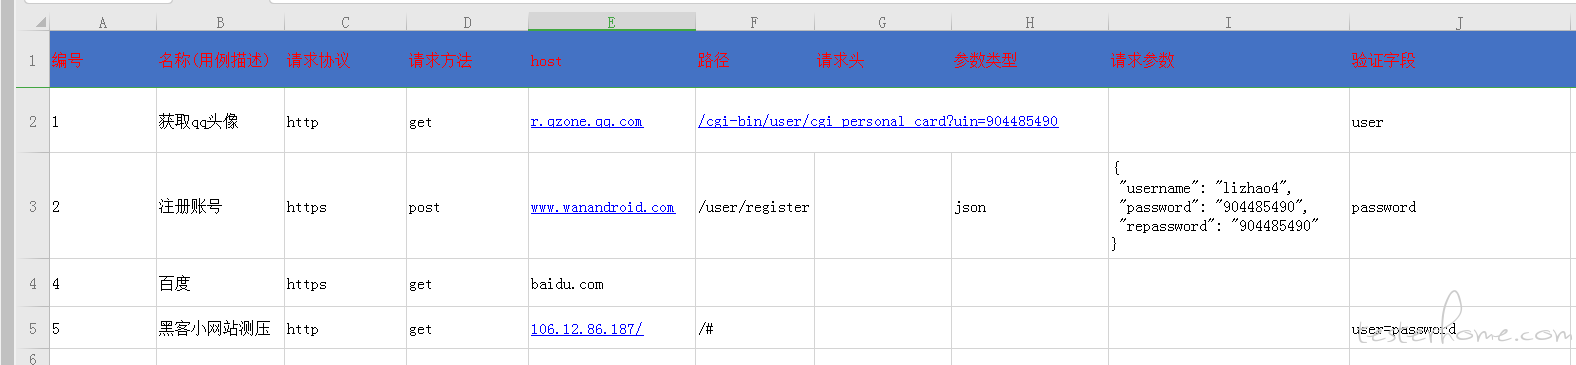
类型:驱动:excel
核心 jar:httpclient
编译:maven(跟本文所讲有点沾不着边)
自动化框架 :testng(这个支持并发所以实现了并发的方法)
报告:ztest(有在之前 tester 老大哥的开源报告上实现了修改)
总结关键字:httpclient+maven+testng+ztest+excel
数据驱动实现主要是通过 jxl 包实现
请点这里:https://testerhome.com/topics/15681
maven pom 配置:
<!-- httpclient依赖 -->
<dependency>
    <groupId>org.apache.httpcomponents</groupId>
    <artifactId>httpclient</artifactId>
    <version>4.5.5</version>
</dependency>

<!-- json解析依赖 -->
<dependency>
    <groupId>com.alibaba</groupId>
    <artifactId>fastjson</artifactId>
    <version>1.2.47</version>
</dependency>

<!-- testng依赖 -->
<dependency>
    <groupId>org.testng</groupId>
    <artifactId>testng</artifactId>
    <version>6.14.3</version>
    <scope>test</scope>
</dependency>
其实实现可以很简单,因为在实现的过程中加入了并发的支持所以实现起来就变成了下面这样子(写的很水不喜勿喷)
请求类具体实现方式:
httpclient 配置类:这个配置类主要目的分为三类
①如何支持 https 请求
②如何支持线程池
③自定义请求重试的机制
https 是安全的 ssl 请求,官方给出的要想支持 https 请求就必须绕过请求证书,至于如何绕过需要实现一个 X509TrustManager 的接口
private static SSLContext createIgnoreVerifySSL() {
        SSLContext sc = null;
        try {
            sc = SSLContext.getInstance("SSLv3");
        } catch (NoSuchAlgorithmException e) {
            logger.error("算法异常", e);
        }
        // 实现一个X509TrustManager接口,用于绕过验证,不用修改里面的方法
        X509TrustManager trustManager = new X509TrustManager() {
            public void checkClientTrusted(java.security.cert.X509Certificate[] paramArrayOfX509Certificate,
                    String paramString) throws CertificateException {
            }

            public void checkServerTrusted(java.security.cert.X509Certificate[] paramArrayOfX509Certificate,
                    String paramString) throws CertificateException {
            }

            public java.security.cert.X509Certificate[] getAcceptedIssuers() {
                return null;
            }
        };

        try {
            sc.init(null, new TrustManager[] { trustManager }, null);
        } catch (KeyManagementException e) {
            logger.error("密钥管理异常", e);
        }
        return sc;
    }
这样子下来 ssl 的配置就有了,然后在 httpclient 里面实现线程池的方法里面配置这个就好了
这样子就得到了线程池的对象,然后再给线程池一顿配置,具体代码有注释解释
第三个请求自定义重试机制(也可使用默认的重试机制,不实现这个方法,去掉这个配置就好了 setRetryHandler(myRetryHandler)),我偏不信邪我就喜欢重写一个
这样子下来我需要的一些配置就有了
public synchronized static CloseableHttpClient createClient() {

    SSLContext sslcontext = createIgnoreVerifySSL();

    // 验证http,https请求,使用默认的连接请求,如有自定义需要
    // 请查看https://hc.apache.org/httpcomponents-client-4.5.x/tutorial/html/connmgmt.html#d5e449,官方自定义证书验证文档
    Registry<ConnectionSocketFactory> registry = RegistryBuilder.<ConnectionSocketFactory> create()
            .register("http", PlainConnectionSocketFactory.INSTANCE)
            .register("https", new SSLConnectionSocketFactory(sslcontext)).build();
    // 线程池设置
    PoolingHttpClientConnectionManager cm = new PoolingHttpClientConnectionManager(registry);// registry
    // 最大连接总数
    cm.setMaxTotal(MAX_CONN);
    // 默认路由最大连接数
    cm.setDefaultMaxPerRoute(Max_PRE_ROUTE);
    // 主机端口最大连接数
    HttpHost localhost = new HttpHost("music.migu.cn", 8000);
    cm.setMaxPerRoute(new HttpRoute(localhost), MAX_ROUTE);
    // http请求重试处理机制,重写方法
    HttpRequestRetryHandler myRetryHandler = new HttpRequestRetryHandler() {
        public boolean retryRequest(IOException exception, int executionCount, HttpContext context) {
            if (executionCount >= 10) {
                logger.error("重试次数超过5", new Throwable("重试次数超过5"));
                return false;
            }
            if (exception instanceof InterruptedIOException) {
                logger.error("中断IO异常", new Throwable("中断IO异常"));
                return false;
            }
            if (exception instanceof UnknownHostException) {
                new Throwable().getMessage();
                logger.error("未知主机");
                return false;
            }
            if (exception instanceof ConnectTimeoutException) {
                logger.error("连接超时", new Throwable("连接超时"));
                return false;
            }
            if (exception instanceof SSLException) {
                logger.error("sll握手异常", new Throwable("sll握手异常"));
                return false;
            }
            HttpClientContext clientContext = HttpClientContext.adapt(context);
            HttpRequest request = clientContext.getRequest();
            boolean idempotent = !(request instanceof HttpEntityEnclosingRequest);
            if (idempotent) {
                logger.error("带有请求的实体自动重试", new Throwable());
                return true;
            }
            return false;
        }
    };
    // 创建自定义将请求重试机制添加进去;客户端分createDefault() 与 custom()
    CloseableHttpClient httpclient = HttpClients.custom().setKeepAliveStrategy(getkeepAliveStrat())
            .setConnectionManager(cm).setRetryHandler(myRetryHandler).build();
    return httpclient;
}
配置有了之后怎么办呢,那当然是实现请求啊
这里需要给大家科普一下头,头分为请求头跟响应头(网上大佬们写的我觉得还不错),因为请求头能自定义还是说一下比较好
请求方的 http 报头结构:通用报头 | 请求报头 | 实体报头
响应方的 http 报头结构:通用报头 | 响应报头 | 实体报头
Accept 代表发送端(客户端)希望接受的数据类型。
比如:Accept:text/xml; /是所有类型都接受
代表客户端希望接受的数据类型是 xml 类型
Content-Type 代表发送端(客户端 | 服务器)发送的实体数据的数据类型。
比如:Content-Type:text/html;
代表发送端发送的数据格式是 html。
解释完了然后开始实现 get,post 请求;实现请求之前需要在写一个 setCookie 的方法
写完了 cookie 之后就就可以当个人了
public BasicHeader setCookie(String head) {
    BasicHeader cookie = new BasicHeader("Cookie", head);
    return cookie;
}
接下来是 get 方法
get 方法里面有两点必须要说明的 一个是 response 响应头信息,一个是 response 响应实体
response 响应头:getReponsemes(response) 这个类实现了解析响应头里面的各种信息里面包含了两种方法
response 响应实体:getResponseEntity(getEntity) 响应实体 httpclien 官网给了一个流解析的 api,但是这个 api 在某些时候会有 bug 所以这个流的解析基础上面又加入了一个解析判断,都有注释有注释你们看的懂的
这两个方法我就不细说了,后面我会放上 git 链接看官们可以自取
public List<String> get(String url, String head) throws Exception {
    List<String> resList = new ArrayList<String>();
    CloseableHttpClient httpclient = HttpClientMain.createClient();// 创建客户端
    CloseableHttpResponse response = null;// 创建响应
    String res = null;// 请求结果
    String statu = null;
    int status;// 状态码
    HttpEntity getEntity = null;
    HttpGet get = null;
    HttpClientContext context = HttpClientContext.create();
    BasicHeader cookie = setCookie(head);
    get = new HttpGet(url);
    // get.setRequestProperty("Content-Type",
    // "application/x-www-form-urlencoded;charset=utf-8");
    // get.setRequestProperty("accept", "*/*");
    // get.setHeader("HTTP_CLIENT_IP", "192.168.10.100");
    get.addHeader("user-agent",
            "Mozilla/5.0 (Windows NT 6.1; Win64; x64)AppleWebKit/537.36 (KHTML, like Gecko) Chrome/65.0.3325.146 Safari/537.36");
    get.addHeader("Content-Type", CONTENT_TYPE_FORM_URLENCODED);
    get.addHeader("accept", "*/*");
    get.setHeader(cookie);
    if (httpclient != null) {
        response = httpclient.execute(get, context);
        if (response != null) {
            status = response.getStatusLine().getStatusCode();
            getEntity = response.getEntity();
            statu = response.getStatusLine().toString();
            res = getResponseEntity(getEntity);
            resList.add(getReponsemes(response).toString());
            resList.add(statu);
            resList.add(res);
            if (status != 200) {
                throw new Exception(res);
            }
        }
    }
    closeAll(httpclient, response);
    return resList;
}
post 方法:post 方法多了一个请求参数至于怎么
public List<String> post(String url, Map<String, Object> params, String head) throws Exception {
    List<String> resList = new ArrayList<String>();
    CloseableHttpClient httpclient = null;// 创建客户端
    CloseableHttpResponse response = null;// 创建响应
    HttpEntity postEntity = null;// 请求结果
    HttpPost httpPost = null;// 请求方法
    int statusCode;// 状态码
    String res = null;
    String statu = null;
    BasicHeader cookie = setCookie(head);
    httpclient = createClient();
    HttpClientContext context = HttpClientContext.create();
    httpPost = new HttpPost(url);
    httpPost = setPostParams(httpPost, params, context, httpclient);
    httpPost.addHeader("user-agent",
            "Mozilla/5.0 (Windows NT 6.1; Win64; x64)AppleWebKit/537.36 (KHTML, like Gecko) Chrome/65.0.3325.146 Safari/537.36");
    httpPost.addHeader("Content-Type", CONTENT_TYPE_FORM_URLENCODED);
    httpPost.addHeader("accept", "*/*");
    httpPost.setHeader(cookie);
    response = httpclient.execute(httpPost, HttpClientContext.create());
    statusCode = response.getStatusLine().getStatusCode();
    // getReponsemes(response);

    if (response != null) {
        statusCode = response.getStatusLine().getStatusCode();
        postEntity = response.getEntity();
        statu = response.getStatusLine().toString();
        res = getResponseEntity(postEntity);
        resList.add(getReponsemes(response).toString());
        resList.add(statu);
        resList.add(res);
        if (statusCode != 200) {
            throw new Exception(res);
        }
    }
    return resList;
}
好了到这里基本的主要方法都有了,然后利用 testng 去实现这些请求了
如果你深入了解 testng 这些看起来就很简单了
一个数据驱动方法,一个 test 方法,一个 ztest 的监听就完事了
@Listeners({ ZTestReport.class })
public class TestTemplate extends TestBase {
    private String excelPath = prop1.getProperty("ExcelPath");
    private String sheetName = "api";
    private List<String> re = null;
    @Test(dataProvider = "data", threadPoolSize = 1, timeOut = 0, invocationCount = 1)
    public synchronized void getData(String num, String nicName, String httpType, String reMethond, String host,
            String path, String head, String paramType, String param, String verisy) throws Exception {

        // 获取当前线程id System.out.println(Thread.currentThread().getId());
        SendRequest sr = new SendRequest(num, nicName, httpType, reMethond, host, path, head, paramType, param, verisy);
        re = sr.request();
        for(String entry:re){
        Reporter.log(entry);
    }

}

    /**
     * 数据驱动
     */
    @DataProvider(name = "data", parallel = true)
    public Object[][] dataProvider() throws IOException, Exception {
        return ExcelDataParam.readExcelDataParam(excelPath, sheetName);
    }
然后只用到了 test 标签至于为什么完全是为了并发,至于是不是并发效果各位看官们可以打印时间到毫秒来看看,也可以打印线程 id,至于支持多少并发完全取决于你的机器支持多少线程这里不多讲,干活基本就这么多了
少了一个 SendRequest
这个类主要是继承了配置文件(比如你想配置开发,测试,生产的主机可以卸载配置文件里面)
这个类主要就是根据驱动里面的参数来判断怎么去执行,各个参数为空该怎么执行,参数类型不同该怎么执行没有技术含量的
public class SendRequest extends TestBase {
    private String num;// 编号
    private String nicName;// 用例名称
    private String httpType;// 请求协议类型
    private String reMethond;// 请求方法
    private String host;// 主机
    private String path;// 路径
    private String head;// 请求头
    private String paramType;// 参数类型 json param
    private String param;// 请求参数
    private String verisy;// 验证点

    public SendRequest(String num, String nicName, String httpType, String reMethond, String host, String path,
            String head, String paramType, String param, String verisy) {
        this.num = num;
        this.nicName = nicName;
        this.httpType = httpType;
        this.reMethond = reMethond;
        this.host = host;
        this.path = path;
        this.head = head;
        this.paramType = paramType;
        this.param = param;
        this.verisy = verisy;
    }

    /**
     * 根据驱动类型来选择调用方法与参数类型接口调用类
     */
    public List<String> request() throws Exception {
        List<String> re = null;
        if (path == null) {
            path = "/";
        }
        if (host == null) {
            host = prop1.getProperty("Host");
        }

        HttpClientMain req = new HttpClientMain();
        if (reMethond.equalsIgnoreCase("get")) {
            re = req.get(httpType + "://" + host + path, head);
        } else {
            // 如果是json参数先把字符串转json,在把json转map
            if (paramType.equalsIgnoreCase("json")) {
                JSONObject json = JSONObject.parseObject(param);
                re = req.post(httpType + "://" + host + path, JsonToMap.jsonToMap(json), head);
            } else {
                re = req.post(httpType + "://" + host + path, ParToMap.strToMap(param), head);

            }
        }
        return re;
    }

}
至于报告是怎么实现的:https://testerhome.com/topics/10802 请看一下这位大佬的,对了大佬的报告没有验证点,所以我加上了后面 git 上面的 rereport 就是加了验证点的报告,大佬好一手 jqury 害的我百度半天才加上
基本就这些了放上 git:https://gitee.com/domains90/HttpClient.git
有疑问的跟我一样的小白们留言就好看到就会回
如果想骂人的请看这里:我手痒想些,就是手痒啊啊啊啊啊啊