本篇更偏向于源码解析,适用于对 airtest 有一些了解,看过入门教程,写过 demo 的童鞋,当然初学者也可以在本章的上手环节跳转到网易官方最快 5 分钟教程中学习,因为我觉得那篇教程已经够好了,就不多写入门教程了。
简介
Airtest Project 是最近非常火的一个 ui 自动化测试工具,由网易游戏内部工具团队开发并开源,获得谷歌力挺。
AirtestIDE 是一个跨平台、多端(Windows、web、android、ios、游戏)的 UI 自动化测试编辑器。
自动化脚本录制、一键回放、报告查看,轻而易举实现自动化测试流程,自有编辑器一站式解决
支持基于图像识别的 Airtest 框架,适用于所有 Android 和 Windows 游戏,会截图就能写脚本
支持基于 UI 控件搜索的 Poco 框架,适用于 Unity3d,Cocos2d 与 Android、ios App、web
能够运行在 Windows 和 MacOS 上
网易内部已成功应用在数十个项目上,利用 手机集群 进行大规模自动化测试,手机集群没有开源,准备做收费模式吧
使用 python 编写,兼容 2、3,尽量用 3 吧
上手
网易官方的最快五分钟上手教程
官方教程,有演示视频,有动图,一目了然。环境搭建也相当简单,基本上安装好 IDE 就可以了。
AirTest IDE 提供了一站式功能:脚本开发(录制、编辑)、设备管理、运行、回放、结果查看

相信通过网易的这个上手教程,很多人都能很快就可以把 airtest 玩起来了。
进阶
当我们跟随着教程写好一条脚本,运行起来以后,一起来看看 AirTest 的大致框架。
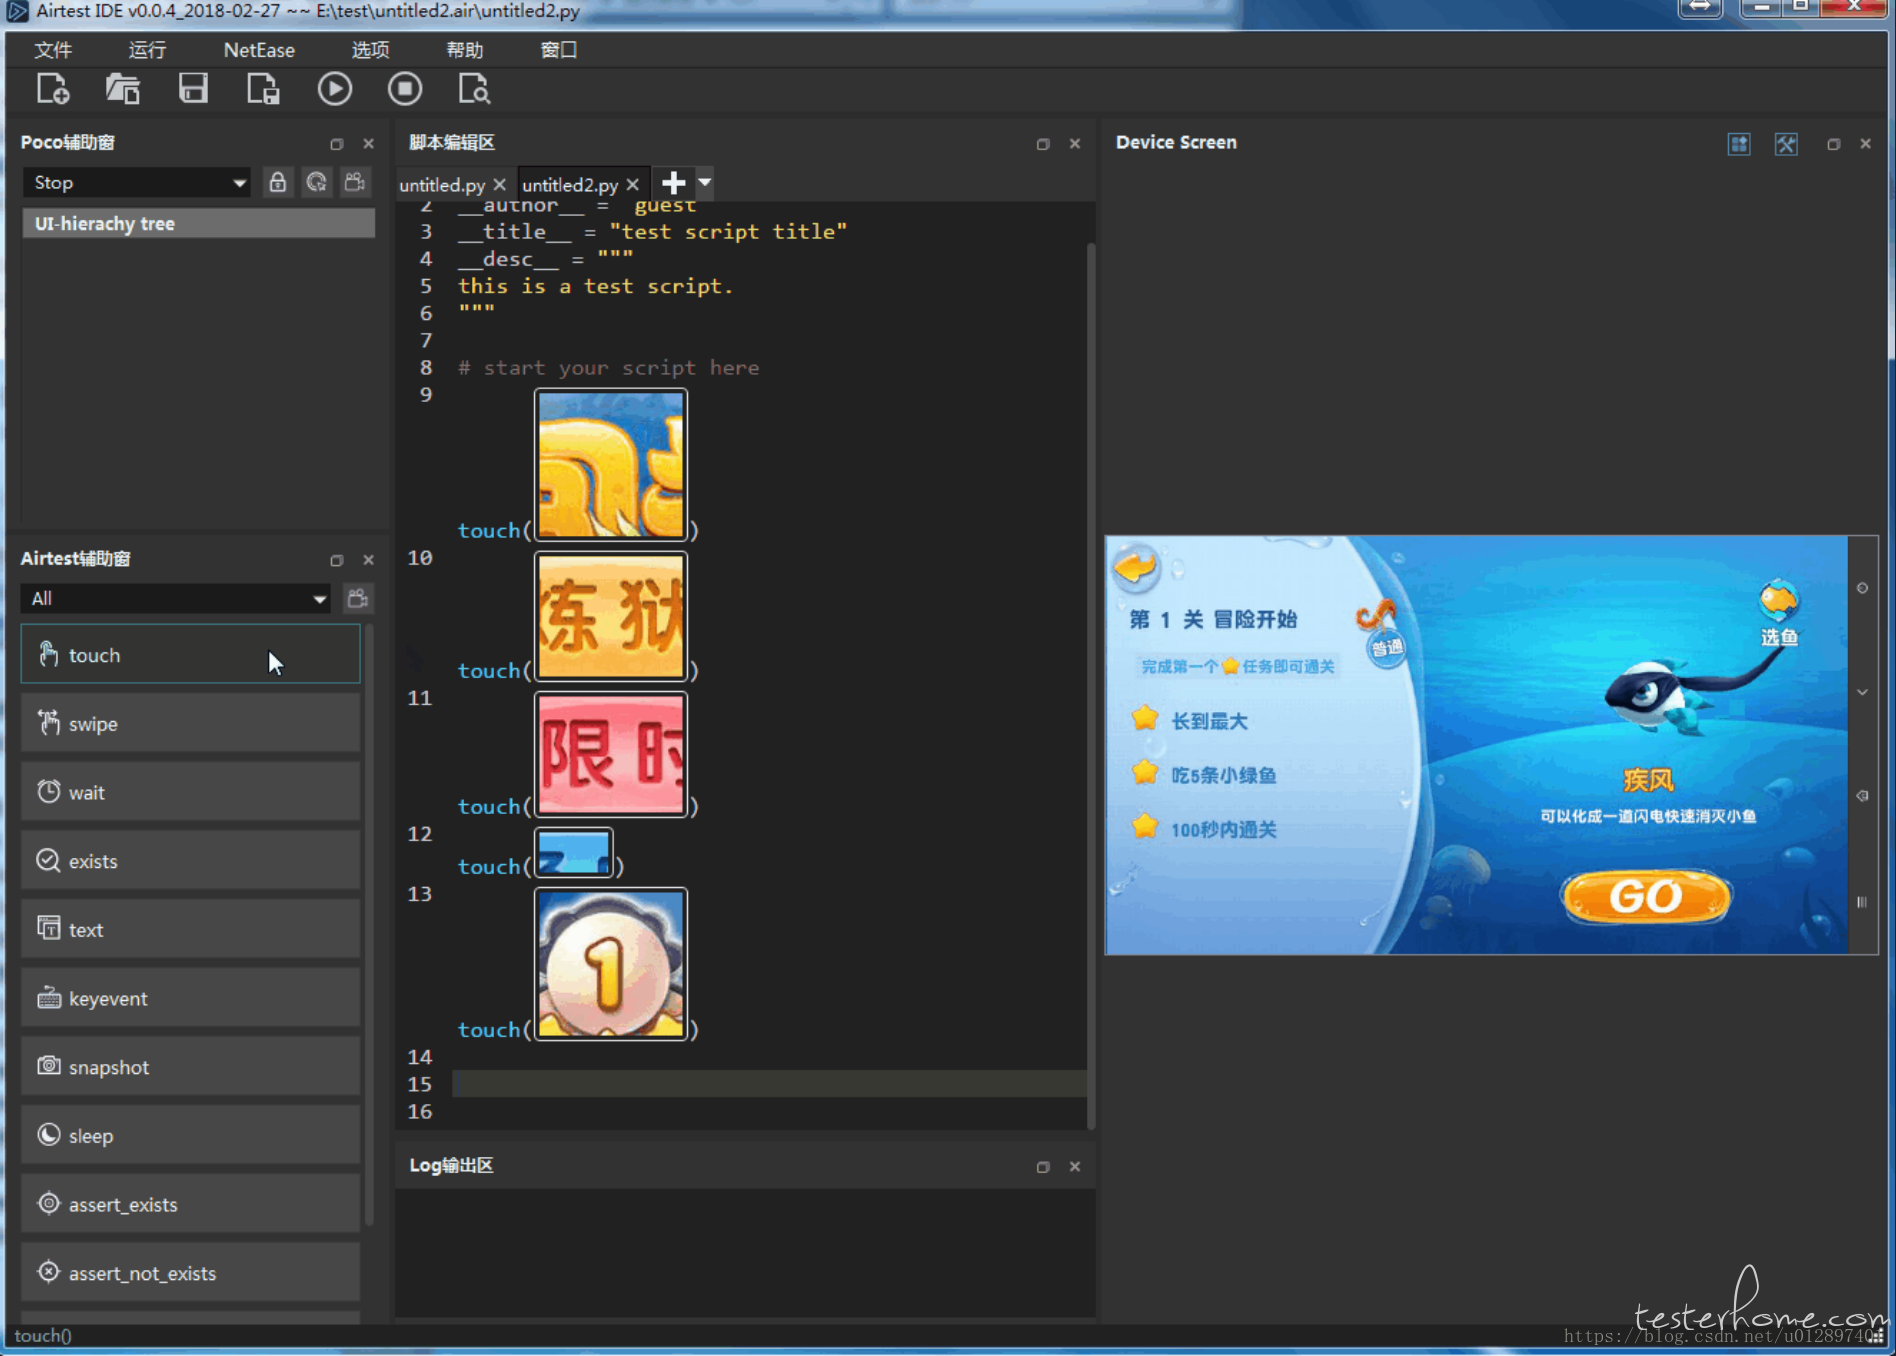
首先在 AirTest 的定义中脚本文件名的后缀是.air,当我们在 IDE 中新建一个脚本文件
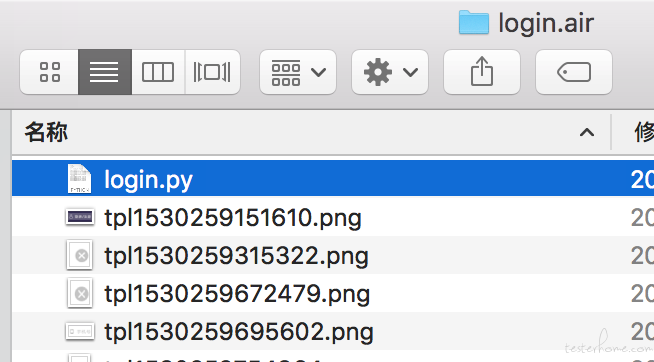
再来到文件管理中我们可以看到这是一个文件夹。

这里面有一个跟 air 脚本同名的 py 文件,其他的 png 图片就是在 IDE 里截图,录制,生成的图像文件。
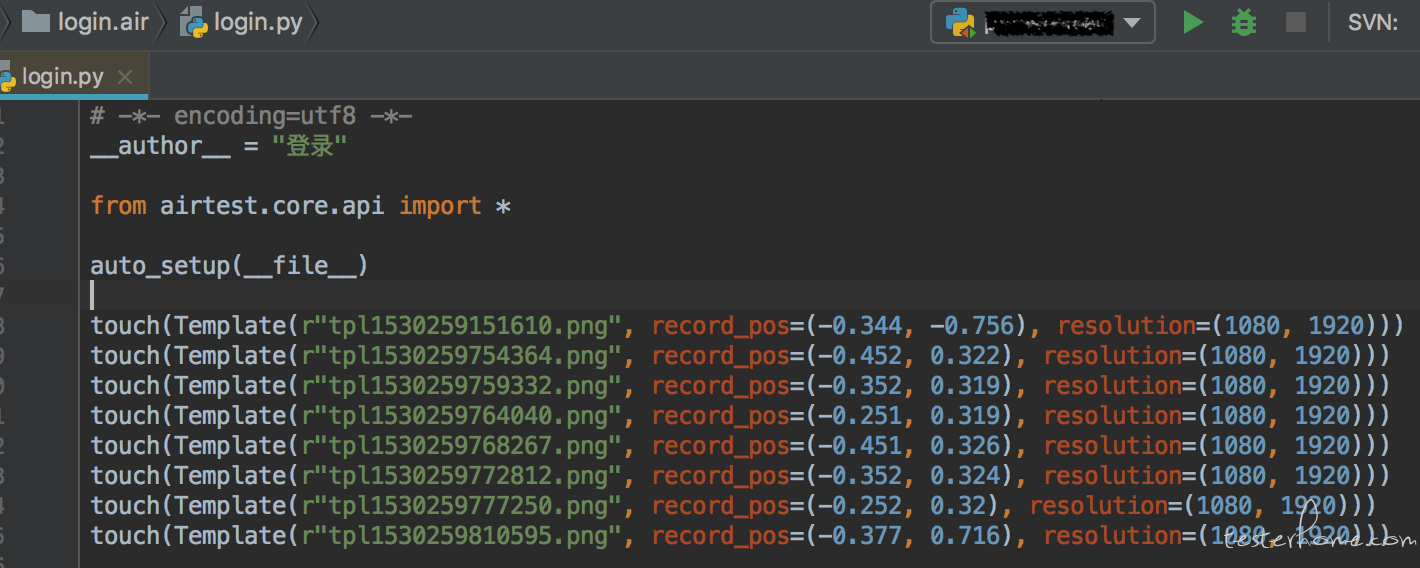
打开这个 py 文件来看看:

可以看出在 IDE 里显示的 touch(图片),就是在 api 里的一个 touch 接口,里面传入一个 Template,这个对象包含了图片文件的名称、录制时的相对坐标 (record_pos),分辨率 (resolution) 等,当然还有其他参数:目标位置 (target_pos)、rgb 匹配 (rgb),如果你在 IDE 里双击图片就会弹出窗口设置这些详细参数。
我想图像识别大概就是这样了:写脚本时截下目标图片(你想要点击的地方),这图片就跟 python 脚本保存在一起,touch 接口传入这些目标图片,进行匹配,成功后点击目标图片的位置,有兴趣的话继续来看看这个 touch 接口的源码。
@logwrap
def touch(v, times=1, **kwargs):
    """
    Perform the touch action on the device screen

    :param v: target to touch, either a Template instance or absolute coordinates (x, y)
    :param times: how many touches to be performed
    :param kwargs: platform specific `kwargs`, please refer to corresponding docs
    :return: finial position to be clicked
    :platforms: Android, Windows, iOS
    """
    if isinstance(v, Template):
        pos = loop_find(v, timeout=ST.FIND_TIMEOUT)
    else:
        try_log_screen()
        pos = v
    for _ in range(times):
        G.DEVICE.touch(pos, **kwargs)
        time.sleep(0.05)
    delay_after_operation()
    return pos
入参:
v,可以是 Template 对象 (目标截图),或者是 pos(坐标)
times,点击次数,默认为 1
kwargs,平台的特殊参数
loop_find(v, timeout=ST.FIND_TIMEOUT)# 通过名字大概知道,循环查找这个 v,有个超时退出,返回坐标点
G.DEVICE.touch(pos, **kwargs)# 点击设备的指定坐标点
G.DEVICE 应该就是一个当前的设备,兼容 android、ios、windows
delay_after_operation# 最后点击完以后还等待一下,所以这里可以配置每步点击的等待时间
所以 touch 接口的逻辑是:
如传入图片信息,循环查找匹配出目标图片所在屏幕的坐标点;
传入是坐标,开始记录 log 信息;
循环点击指定的坐标点;
等待,然后返回目标坐标点。
再往下,看一下 loop_find 这个接口,我想这就是 “图像识别” 的 “核心” 部分了,哈哈
@logwrap
def loop_find(query, timeout=ST.FIND_TIMEOUT, threshold=None, interval=0.5, intervalfunc=None):
    """
    Search for image template in the screen until timeout

    Args:
        query: image template to be found in screenshot
        timeout: time interval how long to look for the image template
        threshold: default is None
        interval: sleep interval before next attempt to find the image template
        intervalfunc: function that is executed after unsuccessful attempt to find the image template

    Raises:
        TargetNotFoundError: when image template is not found in screenshot

    Returns:
        TargetNotFoundError if image template not found, otherwise returns the position where the image template has
        been found in screenshot

    """
    G.LOGGING.info("Try finding:\n%s", query)
    start_time = time.time()
    while True:
        screen = G.DEVICE.snapshot(filename=None)

        if screen is None:
            G.LOGGING.warning("Screen is None, may be locked")
        else:
            if threshold:
                query.threshold = threshold
            match_pos = query.match_in(screen)
            if match_pos:
                try_log_screen(screen)
                return match_pos

        if intervalfunc is not None:
            intervalfunc()

        # 超时则raise,未超时则进行下次循环:
        if (time.time() - start_time) > timeout:
            try_log_screen(screen)
            raise TargetNotFoundError('Picture %s not found in screen' % query)
        else:
            time.sleep(interval)
入参:
query:要在截图中查找的图片模板(也就是我们写脚本截的图咯)
timeout:最大匹配时间
threshold:默认是 None,字面意思是阈值,也就是匹配时的相似度吧,调低点可以更容易匹配上,也更容易匹配错
interval:循环匹配的间隔时间,每次要对设备截图传入进来匹配,中间的等待时间
intervalfunc:传入一个方法,在匹配失败时调用,也就是可以在接口的外部自定义匹配失败后的动作
返参:pos:目标图片在设备屏幕中的位置
screen = G.DEVICE.snapshot(filename=None)# 设备截图,所以运行完脚本以后工程路径会有很多个截图文件,就是这里产生的。
match_pos = query.match_in(screen)# 在设备截图中匹配查找我们传入的目标图片
所以这 loop_find 的逻辑就是:
一个循环,
从设备中截取屏幕的图片,
在屏幕图片上查找匹配我们的目标图片,
匹配成功则记录日志然后返回位置坐标,
失败则判断是否是否有 intervalfunc 方法需要执行,默认是没有的,跳过,
然后接着继续循环截图、匹配,直到超时报一个 TargetNotFoundError 异常出去。
那么图像的匹配算法大概就是在这个 match_in 接口里了,接着再看一点吧,哈哈
def match_in(self, screen):
    match_result = self._cv_match(screen)
    G.LOGGING.debug("match result: %s", match_result)
    if not match_result:
        return None
    focus_pos = TargetPos().getXY(match_result, self.target_pos)
    return focus_pos
@logwrap
def _cv_match(self, screen):
    # in case image file not exist in current directory:
    image = self._imread()
    image = self._resize_image(image, screen, ST.RESIZE_METHOD)
    ret = None
    for method in ST.CVSTRATEGY:
        if method == "tpl":
            ret = self._try_match(self._find_template, image, screen)
        elif method == "sift":
            ret = self._try_match(self._find_sift_in_predict_area, image, screen)
            if not ret:
                ret = self._try_match(self._find_sift, image, screen)
        else:
            G.LOGGING.warning("Undefined method in CV_STRATEGY: %s", method)
        if ret:
            break
    return ret
match_in 接口里调用 cv_match 进行匹配,然后 TargetPos().getXY(match_result, self.target_pos) 就是对匹配出来的结果进行处理,在前面讲 touch 的时候有一个传入参数是 target_pos,还有印象吗?根据教程和文档说明,target_pos 是以 123456789 的数字按九宫格键盘排列,分别代表左上角,正上角,右上角,...,右下角。这个 getXY 就是对这个进行处理的,根据传入的 target_pos 对匹配到的坐标信息再做处理返回目标图片中的不同位置上的坐标,默认是返回中心点。
再看 cv_match 接口的逻辑:
imread()# 根据图片路径,将图片读取为 cv2 的图片处理格式
_resize_image(image, screen, ST.RESIZE_METHOD)# 处理图片尺寸,这里可以在 ST.RESIZE_METHOD 自定义缩放规则,默认是用 COCOS 中的 MIN 策略
然后根据 CVSTRATEGY(cv 策略,应该不同匹配的算法),有 tpl、sift,进行 try_match。
其中 sift 策略中优先对预测的区域进行匹配,也就是用到了再 touch 接口中传入的 record_pos,终于知道为啥要传入写脚本是截图的位置了吧。
这个 try_match 是转换接口,method,再调用 method,也就是说匹配的算法有三个不同的,有兴趣可以继续去看看:
_find_template、_find_sift_in_predict_area、_find_sift 这三个接口。
@staticmethod
def _try_match(method, *args, **kwargs):
    G.LOGGING.debug("try match with %s" % method.__name__)
    try:
        ret = method(*args, **kwargs)
    except aircv.BaseError as err:
        G.LOGGING.debug(repr(err))
        return None
    else:
        return ret
总结
Airtest 的优点:
有个 IDE,大大地减少了写自动化脚本的难度,搭建环境、写脚本,运行脚本,查看报告都一站式解决了;
图像识别,对不能用 ui 控件定位的地方的,使用图像识别来定位,对一些自定义控件、H5、小程序、游戏,都可以支持;
支持多个终端,使用图像识别的话可以一套代码兼容 android 和 ios 哦,用 ui 控件定位的话需要兼容一下。
本篇通过 touch 接口对 airtest 的图像识别的源码进行了初步的分析,大致就是每 0.5 秒对设备进行屏幕截图再用匹配算法查找目标图像所在位置,然后执行点击等动作。
更多图像匹配算法实现部分,下回分解。
我的 CSDN 博客:https://blog.csdn.net/u012897401/article/details/82927082