发现很多同学对测试平台比较感兴趣,我们这一系列教程就围绕着测试平台的开发来展开。
本系列教程中,我们将实现一个超级简单的接口测试平台,类似 postman,只不过是 web 版,而不是客户端版本。
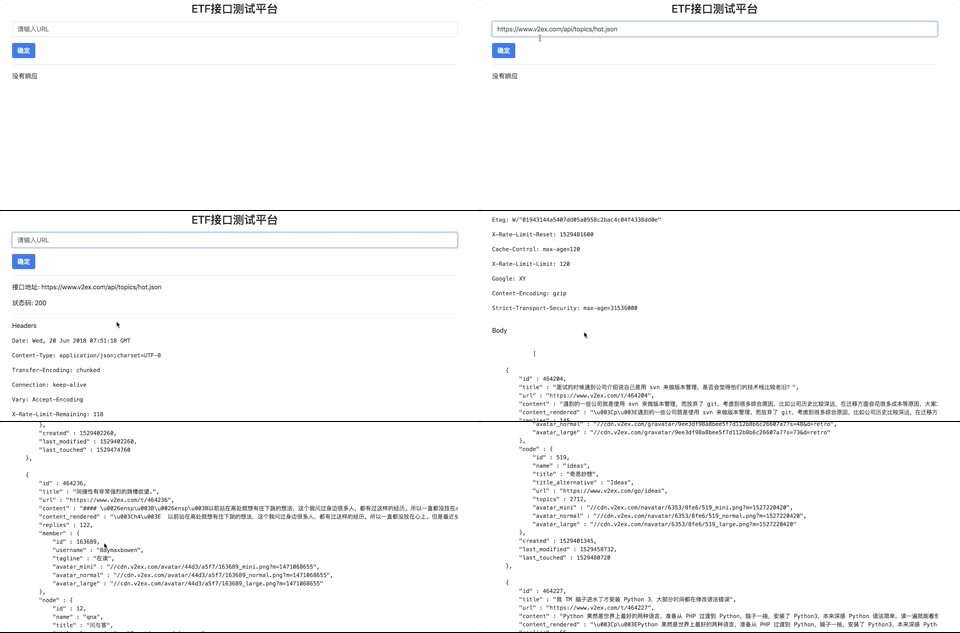
这一节我们将实现在前端界面发送 get 请求并拿到响应的功能。等于是我们会实现 1 个调试 get 接口的平台小工具。
实现之后的效果是这个样子的。

从哪里开始
你可能需要下面的一些知识以便更好的理解教程
- python 基础,能大致读懂代码就可以
- web 服务器知识
- html 知识,因为会涉及到提交表单
- 最基本的 css 知识,涉及到几行 css 代码
如果你完全没有基础那也没关系,你可以一边学习教程一边学习遇到的新知识点,积少成多,坚持下去就有收获。
技术选型
为了尽可能的简单,我们选择使用 python 来实现测试平台,毕竟 python 学习成本相对不高,另外 python 以后也应该是测试岗位的标配技能。
我们的平台主要是 web 应用,所以我们选择flask框架来快速实现功能。
为了能让我们的前端页面稍微好看一点点,我们选择bootstrap4作为前端组件。
为了能够更简单的处理 http 请求和响应,我们将使用requests来简化请求处理过程。
安装依赖
对于初学者来说这一步应该是最难的,出错之后希望大家可以去搜索相关的解决方案,不要轻易放弃。
首先安装 python3。
然后使用 pip 从命令行安装 reqeusts 和 flask,命令如下
pip install requests

pip install Flask
实现 UI
我们先写个页面,也就是让我们的测试平台有个 UI 可以从浏览器中访问。
创建文件main.py,内容如下
from flask import Flask, render_template, request
import requests

app = Flask(__name__)

@app.route('/')
def home():
    return render_template('home.html', resp=None)
在main.py同级目录下创建templates文件夹,在文件夹内创建文件home.html,内容如下
<html lang="zh">
  <head>
    <!-- Required meta tags -->
    <meta charset="utf-8">
    <meta name="viewport" content="width=device-width, initial-scale=1, shrink-to-fit=no">

    <!-- Bootstrap CSS -->
    <link rel="stylesheet" href="https://cdn.bootcss.com/bootstrap/4.0.0/css/bootstrap.min.css" integrity="sha384-Gn5384xqQ1aoWXA+058RXPxPg6fy4IWvTNh0E263XmFcJlSAwiGgFAW/dAiS6JXm" crossorigin="anonymous">
    <style media="screen">
      .main-title {
        margin-top: 2rem;
        margin-bottom: 1rem;
      }
    </style>

    <title>ETF</title>
  </head>
  <body>
    <div class="container">
      <h3 class="text text-center main-title">ETF接口测试平台</h3>
      <form action="/handle_get" method="post">
        <div class="form-group">
          <input type="text" name="url" id="url" placeholder="请输入URL" class="form-control" autofocus>
        </div>
        <div class="form-group">
          <input type="submit" name="submit" value="确定" class="btn btn-primary">
        </div>
      </form>
    </div>

    <!-- Optional JavaScript -->
    <!-- jQuery first, then Popper.js, then Bootstrap JS -->
    <script src="https://cdn.bootcss.com/jquery/3.2.1/jquery.slim.min.js" integrity="sha384-KJ3o2DKtIkvYIK3UENzmM7KCkRr/rE9/Qpg6aAZGJwFDMVNA/GpGFF93hXpG5KkN" crossorigin="anonymous"></script>
    <script src="https://cdn.bootcss.com/popper.js/1.12.9/umd/popper.min.js" integrity="sha384-ApNbgh9B+Y1QKtv3Rn7W3mgPxhU9K/ScQsAP7hUibX39j7fakFPskvXusvfa0b4Q" crossorigin="anonymous"></script>
    <script src="https://cdn.bootcss.com/bootstrap/4.0.0/js/bootstrap.min.js" integrity="sha384-JZR6Spejh4U02d8jOt6vLEHfe/JQGiRRSQQxSfFWpi1MquVdAyjUar5+76PVCmYl" crossorigin="anonymous"></script>
  </body>
</html>
上面的 html 代码直接拷贝就好,并没有什么技术含量。
打开命令行,cd 到 main.py 路径下,linux/mac 用户运行
export FLASK_APP=main.py
export FLASK_ENV=development
flask run # 或者使用python -m flask run
windows 用户大概可以这样运行 (没有测试过,有问题请自行搜索)
set FLASK_APP=main.py
set FLASK_ENV=development
flask run # 或者使用python -m flask run
如果没有错误,结果大致如下
* Serving Flask app "main.py" (lazy loading)
* Environment: development
* Debug mode: on
* Running on http://127.0.0.1:5000/ (Press CTRL+C to quit)
* Restarting with stat
* Debugger is active!
* Debugger PIN: 235-696-725
在浏览器中访问 localhost:5000,前端页面就应该可以看到了。
代码做了啥
main.py 里面,我们定义了/路径的处理逻辑。当浏览器访问 localhost:5000 的时候会命中这个逻辑。因为 localhost:5000 与 localhost:5000/是等价的,所以直接访问 localhost:5000 的时候,下面的home()方法会执行
@app.route('/')
def home():
    return render_template('home.html', resp=None)
return render_template('home.html', resp=None) 方法表示去渲染templates目录下的home.html文件,第 2 个参数我们暂时忽略。
实现表单处理逻辑
我们现在可以在前端页面的输入框里随便输入一些内容,然后点击确定按钮,这时候页面会报错,大致的意思是告诉我们/handle_get 这个路径并没有命中任何处理方法,因此会产生 404 错误。
/handle_get 这个路径其实就是 localhost:5000/handle_get 路径,我们现在要实现下面的逻辑
- 用户从输入框输入一个接口地址,点击确认按钮后该地址被发送到服务器端的处理代码里,也就是 main.py 文件中的代码里
- 后台代码拿到用户输入的接口 url,发送 get 请求去访问该 url,拿到接口的响应
- 将响应结果在前端页面中展示出来
服务端代码 main.py 如下
@app.route('/handle_get', methods=['POST'])
def handle_get():
    url = request.form['url']
    try:
        r = requests.get(url)
    except Exception as e:
        print(e)
        r = None

    return render_template('home.html', resp=r)
上面的代码里我们首先定义了命中/handle_get 路径后的处理代码,也就是 handle_get() 方法。注意,我们只响应 POST 方式的调用,这是为什么?
在 handle_get() 方法中,我们拿到了用户输入的 url,并使用 requests 库去发起了 get 请求,拿到了response对象后,将起传到前端页面,也就是 render_template 的第 2 个参数的作用。
这里我们用了异常处理,大家可以把异常处理去掉,看一下会发生什么?
我们修改一下 home.html 页面,让其可以展示响应的内容。
...
...
...

<div class="container">
    <h3 class="text text-center main-title">ETF接口测试平台</h3>
    <form action="/handle_get" method="post">
      <div class="form-group">
        <input type="text" name="url" id="url" placeholder="请输入URL" class="form-control" autofocus>
      </div>
      <div class="form-group">
        <input type="submit" name="submit" value="确定" class="btn btn-primary">
      </div>
    </form>
    <hr>

    {% if resp %}
      <p>接口地址: {{resp.url}}</p>
      <p>状态码: {{resp.status_code}}</p>
      <hr>
      <p>Headers</p>
      {% for key, value in resp.headers.items() %}
        <p> <pre><code>{{key}}: {{value}}</code></pre> </p>
      {% endfor %}

      <hr>
      <p>Body</p>
      <pre>
        <code>
          {{resp.text}}
        </code>
      </pre>
    {% else %}
      <p>没有响应</p>
    {% endif%}
  </div>
这里我们用到了jinja模版引擎,这是一种在 html 中展示动态内容的方法,可以理解成是一种专用语言或者是专用套路。
这里我们展示了响应的状态码,headers 和 body。
总结
我们实现了一个看起来没啥用的功能:输入 1 个接口 url,然后获取其响应并展示。
我们使用了大概 4 种语言
- python
- html
- CSS
- jinja 模版语言
我们涉及到了下面的一些知识点
- web 服务端开发
- html 前端开发的一点点,比如表单
- 如何使用 python 去访问 http 协议的 get 接口
本节所有代码可以在这里查看
下一节里我们将实现自动断言的功能。