TensorFlow 计算图是由 op 和 tensor 组成,那么 tensor 一般都用来代表什么呢?显然,像模型的输入数据、网络权重、输入数据经 op 处理后的输出结果都需要用张量或特殊张量进行表达。既然 tensor 在 TensorFlow 体系架构中如此重要,因此本文将带领大家由浅入深地学习 tensor 的三个话题:用户眼中的 tensor、TensorFlow 系统中的 tensor、tensor 高阶用法 DLPack(跨框架编程,如:TensorFlow+PyTorch)。
注:本文基于 TensorFlow v1.15.5 进行编写。
一、小白眼中的 Tensor
1.1 Tensor HelloWorld
定义两个张量,然后对其求加法,相关代码如下:
# segment 1
a = tf.constant(3.0, dtype=tf.float32)
b = tf.constant(4.0) # also tf.float32 implicitly
total = a + b
print(a)
print(b)
print(total)

### 三个print的输出如下:
"""
Tensor("Const:0", shape=(), dtype=float32)
Tensor("Const_1:0", shape=(), dtype=float32)
Tensor("add:0", shape=(), dtype=float32)
"""
# 说明:此时的Tenosr尚不能产生真正的结果。以上代码创建了计算图,Tensor只是代表op运行的结果(但此时op未运行)。
如果想看到最终 total 的计算结果,则应该创建 Session 对象并运行计算图,具体代码如下(在 segment1 基础上增加代码):
with tf.Session() as sess:
    result = sess.run(total)
    print(result, type(result), type(total))
# 输出结果= 7.0 <class 'numpy.float32'> <class 'tensorflow.python.framework.ops.Tensor'>
由此可见,Tensor 代表尚未执行的结果表示,创建 Session 对象并运行计算图可得 total 结果 7.0,并且结果的数据类型已变为 numpy。最后说明一下,本小节代码输出的 Tensor 是指 tf.Tensor,对应的代码实现是tensorflow.python.framework.ops.Tensor。
1.2 张量属性及特殊张量
从用户视角看 tf.Tensor 主要有三个属性:name、dtype、shape。除此之外,还有三个属性比较重要(不常用或者不直接可见):op、graph、device。其中 op 属性记录产生此 Tensor 的操作名称,graph 属性记录包含此 Tensor 的计算图,device 属性记录产生此 Tensor 的设备名称。
在 TensorFlow 体系中有四种特殊的张量(此处暂不严格区分 Tensor 与产生此 Tensor 的 op),具体如下:
• tf.Variable: 定义内容可变的张量,一般用来定义模型权重。
• tf.constant: 一般来说,张量内容不可变,此 API 可用来定义常规张量。
• tf.placeholder: 占位符张量,用于描述静态图输入规格。静态图采用先编译后执行的方式,因此在定义计算图时要知道输入规格。
• tf.SparseTensor: 为稀疏数据定制的张量结构。
1.3 Tensor 与 op 的关系
我们多次提到,Tensor 可以作为 op 的输入,经 op 一系列处理后产生新的 Tensor 作为输出。为了深入理解这一点,我们回头重新审视 segment1 中的代码片段(请大家注意 Tensor 的命名):
# segment 1
a = tf.constant(3.0, dtype=tf.float32)
b = tf.constant(4.0) # also tf.float32 implicitly
total = a + b
print(a)
print(b)
print(total)

### 三个print的输出如下:
"""
Tensor("Const:0", shape=(), dtype=float32)
Tensor("Const_1:0", shape=(), dtype=float32)
Tensor("add:0", shape=(), dtype=float32)
"""
# 说明:此时的Tenosr尚不能产生真正的结果。以上代码创建了计算图,Tensor只是代表op运行的结果(但此时op未运行)。
针对上述代码,我们先来看看哪些是 Tensor,哪些是 op,然后基于此分别描述每一个操作的执行过程。为回答第一个问题,我们先看一段 TensorFlow 官方注释:
"""
`tf.constant` creates a `Const` node in the computation graph with the

exact value at graph construction time.
"""
由此可见,segment1 的代码中有两种 op,分别为 Const 和 add,前者出现了两次,而后者 1 次。基于此,我们得知 segment1 依次向计算图中添加了三个 op,与此同时也可以回答第二个问题,即每个操作的过程。具体如下:
### 三个print的输出如下(a,b,total):
"""
Tensor("Const:0", shape=(), dtype=float32)
Tensor("Const_1:0", shape=(), dtype=float32)
Tensor("add:0", shape=(), dtype=float32)
"""
# 向计算图添加第一个op(Const),输入是一个标量,输出是Tensor a,其名称由两部分组成,即op名称:a在op输出的索引位置.
# 向计算图添加第二个op(Const_1,因为op名称要唯一),输入标量,输出Tensor b,其命名规则同上.
# 向计算图添加第三个op(add),输入是Tensor a和b,输出Tensor total,其命名规则同上.
二、一探 tensor 究竟
2.1 前后端 Tensor 映射
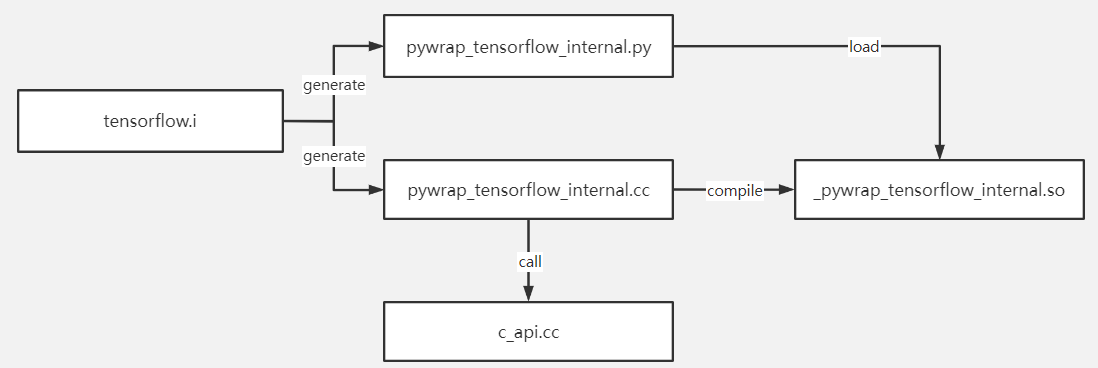
在 TensorFlow 的白皮书 [7] 中提到 C API 是连接前端用户代码和后端执行引擎的桥梁,为深入理解这个概念,建议读者参照 TensorFlow 官网从头编译源代码。TensorFlow v1.15.5 基于 Bazel 进行编译,前端 python 与后端 C++ 通过 SWIG 进行交互。实际上在系统编译之前会先启动 SWIG 代码生成过程,通过解析 tensorflow.i 自动生成两个 wrapper 文件:pywrap_tensorflow_internal.py 和 pywrap_tensorflow_internal.cc,前者对接前端 python 调用,后者对接后端 C API 调用。大家安装 tensorflow 官方二进制包后,只能看到 py 文件而没有 cc 文件。如果自己编译 TensorFlow 源码,可在项目根目录下的 bazel-bin 中找到相应的 py 和 cc 文件,如下图所示:

上图红框中的 so 文件是由 cc 文件编译得到,黄框中的 py 模块首次被导入时,会自动加载 so 动态链接库。而在 so 对应的 cc 文件中,静态注册了一个函数映射表,实现 python 函数到 C 函数的映射。此映射表结构大致如下:
static PyMethodDef SwigMethods[] = {
          { (char *)"SWIG_PyInstanceMethod_New", (PyCFunction)SWIG_PyInstanceMethod_New, METH_O, NULL},
          { (char *)"TF_OK_swigconstant", TF_OK_swigconstant, METH_VARARGS, NULL},
          { (char *)"TF_CANCELLED_swigconstant", TF_CANCELLED_swigconstant, METH_VARARGS, NULL},
          { (char *)"TF_UNKNOWN_swigconstant", TF_UNKNOWN_swigconstant, METH_VARARGS, NULL},
          { (char *)"TF_INVALID_ARGUMENT_swigconstant", TF_INVALID_ARGUMENT_swigconstant, METH_VARARGS, NULL},
          // 此处省略许多代码
};
如果没有亲身实践,上面这些文字读起来多少有些吃力。为便于大家理解,我们把上述文字用如下简图进行总结:
有些好奇宝宝可能会说:上面讲的太宏观,好像懂了,又好像没懂。没关系,接下来我们以静态图的运行接口 session.run() 为例,结合 TensorFlow 源码详细梳理一下前后端的映射过程,具体过程见下图:
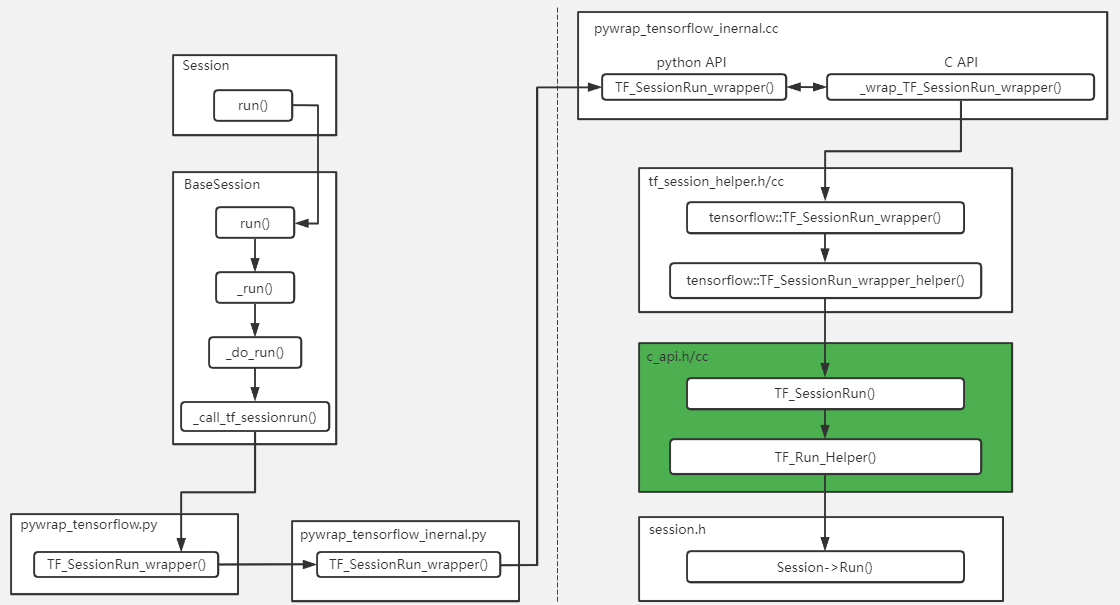
由上图我们可清晰看到 C API 层把前后端给隔离开了,当然 C API 层包括 pywrap_tensorflow_internal.h/cc、tf_session_helper.h/cc、c_api.h/cc。至此 session.run() 从前端映射到后端的流程讲完了,那接下来回答前端 tensor 如何映射至后端 Tensor,请看如下代码:
// tf_session_helper.cc    line351
void TF_SessionRun_wrapper_helper(TF_Session* session, const char* handle,
                                  const TF_Buffer* run_options,
                                  const std::vector<TF_Output>& inputs,
                                  const std::vector<PyObject*>& input_ndarrays,
                                  const std::vector<TF_Output>& outputs,
                                  const std::vector<TF_Operation*>& targets,
                                  TF_Buffer* run_metadata,
                                  TF_Status* out_status,
                                  std::vector<PyObject*>* py_outputs) {
  DCHECK_EQ(inputs.size(), input_ndarrays.size());
  DCHECK(py_outputs != nullptr);
  DCHECK(py_outputs->empty());
  Status s;

  // Convert input ndarray PyObjects to TF_Tensors. We maintain a continuous
  // array of TF_Tensor*s as well as scoped containers to make sure they're
  // cleaned up properly.
  // 省略了很多代码,可以看到此处把前端类ndarray的对象转化成了TF_Tensors。
}

// c_api.cc  line2274
void TF_SessionRun(TF_Session* session, const TF_Buffer* run_options,
                   const TF_Output* inputs, TF_Tensor* const* input_values,
                   int ninputs, const TF_Output* outputs,
                   TF_Tensor** output_values, int noutputs,
                   const TF_Operation* const* target_opers, int ntargets,
                   TF_Buffer* run_metadata, TF_Status* status) {
  // TODO(josh11b,mrry): Change Session to be able to use a Graph*
  // directly, instead of requiring us to serialize to a GraphDef and
  // call Session::Extend().
  if (session->extend_before_run &&
      !ExtendSessionGraphHelper(session, status)) {
    return;
  }

  TF_Run_Setup(noutputs, output_values, status);

  // Convert from TF_Output and TF_Tensor to a string and Tensor.
  // 看这里,此外TensorFlow把TF_Tensor转化成c++ Tensor
  std::vector<std::pair<string, Tensor>> input_pairs(ninputs);
  if (!TF_Run_Inputs(input_values, &input_pairs, status)) return;
  for (int i = 0; i < ninputs; ++i) {
    input_pairs[i].first = OutputName(inputs[i]);
  }

  // Convert from TF_Output to string names.
  std::vector<string> output_names(noutputs);
  for (int i = 0; i < noutputs; ++i) {
    output_names[i] = OutputName(outputs[i]);
  }
}
2.2 C++ Tensor 类
查看参考文献 5,我们找到了 C++ Tensor 类的定义,其重要片段(seg1)如下:
class Tensor{
  public:
    // Tensor序列化/反序列化相关,在2.3节详细介绍
    bool FromProto(const TensorProto& other) TF_MUST_USE_RESULT;
    void AsProtoField(TensorProto* proto) const;
    void AsProtoTensorContent(TensorProto* proto) const;

    // Tensor实际为底层数据的一种视图,可用vec或matrix进行展示
    template <typename T>
    typename TTypes<T>::Vec vec() {
      return tensor<T, 1>();
    }

    template <typename T>
    typename TTypes<T>::Matrix matrix() {
      return tensor<T, 2>();
    }

    template <typename T, size_t NDIMS>
    typename TTypes<T, NDIMS>::Tensor tensor();

  private:
    TensorShape shape_;    // 维护Tensor的形状和数据类型
    TensorBuffer buf_;     // 底层数据的指针
}
我们先来分析下两个私有成员。首先看一下 TensorBuffer 类,它是一个继承引用计数类的虚拟类,不包含任何实现。通过查看参考文献 6,我们得知 BufferBase 继承 TensorBuffer 类,且维护了一个内存分配器指针。而 Buffer 类继承 BufferBase 类,且维护了指向实际数据的指针 data_和元素数量 elem_。上述类的继承关系如下图所示(为便于理解图中给出成员定义,而非标准的 UML 图):

接下来我们分析 TensorShape 类。它也有自己的类继承体系,其核心逻辑定义在父类 TensorShapeRep 中,相关的类继承体系如下图:
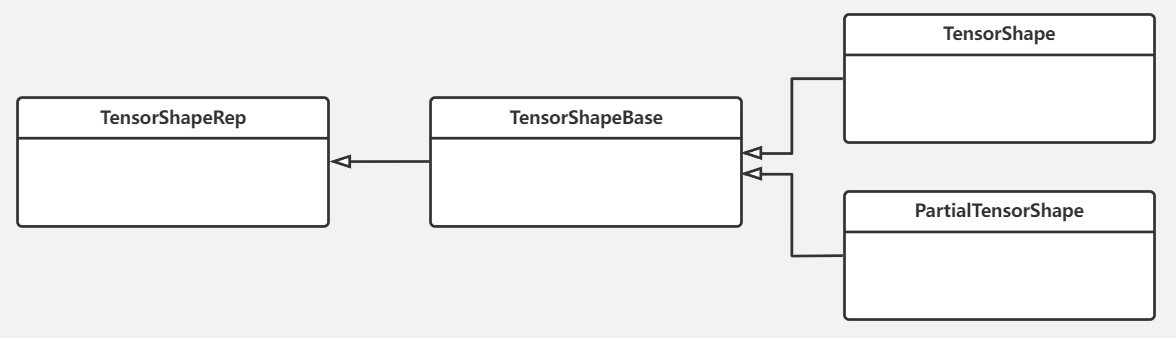
为深入理解 TensorShape 的作用,以下结合 TensorShapeRep 的部分代码(seg2)进行分析:
class TensorShapeRep{
  private:
    // 如下buf共计16字节表示TensorShape,其中前12字节用来存储形状(Rep16、Rep32、Rep64)
    // 第13字节作用不清楚,第14、15、16字节分别表示数据类型编号、张量的维度数目、张量维度的表示类型
    union {
      uint8 buf[16];

      Rep64* unused_aligner;   // Force data to be aligned enough for a pointer.
    } u_;

  public:
    // 理论上可定义任意维的张量,但1维、2维、3维张量最常见。所以给出如下三种维度表示方法(12字节)
    struct Rep16 {
      uint16 dims_[6];    // 最多可表示6维的张量,每一维的长度不超过2^16-1
    };
    struct Rep32 {
      uint32 dims_[3];    // 最多可表示3维的张量,每一维的长度不超过2^32-1
    };
    struct Rep64 {
      gtl::InlinedVector<int64, 4>* dims_;  // 支持任意维度的张量
    };
}
本小节最后,我们再来看一下 Tensor 类定义中的 vector() 和 matrix()。查看两个方法的实现,发现调用了共同的方法 tensor(),而 tensor() 的返回类型为 TTypes::Tensor,而 TTypes 正是衔接 TF Tensor 与 Eigen 库的关键。请看如下代码(seg3):
// tensorflow1.15.5\tensorflow\core\framework\tensor.h
class Tensor{
  public:
    // Returns the shape of the tensor.
    const TensorShape& shape() const { return shape_; }

    template <typename T>
    typename TTypes<T>::Vec vec() {
      return tensor<T, 1>();
    }


    template <typename T>
    typename TTypes<T>::Matrix matrix() {
      return tensor<T, 2>();
    }


    template <typename T, size_t NDIMS>
    typename TTypes<T, NDIMS>::Tensor tensor();
}

// tensorflow1.15.5\tensorflow\core\framework\tensor_types.h
template <typename T, int NDIMS = 1, typename IndexType = Eigen::DenseIndex>
struct TTypes {
  // Rank-<NDIMS> tensor of scalar type T.
  typedef Eigen::TensorMap<Eigen::Tensor<T, NDIMS, Eigen::RowMajor, IndexType>,Eigen::Aligned> Tensor;
  // 省略了许多代码
}

// tensorflow1.15.5\tensorflow\core\framework\tensor.h
// TF Tensor的shape()返回TensorShape。base()返回指向实际数据的指针。
template <typename T, size_t NDIMS>
typename TTypes<T, NDIMS>::Tensor Tensor::tensor() {
  CheckTypeAndIsAligned(DataTypeToEnum<T>::v());
  return typename TTypes<T, NDIMS>::Tensor(base<T>(),
                                           shape().AsEigenDSizes<NDIMS>());
}
由上述代码可见,调用 tensor() 是把 TF Tensor 转化成了 TTypes::Tensor,而后者本质上是 Eigen::TensorMap。至此,我们搞清楚了 TF Tensor 与 Eigen 库的关系,可以认为 TF C++ Tensor 是对 Eigen::TensorMap 的一种封装。因为 Eigen::TensorMap 构造函数的参数来自于 TF Tensor 中保存的信息(base() 和 shape() 对应的信息)。
2.3 C++ Tensor 序列化
在 TensorFlow 的分布式训练环境中涉及大量的跨机通信,通信的内容就是序列化后的张量(通过 send/recv op 对协同工作)。本小节我们将一起学习 Tensor 的序列化机制,以及 Tensor 与序列化对象的互编程。TensorFlow 中 Tensor 对应的序列化对象叫 TensorProto,它是由对应的 proto 文件生成。具体代码如下(seg4):
// tensorflow1.15.5\tensorflow\core\framework\tensor.proto
syntax = "proto3";

message TensorProto {
  DataType dtype = 1;

  TensorShapeProto tensor_shape = 2;

  int32 version_number = 3;

  bytes tensor_content = 4;

  repeated int32 half_val = 13 [packed = true];

  // DT_FLOAT.
  repeated float float_val = 5 [packed = true];

  // DT_DOUBLE.
  repeated double double_val = 6 [packed = true];

  // DT_INT32, DT_INT16, DT_INT8, DT_UINT8.
  repeated int32 int_val = 7 [packed = true];

  // DT_STRING
  repeated bytes string_val = 8;

  // DT_COMPLEX64. scomplex_val(2*i) and scomplex_val(2*i+1) are real
  // and imaginary parts of i-th single precision complex.
  repeated float scomplex_val = 9 [packed = true];

  // DT_INT64
  repeated int64 int64_val = 10 [packed = true];

  // DT_BOOL
  repeated bool bool_val = 11 [packed = true];

  // DT_COMPLEX128. dcomplex_val(2*i) and dcomplex_val(2*i+1) are real
  // and imaginary parts of i-th double precision complex.
  repeated double dcomplex_val = 12 [packed = true];

  // DT_RESOURCE
  repeated ResourceHandleProto resource_handle_val = 14;

  // DT_VARIANT
  repeated VariantTensorDataProto variant_val = 15;

  // DT_UINT32
  repeated uint32 uint32_val = 16 [packed = true];

  // DT_UINT64
  repeated uint64 uint64_val = 17 [packed = true];
};
大家可用 protoc 编译器来编译 tensor.proto 文件,结果生成 tensor.pb.h 和 tensor.pb.cc 两个文件,他们分别声明了 TensorProto 类定义、TensorProto 成员方法的实现。我们可以粗略地将 TensorProto 看作 Tensor 的二进制对象,基于此它们相互之间的转换代码如下所示(seg5):
// Tensor的序列化过程
auto tensor_proto = new TensorProto();
// Fills in `proto` with `*this` tensor's content.
// `AsProtoField()` fills in the repeated field for `proto.dtype()`,
// while `AsProtoTensorContent()` encodes the content in `proto.tensor_content()` in a compact form.
tensor->AsProtoField(tensor_proto);
tensor->AsProtoTensorContent(tensor_proto);

// Tensor的反序列化过程
Tensor tensor;
tensor.FromProto(tensor_proto);
三、跨框架编程 - 通用内存张量 DLPack
3.1 什么是 DLPack
DLPack 是一种开放的内存张量结构,用于在 AI 框架之间共享张量。多框架整合解决 AI 问题,能充分发挥各框架优势(一些运算在某框架中支持更好),并最终取得整体最佳性能。但这里有一个关键问题要解决:如何将内存中的张量从一个框架传递到另一个框架,而不发生任何数据拷贝?幸运的是,陈天奇团队给出了 DLPack 这个答案。
DLPack 的设计理念是尽可能的轻量化,它不考虑内存分配、设备 API,仅仅关注张量数据结构。它可以运行在多个硬件平台上,目前支持的框架有:NumPy、CuPy、PyTorch、Tensorflow、MXNet、TVM、mpi4py。DLPack 的开发者不打算实现 Tensor 和 Ops,而是将其用作跨框架重用张量和操作的公共桥梁。深入理解 DLPack,要掌握两大模块:C API 与 Python API。DLPack C API 体系结构如下:
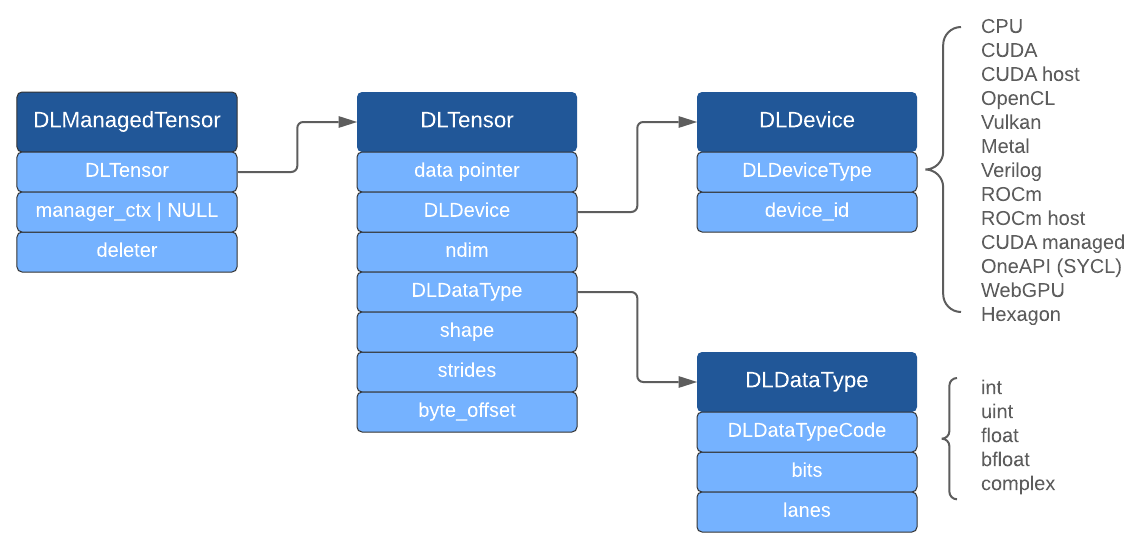
上图中深蓝色的结构体均定义在 [13] 中。DLTensor 代表普通 C Tensor 对象,但不负责内存管理。DLManagedTensor 也是一个 C Tensor 对象,负责 DLTensor 的内存管理,它被设计用来帮助其他框架借用此 DLTensor。接下来,我们将目光转向 DLPack 的 Python API。
DLPack Python 接口是 Python array 的标准 API。用 DLPack Python 接口进行数据交换的接口有两个:
• from_dlpack(x):输入一个包含__dlpack__方法的数组对象,用这个方法构建一个包含 x 数据域的新数组对象。
• __dlpack__(self,stream=None) and __dlpack_device__():在 from_dlpack(x) 内部调用 x 的这两个方法,分别用于获取 x 的数据域以及定位 x 数组对象在哪个设备上。
从语义层面理解 y=from_dlpack(x) 的话,生成 x 的库叫生产者,包含 from_dlpack() 的库叫做消费者。其中生产者提供了访问 x 数据域的途径,通常来说生产者和消费者之间关于相应的数据是零拷贝的,也即 y 可视为 x 的视图。如果深入 from_dlpack(x) 内部,则 x.__dlpack__方法生成包含 DLManagedTensor 的 PyCapsule 对象(或称 capsule),这个对象只能被消费一次。生产者必须将 PyCapsule 对象名称设为"dltensor",以方便按名称检索;同时也要设置 DLManagedTensor 的 deleter 方法给 PyCapsule_Destructor,这个设置是当名为"dltensor"的 capsule 对象不再需要时使用。消费者把 DLManagedTensor 的所有权从 capsule 对象转移至自己,这是通过把 capsule 对象改名为"used_dltensor"以确保 PyCapsule_Destructor 不会被调用来实现的。但当 capsule 对象把 DLManagedTensor 所有权转移至消费者对象时,消费者对象的 destructor 方法仍然可以调用 DLManagedTensor 的 deleter 方法。
3.2 TensorFlow 中的 dlpack
笔者发现 TensorFlow 对 DLPack 的支持是从 v2.2.0 开始的,更早的版本没有 dlpack 相应的库。TensorFlow 的 dlpack 接口与 3.1 遵守相同的语义描述,相应的 API 测试语句如下:
import tensorflow as tf

x = tf.constant(5)
x                     // <tf.Tensor: shape=(), dtype=int32, numpy=5>
r =tf.experimental.dlpack.to_dlpack(x)
print(r,type(r))      // <capsule object "dltensor" at 0x7f55a0431c30> <class 'PyCapsule'>

x_other = tf.experimental.dlpack.from_dlpack(r)
x_other               // <tf.Tensor: shape=(), dtype=int32, numpy=5>
3.3 TVM 与 DLPack 的关系
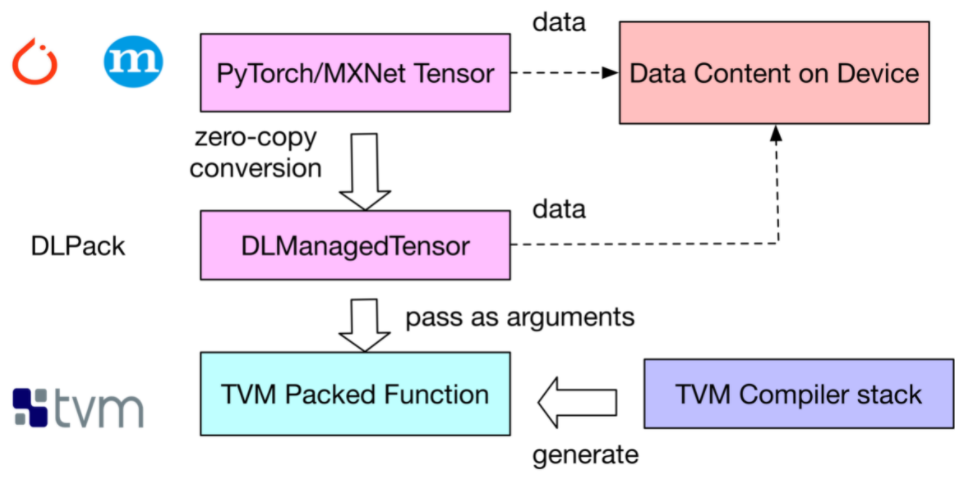
如果你想开发一款跨 AI 框架的深度学习编译器,DLPack 就是一种可行的方案(TVM 就是这条技术路线)。比如,我们在 TVM 中声明并编译一个矩阵乘法算子,然后基于 DLPack 表示构建一个包装器,该包装器能让此矩阵乘法算子支持 PyTorch Tensor。对 MxNet 可以采用类似的操作。DLPack 提供在 AI 框架和 TVM 之间共享的中间包装器的原理如下图所示:
上述原理可以参考如下代码举例:
// 前提说明:在PyTorch中计算矩阵乘法
import torch
x = torch.rand(56,56)
y = torch.rand(56,56)
z = x.mm(y)

// 第一步,定义并构建一个TVM矩阵乘法算子
n = tvm.convert(56)
X = tvm.placeholder((n,n), name='X')
Y = tvm.placeholder((n,n), name='Y')

k = tvm.reduce_axis((0, n), name='k')
Z = tvm.compute((n,n), lambda i,j : tvm.sum(X[i,k]*Y[k,j], axis=k))
s = tvm.create_schedule(Z.op)
fmm = tvm.build(s, [X, Y, Z], target_host='llvm', name='fmm')

// 第二步,对TVM函数进行包装以支持PyTorch Tensor,并验证结果
from tvm.contrib.dlpack import to_pytorch_func
# fmm is the previously built TVM function (Python function)
# fmm is the wrapped TVM function (Python function)
fmm_pytorch = to_pytorch_func(fmm)
z2 = torch.empty(56,56)
fmm_pytorch(x, y, z2)
np.testing.assert_allclose(z.numpy(), z2.numpy())

// 第三步,参照第二步对MxNet进行类似包装处理
import mxnet
from tvm.contrib.mxnet import to_mxnet_func
ctx = mxnet.cpu(0)
x = mxnet.nd.uniform(shape=(56,56), ctx=ctx)
y = mxnet.nd.uniform(shape=(56,56), ctx=ctx)
z = mxnet.nd.empty(shape=(56,56), ctx=ctx)
f = tvm.build(s, [X, Y, Z], target_host='llvm', name='f')
f_mxnet = to_mxnet_func(f)
f_mxnet(x, y, z)
np.testing.assert_allclose(z.asnumpy(), x.asnumpy().dot(y.asnumpy()))

// 第四步,to_pytorch_func()的详细定义
// TVM提供了dlpack tensor和TVM NDArray互转的函数.TVM函数在最底层调用的是TVM NDArray.
// 此包装器的大致流程是: AI Tensor -> dlpack tensor -> TVM NDArray -> call TVM function
def convert_func(tvm_func, tensor_type, to_dlpack_func):
    assert callable(tvm_func)

    def _wrapper(*args):
        args = tuple(ndarray.from_dlpack(to_dlpack_func(arg))\
            if isinstance(arg, tensor_type) else arg for arg in args)
        return tvm_func(*args)

    return _wrapper

def to_pytorch_func(tvm_func):
    import torch
    import torch.utils.dlpack
    return convert_func(tvm_func, torch.Tensor, torch.utils.dlpack.to_dlpack)
四、总结
本文内容较多且烧脑,建议读者反复阅读几遍,定能有所收获。我们在此对通篇内容作个总结,本文主要讲了三个主题:
• 第一部分讲解小白眼中的 Tensor,重点分析了 Tensor 的属性和 OP 的关系。
• 第二部分讲解系统开发者眼中的 Tensor,重点讲解 Tensor 前后端映射,以及 Tensor 的 C++ 定义及序列化。
• 第三部分讲解通用内存张量 DLPack,重点讲解了 DLPack 的定义及在 TensorFlow 中的使用,以及 DLPack 在 TVM 中扮演的角色。
参考文献
1.TensorFlow Introduction: https://github.com/tensorflow/docs/blob/master/site/en/r1/guide/low_level_intro.md
2.TensorFlow Tensors: https://github.com/tensorflow/docs/blob/master/site/en/r1/guide/tensors.md
3.tf.constant 源码: https://github.com/tensorflow/tensorflow/blob/v1.15.5/tensorflow/python/framework/constant_op.py#L165
4.tensorflow 源码解析之 framework-tensor: https://www.cnblogs.com/jicanghai/p/9537282.html
5.TensorFlow c++ Tensor source code: https://github.com/tensorflow/tensorflow/blob/v1.15.5/tensorflow/core/framework/tensor.h
6.TensorFlow c++ Tensor source code: https://github.com/tensorflow/tensorflow/blob/v1.15.5/tensorflow/core/framework/tensor.cc
7.《TensorFlow: A System for Large-Scale Machine Learning》: https://www.usenix.org/system/files/conference/osdi16/osdi16-abadi.pdf
8.tensorflow-internals.pdf: https://github.com/horance-liu/tensorflow-internals
9.DLPack doc: https://dmlc.github.io/dlpack/latest/
10.DLPack github: https://github.com/dmlc/dlpack
11.DLPack CAPI: https://dmlc.github.io/dlpack/latest/c_api.html
12.Python Specification for DLPack: https://dmlc.github.io/dlpack/latest/python_spec.html
13.dlpack.h: https://github.com/dmlc/dlpack/blob/main/include/dlpack/dlpack.h
14.Building a Cross-Framework Deep Learning Compiler via DLPack: https://tvm.apache.org/2018/08/10/DLPack-Bridge