通用技术 Python winreg 注册表操作以及如何添加右键快捷菜单
吐槽
先吐槽下,Python 的注册表操作库,winreg 真是难用
权限问题
写完的 Python 脚本必须用管理员权限运行,才能对注册表进行写操作。否则会报 PermissionError 异常
这个时候需要调用 Windows 的 API,重新启动一遍程序 runas administrator,将原来的程序退出。
代码也很简单
from __future__ import print_function
import ctypes, sys

def is_admin():
    try:
        return ctypes.windll.shell32.IsUserAnAdmin()
    except:
        return False
if is_admin():
    # 将要运行的代码加到这里
else:
    if sys.version_info[0] == 3:
        ctypes.windll.shell32.ShellExecuteW(None, "runas", sys.executable, __file__, None, 1)
    else:#in python2.x
        ctypes.windll.shell32.ShellExecuteW(None, u"runas", unicode(sys.executable), unicode(__file__), None, 1)
参考资料: python 如果获取 windows 管理员权限(一)
Python 代码实现注册表编辑
改成 Python 代码怎么写呢。这里需要用到 python 的 winreg 库。(Python2 的叫_winreg)
OpenKey
先说下 OpenKey 这个函数的返回值可以作为下面函数的第一个参数。
SetValue, SetValueEx, DeleteValue,CreateKey, DeleteKey 等等
看下这个函数的用法
Opens the specified key.

  key
    An already open key, or any one of the predefined
  sub_key
    A string that identifies the sub_key to open.
  reserved
    A reserved integer that must be zero.  Default is
  access
    An integer that specifies an access mask that desc
    security access for the key.  Default is KEY_READ.
使用例子
import winreg
key = winreg.OpenKey(winreg.HKEY_CLASSES_ROOT, "") # 默认OpenKey是只读的,但是在key的下面创建SubKey确实允许的
shellkey = winreg.CreateKey(key, "*\\shell") # 如果subkey已经存在了,就自动打开,返回subkey
winreg.CloseKey(key)
还有一个函数叫OpenKeyEx,但是看文档跟OpenKey一模一样,我们就不用那个了。
注意: CreateKey 的时候,第二个参数我用的是反斜杠 "\", 千万不能换成 "/"
我们继续先前的代码继续写
SetValue 与 SetValueEx
SetValue跟SetValueEx的区别很大。
先说 SetValue 函数
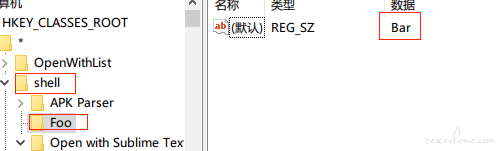
winreg.SetValue(shellkey, "Foo", winreg.REG_SZ, "Bar")
第三个参数没得商量,只能是winreg.REG_SZ
其中 Foo 是 shellkey 下面创建的子建。Bar 则是子建中 (默认) 对应的值。
换成 SetValueEx 函数,我们再看看效果
key = winreg.OpenKey(winreg.HKEY_CLASSES_ROOT, "*\\shell", 0, winreg.KEY_WRITE)
winreg.SetValueEx(key, "Foo", 0, winreg.REG_SZ, "Bar")
# SetValueEx的第四个单数除了`winreg.REG_SZ`也可以是其他的,比如`winreg.REG_BINARY`
打开注册表看看修改的结果
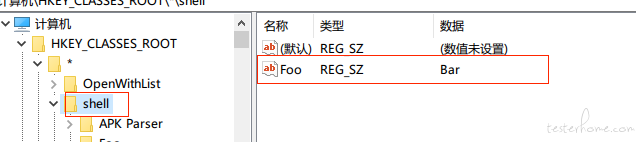
没有新建子建(PS: 这个样子才是 SetValue 正常的样子嘛)
QueryValue 和 QueryValueEx
查询QueryValue对应SetValue, QueryValueEx对应SetValueEx. 这里建议都用QueryValueEx
key = winreg.OpenKey(winreg.HKEY_CLASSES_ROOT, "*\\shell")
winreg.QueryValueEx(key, "Foo")
# Return ('Bar', 1)  # (Value, Id)

# Read (默认)值
winreg.QueryValueEx(key, "")
DeleteValue
DeleteValue 表现的就比较正常
winreg.DeleteValue(key, "Foo") # key需要有写权限
DeleteKey
最后就是最坑爹的 DeleteKey 了。先看看文档
Deletes the specified key.

  key
    An already open key, or any one of the predefined HKEY_* consta
  sub_key
    A string that must be the name of a subkey of the key identifie
    the key parameter. This value must not be None, and the key may
    have subkeys.

This method can not delete keys with subkeys.

If the function succeeds, the entire key, including all of its valu
is removed.  If the function fails, an OSError exception is raised.
其中有一句意思是要删除的 key,不能包含 subkey。但是 CreateKey 却可以写任意长的路径。
# Create a long path
winreg.CreateKey(winreg.HKEY_CLASSES_ROOT, "*\\shell\\wow\\foo\\bar")

# Hava to delete one by one
winreg.DeleteKey(winreg.HKEY_CLASSES_ROOT, "*\\shell\\wow")
# Will Raise PermissionError: [WinError 5] 拒绝访问。

# Bellow is Right way
winreg.DeleteKey(winreg.HKEY_CLASSES_ROOT, "*\\shell\\wow\\foo\\bar")
winreg.DeleteKey(winreg.HKEY_CLASSES_ROOT, "*\\shell\\wow\\foo")
winreg.DeleteKey(winreg.HKEY_CLASSES_ROOT, "*\\shell\\wow")
查看一个 Key 下是所有子健 winreg.QueryInfoKey 和 winreg.EnumKey 混合着用
key = winreg.OpenKey(winreg.HKEY_CLASSES_ROOT, "*\\shell")
winreg.QueryInfoKey(key)
# (5, 1, 131726427772537232)   对应subkey数量,当前key的values数,修改时间
winreg.EnumKey(key, 0)
# 'APK Parser'  # 返回subkey的名字
winreg.EnumValue(key, 0)
# ('Foo', 'Bar', 1) # Key, Value, Type
实现递归删除
winreg.CreateKey(winreg.HKEY_CLASSES_ROOT, "*\\shell\\wow\\foo\\bar")

def rdelete(key, subkey):
    qkey = winreg.OpenKey(key, subkey)
    ksize, _, _ = winreg.QueryInfoKey(qkey)
    for i in range(ksize):
        name = winreg.EnumKey(qkey, i)
        rdelete(key, subkey + "\\" + name)
    winreg.DeleteKey(key, subkey)

rdelete(winreg.HKEY_CLASSES_ROOT, "*\\shell\\wow")
关联到右键菜单(手动实现)
先说下手动如何完成。
Win+R输入regedit 打开注册表编辑器。
定位到 HKEY_CLASSES_ROOT\*\shell层级
然后右键shell,新建 -> 项,填写名字 比如 Apk parser

右键菜单里面显示的就是(默认)这个名称对应的值,如果为空的话,显示的是左边那个文件夹的名字 Apk Parser
Apk parser下面再新建一个 Key command.
(默认) 对应的值,就是右键执行调用的命令。 "%1"代表文件的名字
关联到右键菜单(代码实现)
下面完成一个简单的右键 apk 文件实现安装的例子。
首先把 adb.exe 转移到C:\adb\adb.exe。
图标文件

放到%USERPROFILE%目录下,命名为ApkInstaller.ico
修改注册表最简单的方法就是把下面的内容,保存成文件 apk-install.reg。然后双击
内容
Windows Registry Editor Version 5.00

[HKEY_CLASSES_ROOT\*\shell\apkinstaller]
@="APK Installer"
"Icon"="%UserProfile%\\ApkInstaller.ico"

[HKEY_CLASSES_ROOT\*\shell\apkinstaller\command]
@="C:\\adb\\adb.exe install \"%1\""
使用 Python 的写法为
with winreg.CreateKey(winreg.HKEY_CLASSES_ROOT, "*\\shell\\apkinstaller") as key:
    winreg.SetValueEx(key, "", 0, winreg.REG_SZ, "APK Installer")
    winreg.SetValueEx(key, "Icon", 0, winreg.REG_SZ, "%USERPROFILE%\\ApkInstaller.ico")

with winreg.CreateKey(winreg.HKEY_CLASSES_ROOT, r"*\shell\apkinstaller\command") as key:
    winreg.SetValueEx(key, "", 0, winreg.REG_SZ, "C:\\adb\\adb.exe install \"%1\"")
运行完代码之后,这时随便找一个文件右键,就可以看到我们新添加的菜单了。
其中.*代表所有文件,也可以换成其他的
- AllFileSystemObjects: 所有文件和文件夹
- Folder: 所有文件夹
- Directory: 所有文件夹(不知道为啥有两个)
- Directory\Background 空白处右击
参考资料
- CSDN Windows 特定文件添加右键菜单
- https://docs.python.org/3/library/winreg.html
- Add APK Installer to Windows File Explorer Context Menu
- 双击安装 apk 的方法 https://github.com/QianChenglong/apk-instll
Python winreg 的二次封装, 有不少,但感觉都一般