从我的博客搬运
劝退帖 :P
nGrinder 是对 Grinder 的封装,本来 Grinder 只支持 Jython,nGrinder 3.2.1+ 加入了对 Groovy 的支持,用的是改造过的 JUnit 框架,比原版脚本强大得多。
nGrinder 架构简介, 2017-03
nGrinder 的 Groovy 脚本使用指南(Groovy 脚本结构), 2017-03
nGrinder 的 Groovy 脚本使用指南(Groovy maven 结构), 2017-03https://github.com/naver/ngrinder/wiki/Groovy-Script-Structure
更多高级用法:
https://github.com/naver/ngrinder/wiki/Scripting-Guide
https://github.com/naver/ngrinder/wiki/Groovy-Script-Snippet
这篇文章的作用基本上是标出雷区劝人绕道——对不是专职做性能测试的人来说,要写/改代码的场景都太麻烦,难以发挥 nGrinder 开箱即用的优势。
脚本结构
@RunWith(GrinderRunner)  // 每个测试类加这注解
class TestRunner {
    @BeforeProcess  // 在每个进程启动前执行
    public static void beforeProcess() {
        // 加载资源文件、初始化 GTest 等
    }

    @BeforeThread  // 在每个线程执行前执行
    public void beforeThread() {
        // 登录、设置 cookie 之类
    }

    @Before  // 在每个 @Test 注解的方法执行前执行
    public void before() {
        // 设置变量、多个 @Test 方法共用的逻辑等
    }

    @Test  // 在测试结束前不断运行。各个 @Test 注解的方法异步执行。
    public void foo() {
        // ...
    }

    @Test
    public void bar() {
        // ...
    }

    @After  // 在每个 @Test 注解的方法执行后执行
    public void after() {
        // 很少用到
    }

    @AfterThread
    public void afterThread() {
        // 登出之类
    }

    @AfterProcess  // 在每个进程结束后执行
    public static void afterProcess() {
        // 关闭资源
    }
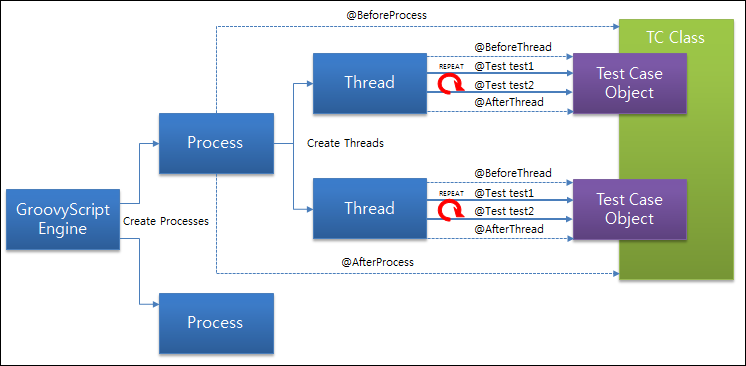
(图片来源:nGrinder 官方 wiki)
header
- 方法 1:通过 UI 设置:脚本 -> 新建脚本 -> 显示高级配置。
- 加
User-Agent头比较方便,输入框里双击就出来默认值。
- 加
- 方法 2:改脚本:
2-A. 在 @BeforeProcess 注解的方法里添加:(相当于方法 1)
List<NVPair> headerList = new ArrayList<NVPair>()
headerList.add(new NVPair("Content-Type", "application/json"))
// ...
headers = headerList.toArray()
2-B. 修改开头的成员变量:
public static NVPair[] headers = [
    new NVPair("Content-Type", "application/json")
]
2-C. 在 @Test 注解的方法的请求参数里添加:
def result = request1.POST("http://example.com",
    params,
    [new NVPair("Content-Type", "application/json")] as NVPair[])
gzip
// nGrinder 不会自动解压,通常在 @beforeProcess 注解的方法里加上:
HTTPPluginControl.getConnectionDefaults().setUseContentEncoding(true)

// 然后在设 header 的地方加上:
headerList.add(new NVPair("Accept-Encoding", "gzip"))
请求参数
form
- 方法 1:通过 UI 设置:脚本 -> 新建脚本 -> 显示高级配置
- 方法 2:改脚本:
2-A. 在 @BeforeProcess 注解的方法里添加:(相当于方法 1)
List<NVPair> paramList = new ArrayList<NVPair>()
paramList.add(new NVPair("accessToken", accessToken))
// ...
params = paramList.toArray()
2-B. 修改开头的成员变量:
public static NVPair[] params = [
    new NVPair("accessToken", "9de6d5f2b62d4bb686de8033fd00bc65")
]
2-C. 在 @Test 注解的方法的请求参数里添加:
def result = request1.POST("http://example.com",
    [new NVPair("accessToken", accessToken)] as NVPair[],
    headers)
JSON
def json = '{"userId": ["100180"]}';
request.POST("http://you_api_url", json.getBytes(), [
    new NVPair("Content-Type", "application/json"
] as NVPair[])
http://grinder.sourceforge.net/g3/script-javadoc/net/grinder/plugin/http/HTTPRequest.html
通过 UI 传參
限制很多,只能传 1 个参数(保存到名为 param 的属性),值只能由 1-50 个数字字母、_、,、.、| 组成,不能有空格。
// 获取 UI 传入的字符串
def foo = System.getProperty("param")

// 带默认值
def foo = System.getProperty("param", "XXX")

// 3.2.3+ 可以放开自动生成的脚本里 import static net.grinder.util.GrinderUtils.* 的注释
/* GrinderUtils 类有以下静态方法:
getParam()
getParam(String)
getParamInt()
getParamLong()
getParamFloat()
getParamDouble()
getParamBoolean()
*/
https://github.com/naver/ngrinder/wiki/How-to-pass-a-parameter-to-the-script
返回内容
断言
使用 JUnit 的断言:
def result = request.GET("http://www.google.com")

// HTTP 状态码
assertThat(result.statusCode, is(200))
// 响应体
assertThat(result.text, containsString("google"))
解析 JSON
假设服务器返回以下内容,成功标志是 "resultCode": 1:
{
    "data": {
        "token": "9de6d5f2b62d4bb686de8033fd00bc65"
    },
    "resultCode": 1
}
import groovy.json.JsonSlurper

// ...

def jsonData = new JsonSlurper().parseText(result.text)
assertThat(jsonData.resultCode, is(1))
提取参数
GrinderRunner 每个线程只创建 1 个测试用例对象,所以 @Test 注解的方法可以共享成员变量:
private String token

@Test
public void test1() {
    // ...
    if (jsonData.resultCode == 1) {
        token = jsonData.data.token
        test2()
    }
}

// 希望顺序执行的场合,不加 @Test,让别的方法调
public void test2() {
    // 打 log
    grinder.logger.info(this.token)

    def result = request.POST("http://192.168.3.231/auth2/v2/user/getSimpleUser",
        '{"userId": ["100180"]}'.getBytes(),
        [
            new NVPair("Content-Type", "application/json",
            new NVPair("access-token", this.token)
        ] as NVPair[]
    )
    // ...
}
【注意】目前这块的支持很差,不推荐这样用:
- 如果 1 个脚本里调了多个接口,详细报告里看不出这些接口分别是什么、响应时间和 TPS 分别多少。
- 如果某个方法断言成功,即使其他方法抛异常也不会反映在 UI 的错误数里,看 log 才能发现问题。
定义多个事务
【注意】目前 UI 对这块的支持很差,详细报告里只有总体情况,想看各个事务的数据只能下载 CSV 自己写程序解析。
public static GTest test1
public static GTest test2

// ...

@BeforeProcess
public static void beforeProcess() {
    test1 = new GTest(1, "foo_stats")  // 参数为 ID、显示名
    test2 = new GTest(2, "bar_stats")
    // ...
}

@BeforeThread
public void beforeThread() {
    test1.record(this, "foo")  // 参数为 this、@Test 注解的方法名
    test2.record(this, "bar")
    // ...
}

@Test
public void foo() {
    // ...
}

@Test
public void bar() {
    // ...
}
不同权重
@RunRate(50)  // 数字代表百分比
@Test
public void test1() {
    // ...
}

@RunRate(20)
@Test
public void test2() {
    // ...
}
如果权重加起来不到 100,剩下的时间什么也不干。
修改默认脚本模板
nGrinder 没有放出模板,只能改源码:
修改 ngrinder-controller/src/main/resources/script_template/basic_template_groovy.ftl 内容,重新打包。
资源文件
在脚本文件同级目录下建 resources 目录,上传资源文件。
【缺点】多个脚本使用同样的资源文件时不方便,只能把这些脚本放在同一个目录下,除非建 Groovy Maven 工程。
文本:
static String text
@BeforeProcess
public static void beforeProcess() {
    // ...
    text = new File("./resources/foo.txt").text
}
CSV:
非常麻烦,建议换个工具:
nGrinder 参数使用, 2017-08
外部库
在脚本文件同级目录下建 lib 目录,jar 包放进去就能在脚本里引用。
【缺点】多个脚本使用同样的库时不方便,只能把这些脚本放在同一个目录下,除非建 Groovy Maven 工程。
Groovy Maven Structure
https://github.com/naver/ngrinder/wiki/Groovy-Maven-Structure
