一直以来都喜欢用思维导图的方式去写用例,或者记录一些要做的任务。逻辑清晰,模块化的拖拽、下钻等等,写起来很快,提高我们的工作效率。
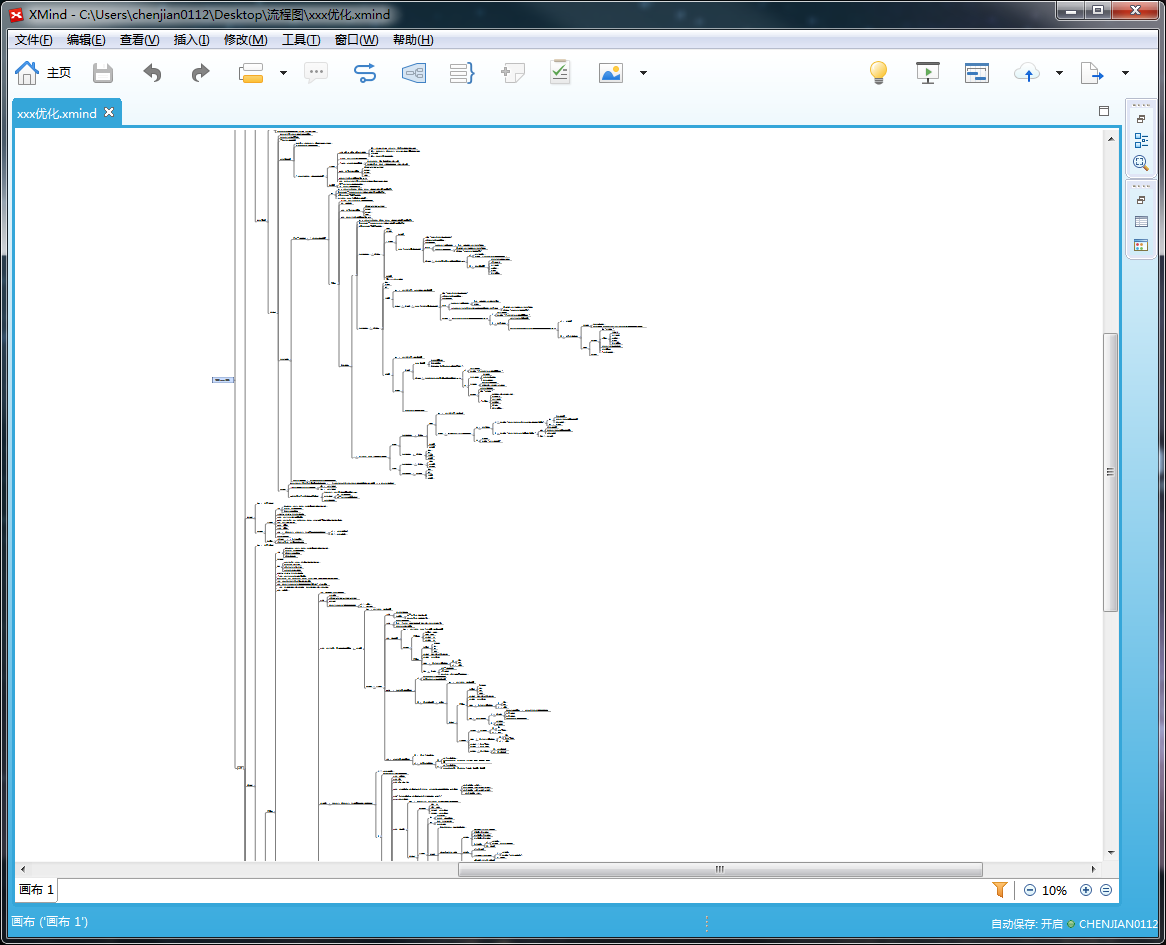
但如果任务细化到一定程度,思维导图的展示会难看,放大了看不清逻辑关系,缩小了又看不清具体描述。
就像这样:
还有这样:

通过 python 脚本,及 reactjs 前端技术,写了这个转换方法。
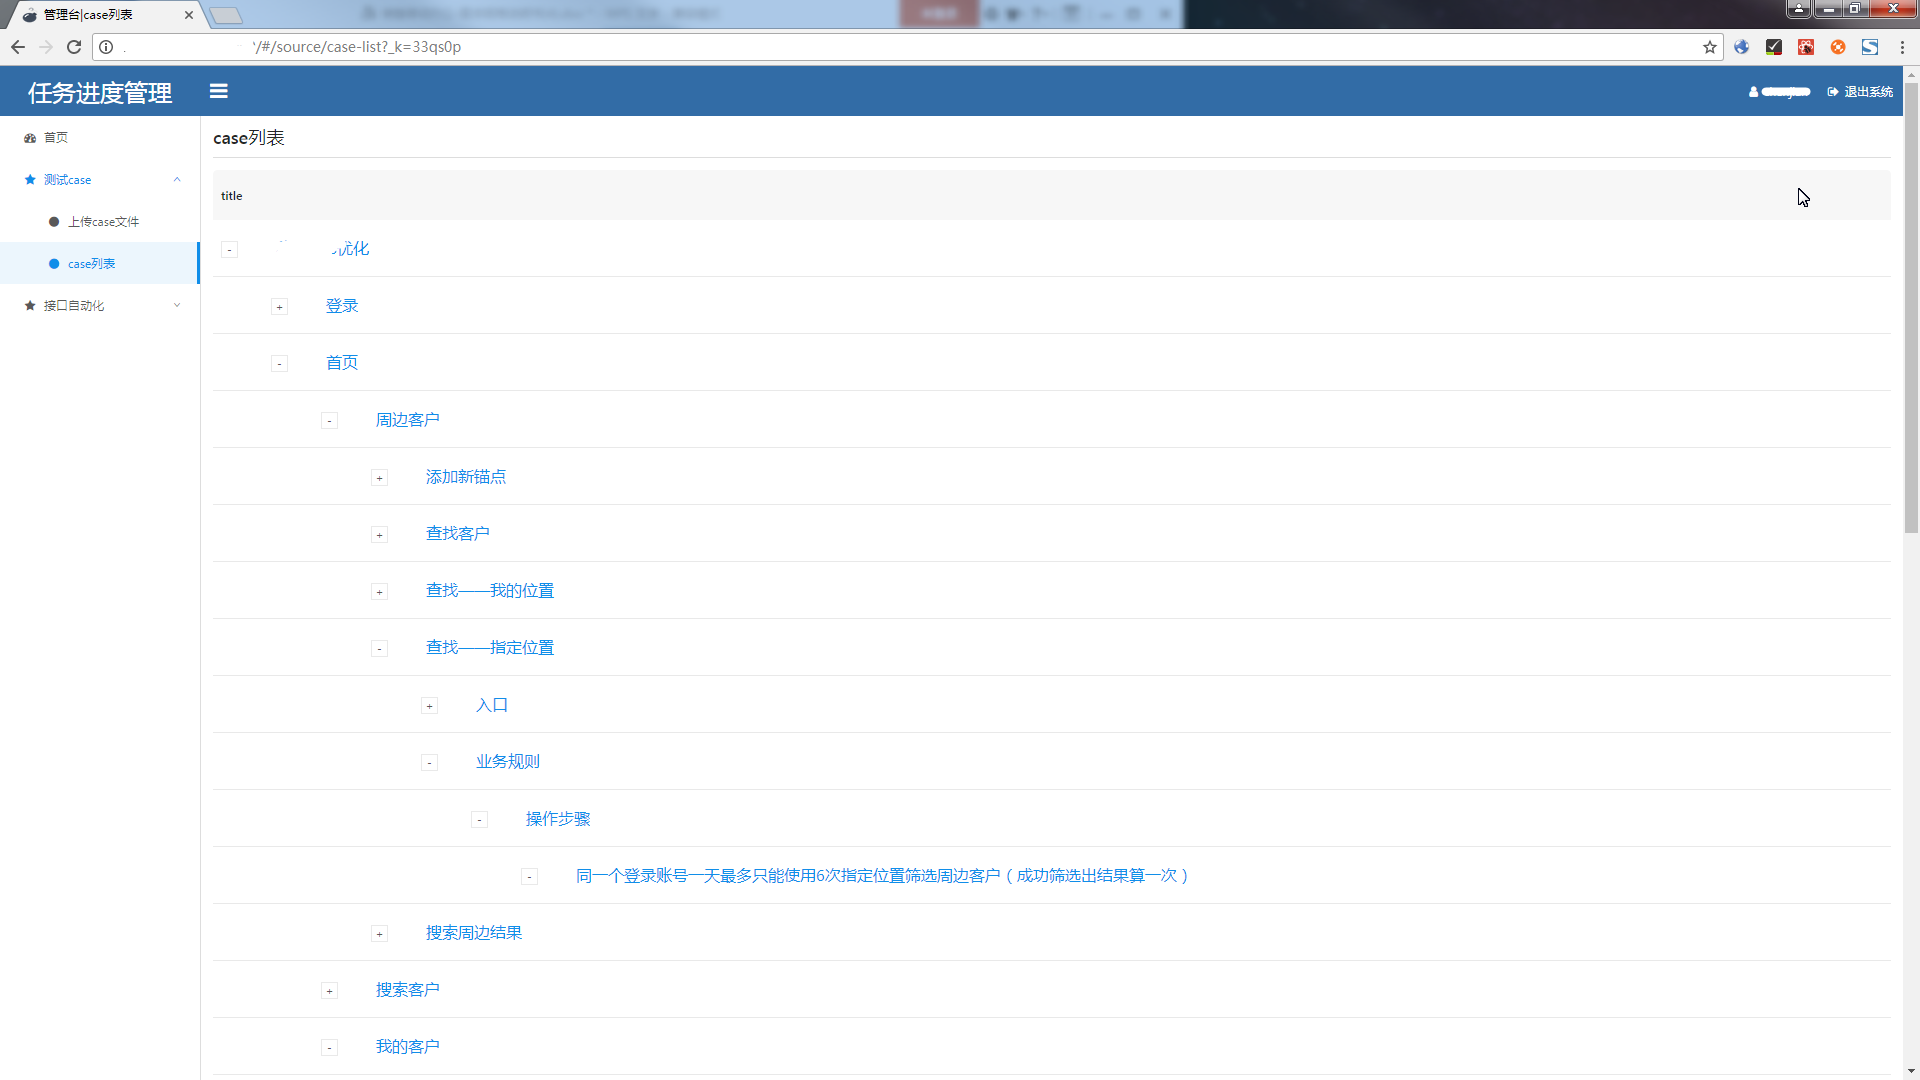
最终可以展示成这样:
先简单说下我的工作步骤:
1.Xmind,编写用例,导出为 html 文件。
2.上传到后台服务端,文件存到指定位置。
3.前台发起请求后台处理上传的文件并格式化返回,前台展示数据。
我一般都是写的逻辑向右的导图,首先我们把 xmind 的用例导出为 html,导出页面上不要勾选任何选项。例如我的导出文件为 test.html。
虽然导出的已经 html 了,但毫无格式可言,看起来是很吃力的。
通过脚本提取其中有用数据,并给它们每条一个 id 编号。
file = open('app/static/uploads/test1.html').read()
soup = BeautifulSoup(file)
allData = []
count = 1
for k in soup.find_all('a'):
    value = k.text.replace(u'\xa0', u'$')
    allData.append([count, value])
    count += 1
这里看到 ‘replace(u'\xa0', u'$')’ 需要说明下,导出的数据他们的父子关系主要是靠空格来区分,这里\xa0 就是空格,方便后面数据转换,我把它们替换成了'$',所以可以说,我们的导图文本里不能写这个关键字,不然会有错误。
下面就是给它们理清楚出父子关系了。
sz = []
allData[0].append(0)
allData[1].append(0)
sz.append(allData[0])
sz.append(allData[1])
for i in range(len(allData)):
    if i > 1:
        prew_index = len(allData[i - 1][1]) - len(allData[i - 1][1].replace('$', ''))
        now_index = len(allData[i][1]) - len(allData[i][1].replace('$', ''))
        if now_index - prew_index == 1:
            allData[i].append(allData[i - 1][0])
        elif now_index - prew_index == 0:
            try:
                allData[i].append(allData[i - 1][2])
            except:
                print allData[i - 1]
        elif now_index - prew_index < 0:
            for l in range(0, len(sz)):
                # 找新数组
                _prew_index = len(sz[(len(sz) - 1) - l][1]) - len(sz[(len(sz) - 1) - l][1].replace('$', ''))
                if now_index - _prew_index == 0:
                    allData[i].append(sz[(len(sz) - 1) - l][2])
                    break
        sz.append(allData[i])
获取到的 sz 数组,就是当前导出的数据格式化数据了,每条数据都有个自己的 id,名字,父 id。但我的 reactjs 前端页面需要的是,有子集的树形结构数据。
通过下面的遍历方法把数据再次格式化处理:
def getchild(pid):
    result = []
    for obj in sz:
        if obj[2] == pid:
            result.append({
                "id": obj[0],
                "title": obj[1].replace('$',''),
                "pid": obj[2],
                "children": getchild(obj[0]),
            })

    return result

newResult = getchild(0)
for item in range(1, len(newResult)):
    newResult[0]["children"].append(newResult[item])
for item in range(1,len(newResult)):
    newResult.pop()
到这里,数据处理的核心部分已经完成了。但要给前端页面展示,我还要把脚本封装到服务端,并通过接口传给前端页面。
我用的 flask,提供 restful 接口。
前端部分用的是 react 框架,主要是用 antd 的 ui 库:
核心部分如下:
class CaseList extends React.Component{
    state = {
        fetch_data:[],
        ...

    }
    fetchList=()=>{
        var par = "entry=0"
        fetch('http://192.168.1.101:5000/gettasklist',{
            method: "POST",
            mode: "cors",
            headers: {
                "Content-Type": "application/x-www-form-urlencoded"
            },
            body: par
        })...
    }
    render(){
        const { fetch_data} = this.state;
        const columns = [ {
            title: 'title',
            dataIndex: 'title',
            key: 'title',
            render: text => <a style={{marginLeft:30,fontSize:16}}>{text}</a>,
        }];
        return(
            <Page title="case列表" loading={this.state.isLoading}>
                <Table rowKey="id" columns={columns} dataSource={fetch_data} indentSize={50}/>
            </Page>
        );
    }
}
实际使用时,我是通过一个上传页面直接上传导出文件到服务器的。
<Page title="上传导出文件" loading={this.state.isLoading}>
    <div style={{alignItems:'center', justifyContent:"center",display:'flex',flex:1, flexDirection:'column',
        marginTop:"20%"}}>
        <Upload {...props}>
            <Button>
                <Icon type="upload" /> Select File
            </Button>
        </Upload>
        <Button
            className="upload-demo-start"
            type="primary"
            onClick={this.handleUpload}
            disabled={this.state.fileList.length === 0}
            loading={uploading}
            style={{marginTop:20}}
        >
            {uploading ? 'Uploading' : 'Start Upload' }
        </Button>
    </div>
</Page>
后续还将优化前端和脚本生成的数据,通过写入数据库,前端可以执行测试通过、已完成等,以记录我们的测试点的执行状态。
用 python 将思维导图转换成树形列表 (二)