MQC 为大家提供了海量的适配真机、强大的在线录制、遍历的用例管理、定制化的报告展示等功能,这篇文章将会通过一个 DEMO 教会大家如何利用好 MQC 提供的这些服务来回归测试自己的 App。
如何使用 MQC 功能测试服务?
Appium 基础篇有提到,desired capabilities 会提供 appium 运行时的各项环境参数,MQC 在功能测试开始前会动态生成 desired capabilities 类,用户脚本只需要调用相关 api 即可快速启动 Appium。
import desired_capabilities

def setUp():
    desired_caps = desired_capabilities.get_desired_capabilities()
    uri = desired_capabilities.get_uri()
    driver = webdriver.Remote(uri, desired_caps)
除此之外,MQC 提供了许多定制化的操作,只需要按照格式进行简单的 log 打印,就可以实现记录步骤、截图、记录执行状态等等操作,使得报告更加完善。当然,不打日志同样可以使用功能测试服务,只需要上传一个可执行的 main.py 文件 (打包成 zip 文件)。
# 步骤1: 等待5s
print "STEP : 等待5s"
# 判断该步骤执行状态,FATAL : exception, 表示该步骤失败; ASSERT : true, 表示该步骤成功; ASSERT : false, 表示该步骤失败且该用例也失败
print "FATAL : element not found"
# 为该步骤截图
print "SCREENSHOT : 1"
一个合理且容易被解析的日志结构应该如下:
STEP : 等待5s
SCREENSHOT : 0
STEP : 点击控件:com.hexin.plat.android.ShenWanHongYuanSecurity:id/launch_ad
FATAL : element not found
SCREENSHOT : 1
STEP : 等待5s
SCREENSHOT : 2
STEP : 点击控件:请输入您有效的手机号
ASSERT : true
SCREENSHOT : 3
那么,我们可以把上篇文章的 DEMO 进行改造,脚本如下:
# -*- coding: UTF-8 -*-
import unittest
import time
import sys

from appium import webdriver
from time import sleep
from unittest import TestCase
from appium.webdriver.common.touch_action import TouchAction
from selenium.webdriver.common.touch_actions import TouchActions

class MqcAppium(TestCase):
    #设备宽高
    global width
    global height

    #unittest 启动
    def setUp(self):
        desired_caps = self.get_desired_capabilities()
        uri = "http://localhost:4723/wd/hub"
        retry = 0
        while retry < 2:
            try:
                self.driver = webdriver.Remote(uri, desired_caps)
                break
            except Exception, e:
                retry += 1
                if retry == 2:
                    raise e
        sleep(10)
        # 获取当前设备分辨率
        self.window_size  = self.driver.get_window_size()
        self.width = self.window_size["width"]
        self.height = self.window_size["height"]

    # unittest 用例,用 test_**** 命名
    def test_login(self):
        #大部分app启动后会有动画,启动延迟等,视情况预留启动延迟
        sleep(5)

        #通过 resource-id 与 index 查找 个人中心 控件
        navPerson = self.wait_for_element(id="com.yunos.mqc:id/id_indicator_discovery", index=3);
        navPerson.click()

        #通过 text 查找 尚未登录
        noLogin = self.wait_for_element(xpath=("//*[@text='%s']" % ("尚未登录")));
        noLogin.click()

        #通过 xpath、resource-id 多种方式定位登录控件,避免有些手机上 xpath 失效或者不一致的情况
        inputUsername = self.wait_for_element(xpath="//android.widget.FrameLayout[1]/android.widget.LinearLayout[1]/android.widget.FrameLayout[1]/android.widget.LinearLayout[1]\
        /android.widget.FrameLayout[1]/android.widget.LinearLayout[1]/android.widget.LinearLayout[1]/android.widget.EditText[1]", id="com.yunos.mqc:id/custom_account")
        inputUsername.click()
        inputUsername.send_keys("mqc_test")

        inputPassword = self.wait_for_element(xpath="//android.widget.FrameLayout[1]/android.widget.LinearLayout[1]/android.widget.FrameLayout[1]/android.widget.LinearLayout[1]/\
        android.widget.FrameLayout[1]/android.widget.LinearLayout[1]/android.widget.LinearLayout[1]/android.widget.EditText[2]", id="com.yunos.mqc:id/custom_passwd")
        inputPassword.click()
        inputPassword.send_keys("123456")

        login = self.wait_for_element(id="com.yunos.mqc:id/custom_loginBtn")
        login.click()

        #返回 广场 并且向下滑动
        navGround = self.wait_for_element(id="com.yunos.mqc:id/id_indicator_discovery", index=0);
        navGround.click()

        #与前文 swipe 函数不同的是,为了兼容不同分辨率的手机,滑动操作应当使用 比例 而非 绝对坐标,当然,若是需要精确地滑动操作,建议使用scrollTo
        self.swipe([[0.5, 0.7], [0.5, 0.6], [0.5, 0.5], [0.5, 0.4], [0.5, 0.3]])

    def tearDown(self):
        try:
            self.driver.quit()
        except:
            pass

    def swipe(self, points):
        last_x = 0
        last_y = 0
        swipe_action = TouchAction(self.driver)
        for i in range(0, len(points)):
            x=float(points[i][0]) * self.width
            y=float(points[i][1]) * self.height
            if i == 0:
                swipe_action = swipe_action.press(None, x, y).wait(20)
            elif i == (len(points) - 1):
                swipe_action = swipe_action.move_to(None, x - last_x, y - last_y).release()
                swipe_action.perform()
            else:
                swipe_action = swipe_action.move_to(None, x - last_x, y - last_y).wait(20)
            last_x = x
            last_y = y

    def wait_for_element(self, xpath=None, id=None, index=None, timeout=3):
        startTime = time.time()
        nowTime = time.time()
        while nowTime - startTime < timeout:
            # 通过 xpath 查找控件
            try:
                if xpath is not None:
                    el = self.driver.find_element_by_xpath(xpath)
                    return el
            except:
                pass

            # 通过 id 查找控件
            try:
                if id is not None:
                    if index is not None:
                        return self.driver.find_elements_by_id(id)[index]
                    else:
                        return self.driver.find_element_by_id(id)
            except:
                pass

            sleep(1)
            nowTime = time.time()
        raise Exception("Element xpath[%s] id[%s] index[%s] not found" % (xpath, id, index))

if __name__ == '__main__':
    try: unittest.main()
    except SystemExit: pass
准备好脚本后,就可以到 MQC 平台进行提测了:
1.将这个脚本打包成 zip 包,到 MQC 主页 添加待测 app, 之后进入用例库页面

2.创建一个新用例,取名为 登录
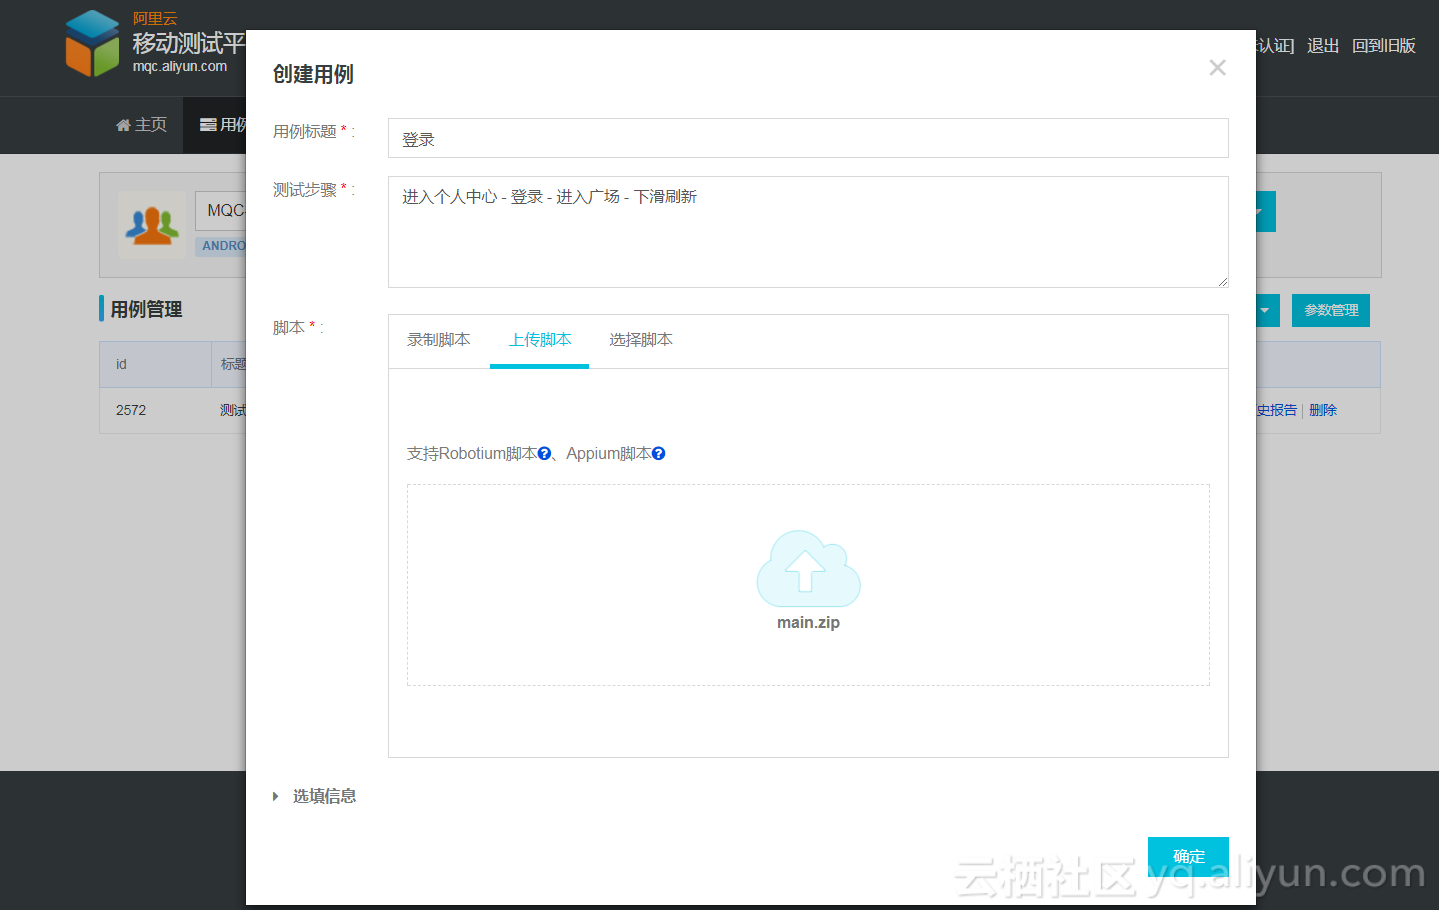
3.进入功能测试提测页面进行用例提测, 用户自己上传脚本创建用例需选中已上传用例,使用在线录制服务创建的用例需选择已录制用例
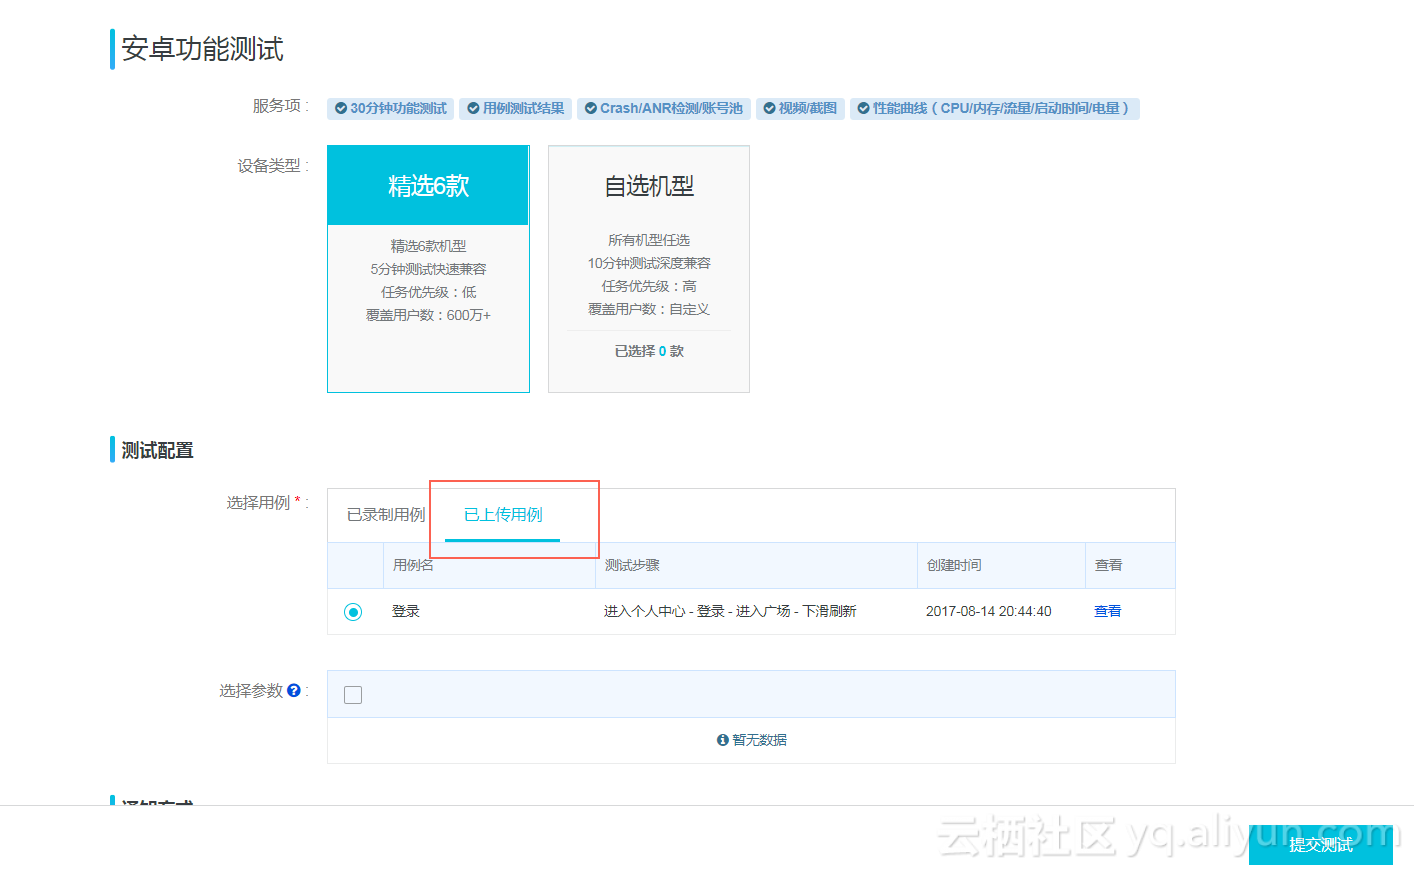
4.将上面的 DEMO 脚本提测后,24 小时内便可查看测试报告。
怎么使用在线录制?
大家写功能测试脚本的时候一定有想过录制回放这样的功能,就是通过工具把操作录制下来,而后再通过引擎回放录制的动作。在线录制结合了云真机机型多的优势,提供了这么一项在线服务。在线录制可以大大加速用例的生成,但是,一个好的用例是需要不断地验证打磨的,除了基本的点击、滑动操作外,若您有具体的功能验证需求,如图片上传、随机密码键盘等等,都是需要有经验的工程师来修改完善脚本的, 在线录制仅仅是用例脚本设计中的第一步。当然,若您有复杂的用例设计需求,也可以联系我们,通过在阿里云购买人工支持用例设计,让阿里云的测试专家为您的 app 量身定制用例。
在使用在线录制的时候,可以看到下图所示界面
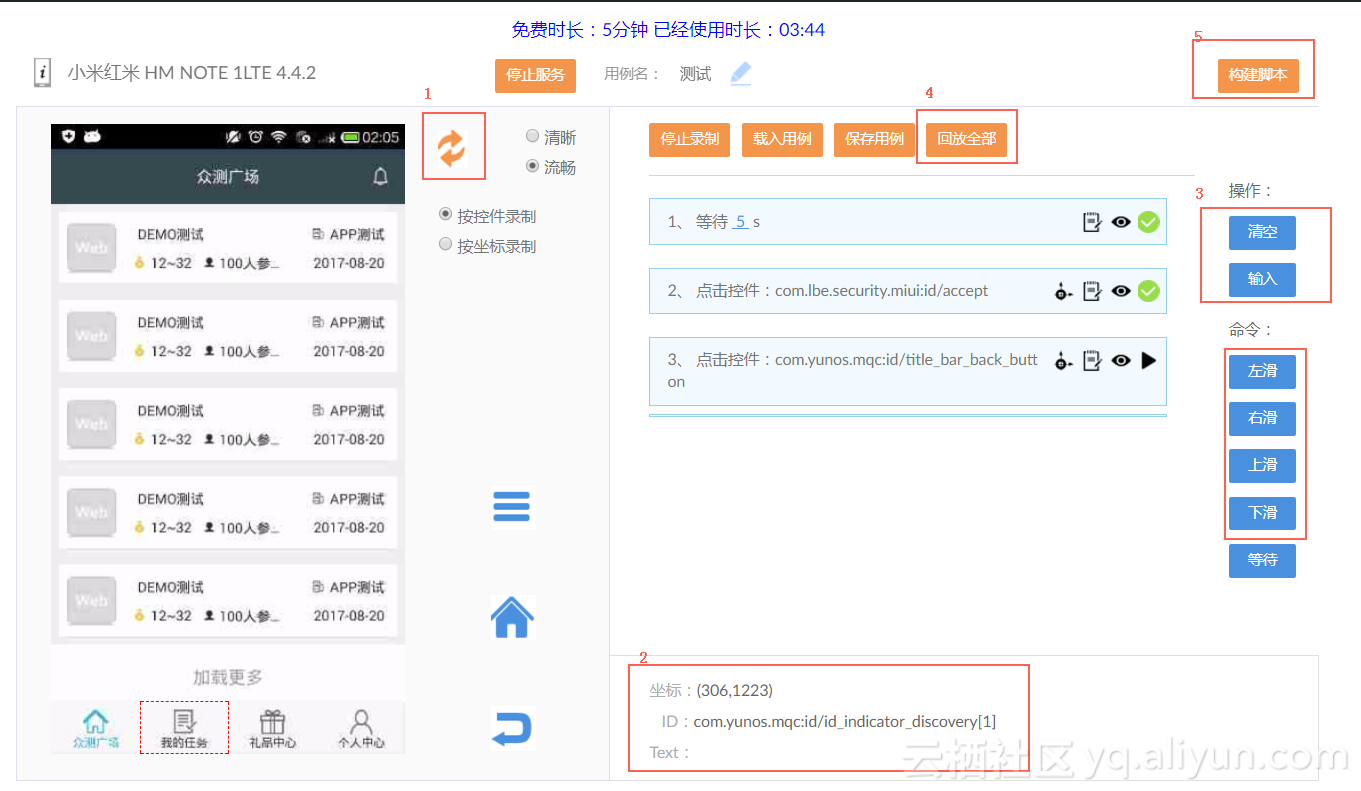
1.在点击的时候若出现控件树不准确的情况,需要手动点击刷新 (框 1) 来重新解析控件树;
2.框 2 中的内容是控件的坐标、resource-id[index]、text 信息;
3.有些 app 有左滑的起始页,这里封装了一些滑动操作,可以有效避免录制的左滑动作过快或过短导致回放失败的问题;对于一些输入操作,录制时直接使用键盘输入可能没有准确识别出该步所有输入文本,可以使用 输入 按钮来完成输入的操作;
4.框 4 和框 5 是直接使用在线录制回放脚本,可以快速验证录制脚本的准确性,框 4 能够直接支持单步回放,框 5 可以构建 appium 脚本再使用 appium 引擎进行回放。
更多功能
MQC 提供了完善的测试流程管理功能,覆盖测试的整个生命周期,除了在线录制、真机回放、测试任务管理等,还有用例库管理、App 版本管理、App 缺陷统计等等功能,欢迎大家来使用体验,这里重点介绍用例库的参数管理。
大家在写功能测试脚本的时候可能都用过 excel 来管理一些常量,并在测试的时候传递给测试用例,这些通常会是脚本里的参数。在使用云端真机进行测试的时候,可以通过参数管理功能来完成参数的分发、互踢等工作,直接在脚本中获取参数,同时在线维护参数值。
如下图创建两组参数 username、password、point,在提测时选上使用的参数,平台会自动将参数分发到各个功能测试任务并执行
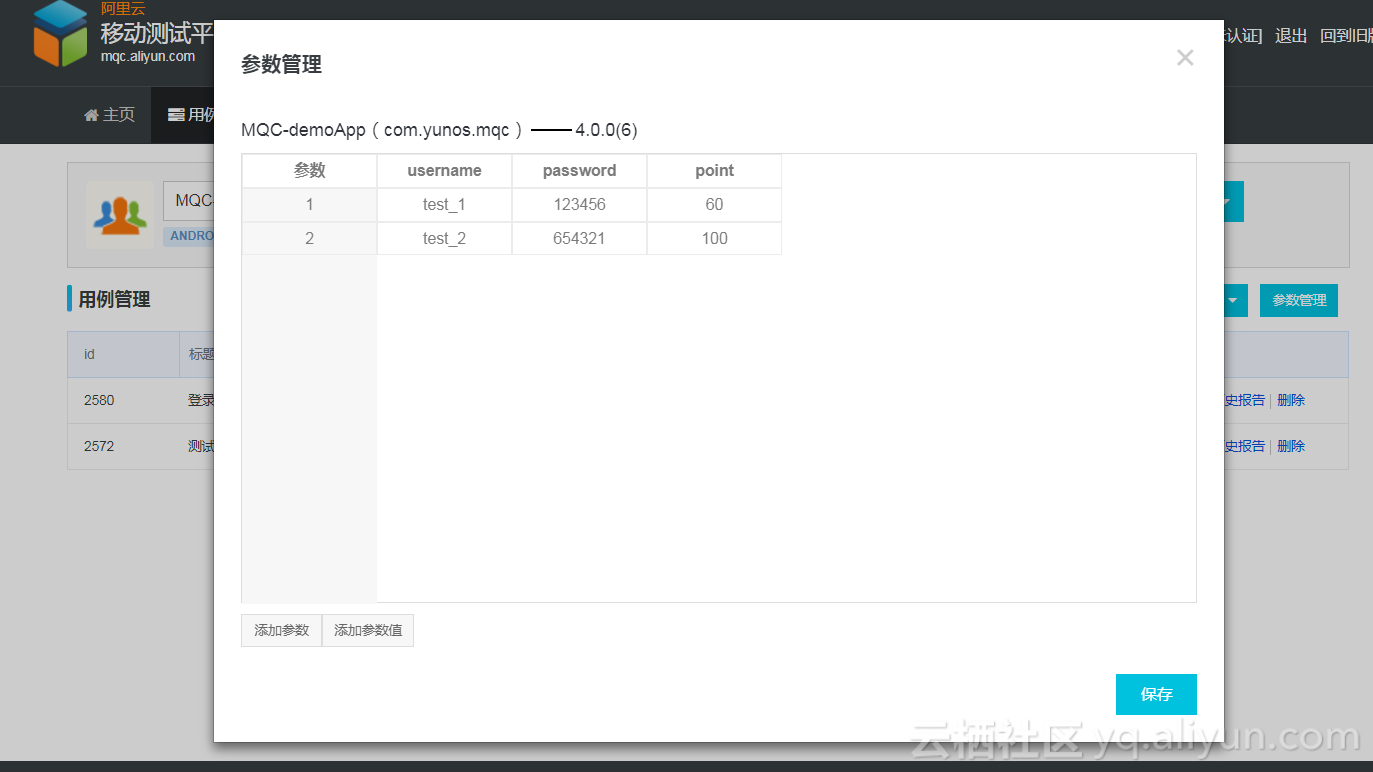
同样,使用 desired_capabilities 类可以获取到相应的参数:
import desired_capabilities

    username = desired_capabilities.getParam("username")
    password = desired_capabilities.getParam("password")
    point = desired_capabilities.getParam("point")
到这 appium 功能测试的一些基本概念与服务已经介绍完全了,后续 MQC 会继续和大家分享功能测试的一些专业知识,希望大家持续关注。