-
hi 楼主 git 用户@magaofei 发现那个缺失的文件是写到了 .gitignore 文件里,他已经给复制出来了,其他朋友如果遇到这个问题,可以.gitignore 里找,或者直接 clone https://github.com/magaofei/Fastmonkey.git,谢谢楼主的积极回复,万分感谢~
-
谢谢楼主,还是不行,不知道是不是我的环境问题 (我 xcode 版本 Xcode 9 beta 5),还是同样的错误,提示我缺少那个文件,楼主直接发我一个这个文件,我拷贝过来可以用吗?如果可以的话,楼主可以邮件发我下吗?谢谢~麻烦了~ 我邮箱 zhulixin@live.com
-
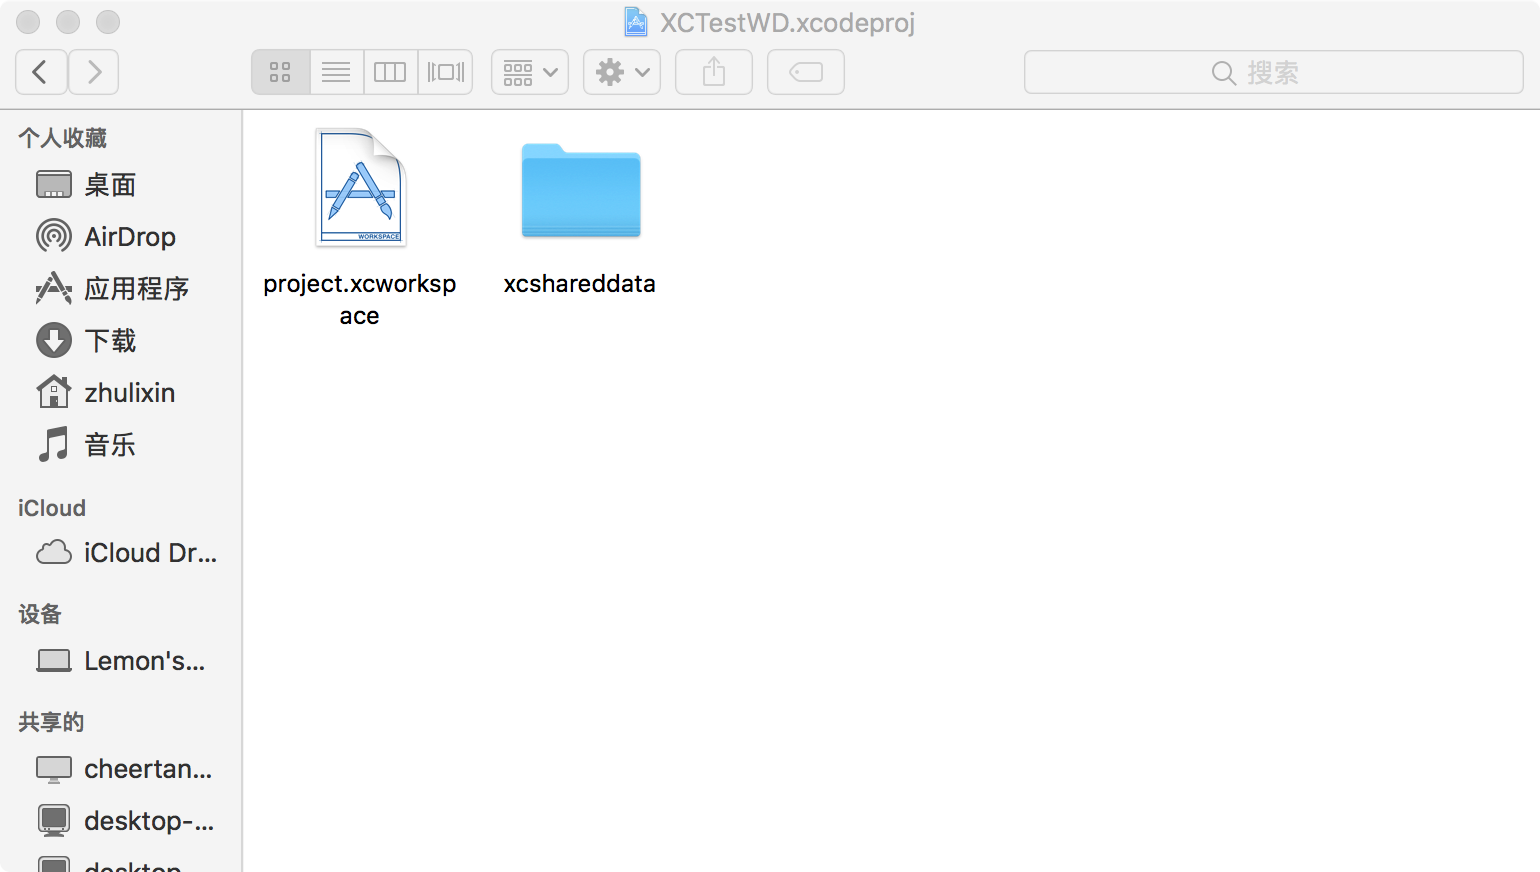
刚从楼主的 git 上 clone 的 zip 包,报错缺少 project.pbxproj 文件,各位大神们,谁有这个文件发一个呗,万分谢谢~邮箱:zhulixin@live.com
-
谢谢楼主回复,我打开后里面还是没找到,我是刚从你的 git 上 clone 下来的,里面没这个文件,能发一个给我吗或者楼主重新传一个到 git 上,谢谢~
-
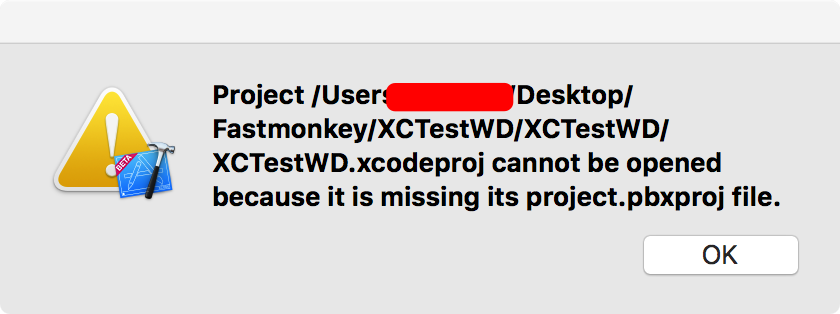
Hi 楼主 iOS 初级用户请教,我在打开 XCTestWD.xcodeproj 文件时,提示我下图错误(我的是 xcode9 beta5)说是缺少文件,请教如何解决,谢谢~

-
[北京] 什么值得买 招聘 测试工程师 / 数据质量测试工程师 / 实习生 at 2017年08月14日
你们杭州有没有坑啊,帅哥?有的话把我收了吧~

-
性能测试工具 python+monkey+ 监控 crash,性能统计 at 2017年08月14日
多谢前辈的指点,我去研究下~

-
性能测试工具 python+monkey+ 监控 crash,性能统计 at 2017年08月08日
这个错误提示是因为你执行一次后,info 文件夹下的 pickle 文件没有删除,再次执行时你当前设备已经被写入一次了,所以再次写入的时候重复了,两种解决方法:1.再次执行的时候手动删除 info 下所有 pickle 文件 2. 把我代码里 start 最后一行的注释去掉。shutil.rmtree((PATH("./info/"))) # 删除持久化目录 info
-
性能测试工具 python+monkey+ 监控 crash,性能统计 at 2017年08月08日
谢谢,是的,确实是打错了,已修改~~
-
python+monkey+ 监控 crash,性能统计 at 2017年08月07日
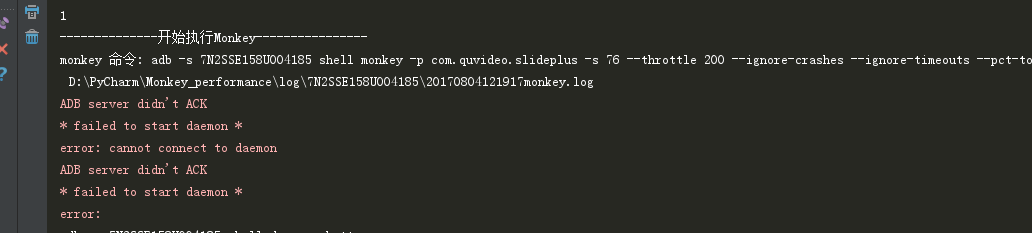
谢谢楼主的建议,虽然我用了批处理,还是会有下面这个 error 提示,执行多设备的时候还是会卡住,推测楼主是在 liunx 上跑的, 我是在 windows 上,系统环境上可能有所不同。
error: could not install smartsocket listener: cannot bind to 127.0.0.1:5037: 通常每个套接字地址 (协议/网络地址/端口) 只允许使用一次。 (10048)
could not read ok from ADB Server- failed to start daemon *
所以我改用多线程来处理了,不过同样也是会报上面的 error 提示,不过好在虽然有提示,但是整体还是跑通了,多线程代码如下,拿出来给一些使用 windows 的同学一起分享下。(python 初学,有些不足的地方还请大神们多多指点~,再次感谢楼主~)
# 多线程启动
class MonkeyThread(threading.Thread):
def init(self, dev):
threading.Thread.init(self)
self.thread_stop = False
self.dev = devdef run(self):
time.sleep(2)
start_monkey(self.dev)def create_threads_monkey(device_list):
thread_instances = []
if device_list != []:
for id_device in device_list:
dev = id_device
instance = MonkeyThread(dev)
thread_instances.append(instance)
for instance in thread_instances:
instance.start()if name == 'main':
path_bat= "D:\PyCharm\Monkey_performance\" # 批处理文件路径
os.system('start ' + os.path.join(path_bat, 'kill_port.bat')) # 批处理关闭 5037 端口
# 重启 adb 服务
os.popen("adb kill-server adb")
os.popen("adb start-server")
time.sleep(10)
device_dir = os.path.exists(Config.info_path)
if device_dir:
print("持久性目录 info 已存在,继续执行测试!")
else:
os.mkdir(Config.info_path) # 创建持久性目录
device_list = BaseMonitor.get_devices()
if ba.attached_devices():
create_threads_monkey(device_list)
else:
print("设备不存在") -
python+monkey+ 监控 crash,性能统计 at 2017年08月04日
请教楼主一个问题,首先感谢楼主提供的源码,我在多设备运行过程中遇到一个问题,就是在执行 map 调用 start 函数时遇到 adb 端口被占用的问题,不知楼主有没有碰到过,详情如下:
11111111: ['7N2SSE158U004185', 'NXTDU16923003480']
2222222222: [{'num': 2, 'devices': '7N2SSE158U004185'}]
2222222222: [{'num': 2, 'devices': '7N2SSE158U004185'}, {'num': 2, 'devices': 'NXTDU16923003480'}]
当前设备 ID:7N2SSE158U004185
当前设备数量: 2
创建持久性文件...
当前设备 ID:NXTDU16923003480
当前设备数量: 2
创建持久性文件...
error: could not install smartsocket listener: cannot bind to 127.0.0.1:5037: 通常每个套接字地址 (协议/网络地址/端口) 只允许使用一次。 (10048)
could not read ok from ADB Server- failed to start daemon *
另外个人在执行过程中遇到几个问题,在这里跟楼主和其他同学们分享下:
1.执行过程中如果 adb 命令被重启或者 kill 掉,在执行 def get_app_pix(dev) 得到的返回值如下,这样就会导致获得的设备分辨率异常显示为 “is”:

所以对楼主 def get_app_pix(dev) 进行了改造,代码如下:
得到手机分辨率
def get_app_pix(dev):
cmd = "adb -s " + dev + " shell wm size"
#print(cmd)
#return subprocess.check_output(cmd).split()[2].decode()
result = os.popen(cmd, "r")
line = result.readline()
while line:
if str(line).find('Physical size') != -1:
line = str(line).strip('\n')
return str(line.split("Physical size:")[1])
line = result.readline()2.同样 def get_men_total(dev): 也会遇到类似问题,代码改造如下:
# 获取设备内存
def get_men_total(dev):
cmd = "adb -s " + dev + " shell cat /proc/meminfo"
output = subprocess.check_output(cmd).split()
items = [x.decode() for x in output]
for k,v in enumerate(items):
if str(v) == 'MemTotal:':
return int(items[k+1])3.在启动 monkey 过程中遇到如下问题,创建持久化文件后,monkey 无法启动,提示 adb server 端口被占用,错误如下:
所以在创建文件完成后,加了两行代码来重启 adb 服务,代码如下:
mkdirInit(devices, app, num)
os.popen("adb kill-server adb")
os.popen("adb start-server")
time.sleep(5)
print("--------------开始执行 Monkey----------------")4.在 BaseMonitor 中统计 cpu 占有率时,也遇到了个问题,在执行到获取 cpu 内核时无法继续执行了,如下图:
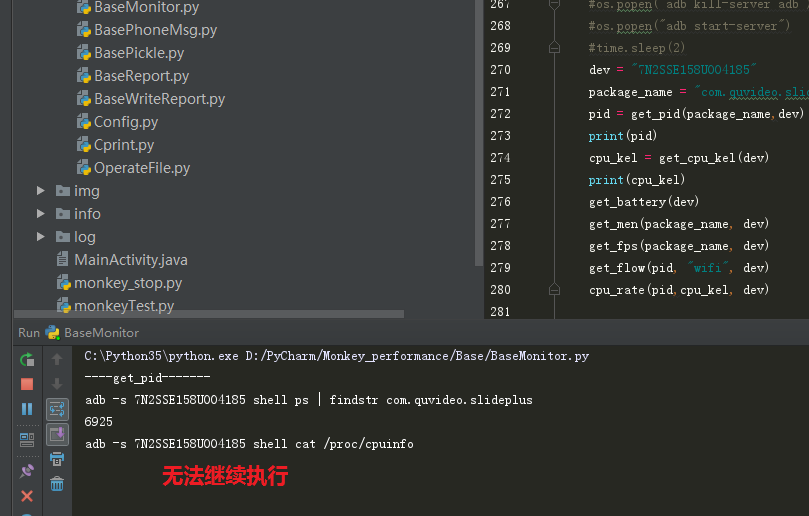
所以对获取内核的代码和 cpu 统计也做了修改,代码如下:
ef totalCpuTime(dev):
user = nice = system = idle = iowait = irq = softirq = 0cmd = "adb -s " + dev + " shell cat /proc/stat"
#print(cmd)
process = (os.popen(cmd))
output = process.read()
#print(output)
res = output.split()
#print(res)
for info in res:
if info == "cpu":
user = res[1]
nice = res[2]
system = res[3]
idle = res[4]
iowait = res[5]
irq = res[6]
softirq = res[7]
"""print("user = %s"% user)
print("nice = %s" % nice)
print("system = %s" % system)
print("idle = %s" % idle)
print("iowait =%s" % iowait)
print("irq = %s" % irq)
print("softirq = %s" % softirq)"""
result = int(user) + int(nice) + int(system) + int(idle) + int(iowait) + int(irq) + int(softirq)
#print("totalCpuTime=" + str(result))
return result'''
每一个进程快照
'''def processCpuTime(pid, dev):
utime = stime = cutime = cstime = 0
try:
cmd = "adb -s " + dev + " shell cat /proc/" + pid + "/stat"
#print(cmd)
process = (os.popen(cmd))
output = process.read()
#print(output)
#process.close()
res = output.split()
#print(res)
utime = res[13]
stime = res[14]
cutime = res[15]
cstime = res[16]
"""print("utime = %s" % utime)
print("stime = %s" % stime)
print("cutime = %s" % cutime)
print("cstime = %s" % cstime)"""
result = int(utime) + int(stime) + int(cutime) + int(cstime)
#print("processCpuTime=" + str(result))
except:
result = 0
return result得到几核 cpu
def get_cpu_kel(dev):
cmd = "adb -s " + dev + " shell cat /proc/cpuinfo"
#print("----cpu_kel-------")
#print(cmd)
process = (os.popen(cmd))
output = process.read()
res = output.split()
num = re.findall("processor",str(res))
#print(num)
return len(num)这是在我的工作机上执行过程中遇到的问题,也许是环境不同,导致我的运行结果和楼主的不同,这里贴出来,如果有遇到类似问题的朋友可以适当借鉴下,再次感谢楼主提供的源码,很棒~大赞~~,也希望楼主能帮我看下我在开头碰到的问题~万分感谢~!
-
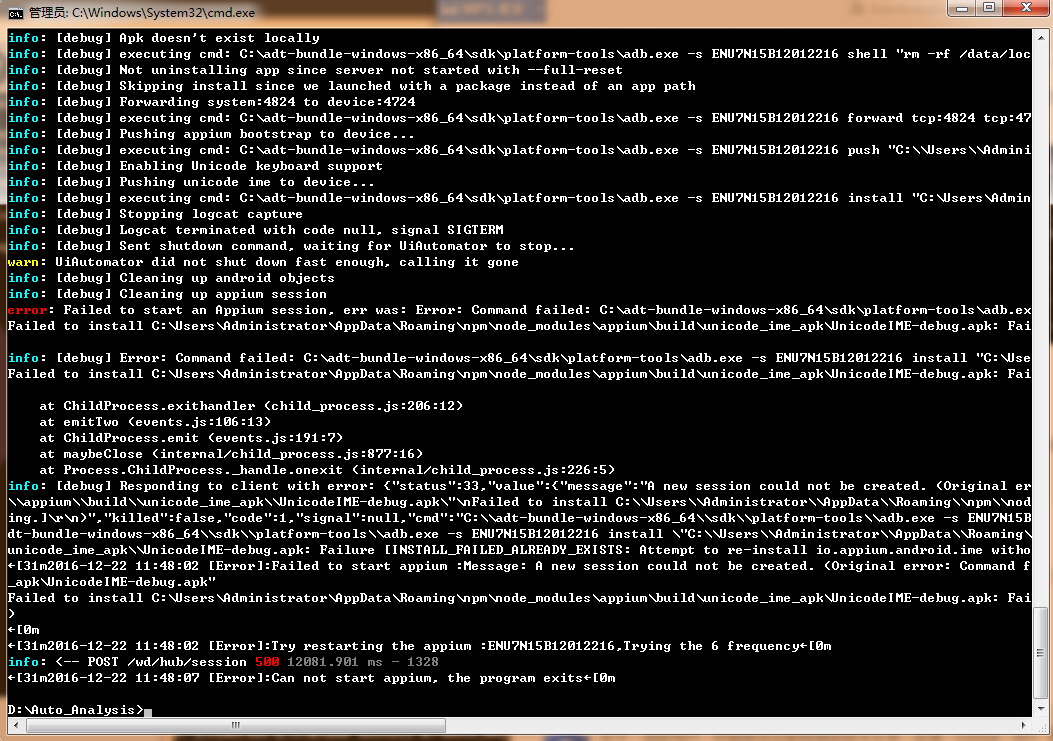
[开源分享] 基于 appium 的自动化测试工具,支持多进程,性能采集分析等 at 2016年12月22日
#116 楼 @joko Hi joko 谢谢你的提示! 感觉不是 unicodeIME 安装失败的原因,重新运行了下,从提示上看是说这个 apk 已存在, 我手动 -r 强行安装完成后,运行还是说 Failure [INSTALL_FAILED_ALREADY_EXISTS: 完成错误截图如下:

看到还有一个错误的信息:"message":"A new session could not be created. 不知道跟这个是不是有关系,我再查下看看。
另外我执行后,设备上没有出现需要确认的弹窗,只是安装了 unlock/appium settings/Auto Analysis,不知道得到这样的结果对不对,有点懵~
-
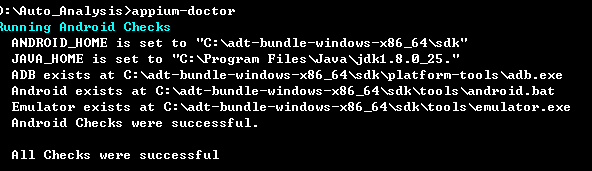
[开源分享] 基于 appium 的自动化测试工具,支持多进程,性能采集分析等 at 2016年12月22日
#114 楼 @xiaocong168 还是不行,appium-doctor 运行结果图如下,不知道怎么搞了

-
[开源分享] 基于 appium 的自动化测试工具,支持多进程,性能采集分析等 at 2016年12月22日
大神们,在 win7 系统执行报错,求教!
appium :1.4.16
python :2.7
device:nexus 6P
Android:7.1.1