
前言
昨天的文章详细的介绍了 mock,今天补充一个 mock 服务的实际使用场景——高并发性能测试时的依赖服务 mock;
背景
最近在做一个项目的全链路压测,目的是验证服务有 LB 层、虚拟化层再到服务本身的性能情况,目标 QPS 是 50w;这就带来一个问题,由于待测服务 A 有 n 个后端服务,且客户端请求数:后端服务请求数是 1:n 的,也就是说预期的 50w 的 qps,对应后端的 qps 和就是 n 倍的 50w;当然,测试过程不能使用线上服务,所以需要一个性能非常好的 mock 服务;
更多内容可以学习《测试工程师 Python 工具开发实战》书籍、《大话性能测试 JMeter 实战》书籍
过程
之前分享过使用 nginx cache 来实现 mock server,当然 nginx cache 也能完成这个任务,32 核 64G 的 linux,nginx 的 cache 性能可以达到单机 20w。
但使用 nginx cache 作为 mock server 有几个问题:
1、需要先 cache 真实的后端服务的 response;
2、如果有多个接口需要 mock 的话,需要频繁的修改 nginx 配置;
3、如果有接口返回内容需要更新,需要删掉本地 cache 文件;
4、单机 20w 的 qps,相比一般的网络框架,已经很高了,但是 n×50w 的 qps,还是需要很多台 nginx,才能完成;
为了解决上述几个问题,考虑用 golang 写一个 mock 服务,写了个架子测试了一下,查 map 的 qps 只能到 6w 多,还不如 nginx,放弃;
google 了一下高性能框架,发现一个叫 japronto 的 python 的网络框架,号称单机 100w+ 的 qps,写了个 demo 试了一下,确实没问题;详见 github 地址:https://github.com/squeaky-pl/japronto
自定义 mock 服务
- 需求 1:单机 100w 的 qps——使用 japronto 服务可实
- 需求 2:自定义 mock 接口 path——服务启动时读取 DB 内配置作为 path
- 需求 3:更新接口返回内容方便——前端页面支持增加&修改 DB 接口 path 配置
- 需求 4:支持 json 结果&protobuf 二进制结果——预置 proto,自定义接口返回类型,服务初始化时做不同处理;
mock 服务实现
服务启动 -> initData -> 根据 type 做不同处理,默认返回类型 json,proto 的话做二进制序列化;
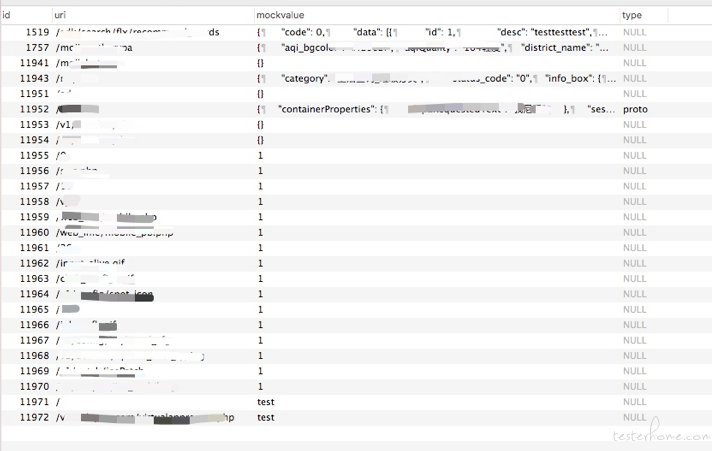
DB 字段:

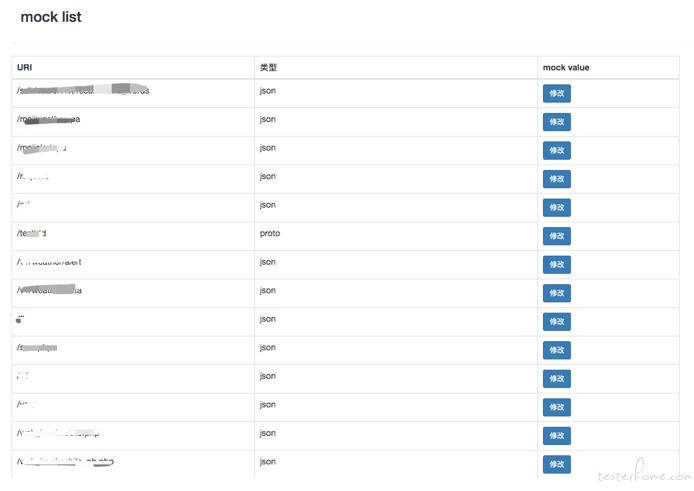
实现简单前端页面完成接口内容修改:

用 wrk 验证一下测试服务性能:(抛开带宽限制)
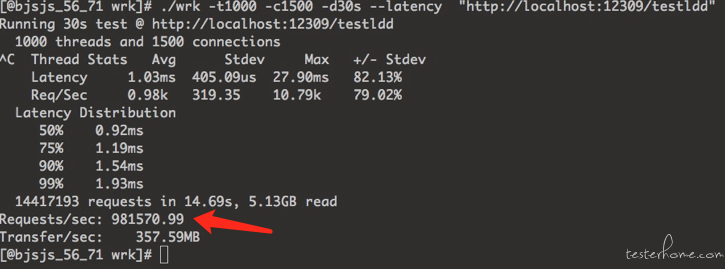

32 核机器,20 个进程,qps 可达 98w,tp99<2ms;
实际使用
实际使用时,只需要同时部署 5 台 20 核虚机,或打包成镜像附属到测试集群,使用内网域名负载均衡到这五台机器(k8s 集群的话使用域名映射),将被测服务的依赖服务地址改写成 mock 域名:端口/自定义 path;
代码地址
核心代码如下
1、fastMock.py
from japronto import Application
import etcd3, json, sys
import mysqlConnect

def handler(request):
    # print(str(res[request.path]))
    if(alldata[request.path]["type"]=="proto"):
        return request.Response(body=alldata[request.path]["mockvalue"])
    else:
        r = json.dumps(alldata[request.path]["mockvalue"])
        return request.Response(text=r)

def covProto(jsonstr):
    #需要protobuf类型的response可以通过配置mock类型(proto)来返回二进制body
    # serverResponseBody = json_format.Parse(jsonstr, prototest_pb2.ServerResponseBody())
    # body = serverResponseBody.SerializeToString()
    #return body
    return "binnary body"


def initData():
    mc = mysqlConnect.MysqlConnect({"HOST": "xx.xx.xx.xx", "USER": "root", "PWD": "xxxx", "DB": "mock"})
    i = mc.query("select * from mockapi")
    res = {}
    for row in i:
        if(row[3]=="proto"):
            body = covProto(row[2])
            res[row[1]] = {"type": row[3], "mockvalue": body}
        else:
            res[row[1]] = {"type": row[3], "mockvalue": row[2]}
    return res


if __name__ == '__main__':
    try:
        theads = sys.argv[1]
    except Exception as e:
        theads = 1
        print(sys.argv)
        print(e)

    app = Application()

    alldata = initData()
    for k in alldata:
        print(k)
        app.router.add_route(k, handler)
    # worker_num 启动时设置,建议等于真cpu个数,debug=True时,控制台会输出请求的path
    app.run(port=80, worker_num=int(theads), debug=False)
2、mysqlConnect.py
#!/usr/bin/env python
# -*- coding: utf-8 -*-
import pymysql


class MysqlConnect():
    def __init__(self, dbinfo={}):
        conn = pymysql.connect(host=dbinfo["HOST"],
                               port=3306,
                               user=dbinfo["USER"],
                               password=dbinfo["PWD"],
                               db=dbinfo["DB"],
                               charset='utf8')
        self.conn = conn

    def query(self, sql):
        cursor = self.conn.cursor()
        cursor.execute(sql)
        return cursor.fetchall()

    def excute(self, sql, args):
        cursor = self.conn.cursor()
        # info = {'name': 'fake', 'age': 15}
        effect_row = cursor.execute(sql, args)
        self.conn.commit()
        return effect_row

    def __del__(self):
        self.conn.close()
整个工程 100 行左右代码,比较简陋,前端页面在另一个内部工程中完成,不好贴出来,大家可以自己实现,或者直接通过 mysql 客户端修改 DB 内容;
目前 mock 服务只支持单一接口对应单一 mock 结果,后续可以自定义多个 value,在服务内随机返回;
使用场景
超高并发的中转服务测试场景,依赖服务数据稳定,被测服务无缓存(或测试过程中去掉缓存)