移动测试开发 TorchServe 搭建 codeBERT 分类模型服务
背景
本人最近在做有关克隆代码检测的相关工作,克隆代码是软件开发过程中的常见现象,它在软件开发前期能够提升生产效率,产生一定的正面效益,然而随着系统规模变大,也会产生降低软件稳定性,软件 bug 传播,系统维护困难等负面作用。本人训练了基于 codeBERT 的分类模型,任务是给定两个函数片段,判断这两个函数片段是否相似,TorchServe 主要用于 PyTorch 模型的部署,现将使用 TorchServe 搭建克隆代码检测服务过程总结如下。
TorchServe 简介
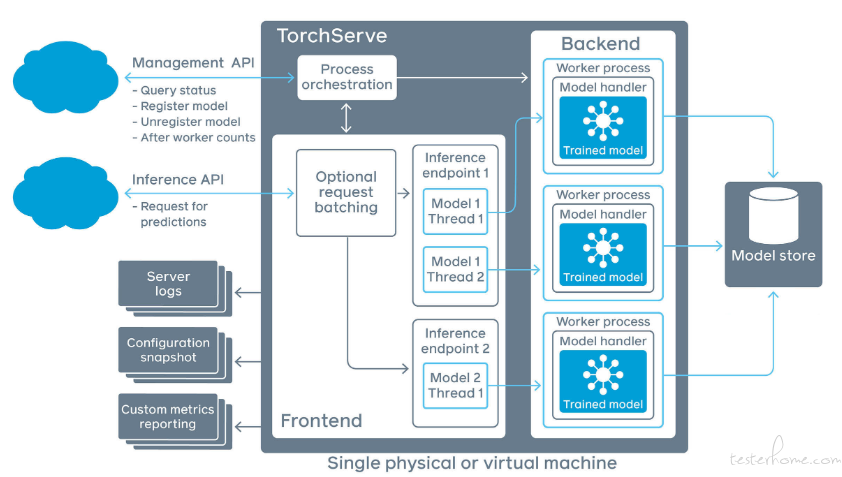
TorchServe 是部署 PyTorch 模型服务的工具,由 Facebook 和 AWS 合作开发,是 PyTorch 开源项目的一部分。它可以使得用户更快地将模型用于生产,提供了低延迟推理 API,支持模型的热插拔,多模型服务,A/B test 版本控制,以及监控指标等功能。TorchServe 架构图如下图所示:

TorchServe 框架主要分为四个部分:Frontend 是 TorchServe 的请求和响应的处理部分;Worker Process 指的是一组运行的模型实例,可以由管理 API 设定运行的数量;Model Store 是模型存储加载的地方;Backend 用于管理 Worker Process。
codeBERT 是什么?
codeBERT 是一个预训练的语言模型,由微软和哈工大发布。我们知道传统的 BERT 模型是面向自然语言的,而 codeBERT 是面向自然语言和编程语言的模型,codeBERT 可以处理 Python,Java,JavaScript 等,能够捕捉自然语言和编程语言的语义关系,可以用来做自然语言代码搜索,代码文档生成,代码 bug 检查以及代码克隆检测等任务。当然我们也可以利用 CodeBERT 直接提取编程语言的 token embeddings,从而进行相关任务。
搭建环境
安装 TorchServe 和 torch-model-archiver
部署服务会用到这两个包,torch-model-archiver 功能是对模型等文件进行打包,TorchServer 功能是开启服务。
pip install torchserve
pip install torch-model-archiever
编写 Handler 类
Handler 是我们自定义开发的类,TorchServe 运行的时候会执行 Handler 类,其主要功能就是处理 input data,然后通过一系列处理操作返回结果,其中模型的初始化等也是由 handler 处理。其中 Handler 类继承自 BaseHandler,我们需要重写其中的 initialize,preprocess,inference 等。
① initialize 方法
initialize 方法主要是进行模型初始化,同时也为后续准备需要的变量,该方法在模型加载的时候被调用。
class CloneDetectionHandler(BaseHandler,ABC):
    def __int__(self):
        super(CloneDetectionHandler,self).__init__()
        self.initialized = False
    def initialize(self, ctx):
        self.manifest = ctx.manifest
        logger.info(self.manifest)
        properties = ctx.system_properties
        model_dir = properties.get("model_dir")
        serialized_file = self.manifest['model']['serializedFile']
        model_pt_path = os.path.join(model_dir,serialized_file)
        self.device = torch.device("cuda:"+str(properties.get("gpu_id")) if torch.cuda.is_available() else "cpu")
        config_class, model_class,tokenizer_class = MODEL_CLASSES['roberta']
        config = config_class.from_pretrained("microsoft/codebert-base")
        config.num_labels = 2
        self.tokenizer = tokenizer_class.from_pretrained("microsoft/codebert-base")
        self.bert = model_class(config)
        self.model = Model(self.bert,config,self.tokenizer)
        self.model.load_state_dict(torch.load(model_pt_path))
        self.model.to(self.device)
        self.model.eval()
        logger.info('Clone codeBert model from path {0} loaded successfully'.format(model_dir))
        self.initialized = True
② preprocess 方法
将请求数据进行处理,得到可以 feed 给 codeBERT 模型的 tensor。
def preprocess(self, requests):
            input_batch = None
            for idx,data in enumerate(requests):
                input_text = data.get("data")
                if input_text is None:
                    input_text = data.get("body")
                logger.info("Received codes:'%s'",input_text)
                if isinstance(input_text,(bytes,bytearray)):
                    input_text = input_text.decode('utf-8')
                code1 = input_text['code1']
                code2 = input_text['code2']
                code1 = " ".join(code1.split())
                code2 = " ".join(code2.split())
                logger.info("code1:'%s'", code1)
                logger.info("code2:'%s'", code2)
                inputs = self.tokenizer.encode_plus(code1,code2,max_length=512,pad_to_max_length=True, add_special_tokens=True, return_tensors="pt")
                input_ids = inputs["input_ids"].to(self.device)
                if input_ids.shape is not None:
                    if input_batch is None:
                        input_batch = input_ids
                    else:
                        input_batch = torch.cat((input_batch,input_ids),0)
            return input_batch
③ inference 方法
进行模型推理,得到模型预测结果。
def inference(self, input_batch):
    inferences = []
    logits = self.model(input_batch)
    num_rows = logits[0].shape[0]
    for i in range(num_rows):
    out = logits[0][i].unsqueeze(0)
    y_hat = out.argmax(0).item()
    predicted_idx = str(y_hat)
    inferences.append(predicted_idx)
    return inferences
模型打包
使用 toch-model-archiver 工具进行打包,将模型参数文件以及其所依赖包打包在一起,在当前目录下会生成 mar 文件。
torch-model-archiver --model-name BERTClass --version 1.0 \
    --serialized-file ./CloneDetection.bin \
    --model-file ./model.py \
    --handler ./handler.py \
启动服务
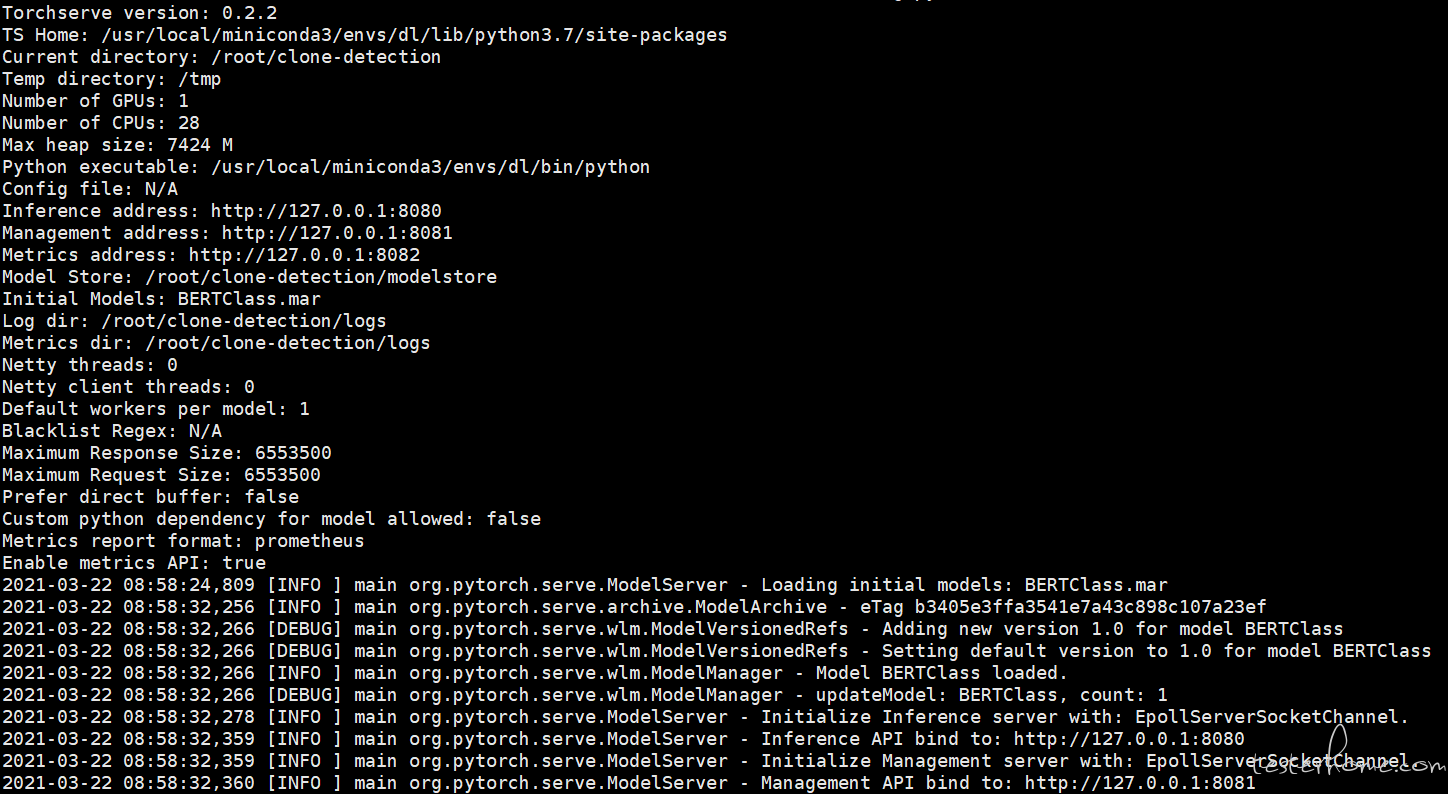
创建 modelstore 目录,将上一步打包生成的 BERTClass.mar 包文件放入 modelstore 目录中,启动模型服务。
torchserve --start --ncs --model-store ./modelstore --models BERTClass.mar

服务测试
利用 requests 库测试部署好的模型服务,第一请求输入不是克隆关系的代码对,模型预测结果为 0,表示两段代码不相似,不是克隆代码对。
import requests
import json
diff_codes = {
    "code1": "    private void loadProperties() {\n        if (properties == null) {\n            properties = new Properties();\n            try {\n                URL url = getClass().getResource(propsFile);\n                properties.load(url.openStream());\n            } catch (IOException ioe) {\n                ioe.printStackTrace();\n            }\n        }\n    }\n",
    "code2": "    public static void copyFile(File in, File out) throws IOException {\n        FileChannel inChannel = new FileInputStream(in).getChannel();\n        FileChannel outChannel = new FileOutputStream(out).getChannel();\n        try {\n            inChannel.transferTo(0, inChannel.size(), outChannel);\n        } catch (IOException e) {\n            throw e;\n        } finally {\n            if (inChannel != null) inChannel.close();\n            if (outChannel != null) outChannel.close();\n        }\n    }\n"
}
res = requests.post('http://127.0.0.1:8080/predictions/BERTClass",json=diff_codes).text

第二个请求输入克隆代码对,模型预测结果为 1,两段代码段相似,是克隆代码对。克隆代码大体分为句法克隆和语义克隆,本例展示的句法克隆,即对函数名,类名,变量名等重命名,增删部分代码片段还相同的代码对。
clone_codes = {
    "code1":"    public String kodetu(String testusoila) {\n        MessageDigest md = null;\n        try {\n            md = MessageDigest.getInstance(\"SHA\");\n            md.update(testusoila.getBytes(\"UTF-8\"));\n        } catch (NoSuchAlgorithmException e) {\n            new MezuLeiho(\"Ez da zifraketa algoritmoa aurkitu\", \"Ados\", \"Zifraketa Arazoa\", JOptionPane.ERROR_MESSAGE);\n            e.printStackTrace();\n        } catch (UnsupportedEncodingException e) {\n            new MezuLeiho(\"Errorea kodetzerakoan\", \"Ados\", \"Kodeketa Errorea\", JOptionPane.ERROR_MESSAGE);\n            e.printStackTrace();\n        }\n        byte raw[] = md.digest();\n        String hash = (new BASE64Encoder()).encode(raw);\n        return hash;\n    }\n",
    "code2":"    private StringBuffer encoder(String arg) {\n        if (arg == null) {\n            arg = \"\";\n        }\n        MessageDigest md5 = null;\n        try {\n            md5 = MessageDigest.getInstance(\"MD5\");\n            md5.update(arg.getBytes(SysConstant.charset));\n        } catch (Exception e) {\n            e.printStackTrace();\n        }\n        return toHex(md5.digest());\n    }\n"
}
res = requests.post('http://127.0.0.1:8080/predictions/BERTClass",json=clone_codes).text

关闭服务
torchserve --stop
总结
本文主要介绍了如何用 TorchServe 部署 PyTorch 模型的流程,首先需要编写 hanlder 类型文件,然后用 torch-model-archiver 工具进行模型打包,最后 torchserve 启动服务,部署流程相对比较简单。
