移动测试开发 Android App 保活服务的配置与禁用
Android 应用保活是应用、系统、用户三个角色相互影响的产物。几乎每一款应用都希望自己能实现永久保活,并通过保活实现消息推送、信息上报等等交互行为;几乎所有的系统厂商都想把应用关在笼子里,通过控制应用的运行时间来避免过多的电量和性能的消耗,这样可以大大提高系统流畅度和手机使用时间;对于用户来说我们希望使用的时候应用可以更好的运行,比如音乐、导航、通信软件,但是我们又希望不使用时彻底关闭应用,但是大部分用户都不清楚如何彻底关闭一个应用并让它不再运行。那么本文介绍一下在 Android 系统里面是如何实现保活方案,如何启动或禁用应用的保活。
Android 应用的保活技术
Android 应用的保活一般会从两个方面着手:一是如何提高应用的存活周期;二是如何唤醒关闭的应用。一般情况下会通过 Android 账户的自动同步机制和开机广播唤醒已关闭的应用;然后通过定时任务、前台服务、在屏幕上显示控件等方式提高应用的存活周期。在账户同步的服务和开机广播接收器中为应用开启一个前台 Service 就实现了应用保活的基本策略。下面分别介绍各个方式的实现。
Android 应用自启与白名单
通过静态注册开机广播可以在系统启动时唤醒应用,应用被唤醒后可以检查并初始化前台服务等保活策略。
1.首先我们需要实现 BroadcastReceiver 的子类作为开机广播的接收器,并在 onReceive 方法中处理业务逻辑。
public class BootReceiver extends BroadcastReceiver {
    @Override
    public void onReceive(Context context, Intent intent) {
        //检查并初始化前台服务等保活策略
    }
}
2.然后我们将开机广播接收器注册到 AndroidManifest.xml 中,并增加开机动作过滤器。
<receiver
    android:name=".receiver.BootReceiver"
    android:directBootAware="true"
    android:enabled="true"
    android:exported="true">
    <!--通过priority指定广播的优先级-->
    <intent-filter android:priority="2147483647">
        <action android:name="android.intent.action.BOOT_COMPLETED" />
        <action android:name="android.intent.action.LOCKED_BOOT_COMPLETED" />
    </intent-filter>
  </receiver>
账户同步机制
Android 应用可以在运行时注册系统账户,并通过 service 与系统账户进行关联,当系统运行时会在特定时期同步账户,同步账户的时候会启动所关联的 service,在关联 service 中可以检查保活方案,通过账户同步机制可以唤醒被关闭的应用。
在开始之前首先定义两常量,在文中通过{常量名}的方式方式指代:
accountType=“xxxxxx”
contentAuthority=“xxxx”
1.在项目 res/xml 中添加账户配置文件,指定文件名为 account_sync_adapter.xml
<?xml version="1.0" encoding="utf-8"?>

<sync-adapter xmlns:android="http://schemas.android.com/apk/res/android"
    android:accountType="{accountType}"
    android:allowParallelSyncs="false"
    android:contentAuthority="{contentAuthority}"
    android:isAlwaysSyncable="true"
    android:supportsUploading="true"
    android:userVisible="true" />
2.在项目 res/xml 中配置账户显示信息,命名为 account_authenticator.xml
<?xml version="1.0" encoding="utf-8"?>

<account-authenticator xmlns:android="http://schemas.android.com/apk/res/android"
    android:accountType="com.qihoo.qa.ticker.account"
    android:icon="@mipmap/ic_launcher" <!--在系统设置中显示的账户图标-->
    android:label="@string/app_name" /><!--在系统设置中显示的账户名称-->
3.实现 ContentProvider 的子类,并在 AndroidManifest.xml 中注册
public class AccountSyncProvider extends ContentProvider {
    @Override
    public boolean onCreate() {
        return false;
    }

    @Nullable
    @Override
    public Cursor query(@NonNull Uri uri, @Nullable String[] projection, @Nullable String selection,
                        @Nullable String[] selectionArgs, @Nullable String sortOrder) {
        return null;
    }

    @Nullable
    @Override
    public String getType(@NonNull Uri uri) {
        return null;
    }

    @Nullable
    @Override
    public Uri insert(@NonNull Uri uri, @Nullable ContentValues values) {
        return null;
    }

    @Override
    public int delete(@NonNull Uri uri, @Nullable String selection, @Nullable String[] selectionArgs) {
        return 0;
    }

    @Override
    public int update(@NonNull Uri uri, @Nullable ContentValues values, @Nullable String selection,
                      @Nullable String[] selectionArgs) {
        return 0;
    }
}
注册服务
<provider
android:name=".account.AccountSyncProvider"
android:authorities="{contentAuthority}"
android:enabled="true"
android:exported="true" />
4.实现账户的认证 service,系统会调用该 service 认证账户,由于是用于保活的空账户,所以不需要关注具体业务
public class AuthenticationService extends Service {

    private AccountAuthenticator accountAuthenticator;

    @Nullable
    @Override
    public IBinder onBind(Intent intent) {
        return accountAuthenticator.getIBinder();//返回binder对象供系统使用
    }

    @Override
    public void onCreate() {
        super.onCreate();
        accountAuthenticator = new AccountAuthenticator(this);
    }

    public static class AccountAuthenticator extends AbstractAccountAuthenticator {

        public AccountAuthenticator(Context context) {
            super(context);
        }

        @Override
        public Bundle editProperties(AccountAuthenticatorResponse response, String accountType) {
            return null;
        }

        @Override
        public Bundle addAccount(AccountAuthenticatorResponse response, String accountType, String authTokenType,
                                 String[] requiredFeatures, Bundle options) throws NetworkErrorException {
            return null;
        }

        @Override
        public Bundle confirmCredentials(AccountAuthenticatorResponse response, Account account,
                                         Bundle options) throws NetworkErrorException {
            return null;
        }

        @Override
        public Bundle getAuthToken(AccountAuthenticatorResponse response, Account account,
                                   String authTokenType, Bundle options) throws NetworkErrorException {
            return null;
        }

        @Override
        public String getAuthTokenLabel(String authTokenType) {
            return null;
        }

        @Override
        public Bundle updateCredentials(AccountAuthenticatorResponse response, Account account,
                                        String authTokenType, Bundle options) throws NetworkErrorException {
            return null;
        }

        @Override
        public Bundle hasFeatures(AccountAuthenticatorResponse response, Account account,
                                  String[] features) throws NetworkErrorException {
            return null;
        }
    }
}
在 AndroidManifest.xml 中注册账户认证服务
<service android:name=".account.AuthenticationService">
    <intent-filter>
        <action android:name="android.accounts.AccountAuthenticator" />
    </intent-filter>
    <meta-data
        android:name="android.accounts.AccountAuthenticator"
        android:resource="@xml/account_authenticator" /> <!--指定账户配置文件-->
</service>
5.编写并配置账户同步服务,系统自动同步账户时回调此服务
public class AccountSyncService extends Service {

    private SyncAdapter mSyncAdapter;

    private static final String TAG = "SyncService";

    @Nullable
    @Override
    public IBinder onBind(Intent intent) {
        return mSyncAdapter.getSyncAdapterBinder();
    }

    @Override
    public void onCreate() {
        super.onCreate();
        mSyncAdapter = new SyncAdapter(getApplicationContext(), true);
    }

    ;
    public static class SyncAdapter extends AbstractThreadedSyncAdapter {
        public SyncAdapter(Context context, boolean autoInitialize) {
            super(context, autoInitialize);
        }


        @Override
        public void onPerformSync(Account account, Bundle extras, String authority, ContentProviderClient provider, SyncResult syncResult) {
            //账户同步时回调此方法,在此处检测保活业务
        }
    }
}
在 AndroidManifest.xml 中注册账户同步服务
<service
  android:name=".account.AccountSyncService"<!--指定service文件-->
  android:enabled="true"
  android:exported="true">
  <intent-filter>
      <action android:name="android.content.SyncAdapter" />
  </intent-filter>
  <meta-data
      android:name="android.content.SyncAdapter"
      android:resource="@xml/account_sync_adapter" /><!--指定配置文件,该配置文件需要手动添加-->
</service>
6.添加账户并设置自动同步
accountName="test"
accountPwd="pwd"
//添加账户
 AccountManager accountManager = (AccountManager) context.getSystemService(Context.ACCOUNT_SERVICE);
 Account account = new Account(accountName,  {accountType});
 accountManager.addAccountExplicitly(account, accountPwd, new Bundle());
 //设置账户同步
 Account account = new Account(accountName, {accountType});
// 下面三个都需要同一个权限  WRITE_SYNC_SETTINGS
// 设置同步
ContentResolver.setIsSyncable(account, {contentAuthority}, 1);
// 自动同步
ContentResolver.setSyncAutomatically(account, {contentAuthority}, true);
// 设置同步周期
ContentResolver.addPeriodicSync(account, {contentAuthority}, new Bundle(), 1);
schedule 定时任务
1.实现 JobService 的子类,用于执行任务时回调
@RequiresApi(api = Build.VERSION_CODES.LOLLIPOP)
public class LiveJobService extends JobService {
    @Override
    public boolean onStartJob(JobParameters params) {
        //执行任务时回调
        return false;
    }

    @Override
    public boolean onStopJob(JobParameters params) {
        return false;
    }
}
2.在 AndroidManifest 中配置任务 service
<service
    android:name=".service.LiveJobService"
    android:enabled="true"
    android:exported="true"
    android:permission="android.permission.BIND_JOB_SERVICE" /><!--指定服务权限-->
3.设置定时任务
JobScheduler jobScheduler = (JobScheduler) context.getSystemService(Context.JOB_SCHEDULER_SERVICE);
//setPersisted 在设备重启依然执行
JobInfo.Builder builder = new JobInfo.Builder(lastJobId+i, new ComponentName(context.getPackageName(),
LiveJobService.class.getName())).setPersisted(true);
// 50s后执行任务
if (Build.VERSION.SDK_INT < Build.VERSION_CODES.N) {
    builder.setPeriodic(50000);
} else {
    // 延迟执行任务
    builder.setMinimumLatency(50000);
}
jobScheduler.schedule(builder.build());
前台服务
保活服务一般在 Service 中后台运行,而 Android 系统对后台服务有一些列的运行限制,所以把服务绑定为前台服务会提高服务的优先级,在系统资源紧张时可以更好的运行。
1.实现 Service 子类 NotificationService,并在在 onStartCommand 方法中开启常驻通知
/**
 * @author walker
 * @date 2020/12/25.
 * @description 在应用后台处理数据
 */
public class NotificationService extends Service {

    @Nullable
    @Override
    public IBinder onBind(Intent intent) {
        return null;
    }

    @Override
    public void onCreate() {
        super.onCreate();
    }

    @Override
    public int onStartCommand(Intent intent, int flags, int startId) {
        // 如果Service被终止
        // 当资源允许情况下,重启service
        //绑定前台通知
        if (Build.VERSION.SDK_INT >= Build.VERSION_CODES.O) {
            setForegroundService();
        }
        return START_STICKY;
    }

    /**
     * 通过通知启动服务
     */
    @androidx.annotation.RequiresApi(api = Build.VERSION_CODES.O)
    public void setForegroundService() {
        //设定的通知渠道名称
        String channelName = "slient_name";
        String CHANNEL_ID = "slient_id";
        //设置通知的重要程度
        int importance = NotificationManager.IMPORTANCE_LOW;
        //构建通知渠道
        NotificationChannel channel = new NotificationChannel(CHANNEL_ID, channelName, importance);
        channel.setDescription("test");
        //在创建的通知渠道上发送通知
        NotificationCompat.Builder builder = new NotificationCompat.Builder(this, CHANNEL_ID);
        builder.setSmallIcon(R.drawable.ic_launcher) //设置通知图标
                .setContentTitle("通知")//设置通知标题
                .setContentText("前台服务")//设置通知内容
                .setAutoCancel(true) //用户触摸时,自动关闭
                .setOngoing(true);//设置处于运行状态
        //向系统注册通知渠道,注册后不能改变重要性以及其他通知行为
        NotificationManager notificationManager = (NotificationManager) getSystemService(Context.NOTIFICATION_SERVICE);
        notificationManager.createNotificationChannel(channel);
        //将服务置于启动状态 NOTIFICATION_ID指的是创建的通知的ID
        startForeground(111, builder.build());
    }

    @Override
    public void onDestroy() {
        super.onDestroy();
    }
}
2.在 AndroidManifest 中配置服务
<!--通过android:process标签指定独立进程名-->
<service
    android:name=".service.DataService"
    android:enabled="true"
    android:exported="false"
    android:process=":sync" />
3.在应用启动时开启服务
startService(new Intent(context,DataService.class));
如何禁用后台运行
我们在开发或配置应用保活相关功能时主要通过开机自启、后台运行、关联启动、账户同步几个方面入手,不同的手机设置入口有可能不一样,但是可以参考这几点进行设置,下面介绍一下华为荣耀 20 上的配置方式。
1.开机自启权限的处理
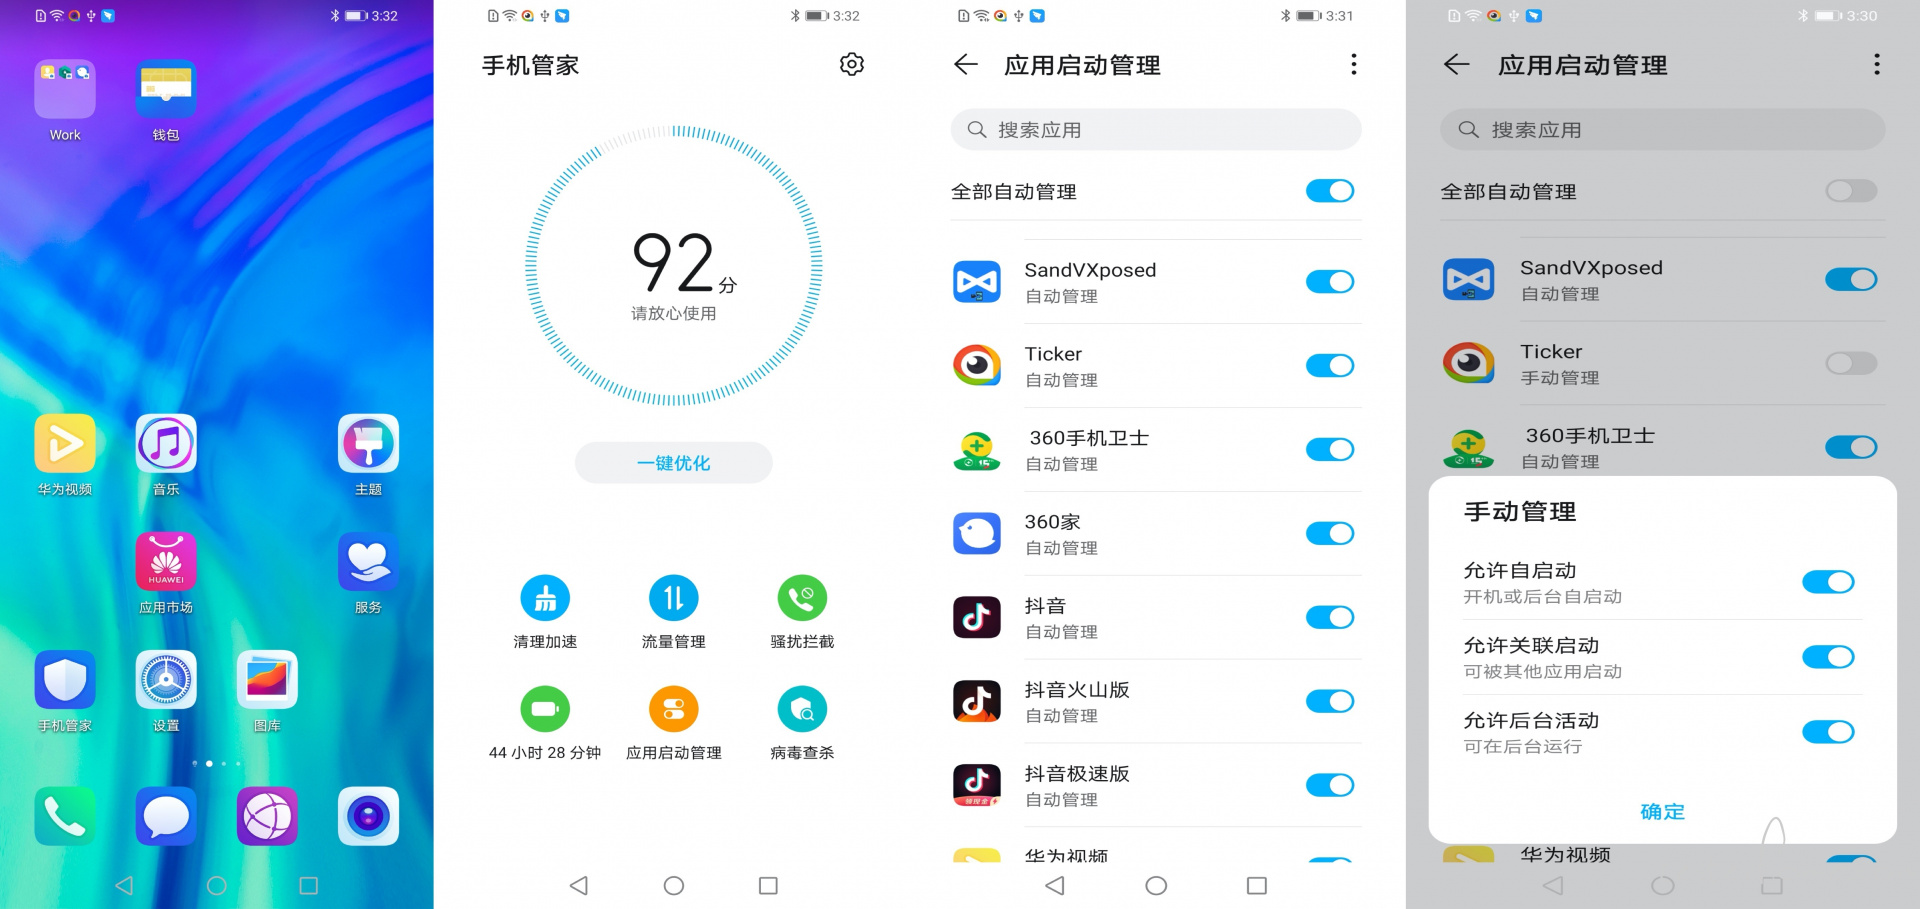
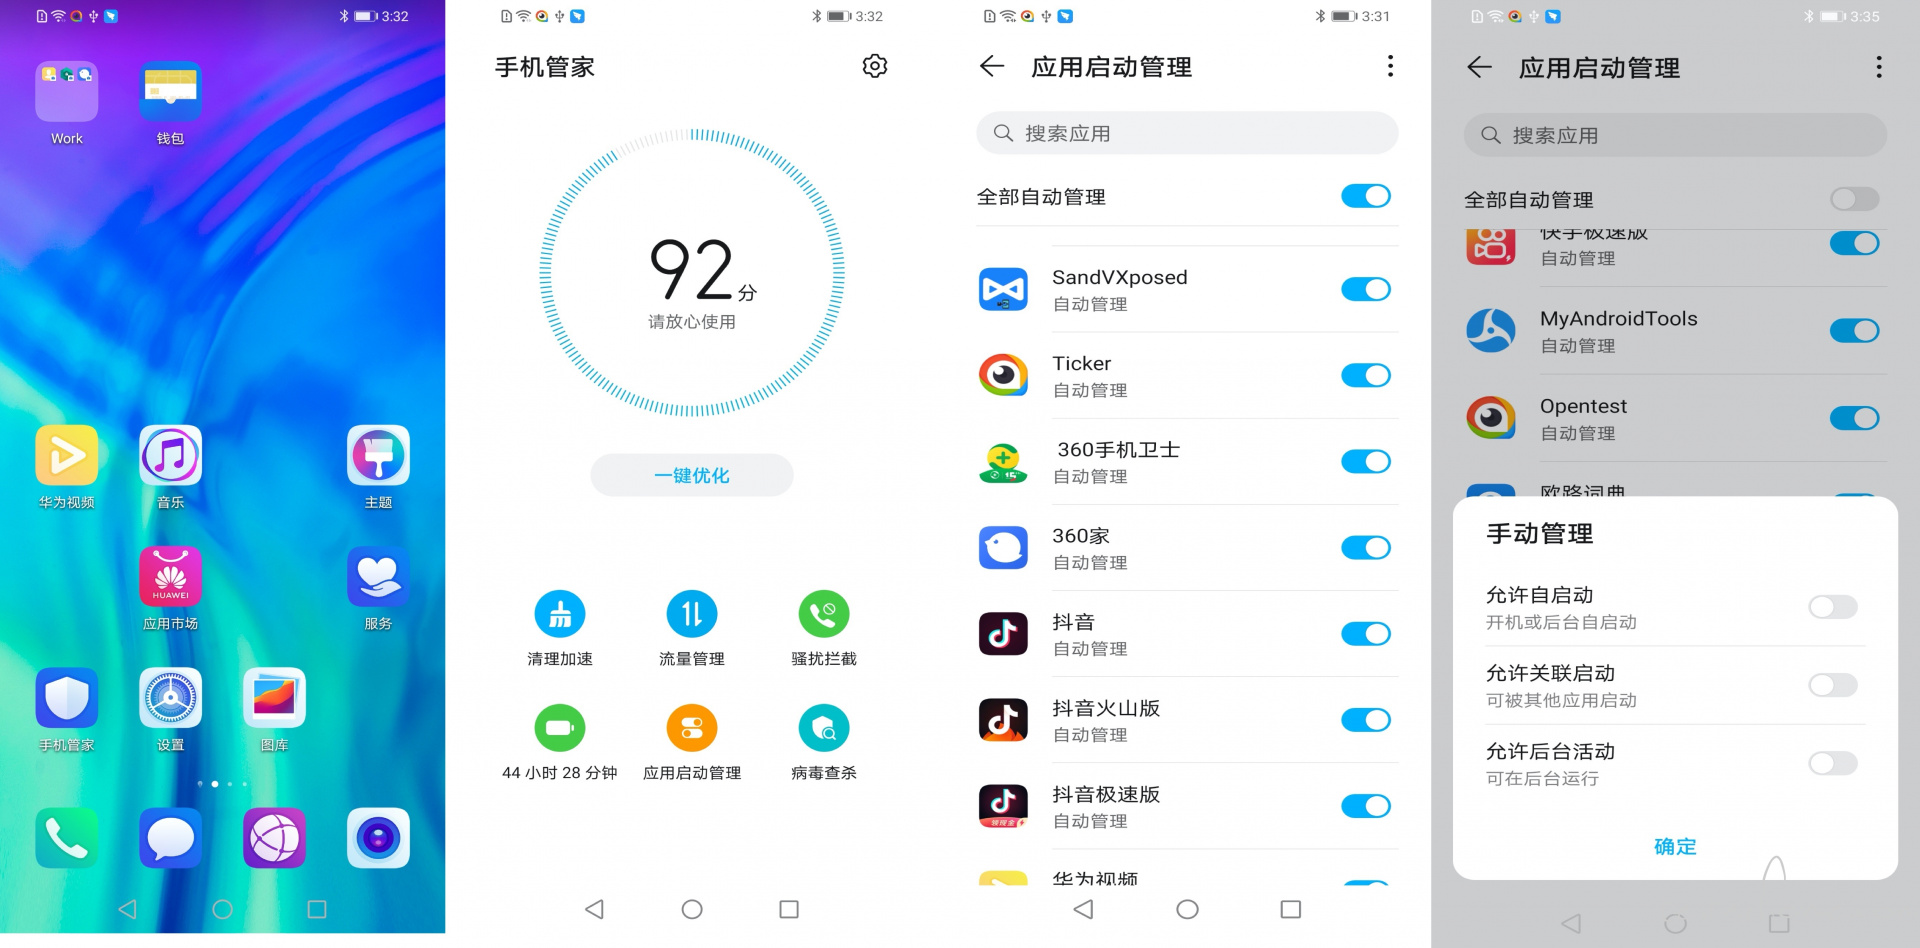
以华为系统为例,在【手机管家】app 中找到【应用启动管理】,并在应用启动管理中找到对应的 app,将对应 app 切换为【手动管理】,并为激活【允许自动启动】【允许关联启动】【允许后台活动】三个选项。
允许设备开机自启以及后台服务的配置:
禁止后台服务以及开机自启的设置
2.账户同步服务的处理
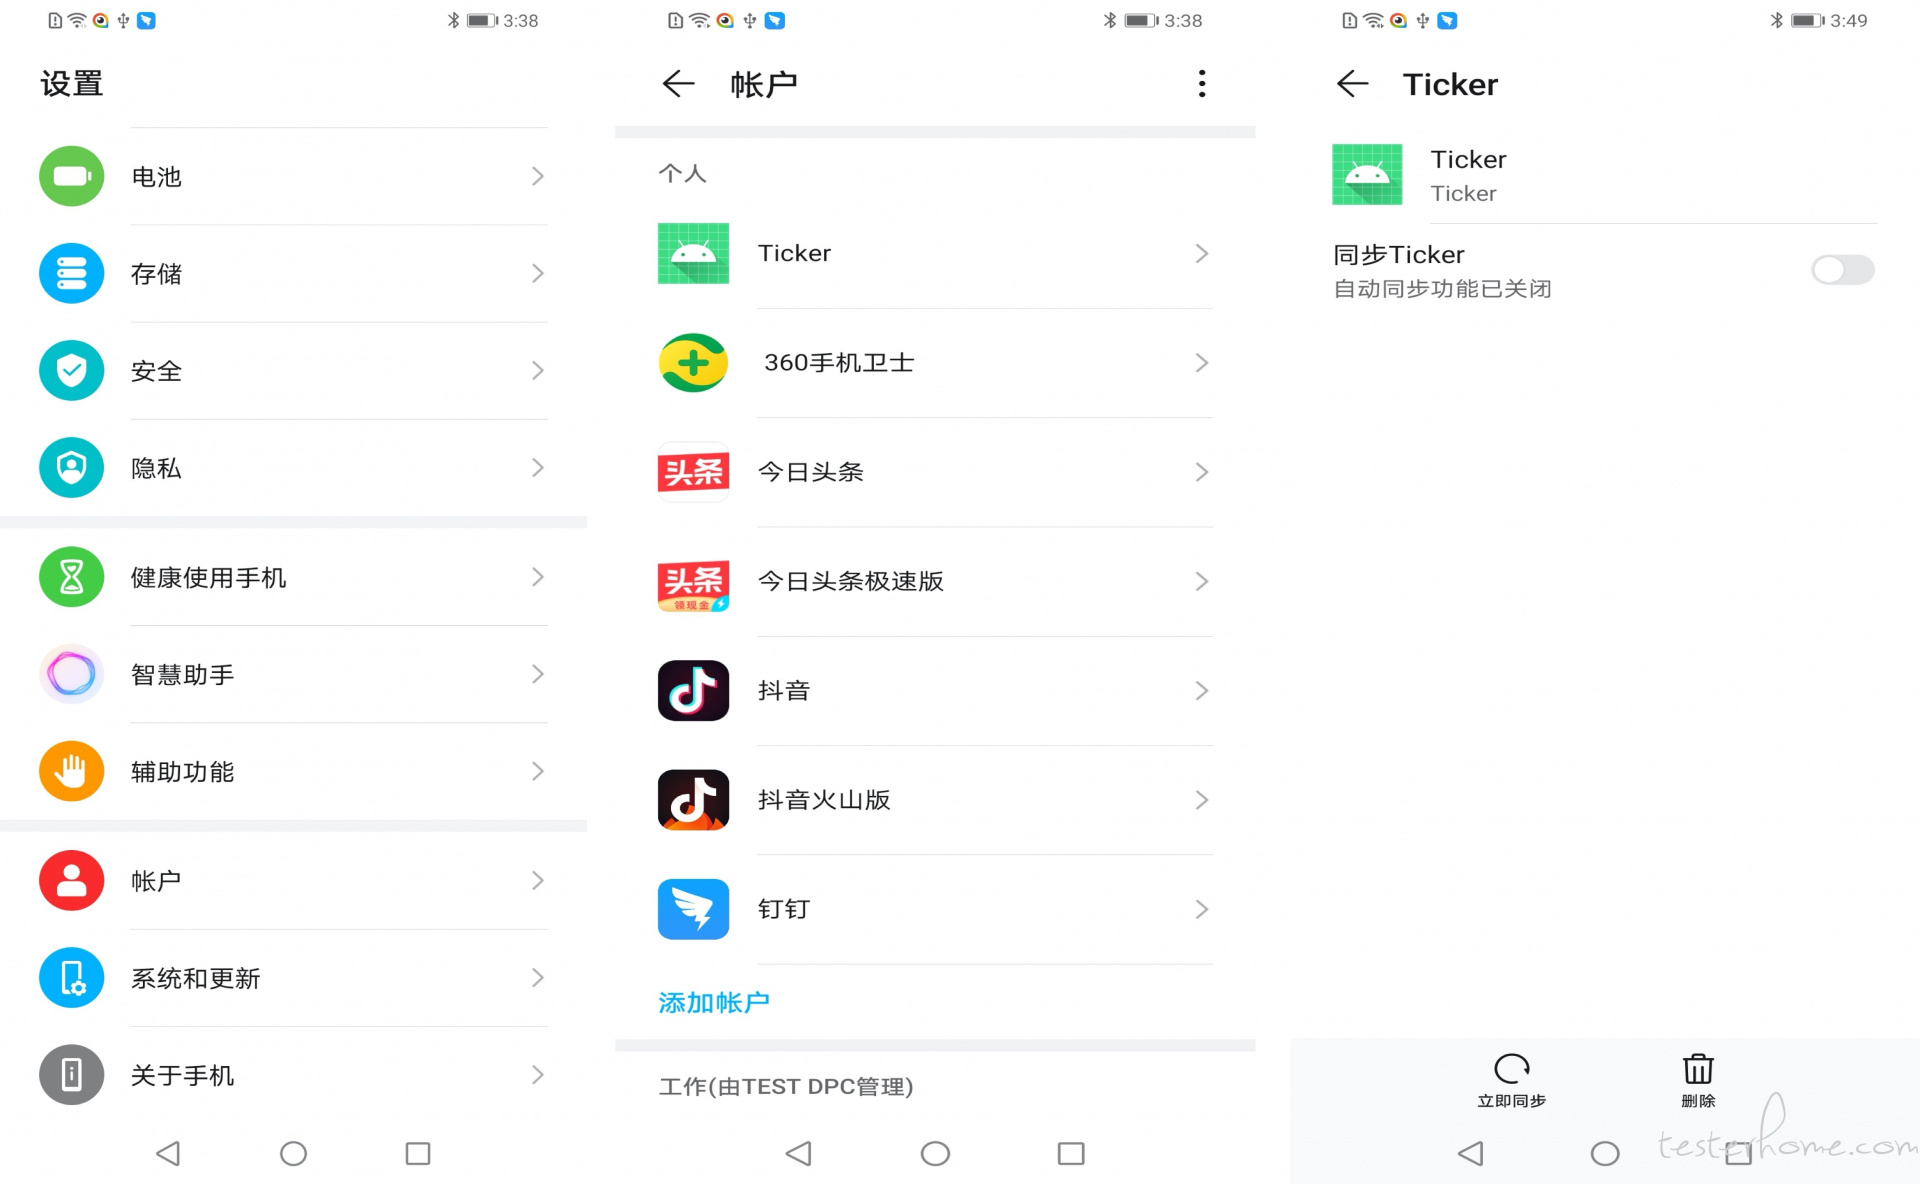
我们在【设置】/【账户】下可以看到系统内所有的账户信息,并可以在这里管理同步服务
允许账户同步设置:
允许账户同步时系统会按既定策略回调注册同步 Service,在 Service 内可以启动应用其他服务,但是部分机型上可能存在适配问题
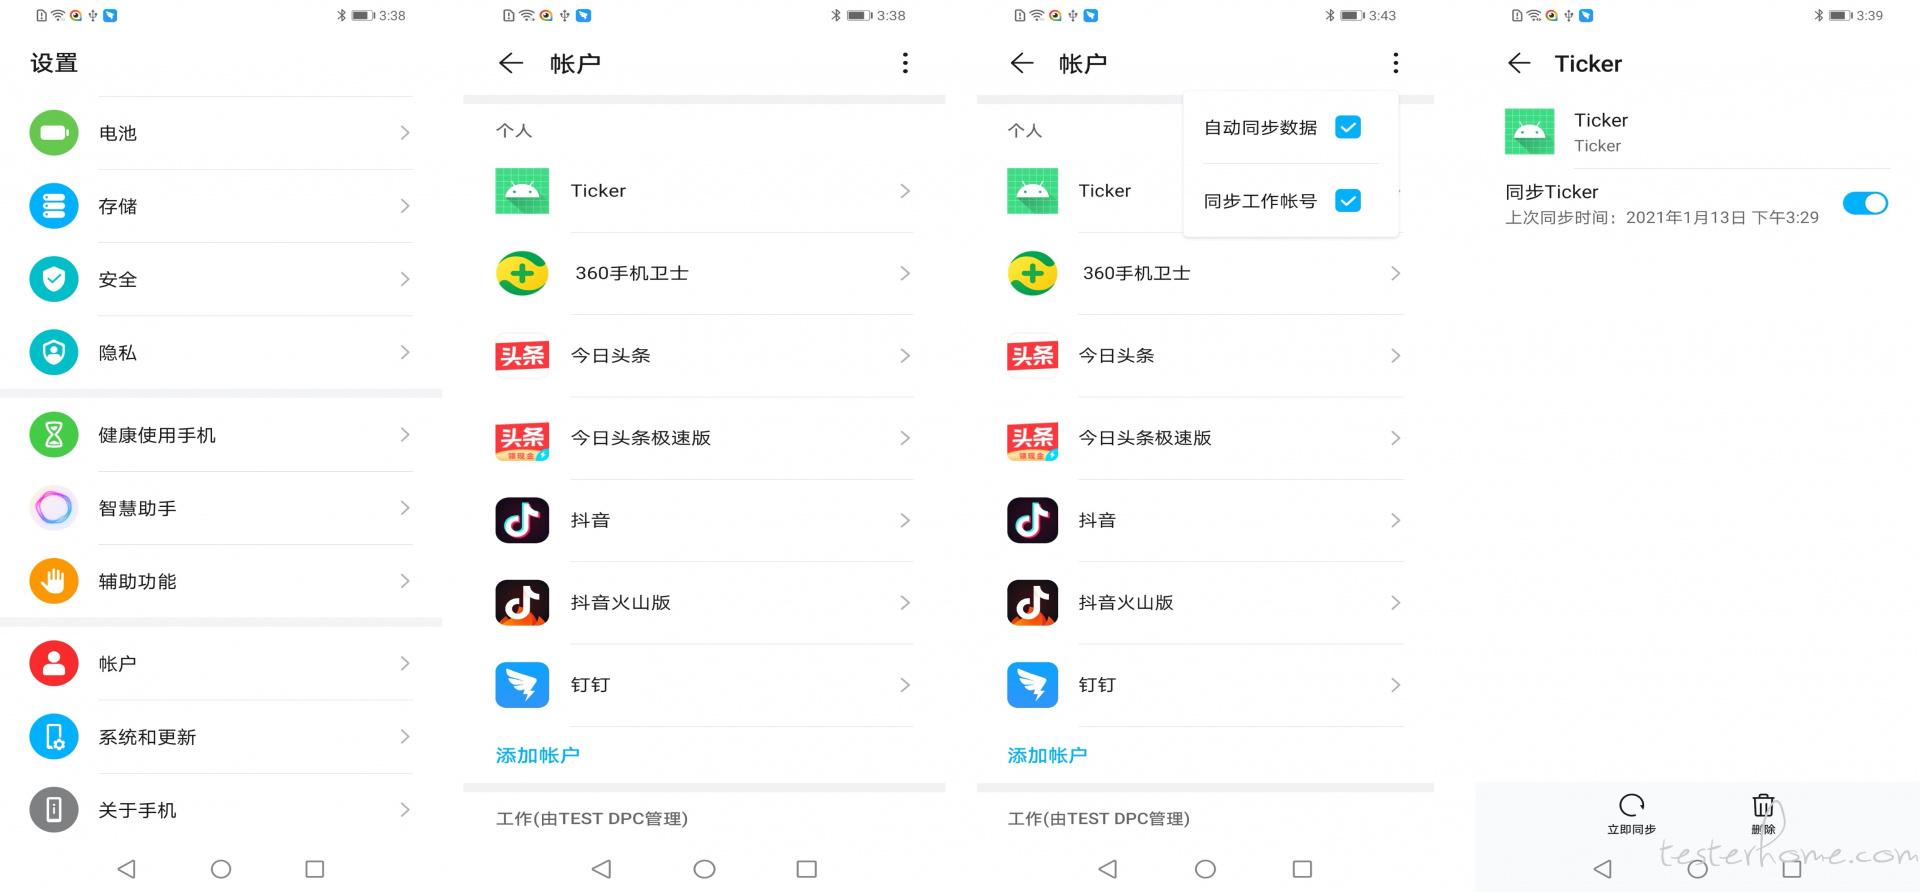
禁用所有账户同步功能:
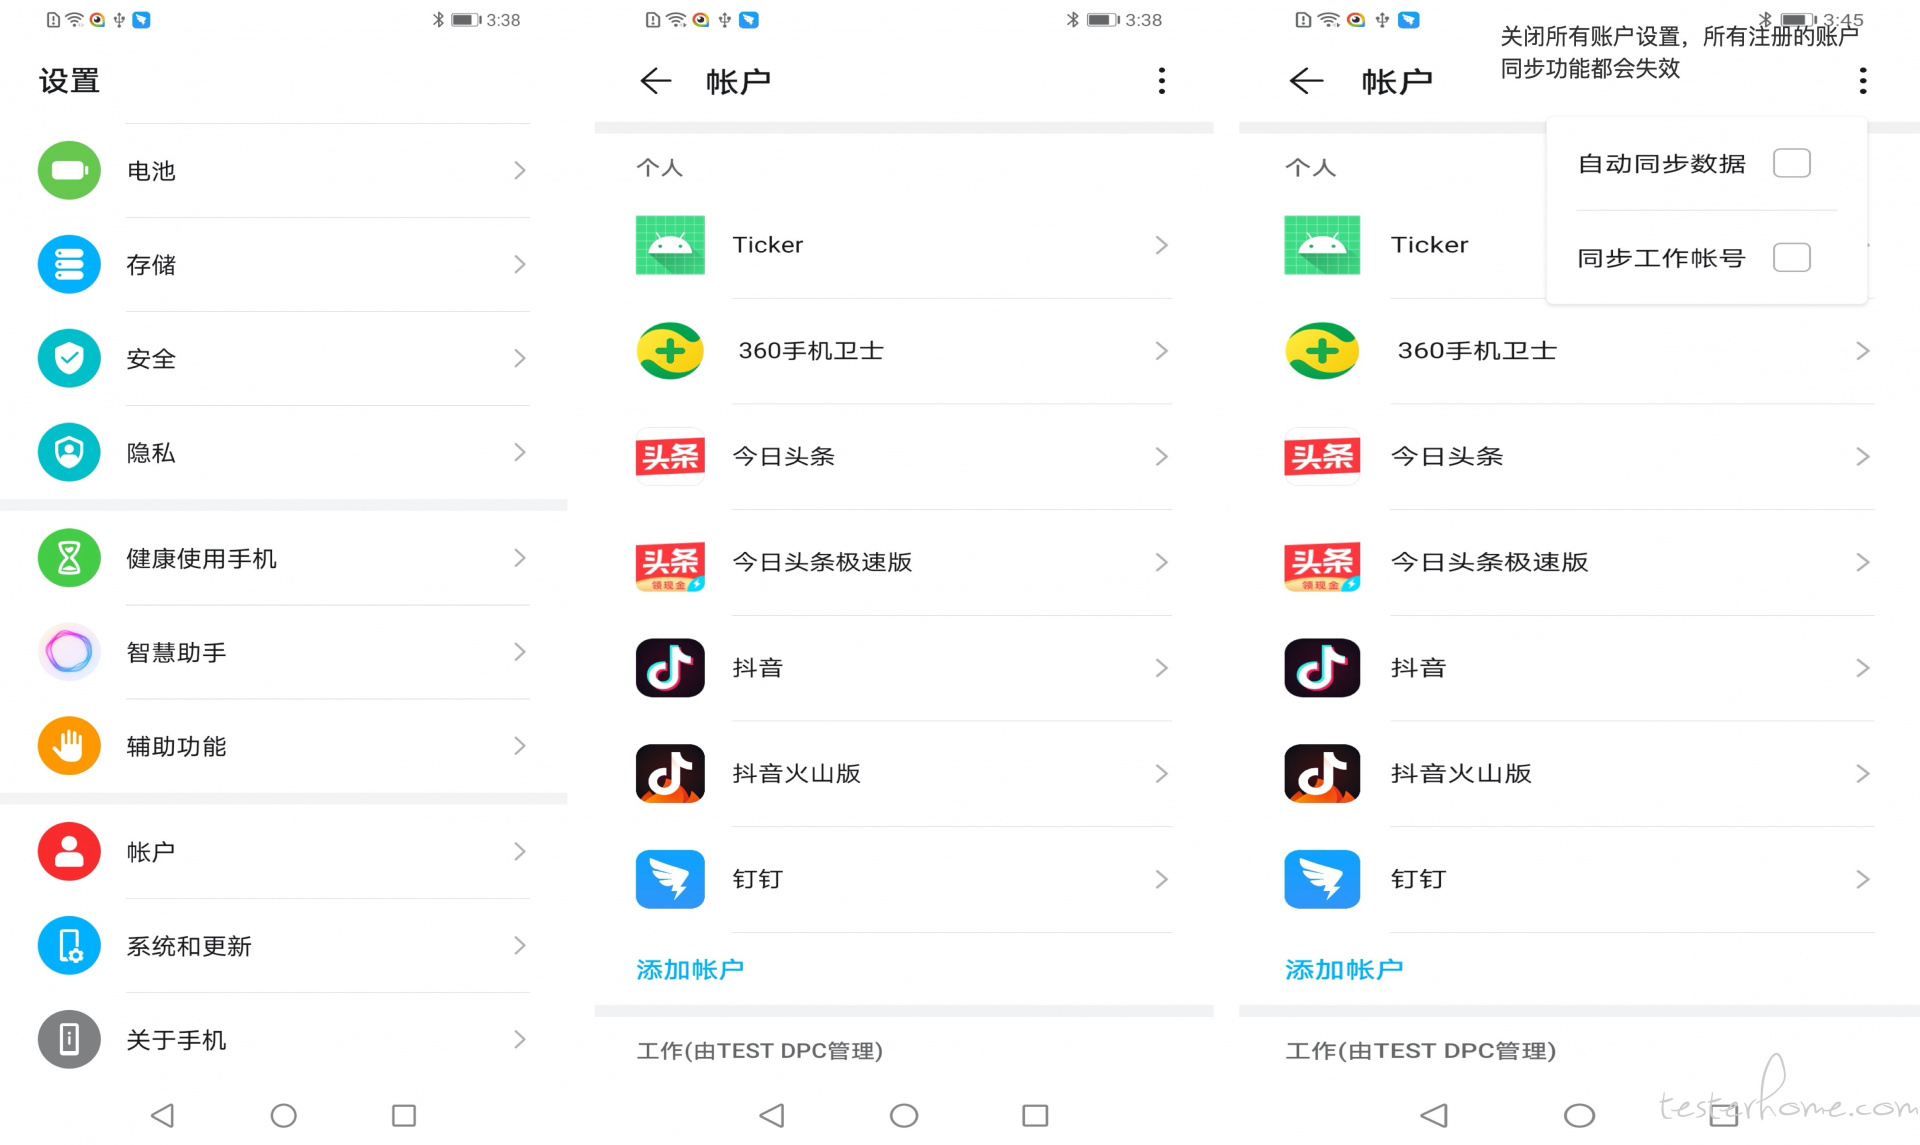
禁用某一应用的账户同步功能
