持续集成 [gitblit][jenkins] 在 jenkins 构建基于 maven 的 HelloWorld 工程
持续集成(使用 jenkins)
自学目标:
- 构建 java 工程:helloworld(已完成)
- 构建 android 工程:helloworld
gitblit 介绍
这是一个开源的基于 java 开发的 git 服务器,链接:https://github.com/gitblit/gitblit
下载源码
从源码编译运行
- 下载 ant,地址:http://ant.apache.org/bindownload.cgi ,并添加 ant 目录下 bin 目录到 path
- 打开源码根目录,执行 ant,并等待依赖 jar 包下载完成
- 导入工程到 eclipse
- 执行 com.gitblit.GitBlitServer 这个类
- 打开浏览器,输入https://localhost:8443/ 即可访问,localhost 可替换成 ip 地址,注意是 https
使用 war 包运行
- 下载 war 包,http://gitblit.com/
- 放到 tomcat 的 webapps 目录,然后运行 tomcat 即可
jar 包运行
java -jar gitblit.jar
登录
可通过用户名:admin, 密码: admin 登录
创建版本库
进入版本库页面,创建版本库
新建一个 maven 工程
打开 eclipse 并新建一个 maven 工程,
<project xmlns="http://maven.apache.org/POM/4.0.0" xmlns:xsi="http://www.w3.org/2001/XMLSchema-instance"
    xsi:schemaLocation="http://maven.apache.org/POM/4.0.0 http://maven.apache.org/xsd/maven-4.0.0.xsd">
    <modelVersion>4.0.0</modelVersion>
    <groupId>com.carl</groupId>
    <artifactId>chen</artifactId>
    <version>0.0.1-SNAPSHOT</version>

    <build>
        <plugins>
            <plugin>
                <groupId>org.apache.maven.plugins</groupId>
                <artifactId>maven-shade-plugin</artifactId>
                <version>3.0.0</version>
                <executions>
                    <execution>
                        <phase>package</phase>
                        <goals>
                            <goal>shade</goal>
                        </goals>
                        <configuration>
                            <transformers>
                                <transformer
                                    implementation="org.apache.maven.plugins.shade.resource.ManifestResourceTransformer">
                                    <mainClass>com.carl.demo.HelloWorld</mainClass>
                                </transformer>
                            </transformers>
                        </configuration>
                    </execution>
                </executions>
            </plugin>
        </plugins>
    </build>
</project>
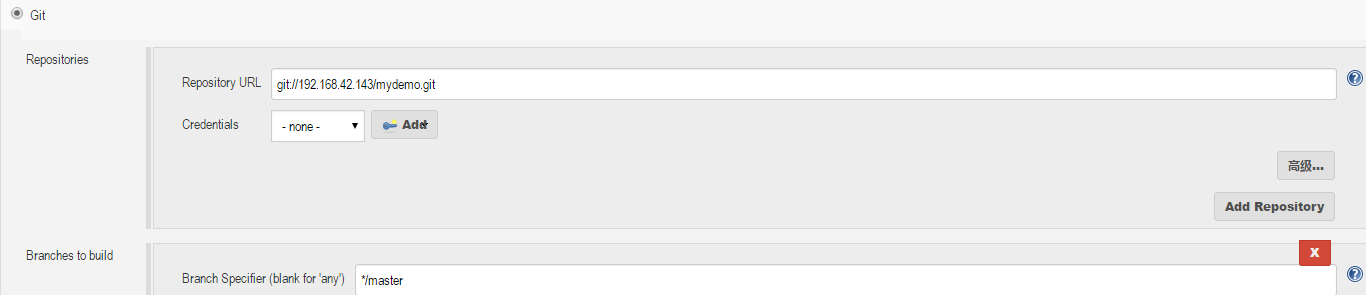
提交到 gitblit
- 打开 CMD 并转到工程根目录,执行以下命令
- git init
- git add -A (提交所有变化)
- git commit -m "first commit" (提交修改到本地)
- git remote add origin ssh://admin@192.168.42.143:29418/mydemo.git (增加远程仓库地址)
- git push -u origin master (提交修改到远程仓库地址)
下载安装执行 jenkins
- 这里使用 war 包:java -jar jenkins.war
- 打开:http://localhost:8080/
jenkins 配置
系统配置


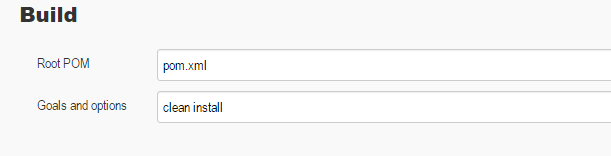
新建,构建一个 maven 项目

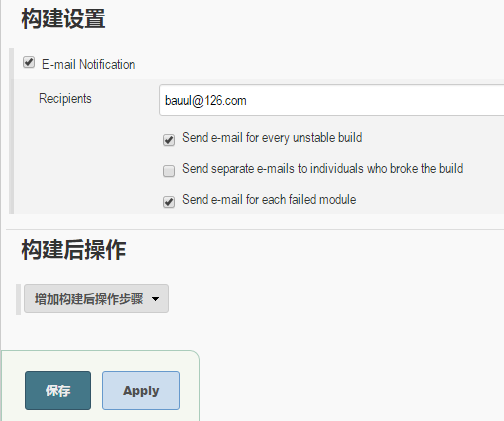
应用并保存,立即构建
结果
构建成功,并在邮箱中能看到通知邮件,初步目标达成
问题
- 现象
fatal: unable to access 'https://admin:admin@ip:port/r/project tor.git/': SSL certificate problem: self signed certificate in certificate chain方法:git config --global http.sslVerify false
「原创声明:保留所有权利,禁止转载」
如果觉得我的文章对您有用,请随意打赏。您的支持将鼓励我继续创作!