
有提示一个文件地址, 用文本软件打开提示的路径,copy , 然后输入到浏览器,确认就可以了。
ps : linux 系统可以使用命令行
zmj:~ zhengmj$ cat /Users/zhengmj/.jenkins/secrets/initialAdminPassword
261fd4cbcb1a4eae88034a68c79a210e
这个是在论坛的处女作,之前在测试岗位和开发都呆过,连运维我都待过一段时间。在创业的小公司呆了一端时间,总结了下自己,突然发现时间飞快,自动化这块我好多年前就想搞。只是下不了决心。现在这个文章希望是我疯狂的测试之路的开始。现在开始用文章记录自己的所有。(虽然我工作多年,还是发现自己很多不足,重新让自己有点压力去实现东西,这个文章我是希望强迫自己长期更新)
初步的想法是
1.实现 Jenkins 的基础持续集成(20170627-20170701 完结 花了 4 天填一些坑,还是不熟悉惹的祸)
3.Jenkins,能执行单元测试(20170701)
4.自己写一个模块监控内存抖动(待完成)
5.Monkey 压力测试 以及 log 收集(待完成)
6.定制 LeakCanary 实现配合 Monkey 测试的内存检测(待完成)
7.转测试人员前使用 appium 回归测试下, (旧版我自己写一个 http 接口 清除数据,再使用按键精灵进行简单的回归)
目前需要克服的问题挺多,因为我这使用了黑苹果系统,家里又是 window 系统
我应该考虑下使用 docker 来当做测试环境, 因为我家里和工作的系统不同。(20170627_待考虑)
Download Jenkins.
Open up a terminal in the download directory and run java -jar jenkins.war
Browse to http://localhost:8080 and follow the instructions to complete the installation.
Many Pipeline examples require an installed Docker on the same computer as Jenkins.
这一段太简单了, 所以不多加解释。 打开浏览器后, 页面让你输入密码。

有提示一个文件地址, 用文本软件打开提示的路径,copy , 然后输入到浏览器,确认就可以了。
ps : linux 系统可以使用命令行
zmj:~ zhengmj$ cat /Users/zhengmj/.jenkins/secrets/initialAdminPassword
261fd4cbcb1a4eae88034a68c79a210e
来到安装插件页面, 我建议全要了,反正也不差这个空间。
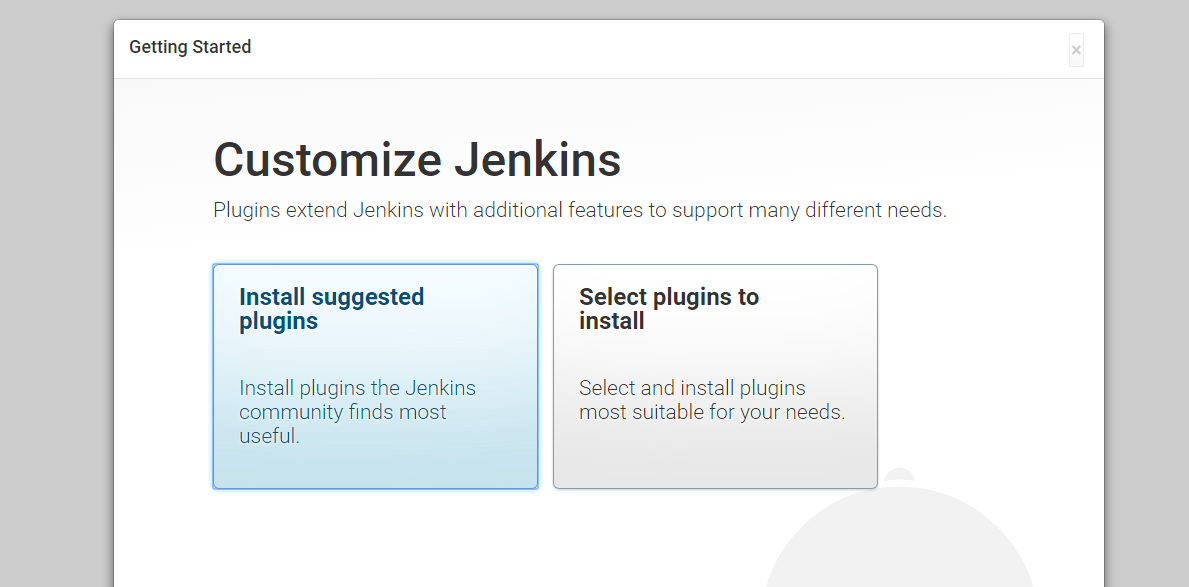
安装完后,就来到了 DashBoard 页面。这些步奏 so easy 。 因为到了上班时间了,中午继续更新,记录自己的点点滴滴。
20170701 不好意思啊, 因为自己有开发工作,加上自己碰到很多不顺心的事,今天才开始补下其实环境我已经搭建完成了,而且准备开源一个项目。这个项目主要是做专门用来记录测试的。目前正在书写中。
接下来系统配置就是 jdk 配置 , gradle 配置, sdk 配置 ,这些都比较简单。所以也不浪费大家的时间,目前我新建了一个 job ,然后每次 5 分钟监听下 oschina 的 git 。目前已经可以构建成功了,也给大家报下喜。如果大家喜欢,我在补充这一段,因为这段和前面一样,太简单了,所以暂时只显示结果。
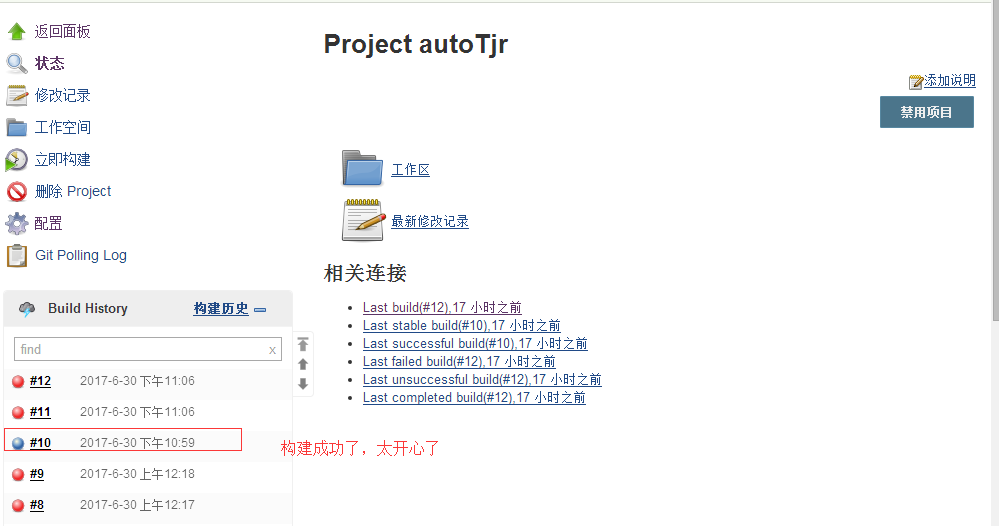
任务比较需要注意的配置,如下图:
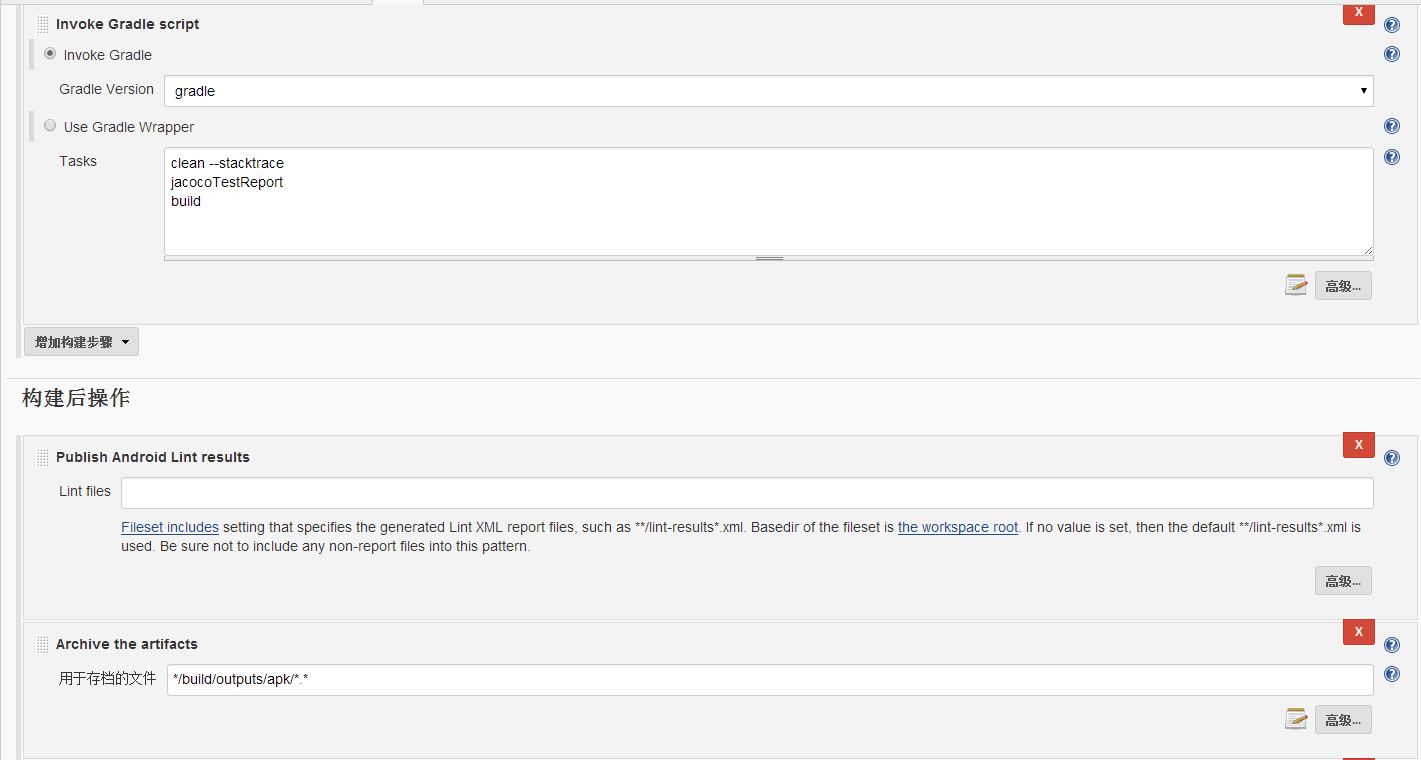
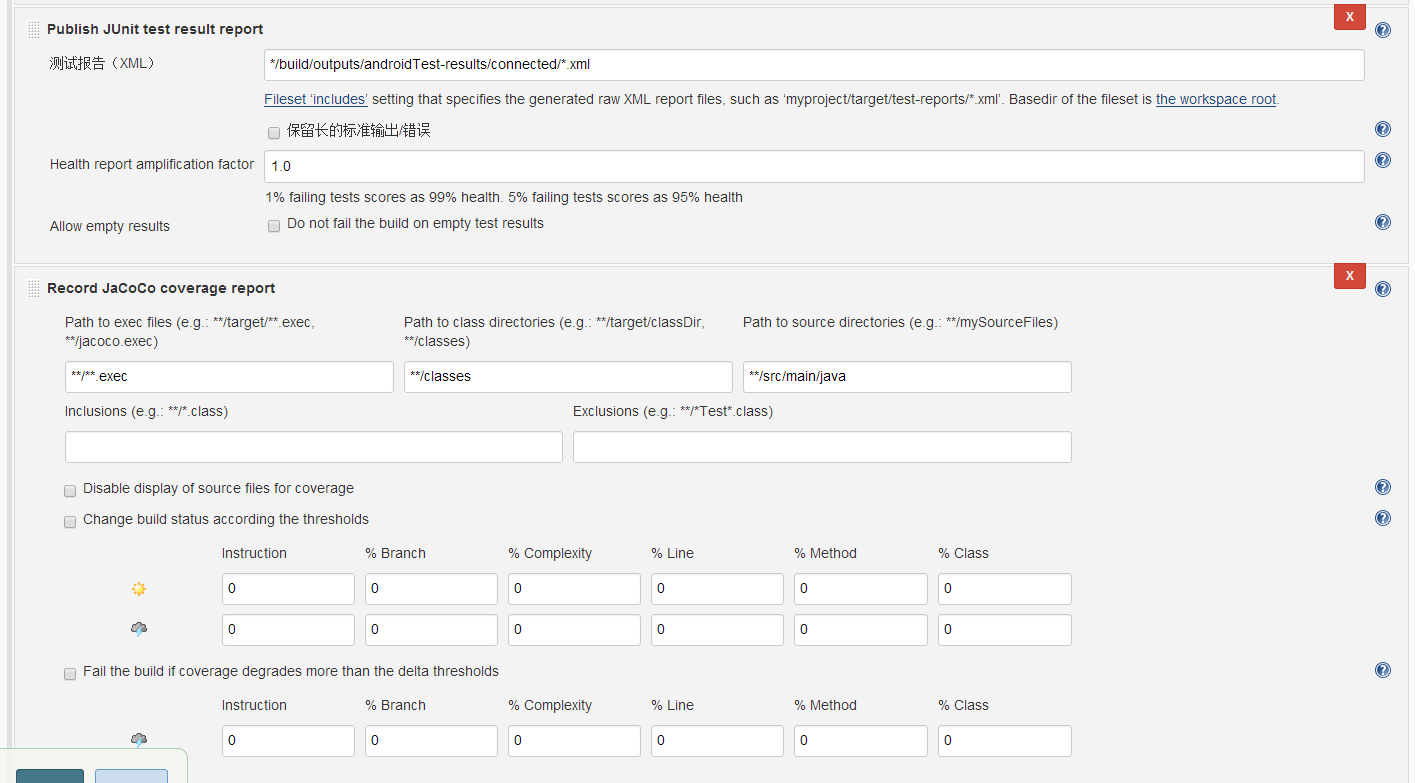
在实现这个持续集成的时候碰到很多坑, 我列举其中的一些,特别是 gradle 的配置很重要 以下是我能进行持续集成的配置。
apply plugin: 'com.android.application'
apply plugin: 'jacoco'
android {
    compileSdkVersion 26
    buildToolsVersion "26.0.0"

    defaultConfig {
        applicationId "com.mj"
        minSdkVersion 14
        targetSdkVersion 26
        versionCode 1
        versionName "1.0"
        testInstrumentationRunner "android.support.test.runner.AndroidJUnitRunner"
    }
    dexOptions {
        javaMaxHeapSize "2g"
    }
    buildTypes {
        release {
            minifyEnabled false
            proguardFiles getDefaultProguardFile('proguard-android.txt'), 'proguard-rules.pro'
        }
        //需要注意的是,打开该属性的话,在断点调试的时候会导致方法参数值丢失(看不到),所以在调试的时候要记得把它关掉。
        debug{
            testCoverageEnabled true
        }

    }
    lintOptions {
        abortOnError false
    }
    packagingOptions {
        exclude 'META-INF/NOTICE'
        exclude 'META-INF/LICENSE'

    }

    jacoco{
        version "0.7.4.201502262128"
    }


    testOptions {
        unitTests {
            returnDefaultValues = true
        }
    }
}


//jacocoTestReport依赖于connectedAndroidTest task,所以在执行jacoco之前需要先执行connectedAndroidTest,也就是说需要连接测试机(模拟器or真机)
task jacocoTestReport(type:JacocoReport,dependsOn:"connectedAndroidTest"){
    group = "Reporting"
    description = "Generate Jacoco coverage reports after running tests."
    reports{
        xml.enabled = false
        html.enabled = true
        csv.enabled = false
    }
    classDirectories = fileTree(
            dir : "$buildDir/intermediates/classes/debug",
            excludes : [
                    '**/*Test.class',
                    '**/R.class',
                    '**/R$*.class',
                    '**/BuildConfig.*',
                    '**/Manifest*.*'
            ]
    )
    def coverageSourceDirs = ['src/main/java']
    additionalSourceDirs = files(coverageSourceDirs)
    sourceDirectories = files(coverageSourceDirs)
    additionalClassDirs = files(coverageSourceDirs)
    executionData = files("$buildDir/outputs/code-coverage/connected/coverage.ec")
}
dependencies {
    compile fileTree(dir: 'libs', include: ['*.jar'])
    androidTestCompile('com.android.support.test.espresso:espresso-core:2.2.2', {
        exclude group: 'com.android.support', module: 'support-annotations'
    })
    compile 'com.android.support:appcompat-v7:26.0.0-alpha1'
    compile 'com.android.support:design:26.0.0-alpha1'
    testCompile 'junit:junit:4.12'
}
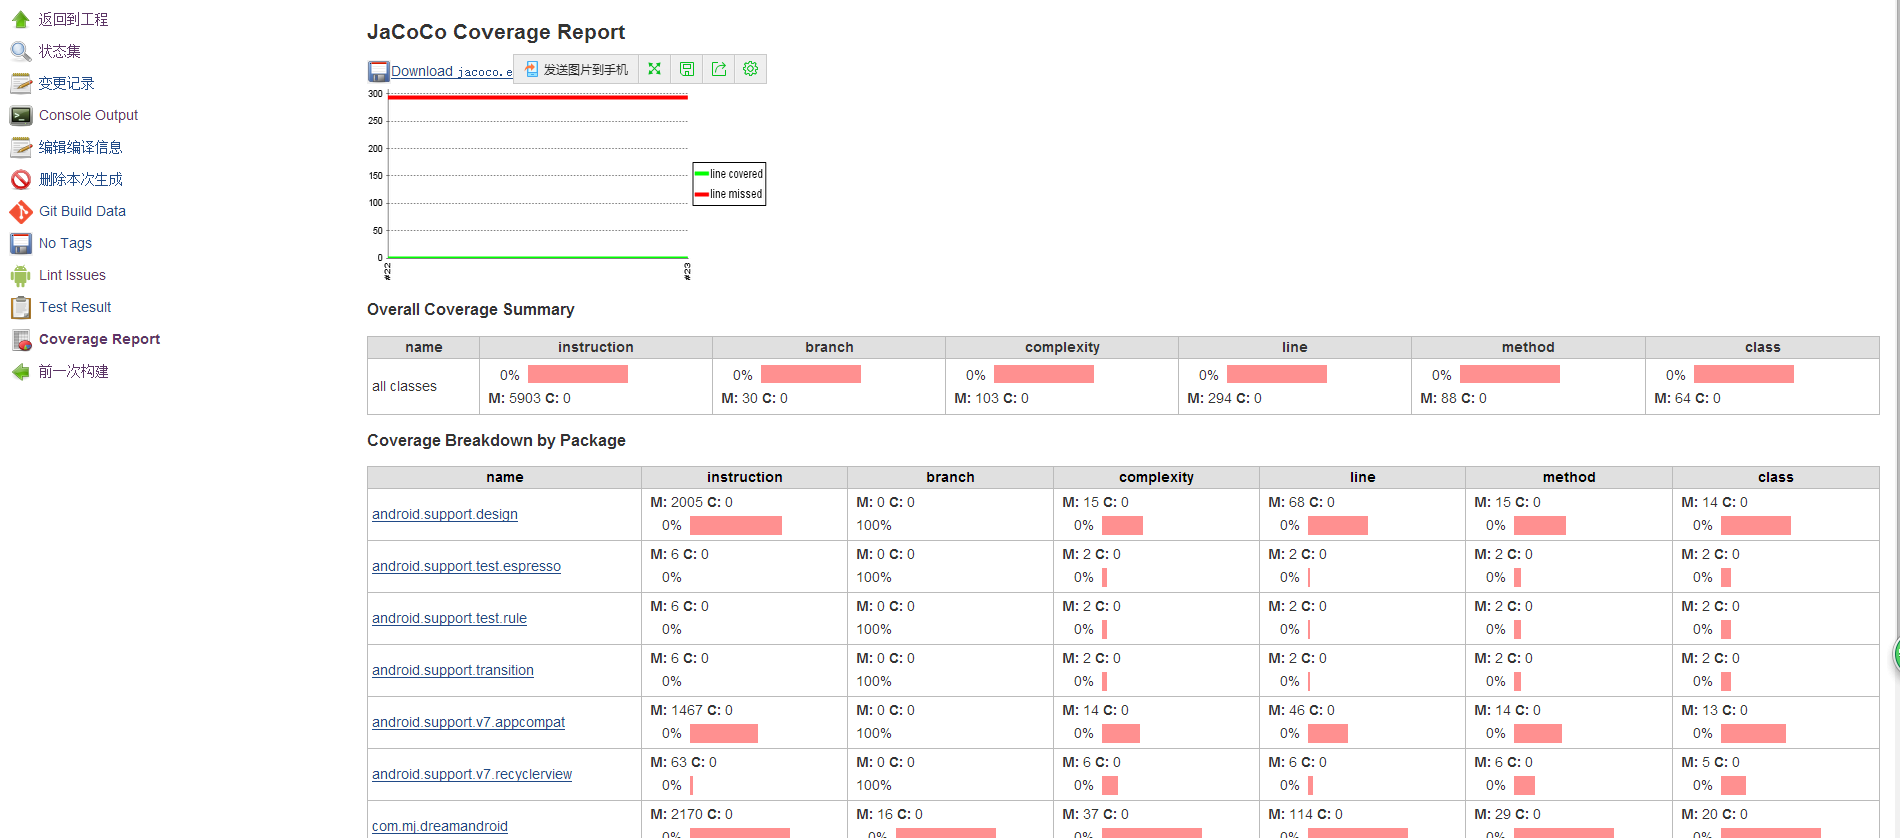
目前已经跑出来的效果
lint

代码覆盖率
junit

特别要说下 junit,以下是源码:
package com.mj.dreamandroid.util;
import android.content.Context;
import android.support.test.InstrumentationRegistry;
import android.support.test.runner.AndroidJUnit4;
import android.util.Log;

import org.junit.Before;
import org.junit.Test;
import org.junit.runner.RunWith;

import static org.junit.Assert.*;

/**
 * Created by Administrator on 2017/7/1.
 */
@RunWith(AndroidJUnit4.class)
public class StockSharedPreferencesTest {
   private Context appContext = InstrumentationRegistry.getTargetContext();
    @Before
    public void setUp() throws Exception{
        Log.d("StockSharedPreferencesTest","setUp");
        StockSharedPreferences.clearData(appContext);
    }

    @Test
    public void savePaintStyleFill() throws Exception {
        Log.d("StockSharedPreferencesTest","savePaintStyleFill");
        StockSharedPreferences.savePaintStyleFill(appContext,true);
        assertEquals(true,StockSharedPreferences.isPaintStyleFill(appContext));
    }

    @Test
    public void isPaintStyleFill() throws Exception {
        Log.d("StockSharedPreferencesTest","isPaintStyleFill");
        assertEquals(false,StockSharedPreferences.isPaintStyleFill(appContext));
    }

    @Test
    public void saveSelectSpeed() throws Exception {
        StockSharedPreferences.saveSelectSpeed(appContext,5);
        assertEquals(5,StockSharedPreferences.getSelectSpeed(appContext));
    }

    @Test
    public void getSelectSpeed() throws Exception {
        assertEquals(3,StockSharedPreferences.getSelectSpeed(appContext));
    }

    @Test
    public void clearData() throws Exception {

    }
}
因为之前不知道在哪里获取 context 加上方法不熟悉, 我也是看了半天官网的文档,才明白过来,需要使用
InstrumentationRegistry.getTargetContext();
InstrumentationRegistry.getTargetContext();
InstrumentationRegistry.getTargetContext();
重要的话说三次。
在 build.gradle 中增加
task findbugs(type: FindBugs,dependsOn:"connectedAndroidTest") {//
    ignoreFailures = true
    effort = "default"
    excludeFilter = new File("${project.rootDir}/findbug_filter.xml")
    reportLevel = "medium"
    //这里填写项目classes目录
    classes = files("$buildDir/intermediates/classes")
    source = fileTree('src/main/java')
    classpath = files()
    reports {
        //只能开启一个
        xml.enabled = true
        html.enabled = false
    }
}
在系统根目录增加过滤的文件 findbug_filter.xml
<?xml version="1.0" encoding="UTF-8"?>
<FindBugsFilter>
    <Match>
        <!-- ignore all issues in resource generation -->
        <Class name="~.*\.R\$.*"/>
    </Match>

    <Match>
        <Class name="~.*\.Manifest\$.*"/>
    </Match>

    <Match>
        <Class name="~.*\.*Test" />
        <!-- test classes are suffixed by 'Test' -->
        <Not>
            <Bug code="IJU" /> <!-- 'IJU' is the code for bugs related to JUnit test code -->
        </Not>
    </Match>
    <!--过滤掉一些bug-->
    <Match>
        <!--1、性能问题-->
        <!--<Bug category="PERFORMANCE" />-->
        <!--2、一般正确性问题-->
        <!--<Bug category="CORRECTNESS" />-->
        <!--3、多线程正确性问题-->
        <!--<Bug category="MT_CORRECTNESS" />-->
        <!--4、恶意代码,有可能成为攻击点-->
        <!--<Bug category="MALICIOUS_CODE" />-->

        <Or>
            <!--Field names should start with a lower case letter-->
            <BugCode name="Nm"/>
            <!--Method ignores exceptional return value or Return value of method without side effect is ignored-->
            <BugCode name="RV"/>
            <!--国际化-->
            <BugCode name="Dm"/>
        </Or>
    </Match>
</FindBugsFilter>
在 jenkins job 中 执行编译的时候增加 findbugs 命令, 就可以了,页面输出
FindBugs: 0 warnings from one analysis.
No warnings since build 24.
New zero warnings highscore: no warnings since yesterday!
这里开始是定制性能的东西 暂时在开发中,所以请期待。儿子生病了, 我得陪伴他下。暂定下周六更新
