sonar 是业界开源的代码质量监控的开源平台,之前在 jenkins mac slave 上配置了 oclint,但是报表在 jenkins 内显示不是很友好,为了真正让开发小伙伴用的顺手,需要配置 sonar 平台。
本文主要目的是详细介绍一下 sonar 环境的搭建,网上有很多的资料介绍环境配置,笔者在 Linux 和 Mac 环境搭建过程中都踩过坑,便记录一二。
1、简单介绍原理
2、sonar 环境配置
3、sonar-runner 环境配置
4、集成执行生成可视化报表
5、参考
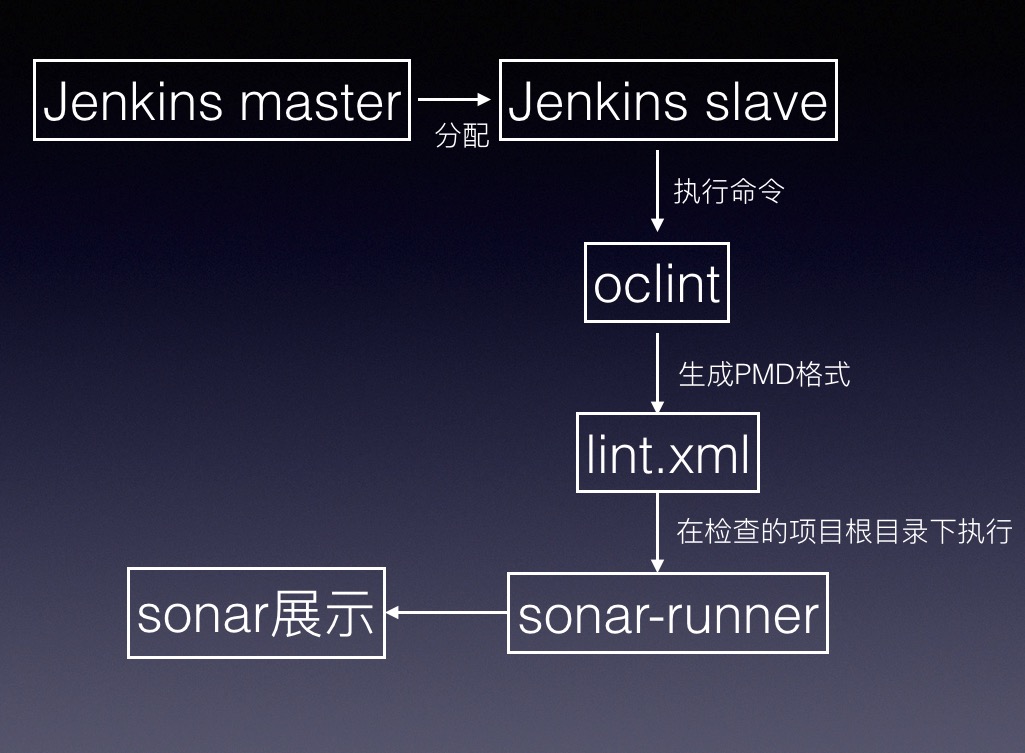
开题提过,我之前的 oclint 是通过 jenkins 调度执行在我们配置的几台 mac slave 上的,oclint 生成的报告是 pmd 格式,通过 jenkins 的插件Pbulish PMD analysis results解析和展示。
但是当开发想看哪些 issue 的时候,就会很麻烦,不是很直观,需要点击到 jenkins 的 job 里面去查找。为了方便开发小伙伴,查阅资料知道了 sonar。
网上对 sonar 有非常详细的介绍,我就不赘述,我理解的 sonar 就是类似于我用 flask 写的一个服务端,可以用来存储数据和展示数据,sonar-runner 就类似于 requests 的一个 post 请求,它将 oclint 检查生成的 PMD 格式的 XML 文件发送给 sonar,然后 sonar 将接收的数据存入
mysql 或者其他类型的数据库,并且展示。
对于 jenkins 触发的 job 我是通过 jenkins 中 gerrit 的触发机制,当开发change-merge到开发分支的时候触发 job 执行。
sonar 环境配置分两步,sonar 和 mysql.
【1】sonar
在这里我在 mac 和 linux 环境都尝试搭建了 sonar。
sonar 下载地址为:https://www.sonarqube.org/downloads/
下载好之后,是一个.tgz 压缩文件,解压之后,这里 linux 和 mac 配置环境是一致的没有什么不同,放在任意文件夹位置都可以。加入放在/opt/sonar/下面。
启动 sonar 服务命令为:
## linux启动
./bin/linux-x86-4/sonar.sh start

## mac启动
./bin/macosx-universal-64/sonar.sh start
启动之前,我更改了 conf/sonar.properties,由于我在 linux 上启动了几个 flask 服务已经占用了很多端口。
我更改了这些项目:
sonar.web.host=0.0.0.0

sonar.web.port=9007

sonar.search.port=9011
然后分别执行启动命令,打开http://127.0.0.1:9007,就可以正常进入 sonar 界面。但是在最下面有红字提示那是因为没有连接数据库。
这里我更改 sonar.search.port 是因为,我发现默认端口 9001 已经被占用,服务启动不起来,报错提示在
logs/ce.log看出来的。
【2】mysql
这里 mac 和 linux 有稍微的区别。
安装命令:
## linux 我推荐rpm格式安装,且安装mysql 5.7版本

1、https://dev.mysql.com/downloads/repo/apt/ 下载dev包
2、转存linux,然后执行
sudo dpkg -i mysql-apt-config_0.8.3-1_all.deb
groupadd mysql
useradd -r -g mysql mysql
sudo apt-get install libaio-dev

## mac安装mysql
brew install mysql
mysql 安装好之后,启动命令:
## linux
sudo /etc/init.d/mysql start

## mac
mysql.server start
通过默认 root 用户登录 mysql,mysql -uroot -proot,登录之后。
需要新增 sonar database 以及 sonar 用户。
CREATE DATABASE sonar CHARACTER SET utf8 COLLATE utf8_general_ci;
CREATE USER 'sonar' IDENTIFIED BY 'sonar';
GRANT ALL ON sonar.* TO 'sonar'@'%' IDENTIFIED BY 'sonar';
GRANT ALL ON sonar.* TO 'sonar'@'localhost' IDENTIFIED BY 'sonar';
FLUSH PRIVILEGES;
成功之后,重启一下 mysql 服务。
更改conf/sonar.properties数据库的配置,让它生效。
sonar.jdbc.username=sonar
sonar.jdbc.password=sonar

sonar.jdbc.url=jdbc:mysql://localhost:3306/sonar?useUnicode=true&characterEncoding=utf8&rewriteBatchedStatements=true&useConfigs=maxPerformance
再重启一下 sonar 服务,然后重新登录http://127.0.0.1:9007,正常启动,则可以看到页面最底端的红字预警提示已经没有了,其实也可以通过 logs 文件夹下,日志查看。
小贴士,这里我为什么强调使用 mysql 5.7 的版本,是因为我在 linux 下安装第一次是用 sudo apt-get install mysql-server,导致安装的 5.5 的版本,和 sonar 6.2 不匹配。
sonar-runner 类似于一个发请求的命令,它应该放置于执行 oclint 的 mac slave 上。
sonar-runner 下载路径:http://repo1.maven.org/maven2/org/codehaus/sonar/runner/sonar-runner-dist/2.4/sonar-runner-dist-2.4.zip
解压缩之后,环境变量可配置可不配置,我建议不要配置 bash_profile,因为要使得 bash_profile 生效,jenkins 需要跟 slave 断开一下再重连,才能生效。这对于持续集成集群服务来说,是不合理的。
要使得 sonar-runner 能有效使用,需要配置sonar-runner/conf/sonar-runner.properties
sonar.host.url=http://localhost:9007
sonar.sourceEncoding=UTF-8
sonar.login=admin
sonar.password=admin
这个时候需要在命令行验证一下,假设 sonar-runner 放置于opt下,opt/sonar-runner/bin/sonar-runner,提示:
SonarQube Runner 2.4
Java 1.8.0_111 Oracle Corporation (64-bit)
Mac OS X 10.12.3 x86_64
INFO: Runner configuration file: /Users/huami/opt/sonar-runner/conf/sonar-runner.properties
INFO: Project configuration file: NONE
INFO: Default locale: "zh_CN", source code encoding: "UTF-8"
说明 sonar-runner 已经配置好。
【1】在执行sonar-runner之前,需要在服务端sonar/extensions/plugins/下加载一个 oc 检查 jar 包插件。
sonar-objective-c-plugin-0.5.0-SNAPSHOT.jar 插件下载地址:https://github.com/ChenTF/iOS-sonarShell
下载好之后,将其转存到sonar/extensions/plugins/,并重启一下 sonar 服务。
【2】需要新建生成或者在下载的包里面,将sonar-project.properties放入 iOS 项目主目录,最后我的sonar-project.properties为:
##########################
# Required configuration #
##########################

sonar.projectKey=MiFit
sonar.projectName=MiFit
sonar.projectVersion=1.0
sonar.language=objectivec

# Project description
sonar.projectDescription=Fake description

# Path to source directories 工程文件目录
sonar.sources=MiFit

# Xcode project configuration (.xcodeproj or .xcworkspace)
# -> If you have a project: configure only sonar.objectivec.project
# -> If you have a workspace: configure sonar.objectivec.workspace and sonar.objectivec.project
# and use the later to specify which project(s) to include in the analysis (comma separated list)
sonar.objectivec.project=MiFit.xcodeproj
sonar.objectivec.workspace=MiFit.xcworkspace

# Scheme to build your application
sonar.objectivec.appScheme=MiFit
# Scheme to build and run your tests (comment following line of you don't have any tests)


##########################
# Optional configuration #
##########################

# Encoding of the source code
sonar.sourceEncoding=UTF-8


sonar.objectivec.oclint.reportPath=lint.xml


sonar.scm.enabled=false

sonar.host.url=http://x.x.x.x:9007
万事俱备,只欠东风。
【3】我已经在 iOS 项目目录下生成了 oclint 执行之后的 PMD 格式的 lint.xml。
为了验证 sonar 搭建的没有问题,直接 cd 到项目根目录下去执行sonar-runner将 lint.xml 结果信息发送到 sonar 服务。
假如前面都正常配置的话,此时执行sonar-runner,log 如果是这样的
 Analysis report uploaded in 2489ms
11:47:24.701 INFO  - ANALYSIS SUCCESSFUL, you can browse http://x.x.x.x:9007/dashboard/index/MiFit
11:47:24.702 INFO  - Note that you will be able to access the updated dashboard once the server has processed the submitted analysis report
11:47:24.702 INFO  - More about the report processing at http://x.x.x.x:9007/api/ce/task?id=AVrK7MT-YTb445TpRSn7
11:47:25.577 INFO  - Task total time: 24.425 s
INFO: ------------------------------------------------------------------------
INFO: EXECUTION SUCCESS
INFO: ------------------------------------------------------------------------
Total time: 32.521s
Final Memory: 23M/777M
可以去http://192.168.1.101:9007看看项目执行的记录有没有正确上传了。

我没有加入自己定义的规则,那才是静态代码监控平台最重要的地方,等我实践好,再分享吧,我现在只是把环境配置好了。
写的不好的地方,请大家多指正。
