8/9/16 更新,抱歉之前提供的讯息太少,第一次发帖敬请原谅
Hi,我刚学习 Appium 两个星期,想要学习自动化测试 App。
之所以选择 Appium,
是因为 Appium 有一个 Appium Inspector 可以录制动作,
另外 AWS Device Farm 也支持这个工具。
然后接下来就遇到了好多好多的问题
一步一步的慢慢解决,直到现在真的不了解才发帖请教
具体的操作流程是这样的
此时就可以操作 Inspector,一步一步录制好脚本
录制出来的就长这个样子,为了方便阅读,我自己加了注解
import io.appium.java_client.AppiumDriver;
import org.openqa.selenium.remote.DesiredCapabilities;
import java.net.URL;

public class AppiumTest {
    public static void main(String[] args) {
        DesiredCapabilities capabilities = new DesiredCapabilities();
        capabilities.setCapability("appium-version", "1.0");
        capabilities.setCapability("platformName", "Android");
        capabilities.setCapability("platformVersion", "5.0.2");
        capabilities.setCapability("deviceName", "HTC");
        capabilities.setCapability("app", "/Users/Kelvin/Dropbox/app-debug.apk");
        wd = new AppiumDriver(new URL("http://127.0.0.1:4723/wd/hub"), capabilities);
        wd.manage().timeouts().implicitlyWait(60, TimeUnit.SECONDS);
        //Click hamburger menu
        wd.findElement(By.xpath("//android.widget.LinearLayout[1]/android.widget.FrameLayout[1]/android.widget.LinearLayout[1]/android.widget.FrameLayout[1]/android.support.v4.widget.DrawerLayout[1]/android.widget.LinearLayout[1]/android.widget.LinearLayout[1]/android.view.View[1]/android.widget.ImageButton[1]")).click();
        //Go to 'Login Page'
        wd.findElement(By.xpath("//android.widget.LinearLayout[1]/android.widget.FrameLayout[1]/android.widget.LinearLayout[1]/android.widget.FrameLayout[1]/android.support.v4.widget.DrawerLayout[1]/android.widget.RelativeLayout[1]/android.support.v7.widget.RecyclerView[1]/android.widget.FrameLayout[8]")).click();
        //Input username: admin
        wd.findElement(By.xpath("//android.widget.LinearLayout[1]/android.widget.FrameLayout[1]/android.widget.LinearLayout[1]/android.widget.FrameLayout[1]/android.support.v4.widget.DrawerLayout[1]/android.widget.LinearLayout[1]/android.widget.FrameLayout[1]/android.widget.FrameLayout[1]/android.widget.RelativeLayout[1]/android.widget.EditText[1]")).sendKeys("admin");
        //Input password: password
        wd.findElement(By.xpath("//android.widget.LinearLayout[1]/android.widget.FrameLayout[1]/android.widget.LinearLayout[1]/android.widget.FrameLayout[1]/android.support.v4.widget.DrawerLayout[1]/android.widget.LinearLayout[1]/android.widget.FrameLayout[1]/android.widget.FrameLayout[1]/android.widget.RelativeLayout[1]/android.widget.EditText[2]")).sendKeys("password");
        //Click login
        wd.findElement(By.xpath("//android.widget.LinearLayout[1]/android.widget.FrameLayout[1]/android.widget.LinearLayout[1]/android.widget.FrameLayout[1]/android.support.v4.widget.DrawerLayout[1]/android.widget.LinearLayout[1]/android.widget.FrameLayout[1]/android.widget.FrameLayout[1]/android.widget.RelativeLayout[1]/android.widget.Button[1]")).click();

        wd.close();
    }
}
<?xml version="1.0" encoding="UTF-8"?>
<project xmlns="http://maven.apache.org/POM/4.0.0"
         xmlns:xsi="http://www.w3.org/2001/XMLSchema-instance"
         xsi:schemaLocation="http://maven.apache.org/POM/4.0.0 http://maven.apache.org/xsd/maven-4.0.0.xsd">
    <modelVersion>4.0.0</modelVersion>

    <groupId>com.amazonaws.devicefarm.android.referenceapp</groupId>
    <artifactId>maven</artifactId>
    <version>1.0-SNAPSHOT</version>
    <packaging>jar</packaging>


    <name>appiumTest</name>
    <url>http://maven.apache.org</url>
    <dependencies>


        <dependency>
            <groupId>junit</groupId>
            <artifactId>junit</artifactId>
            <version>4.11</version>
            <scope>test</scope>
        </dependency>

        <dependency>
            <groupId>org.seleniumhq.selenium</groupId>
            <artifactId>selenium-java</artifactId>
            <version>2.50.1</version>
        </dependency>

        <dependency>
            <groupId>org.testng</groupId>
            <artifactId>testng</artifactId>
            <version>6.8.8</version>
            <scope>test</scope>
        </dependency>

        <dependency>
            <groupId>io.appium</groupId>
            <artifactId>java-client</artifactId>
            <version>3.1.0</version>
        </dependency>
    </dependencies>

    <build>
        <plugins>

            <plugin>
                <groupId>org.apache.maven.plugins</groupId>
                <artifactId>maven-surefire-plugin</artifactId>
                <version>2.19.1</version>
                <!--
                <configuration>
                    <skipTests>false</skipTests>
                </configuration> -->
            </plugin>

            <plugin>
                <groupId>org.apache.maven.plugins</groupId>
                <artifactId>maven-jar-plugin</artifactId>
                <version>2.6</version>
                <configuration>
                    <archive>
                        <manifest>
                            <addClasspath>true</addClasspath>
                            <classpathPrefix>lib/</classpathPrefix>
                            <mainClass>com.amazonaws.devicefarm.android.referenceapp.Activities.MainActivity</mainClass>
                        </manifest>
                    </archive>
                </configuration>
                <executions>
                    <execution>
                        <goals>
                            <goal>test-jar</goal>
                        </goals>
                    </execution>
                </executions>
            </plugin>

            <plugin>
                <groupId>org.apache.maven.plugins</groupId>
                <artifactId>maven-dependency-plugin</artifactId>
                <version>2.10</version>
                <executions>
                    <execution>
                        <id>copy-dependencies</id>
                        <phase>package</phase>
                        <goals>
                            <goal>copy-dependencies</goal>
                        </goals>
                        <configuration>
                            <outputDirectory>${project.build.directory}/dependency-jars/</outputDirectory>
                        </configuration>
                    </execution>
                </executions>
            </plugin>

            <plugin>
                <artifactId>maven-assembly-plugin</artifactId>
                <version>2.5.4</version>
                <executions>
                    <execution>
                        <phase>package</phase>
                        <goals>
                            <goal>single</goal>
                        </goals>
                        <configuration>
                            <finalName>zip-with-dependencies</finalName>
                            <appendAssemblyId>false</appendAssemblyId>
                            <descriptors>
                                <descriptor>src/main/assembly/zip.xml</descriptor>
                            </descriptors>
                        </configuration>
                    </execution>
                </executions>
            </plugin>
        </plugins>
    </build>

</project>
最后就是将这个 MAVEN 专案打包,打包的方式也在 AWS 文件 提到了
首先在 Terminal 上 cd 到专案的位置,然后 mvn clean package -DskipTest=true
就会根据 pom.xml 打包成一个 *.zip 上传到 Amazon 的农场
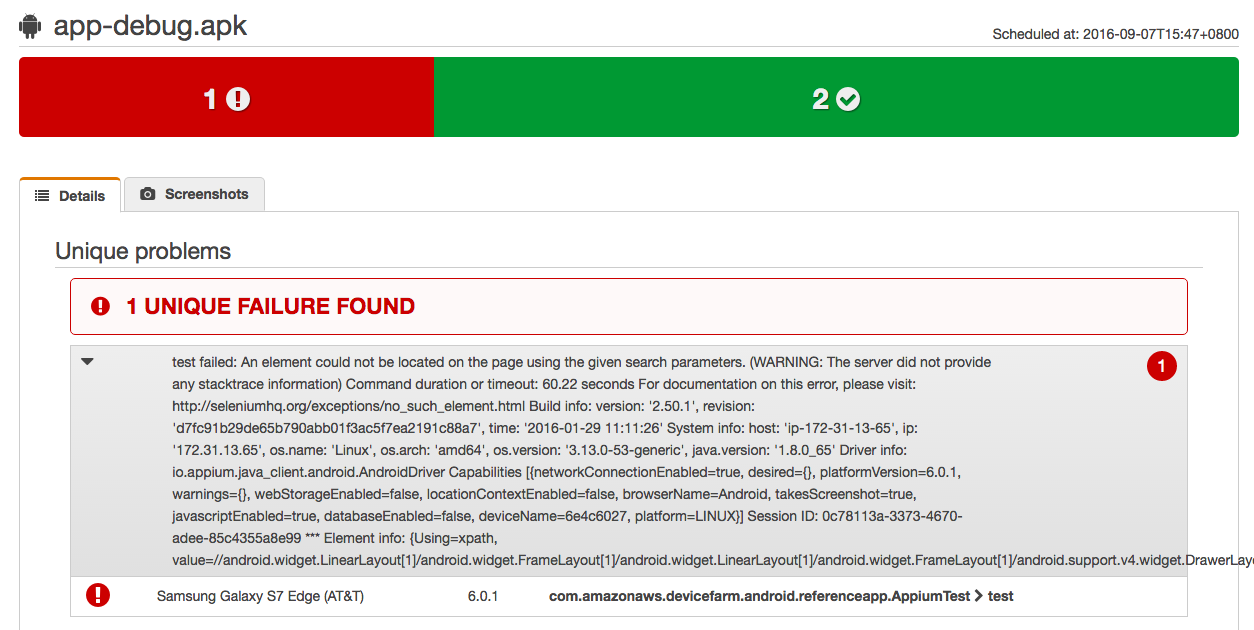
打包这段是正确的,因为 AWS 农场有正确读到我的脚本,
但运行时提示错误讯息 An element could not be located on the page using the given search parameters.
详细的错误讯息:
test failed: An element could not be located on the page using the
given search parameters. (WARNING: The server did not provide any> stacktrace information)
Command duration or timeout: 60.22 seconds
For documentation on this error, please visit:
http://seleniumhq.org/exceptions/no_such_element.html Build info:
version: '2.50.1', revision:
'd7fc91b29de65b790abb01f3ac5f7ea2191c88a7', time: '2016-01-29
11:11:26' System info: host: 'ip-172-31-13-65', ip: '172.31.13.65',
os.name: 'Linux', os.arch: 'amd64', os.version: '3.13.0-53-generic',
java.version: '1.8.0_65' Driver info:
io.appium.java_client.android.AndroidDriver Capabilities
[{networkConnectionEnabled=true, desired={}, platformVersion=6.0.1,
warnings={}, webStorageEnabled=false, locationContextEnabled=false,
browserName=Android, takesScreenshot=true, javascriptEnabled=true,
databaseEnabled=false, deviceName=6e4c6027, platform=LINUX}] Session
ID: 0c78113a-3373-4670-adee-85c4355a8e99 *** Element info:
{Using=xpath,
value=//android.widget.LinearLayout[1]/android.widget.FrameLayout[1]/android.widget.LinearLayout[1]/android.widget.FrameLayout[1]/android.support.v4.widget.DrawerLayout[1]/android.widget.LinearLayout[1]/android.widget.LinearLayout[1]/android.view.View[1]/android.widget.ImageButton[1]}
我把整个专案上传到了 Github,希望可以得到解答,谢谢
https://github.com/kelvinlow/aws-sample-code-appium-testing
