前言:
其实这并不是关于 Gtest 学习入门的资料,我希望读者在读这篇文件之前还是要对 Googletest 的单元测试框架有所了解。为了让读者比较容易理解 gtest 的后续实践,本系列文章分成前后两个部分,前半部分主要以 gtest 所自带的 samples(samples in github) 为例,讲述一下 gtest 的基本用法。后半部分主要在实际应用中的 gtest 的用法,以及一些测试感悟,希望不要让大家失望。
一、初级
// Returns n! (the factorial of n). For negative n, n! is defined to be 1.
// 求 N 的阶乘
int Factorial(int n);
// Returns true iff n is a prime number.
// 判断一个数是否为质数
bool IsPrime(int n);
#endif // GTEST_SAMPLES_SAMPLE1_H_
```c++
/*samples1.cc*/
#include "sample1.h"

// Returns n! (the factorial of n).  For negative n, n! is defined to be 1.
int Factorial(int n) {
  int result = 1;
  for (int i = 1; i <= n; i++) {
    result *= i;
  }

  return result;
}

// Returns true iff n is a prime number.
bool IsPrime(int n) {
  // Trivial case 1: small numbers
  if (n <= 1) return false;

  // Trivial case 2: even numbers
  if (n % 2 == 0) return n == 2;

  // Now, we have that n is odd and n >= 3.

  // Try to divide n by every odd number i, starting from 3
  for (int i = 3; ; i += 2) {
    // We only have to try i up to the squre root of n
    if (i > n/i) break;

    // Now, we have i <= n/i < n.
    // If n is divisible by i, n is not prime.
    if (n % i == 0) return false;
  }

  // n has no integer factor in the range (1, n), and thus is prime.
  return true;
}
/*sample1_unittest.cc*/
// This sample shows how to write a simple unit test for a function,
// using Google C++ testing framework.
// 这个例子展示了如何使用C++ 单元测试框架对函数进行单元测试
// Writing a unit test using Google C++ testing framework is easy as 1-2-3:
// 利用Google C++单元测试框架做单元测试只须简单的三步

// Step 1. Include necessary header files such that the stuff your
// test logic needs is declared.
//
// 第一步,包含必要的头部文件,确保测试逻辑所需要的头文件已被声明,并且不要忘记
// gtest.h。
// Don't forget gtest.h, which declares the testing framework.

#include <limits.h>
#include "sample1.h"
#include "gtest/gtest.h"


// Step 2. Use the TEST macro to define your tests.
//
// TEST has two parameters: the test case name and the test name.
// After using the macro, you should define your test logic between a
// pair of braces.  You can use a bunch of macros to indicate the
// success or failure of a test.  EXPECT_TRUE and EXPECT_EQ are
// examples of such macros.  For a complete list, see gtest.h.
//
//第二步,TEST宏有两个参数,分别为测试用例集名称和测试用例名称,在使用这个宏以后,
//你需要在{}内定义你的测试逻辑。你可以使用一系列的宏来表示测试的成功或着失败。例如
//EXPECT_TRUE表示期望值正确,EXPECT_EQ表示结果值大于或等于期望值。
//
//
//
// <TechnicalDetails>
//
// In Google Test, tests are grouped into test cases.  This is how we
// keep test code organized.  You should put logically related tests
// into the same test case.
//
// The test case name and the test name should both be valid C++
// identifiers.  And you should not use underscore (_) in the names.
//
// Google Test guarantees that each test you define is run exactly
// once, but it makes no guarantee on the order the tests are
// executed.  Therefore, you should write your tests in such a way
// that their results don't depend on their order.
//
//技术细节:
//    在Google Test中,测试用例被分成测试用例集,这保证了我们的代码有良好的组织性,所以
//你应该把逻辑相关的测试用例归集到同一测试用例集当中。
//
//测试用例集名称以及测试用例名称必须是C++合法的标识符,并且在名称中不允许使用下划线(_)
//Google Test测试框架,可以保证所有定义的测试都能够被正确执行,但是对测试执行的顺序比如先执行那些
//后执行那些并没有保证。所以你编写的测试代码,其测试结果不应该依赖于其执行顺序。
//
// </TechnicalDetails>


// Tests Factorial().

// Tests factorial of negative numbers.
// 测试负数的阶乘
TEST(FactorialTest, Negative) {
  // This test is named "Negative", and belongs to the "FactorialTest"
  // 测试用例集的名称是 FactorialTest, 测试用例名称 是 Negative
  // test case.
  EXPECT_EQ(1, Factorial(-5));
  EXPECT_EQ(1, Factorial(-1));
  EXPECT_GT(Factorial(-10), 0);

  // <TechnicalDetails>
  //
  // EXPECT_EQ(expected, actual) is the same as
  //
  //   EXPECT_TRUE((expected) == (actual))
  //
  // except that it will print both the expected value and the actual
  // value when the assertion fails.  This is very helpful for
  // debugging.  Therefore in this case EXPECT_EQ is preferred.
  //
  // On the other hand, EXPECT_TRUE accepts any Boolean expression,
  // and is thus more general.
  //
  //技术细节:
  //    EXPECT_EQ(expected,actual)与EXPECT_TRUE((expected)==(actual))是等同的,有一点
  //不同的是,当EXPECT_EQ(expected,actual)失败时会打印出期望的值与实际的值,这对调试非常有帮助,因此使用EXPECT_EQ更好一些。
  //
  //但是从另一方面说,由于EXPECT_TRUE可以接受任何类型的布尔表达式,所以应用更广一些
  //
  // </TechnicalDetails>
}

// Tests factorial of 0.
TEST(FactorialTest, Zero) {
  EXPECT_EQ(1, Factorial(0));
}

// Tests factorial of positive numbers.
TEST(FactorialTest, Positive) {
  EXPECT_EQ(1, Factorial(1));
  EXPECT_EQ(2, Factorial(2));
  EXPECT_EQ(6, Factorial(3));
  EXPECT_EQ(40320, Factorial(8));
}


// Tests IsPrime()

// Tests negative input.
TEST(IsPrimeTest, Negative) {
  // This test belongs to the IsPrimeTest test case.

  EXPECT_FALSE(IsPrime(-1));
  EXPECT_FALSE(IsPrime(-2));
  EXPECT_FALSE(IsPrime(INT_MIN));
}

// Tests some trivial cases.
TEST(IsPrimeTest, Trivial) {
  EXPECT_FALSE(IsPrime(0));
  EXPECT_FALSE(IsPrime(1));
  EXPECT_TRUE(IsPrime(2));
  EXPECT_TRUE(IsPrime(3));
}

// Tests positive input.
TEST(IsPrimeTest, Positive) {
  EXPECT_FALSE(IsPrime(4));
  EXPECT_TRUE(IsPrime(5));
  EXPECT_FALSE(IsPrime(6));
  EXPECT_TRUE(IsPrime(23));
}

// Step 3. Call RUN_ALL_TESTS() in main().
//
// We do this by linking in src/gtest_main.cc file, which consists of
// a main() function which calls RUN_ALL_TESTS() for us.
//
// This runs all the tests you've defined, prints the result, and
// returns 0 if successful, or 1 otherwise.
//
// Did you notice that we didn't register the tests?  The
// RUN_ALL_TESTS() macro magically knows about all the tests we
// defined.  Isn't this convenient?
//
// 第三步,我们在编译的时候会链接src/gtest_main.cc 文件,这个文件包含了
// main()函数,在main()函数里调用RUN_ALL_TESTS(), 而此函数会调用我们所定义
// 的所有TEST()函数,并打印运行结果,返回值为0表示成功,为1表示失败。
//
// 由于我们不许要注册这些测试,RUN_ALL_TESTS()就全部替我们做好,所以此框架
// 使用起来非常的方便。
例一中主要阐述了如何根据 gtest 来编写一个简单的单元测试。关于一些注意事项在技术细节中已经阐述清楚,这样看来单元测试不难吧。有一点需要多注意一些,在上文中也提到了,测试用例集与测试用例的关系,在实际测试中,尽量将相关的测试用例放在一个测试用例集里面,这样方便管理,如果出现问题,定位以及调试问题都比较方便。
可以看到,我们本例子,我们并没有添加 main 函数,在第三步的论述中也阐明了原因。但是如果我们的程序中存在 main 函数,那么在链接的时候就不要去链接 gest_main.cc 文件,否则会报错.
#makefile文件部分
gtest-all.o : $(GTEST_SRCS_)
    $(CXX) $(CPPFLAGS) -I$(GTEST_DIR) $(CXXFLAGS) -c \
            $(GTEST_DIR)/src/gtest-all.cc

gtest_main.o : $(GTEST_SRCS_)
    $(CXX) $(CPPFLAGS) -I$(GTEST_DIR) $(CXXFLAGS) -c \
            $(GTEST_DIR)/src/gtest_main.cc

gtest.a : gtest-all.o
    $(AR) $(ARFLAGS) $@ $^

gtest_main.a : gtest-all.o gtest_main.o
    $(AR) $(ARFLAGS) $@ $^

# Builds a sample test.  A test should link with either gtest.a or
# gtest_main.a, depending on whether it defines its own main()
# function.

sample1.o : $(USER_DIR)/sample1.cc $(USER_DIR)/sample1.h $(GTEST_HEADERS)
    $(CXX) $(CPPFLAGS) $(CXXFLAGS) -c $(USER_DIR)/sample1.cc

sample1_unittest.o : $(USER_DIR)/sample1_unittest.cc \
                     $(USER_DIR)/sample1.h $(GTEST_HEADERS)
    $(CXX) $(CPPFLAGS) $(CXXFLAGS) -c $(USER_DIR)/sample1_unittest.cc

sample1_unittest : sample1.o sample1_unittest.o gtest_main.a
    $(CXX) $(CPPFLAGS) $(CXXFLAGS) -lpthread $^ -o $@
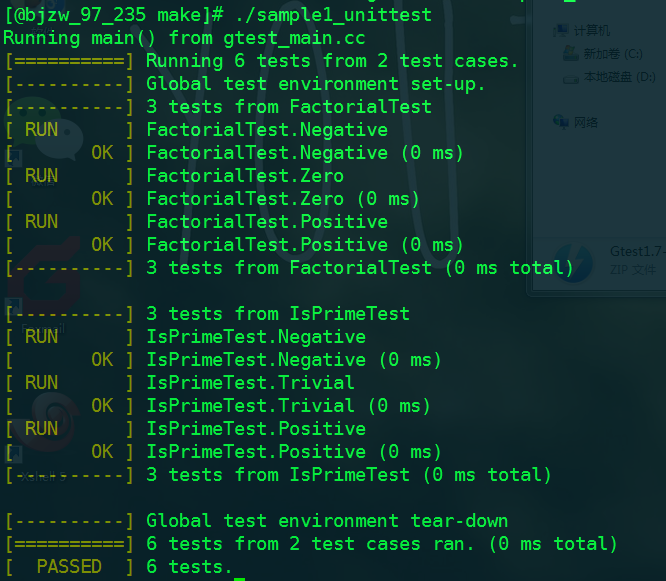
从上述 makefile 文件的最后看到,在链接生成 sample1_unittest 可执行文件的时候,链接的是 gtest_main.a 的静态链接库。如果我们的自定义程序中包含 main 函数,那么这个地方就需要链接 gtest.a 的静态链接库。
make 之后运行的结果下图所示:
/*sample2.h*/
#ifndef GTEST_SAMPLES_SAMPLE2_H_
#define GTEST_SAMPLES_SAMPLE2_H_

#include <string.h>


// A simple string class.
// 简单的字符串类
class MyString {
 private:
  const char* c_string_;
  //复制操作符被禁用
  const MyString& operator=(const MyString& rhs);

 public:
  // Clones a 0-terminated C string, allocating memory using new.
  // 克隆一个以'\0'结尾的字符串,并分配内存
  static const char* CloneCString(const char* a_c_string);

  ////////////////////////////////////////////////////////////
  //
  // C'tors

  // The default c'tor constructs a NULL string.
  // 默认构造函数
  MyString() : c_string_(NULL) {}

  // Constructs a MyString by cloning a 0-terminated C string.
  // 通过clone一个以‘\0’结尾的字符串来构建MyString
  explicit MyString(const char* a_c_string) : c_string_(NULL) {
    Set(a_c_string);
  }

  // Copy c'tor
  // 拷贝构造函数
  MyString(const MyString& string) : c_string_(NULL) {
    Set(string.c_string_);
  }

  ////////////////////////////////////////////////////////////
  //
  // D'tor.  MyString is intended to be a final class, so the d'tor
  // doesn't need to be virtual.
  //
  // 因为MyString作为最终类存在,所以析构函数不必为虚函数
  ~MyString() { delete[] c_string_; }

  // Gets the 0-terminated C string this MyString object represents.
  // 获取c_string_
  const char* c_string() const { return c_string_; }

  size_t Length() const {
    return c_string_ == NULL ? 0 : strlen(c_string_);
  }

  // Sets the 0-terminated C string this MyString object represents.
  // 设置MyString的c_string_
  void Set(const char* c_string);
};
#endif  // GTEST_SAMPLES_SAMPLE2_H_
/*sample2.cc*/
#include "sample2.h"

#include <string.h>

// Clones a 0-terminated C string, allocating memory using new.
const char* MyString::CloneCString(const char* a_c_string) {
  if (a_c_string == NULL) return NULL;

  const size_t len = strlen(a_c_string);
  char* const clone = new char[ len + 1 ];
  memcpy(clone, a_c_string, len + 1);

  return clone;
}

// Sets the 0-terminated C string this MyString object
// represents.
void MyString::Set(const char* a_c_string) {
  // Makes sure this works when c_string == c_string_
  const char* const temp = MyString::CloneCString(a_c_string);
  delete[] c_string_;
  c_string_ = temp;
}
/*sample2_unittest.cc*/
// This sample shows how to write a more complex unit test for a class
// that has multiple member functions.
//
// Usually, it's a good idea to have one test for each method in your
// class. You don't have to do that exactly, but it helps to keep
// your tests organized. You may also throw in additional tests as
// needed.
//
// 这个例子将展示如何为一个具有多个成员函数的类编写较为复杂的单元测试
//
// 通常为你类中的每一个方法都做一次测试是一个好主意。虽然你并非一定要
// 这么做,但是这样做将使你的测试集更便于管理,当然你也可以根据需要添
// 加额外的测试用例
#include "sample2.h"
#include "gtest/gtest.h"
// In this example, we test the MyString class (a simple string).
// Tests the default c'tor.
TEST(MyString, DefaultConstructor) {
const MyString s;
// Asserts that s.c_string() returns NULL.
//
// <TechnicalDetails>
//
// If we write NULL instead of
//
// static_cast<const char *>(NULL)
//
// in this assertion, it will generate a warning on gcc 3.4. The
// reason is that EXPECT_EQ needs to know the types of its
// arguments in order to print them when it fails. Since NULL is
// #defined as 0, the compiler will use the formatter function for
// int to print it. However, gcc thinks that NULL should be used as
// a pointer, not an int, and therefore complains.
//
// The root of the problem is C++'s lack of distinction between the
// integer number 0 and the null pointer constant. Unfortunately,
// we have to live with this fact.
//
//技术细节:
// 如果我们使用NULL,而不是static_cast<const char *>(NULL)。在断言中
//如果编译器为gcc3.4,它将产生一个警告。产生警告的原因是,EXPECT_EQ需要
//知道它参数的具体类型,以便产生错误的时候将其输出出来。由于NULL被
//#define定义为0,所以编译器会使用格式化函数来将其输出。然而,GCC认为
//NULL应该被当作指针类型,而不是int整形,所以编译器会抱怨。
//
//产生这个问题的根源是,C++对整数0以及空指针常量缺乏判别依据。不幸的是
//我要学会接受这个现实。
//
// </TechnicalDetails>
EXPECT_STREQ(NULL, s.c_string());
EXPECT_EQ(0u, s.Length());
}
const char kHelloString[] = "Hello, world!";
// Tests the c'tor that accepts a C string.
// 测试构造函数
TEST(MyString, ConstructorFromCString) {
const MyString s(kHelloString);
EXPECT_EQ(0, strcmp(s.c_string(), kHelloString));
EXPECT_EQ(sizeof(kHelloString)/sizeof(kHelloString[0]) - 1,
s.Length());
}
// Tests the copy c'tor.
// 测试拷贝构造函数
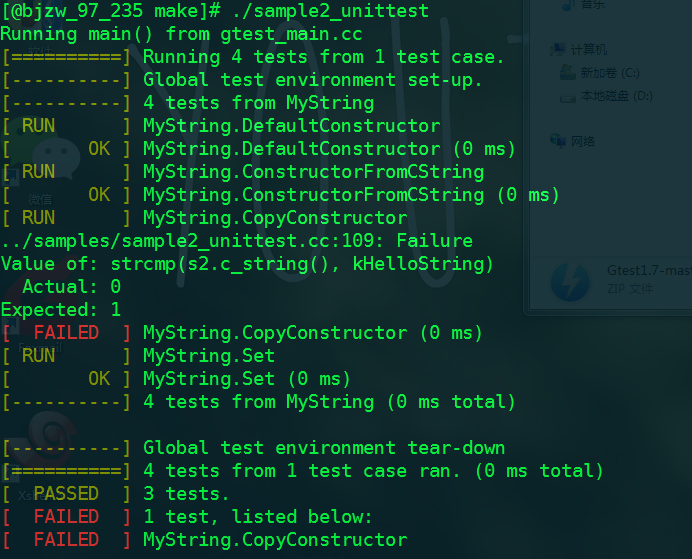
TEST(MyString, CopyConstructor) {
const MyString s1(kHelloString);
const MyString s2 = s1;
//下面的判断会是失败的
EXPECT_EQ(1, strcmp(s2.c_string(), kHelloString));
}
// Tests the Set method.
// 测试Set方法
TEST(MyString, Set) {
MyString s;
s.Set(kHelloString);
EXPECT_EQ(0, strcmp(s.c_string(), kHelloString));
// Set should work when the input pointer is the same as the one
// already in the MyString object.
//
// Set函数在输入指针与已存在于MyString对象中的指针相同时,下面的
// 测试才会通过
s.Set(s.c_string());
EXPECT_EQ(0, strcmp(s.c_string(), kHelloString));
// Can we set the MyString to NULL?
s.Set(NULL);
EXPECT_STREQ(NULL,s.c_string());
}
sample2 的运行截图:
例一阐述的是如果对普通的函数进行单元测试,而例二则阐述如何对类中的成员函数进行单元测试。大致的方法基本相同,只不过在测试类成员函数之前,要先定义类,也就是例子中的 MyString s;上述两个例子是 gtest 的简单应用,当然对于类中成员函数的单元测试要复杂的多,比如成员函数的公有还是私有,成员函数的耦合性等等,这些会在最后的单元测试实践中讨论。好了,初步的介绍就到这吧~
