
公司的原有压测平台是由 go 开发,使用 locust 作为压力引擎使用,在互联网的大环境下,开始各种降本增效,性能测试的 pod 现在缩减到只有 1/8 个物理核心,这种情况下,locust 大概 300 并发都已经出现了 cpu 瓶颈,所以需要一款性能更好的压测引擎作为替代品,刚开始的时候是想直接使用 wrk 集成进项目中,但是遇见了几个比较麻烦的问题:
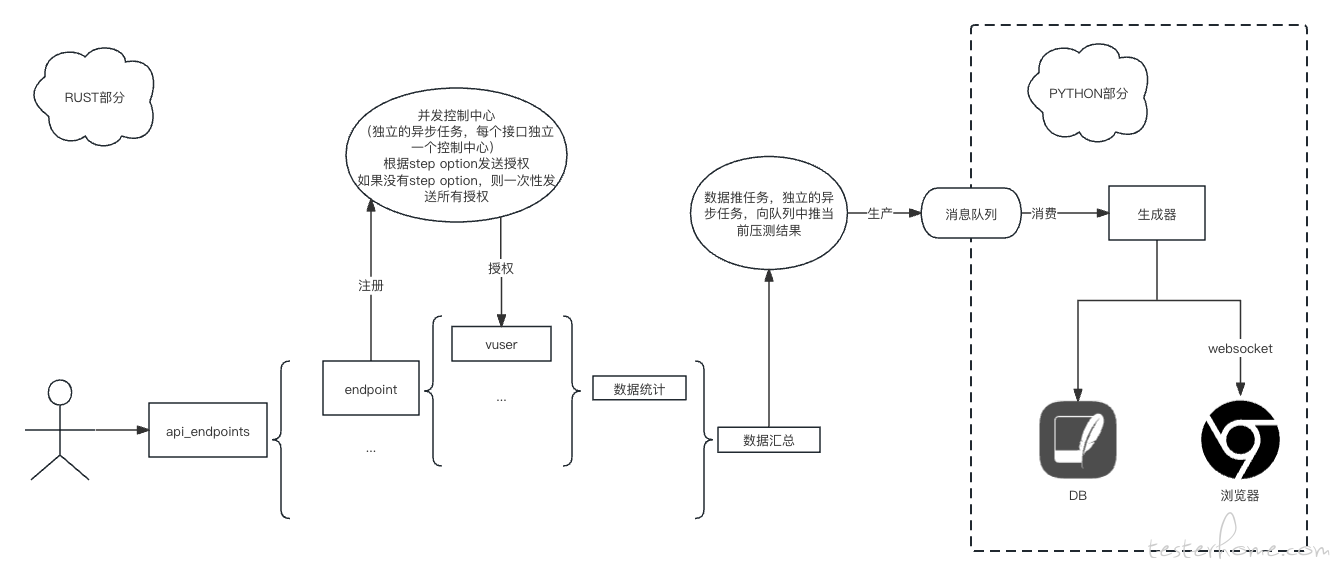
所以经过调研现有的开源压测引擎,没有符合现在的平台化需求的,所以诞生了这个项目,之所以选用 rust,是因为 rust 的性能会非常的好,而且高并发的压测下,没有 gc 对结果产生影响,引擎写完后,可以直接导出一个 c 的入口,go 开启 cgo 会比较简单的将项目集成。
由于引擎是一个独立的项目,无公司的业务部分,可以直接开源。介于现在大部分测试人员的技术栈都是以 python 为主,所以又在引擎外面,使用 pyo3 开发了一个 python 的包装器,可以让更多 python 技术栈的同学直接调用,为了方便大家使用,又开发了一个比较简单的前端页面,可以满足简单的压测需求。
项目已发布到 pip,可以直接使用 pip 安装使用,ci 部分使用 github actions 进行矩阵编译,支持 python3.8-3.12,linux-x86, mac arm、x86, win-x86,应该可以覆盖大部分环境,如果有特殊需求,可以联系作者添加 action
安装:
pip install atomic-bomb-engine
在 python 中导入
import atomic_bomb_engine
异步使用的时候,还需要引用 asyncio
import asyncio
多接口压测可以使用 batch_async 方法进行操作,函数签名和解释如下
async def batch_async(
             test_duration_secs: int,
             concurrent_requests: int,
             api_endpoints:List[Dict],
             step_option:Dict[str, int]=None,
             verbose:bool=False,
             should_prevent:bool=False) ->Dict:
    """
        批量压测
        :param test_duration_secs: 测试持续时间
        :param concurrent_requests: 并发数
        :param api_endpoints: 接口信息
        :param step_option: 阶梯加压选项
        :param verbose: 打印详细信息
        :param should_prevent: 是否禁用睡眠
    """
使用 assert_option 方法可以返回断言选项字典
assert_options=[
atomic_bomb_engine.assert_option("$.code", 429),
atomic_bomb_engine.assert_option("$.code", 200)
])
print(result)
jsonpath 如果不会用的话,建议去jsonpath学习
使用 step_option 方法可以返回阶梯加压选项字典
def step_option(increase_step: int, increase_interval: int) -> Dict[str, int]:
    """
    生成step option
    :param increase_step: 阶梯步长
    :param increase_interval: 阶梯间隔
    """
同样的本包中也包含了一个对 api_endpoint 的包装:endpoint 方法,方便调用,endpoint 中的 assert_options 中也可以套用 assert_option 方法
async def run_batch():
    result = await atomic_bomb_engine.batch_async(
        test_duration_secs=10,
        concurrent_requests=10,
        api_endpoints=[
            atomic_bomb_engine.endpoint(
                name="test1",
                url="https:xxxxx1.xx",
                method="get",
                weight=1,
                timeout_secs=10,
                assert_options=[atomic_bomb_engine.assert_option(jsonpath="$.code", reference_object=200)]
            ),
            atomic_bomb_engine.endpoint(
                name="test2",
                url="https://xxxxx2.xx",
                method="get",
                weight=1,
                timeout_secs=10)
        ])
    print(result)
监听时可以使用 BatchListenIter 生成器
async def listen_batch():
    iterator = atomic_bomb_engine.BatchListenIter()
    for message in iterator:
        if message:
            print(message)
        else:
            await asyncio.sleep(0.3)
同时调用时同单接口
async def main():
    await asyncio.gather(
        run_batch(),
        listen_batch(),
    )


if __name__ == "__main__":
    asyncio.run(main())
导入
from atomic_bomb_engine import server
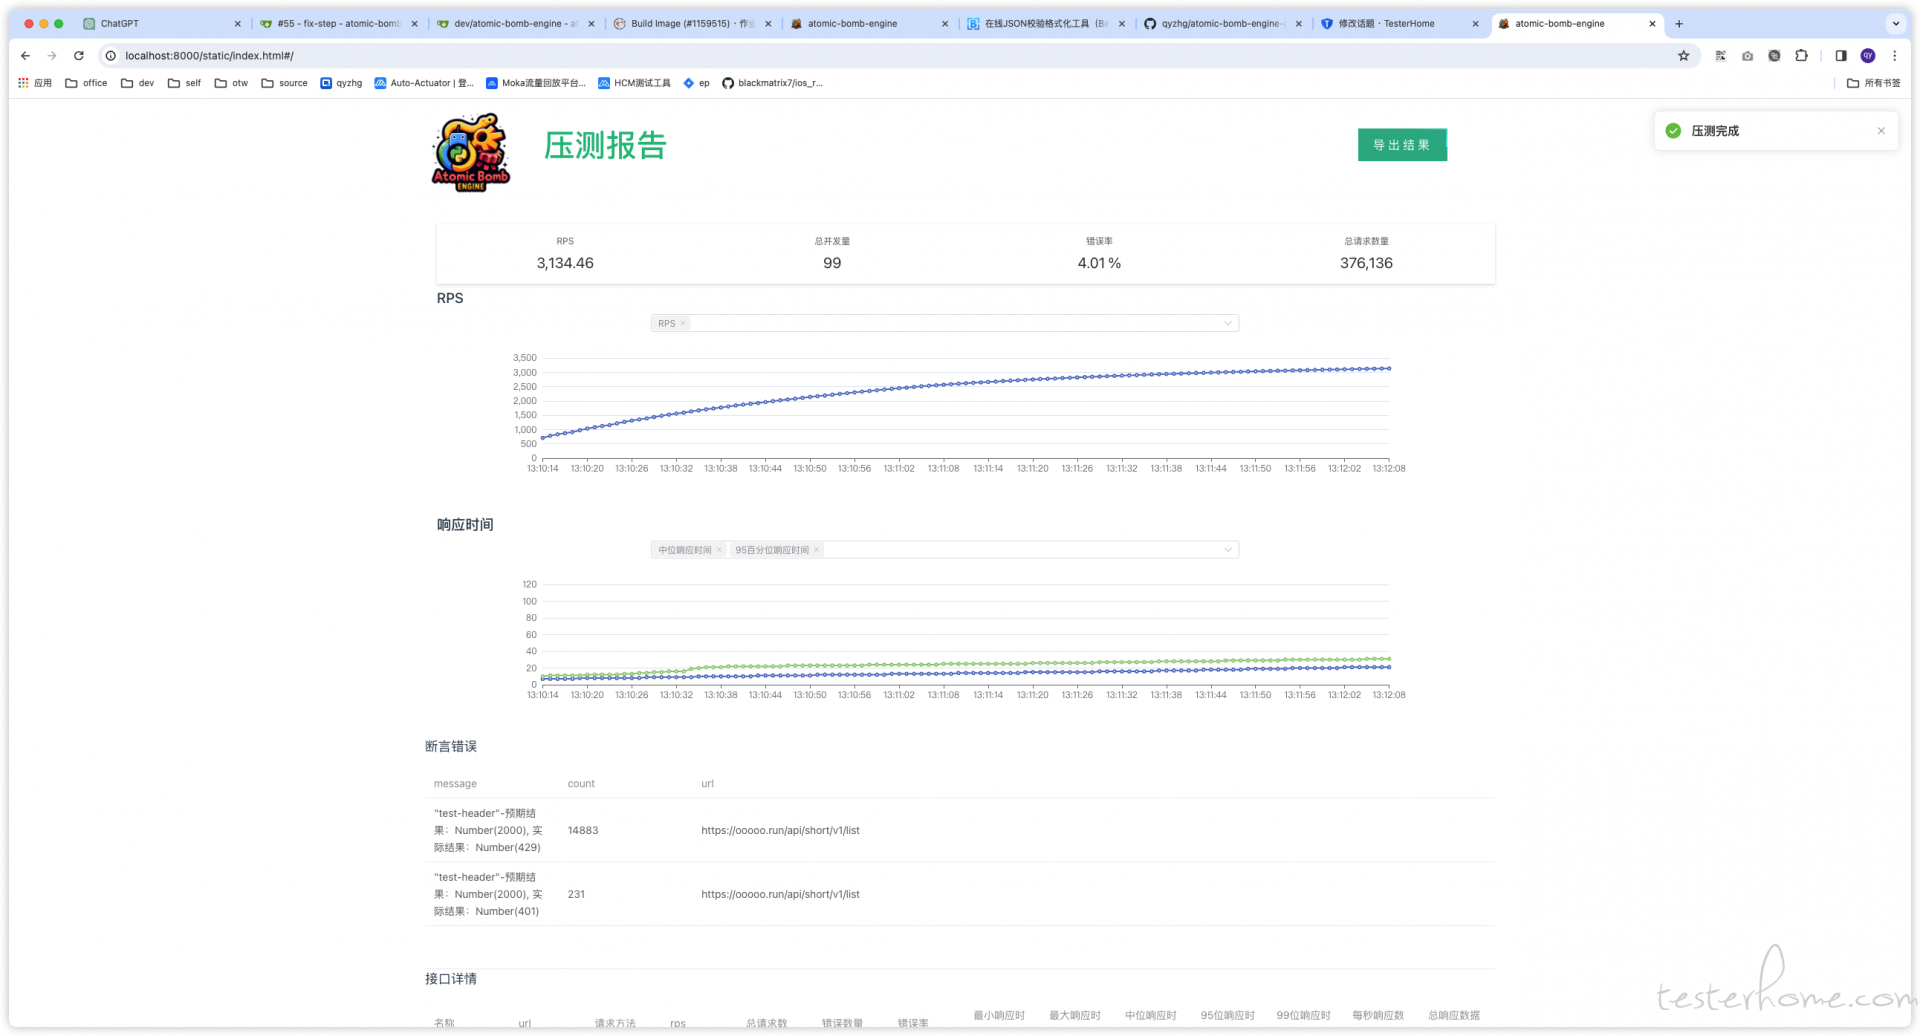
导入内置的 server 后,可以使用内置的 http 服务器,开启一个 ui 界面,并且开始监听压测过程中的数据,无需手动迭代数据
import asyncio

import atomic_bomb_engine
from atomic_bomb_engine import server


@server.ui(port=8000)
async def run_batch():
    result = await atomic_bomb_engine.batch_async(
        test_duration_secs=120,
        concurrent_requests=100,
        step_option=atomic_bomb_engine.step_option(increase_step=6, increase_interval=5),
        verbose=False,
        api_endpoints=[
            atomic_bomb_engine.endpoint(name="test-baidu",url="https://baidu.com",method="GET",weight=1,timeout_secs=10),
            atomic_bomb_engine.endpoint(name="test-google", url="https://google.com", method="GET", weight=1, timeout_secs=10),
        ])
    print(result)
    return result


if __name__ == '__main__':
    asyncio.run(run_batch())
由于项目开启时间较短,只有短短一个月左右,可能会有一些 bug 和没有做的需求,如果发现了 bug 和需求,都可以联系作者,由于是工作之余开发,可能不会太保证时效性