UIAutomator2.0 出来有一段时间了。
我们就看一句话
Most importantly, UIAutomator is now based on Android Instrumentation
Instrumentation 终于把 UIAutomator 纳入了他的麾下。
UIAutomator2.0 出来之后,投入使用的似乎不多,官方的文档也不多,而且还有错。 不过各个测试框架也在积极拥抱变化,比如 Appium,Selendroid。最快的极客学院也推出了 UIAutomator2.0 的教程。当然我们 TesterHome 也有同学上了一把,比如在 Android studio 上运用 UI Automator 执行自动化测试。新东西出来了,不代表旧事物就不能用了。之前的 UIAutomator 一样可以跑的很欢,守旧的同学可以继续。
事实上,Google 提供的 Android Testing Support Library 变化的挺多的,比如全面拥抱 Junit 4.0,力荐使用 AndroidJUnitRunner,然后使用 Android Studio IDE 等等。反正不仅在开发端,在测试端,Google 也在做一些标准和统一,然后让我们忘记之前的 monkeyrunner, instruments,只剩下:
废话时间结束。
在这之前,我是这样写 UIAutomator 的, 参见如何使用和调试 android UIAutomator ?。我记性不好,就算现在写,也会翻翻自己的文章。我试着也使用 maven 来配置,不过失败告终。因为在 maven 库里面,找不到 com.android.support.test.*,因为貌似所有的测试依赖都移到这里来了。而在你电脑上,它藏在 android-sdk/extras/android/m2repository 下面,感觉上它也可以成为你 local maven 库中的一个,不过没时间研究。关于安装 Android Maven 本地依赖库可以帮你开拓下思维,但是然并软。所以老老实实使用 gradle 吧。
更新下,如果不想用 gradle,想直接使用 jar 包做依赖的话,可以下载 https://github.com/googlesamples/android-testing/tree/master/ui/espresso/BasicSampleBundled/libs 下面的 jar。
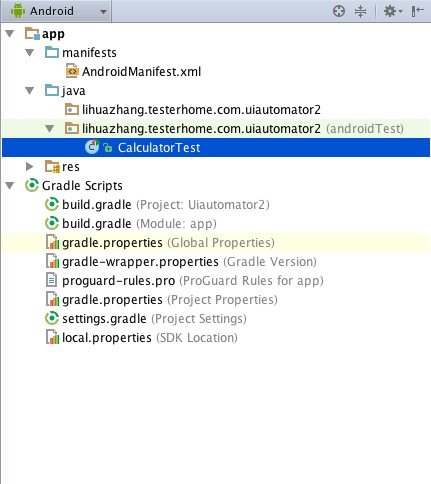
对于 Instrumentation 大家应该都熟知,如何写一个 Instrumentation 工程,百度一搜一大把,大家模仿网上教程的时候用点心,别抄成个二百五。UIAutomator2.0 是基于 Instrumentation,所以基本上,和 Instrumentation 一样,它也有一个测试应用的概念。我们打开 AS,创建一个空应用,比如我的:
提示:Gradle 加载可能有点慢,自备 *** 会来的快一点。
先在 build.grade 里面添加依赖。
apply plugin: 'com.android.application'

android {
    compileSdkVersion 23
    buildToolsVersion "23.0.1"

    defaultConfig {
        applicationId "lihuazhang.testerhome.com.uiautomator2"
        minSdkVersion 19
        targetSdkVersion 23
        versionCode 1
        versionName "1.0"
        testInstrumentationRunner "android.support.test.runner.AndroidJUnitRunner" # 这是我添加的
    }
    buildTypes {
        release {
            minifyEnabled false
            proguardFiles getDefaultProguardFile('proguard-android.txt'), 'proguard-rules.pro'
        }
    }
}

dependencies {
    compile fileTree(dir: 'libs', include: ['*.jar'])
    compile 'com.android.support:appcompat-v7:23.1.0'

    # 这以下是我添加的
    androidTestCompile 'com.android.support:support-annotations:23.1.0'
    androidTestCompile 'com.android.support.test:runner:0.4'
    // Set this dependency to use JUnit 4 rules
    androidTestCompile 'com.android.support.test:rules:0.4'
    // Set this dependency to build and run Espresso tests
    androidTestCompile 'com.android.support.test.espresso:espresso-core:2.2.1'
    // Set this dependency to build and run UI Automator tests
    androidTestCompile 'com.android.support.test.uiautomator:uiautomator-v18:2.1.2'

}
在 androidTest 下面添加测试代码
package lihuazhang.testerhome.com.uiautomator2;

import android.content.Intent;
import android.content.pm.PackageManager;
import android.content.pm.ResolveInfo;
import android.support.test.InstrumentationRegistry;
import android.support.test.filters.SdkSuppress;
import android.support.test.runner.AndroidJUnit4;
import android.support.test.uiautomator.By;
import android.support.test.uiautomator.UiDevice;
import android.support.test.uiautomator.UiObject2;
import android.support.test.uiautomator.Until;

import org.junit.Before;
import org.junit.Test;
import org.junit.runner.RunWith;

import static org.hamcrest.core.IsNull.notNullValue;
import static org.junit.Assert.assertEquals;
import static org.junit.Assert.assertThat;

/**
 * Created by lihuazhang on 15/11/8.
 */

@RunWith(AndroidJUnit4.class)
@SdkSuppress(minSdkVersion = 18)
public class CalculatorTest {
    private UiDevice mDevice;
    private static final int LAUNCH_TIMEOUT = 5000;
    private final String BASIC_SAMPLE_PACKAGE = "com.android.calculator2";

    @Before
    public void setUp() {
        // Initialize UiDevice instance
        mDevice = UiDevice.getInstance(InstrumentationRegistry.getInstrumentation());

        // Start from the home screen
        mDevice.pressHome();

        // Wait for launcher
        final String launcherPackage = getLauncherPackageName();
        assertThat(launcherPackage, notNullValue());
        mDevice.wait(Until.hasObject(By.pkg(launcherPackage).depth(0)), LAUNCH_TIMEOUT);
    }
    @Test
    public void checkPreconditions() {
        assertThat(mDevice, notNullValue());
    }

    @Test
    public void calculatorTest() {
        mDevice.findObject(By.desc("应用")).click();
        mDevice.wait(Until.hasObject(By.desc("计算器")), LAUNCH_TIMEOUT);
        mDevice.findObject(By.desc("计算器")).click();

        UiObject2 button7 = mDevice.wait(Until.findObject(By.res("com.android.calculator2", "digit_7")), 500);
        UiObject2 buttonX = mDevice.wait(Until.findObject(By.res("com.android.calculator2", "op_mul")), 500);
        UiObject2 button6 = mDevice.wait(Until.findObject(By.res("com.android.calculator2", "digit_6")), 500);
        UiObject2 buttonEqual = mDevice.wait(Until.findObject(By.res("com.android.calculator2", "eq")), 500);
        UiObject2 output = mDevice.wait(Until.findObject(By.res("com.android.calculator2", "result")), 500);

        button7.click();
        buttonX.click();
        button6.click();
        buttonEqual.click();
        assertEquals(output.getText(), "42");

    }

    private String getLauncherPackageName() {
        // Create launcher Intent
        final Intent intent = new Intent(Intent.ACTION_MAIN);
        intent.addCategory(Intent.CATEGORY_HOME);

        // Use PackageManager to get the launcher package name
        PackageManager pm = InstrumentationRegistry.getContext().getPackageManager();
        ResolveInfo resolveInfo = pm.resolveActivity(intent, PackageManager.MATCH_DEFAULT_ONLY);
        return resolveInfo.activityInfo.packageName;
    }
}
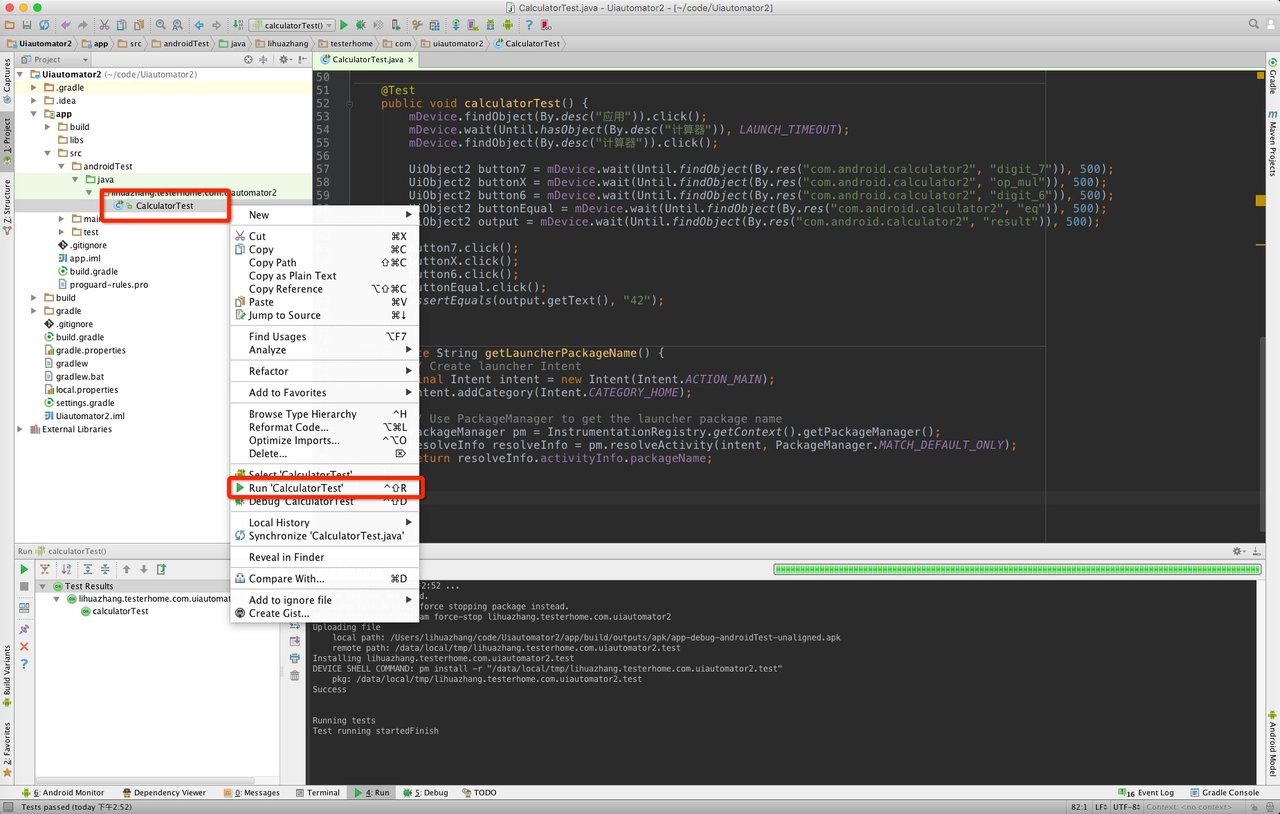
运行很简单,右击测试文件,点击运行即可。
如果在命令行的话,直接运行 ./gradlew cC

这个时候,我们打开 adb shell:

那既然是 instrumentation,其实我们可以使用这样的命令来执行。
➜  connected  adb shell am instrument -w lihuazhang.testerhome.com.uiautomator2.test/android.support.test.runner.AndroidJUnitRunner

lihuazhang.testerhome.com.uiautomator2.CalculatorTest:..

Time: 7.014

OK (2 tests)
我没找到 uiautomator 1.0 的 nohup 形式,不知道其他人知道不。
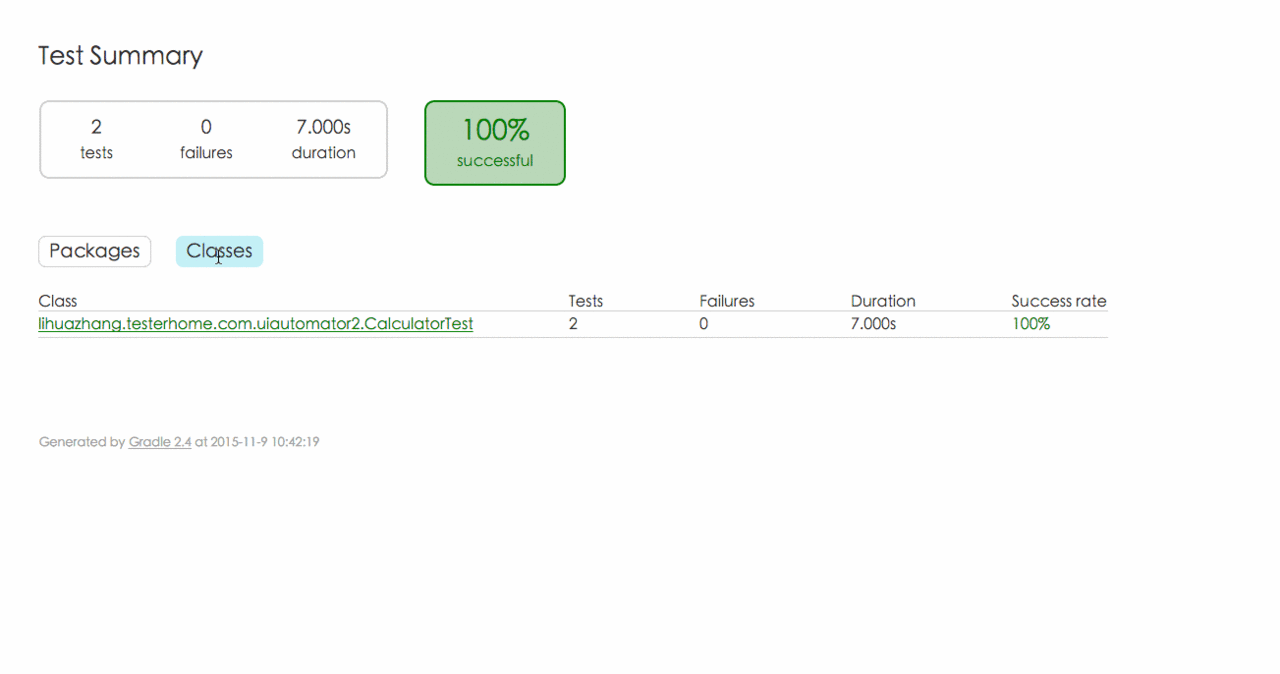
感谢 @carl 的提醒,漂亮的报告还是需要的。./gradlew cC 生成的报告在 Uiautomator2/app/build/reports/androidTests/connected 位置。
不要继承 InstrumentationTestCase
This class is deprecated. It is no longer necessary to extend UiAutomatorTestCase. You can use getInstance(Instrumentation) from any test class as long as you have access to an Instrumentation instance.
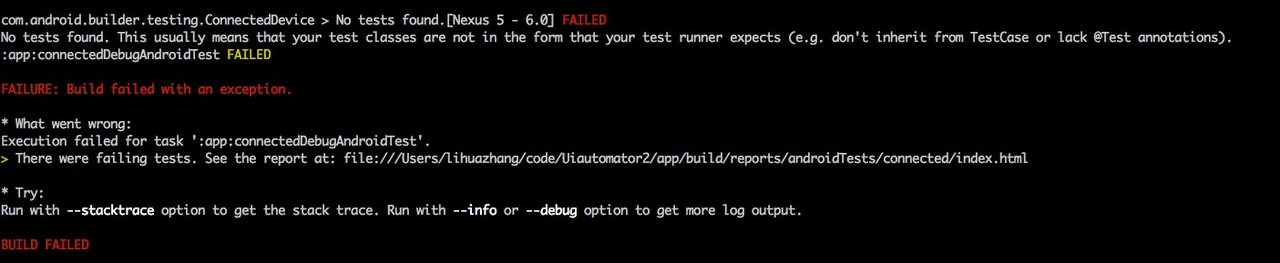
既然 UiAutomatorTestCase 都不用继承了,更别提 InstrumentationTestCase 了。官方文档里部分代码还在继承 InstrumentationTestCase,当然不会引起啥错误,但是在命令行使用 gradle cC 的时候,测试用例不会被执行。
更新下,@carl 说他是继承了 InstrumentationTestCase 的,所以我又试验了下。gradle cC 运行的时候报错:
mDevice.wait(Until.findObject(By.res("com.android.calculator2", "digit_7")), 500); 必要的等待还是需要的。众所周知,UI 自动化,如果不加入必要的等待策略,那么很难保证测试用例的鲁棒性。
我在执行测试用例的时候,使用的 Genymotion 模拟器,但是发现了一些问题,比如这个计算器的用例在 Genymotion 中无法通过。
遇到此类异常 UiAutomationService android.accessibilityservice.IAccessibilityServiceClient$Stub$Proxy@52c58464already registered!,先看看设备上是否有 uiautomator 在运行,有的话杀之。
在代码里的 System.out.println 是会输出在 logcat 的日志里。此外执行信息也会出现在 logcat 中。
