最近想将 locust 的测试结果用 Grafana 展示,网上找了很多方法,都不是很满意,于是去看了官方文档,找到一种方法实现,官方文档:https://github.com/SvenskaSpel/locust-plugins

1.拉取 TimescaleDB 镜像
docker pull timescale/timescaledb:latest-pg12
2.运行 TimescaleDB 容器。POSTGRES_PASSWORD 是数据库的密码,默认用户名为:postgres
docker run -d --name timescaledb -p 5432:5432 -v /opt/data:/var/lib/postgresql/data -e POSTGRES_PASSWORD=123456 timescale/timescaledb:latest-pg12
3.进入 imescaleDB 数据库容器
docker exec -it timescaledb /bin/bash
4.进入 imescaleDB 数据库
psql -U postgres -h localhost
5.创建一个数据库
CREATE database tutorial;
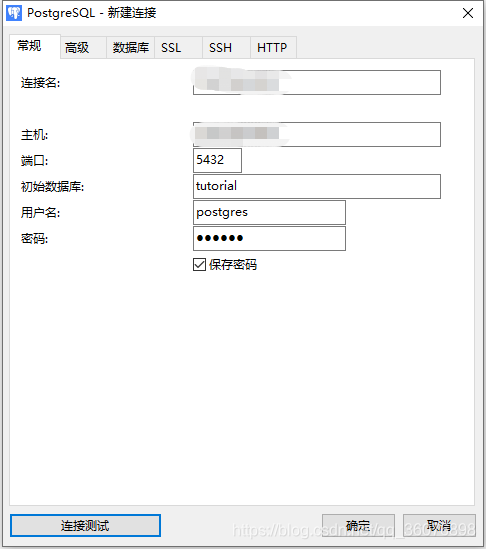
6.可以通过 navicat 连接数据


7.因为 TimescaleDB 数据库里的表是透明的,故无法通过工具查看到

8.可以通过查询的方式实现
select * from public.request;
select * from public.testrun;
select * from public.user_count;
select * from public.events;

将官方给的的 sql 文件导入 tutorial 数据库https://github.com/SvenskaSpel/locust-plugins/blob/master/locust_plugins/timescale_schema.sql
timescale_schema.sql
--
-- TIMESCALEDB init schema
-- tested with version 11
--


SET statement_timeout = 0;
SET lock_timeout = 0;
SET idle_in_transaction_session_timeout = 0;
SET client_encoding = 'UTF8';
SET standard_conforming_strings = on;
SET check_function_bodies = false;
SET xmloption = content;
SET client_min_messages = warning;
SET row_security = off;

CREATE TABLE public.testrun (
    id timestamp with time zone NOT NULL,
    testplan text NOT NULL,
    profile_name text,
    num_clients integer NOT NULL,
    rps double precision,
    description text,
    end_time timestamp with time zone,
    env character varying(10) NOT NULL,
    username character varying(64),
    gitrepo character varying(120),
    rps_avg numeric,
    resp_time_avg numeric,
    changeset_guid character varying(36),
    fail_ratio double precision,
    requests integer
);


ALTER TABLE public.testrun OWNER TO postgres;

--
-- Name: testrun testrun_pkey; Type: CONSTRAINT; Schema: public; Owner: postgres
--

ALTER TABLE ONLY public.testrun
    ADD CONSTRAINT testrun_pkey PRIMARY KEY (id);


--
-- Name: testrun_id_idx; Type: INDEX; Schema: public; Owner: postgres
--

CREATE INDEX testrun_id_idx ON public.testrun USING btree (id DESC);

CREATE TABLE public.request (
    "time" timestamp with time zone NOT NULL,
    run_id timestamp with time zone NOT NULL,
    exception text,
    greenlet_id integer NOT NULL,
    loadgen text NOT NULL,
    name text NOT NULL,
    request_type text NOT NULL,
    response_length integer,
    response_time double precision,
    success smallint NOT NULL,
    testplan character varying(30) NOT NULL,
    pid integer,
    context jsonb
);


ALTER TABLE public.request OWNER TO postgres;

--
-- Name: request_time_idx; Type: INDEX; Schema: public; Owner: postgres
--

CREATE INDEX request_time_idx ON public.request USING btree ("time" DESC);


--
-- Name: run_id_idx; Type: INDEX; Schema: public; Owner: postgres
--

CREATE INDEX run_id_idx ON public.request USING btree (run_id);


CREATE TABLE public.user_count (
    testplan character varying(30) NOT NULL,
    user_count integer NOT NULL,
    "time" timestamp with time zone NOT NULL,
    run_id timestamp with time zone
);


ALTER TABLE public.user_count OWNER TO postgres;

--
-- Name: user_count_time_idx; Type: INDEX; Schema: public; Owner: postgres
--

CREATE INDEX user_count_time_idx ON public.user_count USING btree ("time" DESC);


CREATE TABLE public.events (
    time timestamp with time zone NOT NULL,
    text text NOT NULL
);

SELECT create_hypertable('request', 'time');
SELECT create_hypertable('user_count', 'time');
SELECT create_hypertable('events', 'time');

备注:
1.这个是我封装过后的,用于记录的。可以跳过直接看后面的基础脚本。
2.此脚本只能在 Linux 下环境下运行,不然会报错。
from locust_plugins import run_single_user, listeners
from locust import HttpUser, task, events
import os

os.environ['PGHOST'] = '这里填TimescaleDB数据库IP'
os.environ['PGUSER'] = 'postgres'
os.environ['PGPASSWORD'] = '123456'
os.environ['PGDATABASE'] = 'tutorial'


class MyUser(HttpUser):
    @task
    def index(self):
        self.client.post("/login", {"username": "admin", "password": "admin"})

    host = "http://127.0.0.1:10000"


@user2ener
def on_locust_init(environment, **_kwargs):
    listeners.Timescale(env=environment, testplan="timescale_listener_ex")
1.在 Linux 环境下安装 python,具体怎么安装就不多说了
pip install locust
pip install locust-plugins
2.普通模式运行
locust -f test.py --headless -u 1 -r 1 --run-time 10s
如下图说明成功入库

4.前往数据库查询数据

Grafana 的安装这里就不多说了
1.设置 Grafana,并导入 dashboard https://grafana.com/grafana/dashboards/10878

2.Granfana 连接 TimescaleDB 数据库


3.导入 json 文件


4.采用分布式运行脚本,不知道怎么用分布式的请看https://blog.csdn.net/qq_36076898/article/details/109015136
locust -f test.py --master --web-host=0.0.0.0 --headless -u 4 -r 1 --run-time 10s --expect-workers=2

locust -f test.py --worker --master-host=127.0.0.1


