为什么说是菜鸟解析篇呢,菜鸟说的是我本人,因为我 OC 实在不咋地,仅仅是能看懂。请各位高手能够稍微看几眼,好好教育我一下。
项目地址 https://github.com/appium/WebDriverAgent
|-- Configurations
|-- PrivateHeaders
|   |-- AccessibilityUtilities
|   |-- MobileCoreServices
|   |-- TextInput
|   |-- UIKitCore
|   `-- XCTest
|-- WebDriverAgent.xcodeproj (子目录省略)
|-- WebDriverAgentLib
|   |-- Categories
|   |-- Commands
|   |-- Routing
|   |-- Utilities
|   `-- Vendor
|       |-- CocoaAsyncSocket
|       |-- CocoaHTTPServer
|       |-- RoutingHTTPServer
|       `-- YYCache
|-- WebDriverAgentRunner
|        `-- UITestingUITests.m
`-- WebDriverAgentTests (子目录省略)
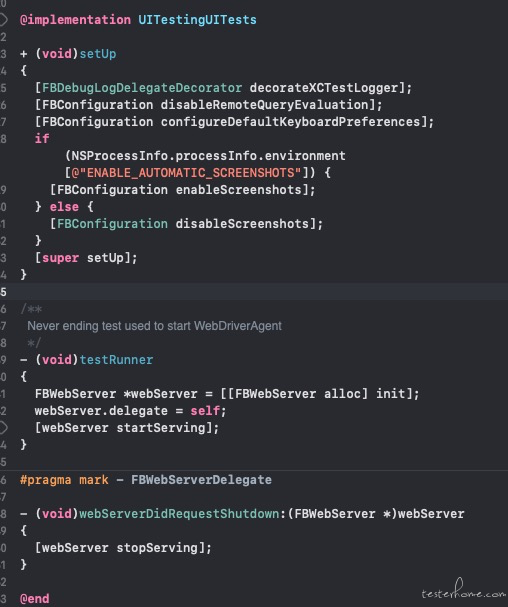
入口代码在 WebDriverAgentRunner/UITestingUITests.m
这里 setUp 做了一些基础的设置(日志、键盘、是否开启自动截图(默认关闭))
testRunner 函数,初始了 FBWebServer 这个类。然后启动了 HTTP 服务。
最后那个函数 webServerDidRequestShutdown 实现了@protocol FBWebServerDelegate
这个类的实现定义在 WebDriverAgentLib/Routing/FBWebServer.m
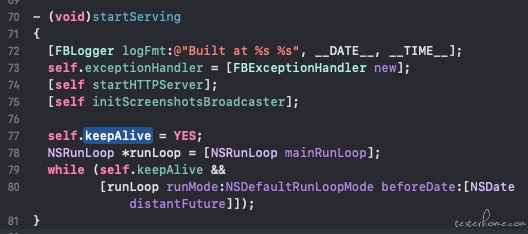
startServing 函数里面,先开启 http 服务,然后在开启截图广播(也就是 Mjpeg 服务)
最后调用 mainRunLoop 一直运行到 keepAlive 为 NO 或直到世界末日。
接下来看看 startHTTPServer 的实现
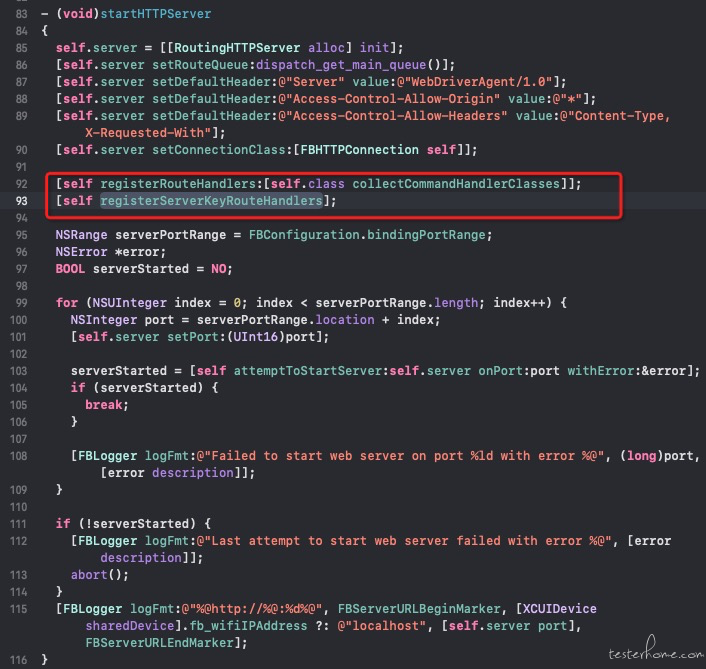
这个函数,继承了 RoutingHTTPServer,这个服务又继承了 HTTPServer(这个就是 CocoaHTTPServer)感觉应该是个开源的实现,先不看了。
其中我用红框框住了一两个函数,其中一个函数
[self registerRouteHandlers:[self.class collectCommandHandlerClasses]]; 这个函数的实现非常的优美。
+ (NSArray<Class<FBCommandHandler>> *)collectCommandHandlerClasses
{
  NSArray *handlersClasses = FBClassesThatConformsToProtocol(@protocol(FBCommandHandler));
  NSMutableArray *handlers = [NSMutableArray array];
  for (Class aClass in handlersClasses) {
    if ([aClass respondsToSelector:@selector(shouldRegisterAutomatically)]) {
      if (![aClass shouldRegisterAutomatically]) {
        continue;
      }
    }
    [handlers addObject:aClass];
  }
  return handlers.copy;
}
对于不怎么懂 OC 的我看的实在有点费劲。不过最终在强大的谷歌帮助下还是理解了,转化成 python 代码是这样的
handlersClasses: tuple = FBClassesThatConformsToProtocol(FBCommandHandler)
handlers: list = []
for aClass in handlersClasses:
  if hasattr(aClass, "shouldRegisterAutomatically"):
    if not aClass.shouldRegisterAutomatically():
      continue
    handlers.append(aClass)
  return handlers[:]
FBClassesThatConformsToProtocol(@protocol(FBCommandHandler)); 这个函数是通过objc_getClassList和class_conformsToProtocol来查找所有实现了 FBCommandHandler 的 protocol(Java 中叫接口) 的类。而所有实现了这个接口的类,目前都放在了目录 WebDriverAgentLib/Commands目录下。
所有的路由定义在每个 FBXXCommands.m 中的 routes 函数下面。
理解了逻辑之后,我们尝试自己实现了一个 /openatx/tap 的路由。
创建一个文件 WebDriverAgentLib/Commands/FBOpenatxCommands.h,内容为
#import <Foundation/Foundation.h>

#import <WebDriverAgentLib/FBCommandHandler.h>

NS_ASSUME_NONNULL_BEGIN

@interface FBOpenatxCommands : NSObject <FBCommandHandler>

@end

NS_ASSUME_NONNULL_END
创建文件 WebDriverAgentLib/Commands/FBOpenatxCommands.m,内容为
#import "FBOpenatxCommands.h"
#import "XCUIElement+FBTap.h"

@interface FBOpenatxCommands ()
@end

@implementation FBOpenatxCommands

#pragma mark - <FBCommandHandler>

+ (NSArray *)routes
{
  return
  @[
    [[FBRoute POST:@"/openatx/tap"].withoutSession respondWithTarget:self action:@selector(handleTap:)]
  ];
}

+ (id<FBResponsePayload>)handleTap:(FBRouteRequest *)request
{
  CGPoint tapPoint = CGPointMake((CGFloat)[request.arguments[@"x"] doubleValue], (CGFloat)[request.arguments[@"y"] doubleValue]);
  point = FBInvertPointForApplication(tapPoint, request.session.activeApplication.frame.size, application.interfaceOrientation);

  XCUICoordinate* tapElement = [[application coordinateWithNormalizedOffset:CGVectorMake(0, 0)] coordinateWithOffset:CGVectorMake(point.x, point.y)];
  [tapElement tap];

  return FBResponseWithOK();
}
然后编译在手机上运行就可以实现,/openatx/tap这个接口了。
使用方法
POST $DEVICE_URL/openatx/tap
Payload为 `{"x": 10, "y": 10}`
先从简单的改起来。 FBWebServer.m 这个文件有个成员函数 registerServerKeyRouteHandlers
其中的/health 请求的逻辑改为
[self.server get:@"/health" withBlock:^(RouteRequest *request, RouteResponse *response) {
    NSDate *requestStart = [NSDate date]; // 增加
    [response respondWithString:@"I-AM-ALIVE"];
    NSTimeInterval execTime = [[NSDate date] timeIntervalSinceDate:requestStart]; // 增加
    NSLog(@"executionTime = %.2f seconds", execTime); // 增加
  }];
为了方便使用,继续封装一下
void measureBlockTime(NSString*title, void (^block)(void)) {
  NSDate *requestStart = [NSDate date]; // 增加
  block();
  NSTimeInterval execTime = [[NSDate date] timeIntervalSinceDate:requestStart]; // 增加
  NSLog(@"%@ executionTime = %.2f seconds", title, execTime); // 增加
}

[self.server get:@"/health" withBlock:^(RouteRequest *request, RouteResponse *response) {
  measureBlockTime(@"/health", ^{
    [response respondWithString:@"I-AM-ALIVE"];
  });
}];
写不动了,哎,就这样吧。
