uiautomatorviewer 二次开发之自动生成控件定位符
前言
我们在使用 Appium 进行移动自动化测试脚本编写的时候,经常出现控件无法定位,如 ListView 下面的 item,控件基本属性一样的、某些控件没有 id、name 等,这个时候,如果单纯靠 id、name、text 可能无法完全唯一定位一个控件,这个时候就需要编写 xpath 了,可是 xpath 语法、写法对于没有接触过的测试人员来说,又是个门槛,接下来,我们就来讨论如何通过二次开发 uiautomatorviewer 自动生成 xpath 供用户直接 copy 使用。
原理
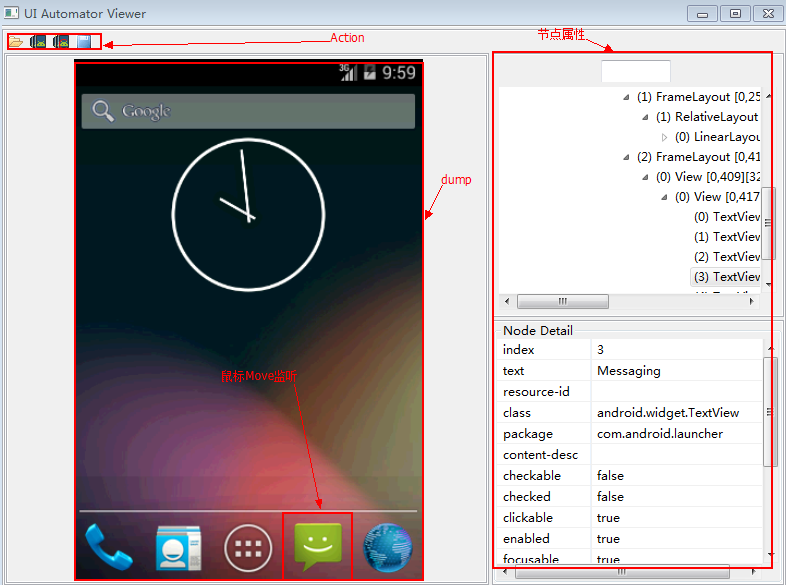
uiautomatorviewer 是 android SDK 包中原生的开源工具,给用户提供一种查看当前终端布局、控件属性的一个辅佐工具,
该工具的 GUI 是使用 RCP 组件进行开发的,然后通过 uiautomator dump 把当前终端布局文件 dump 到本地,uiautomatorviewer
通过 xml 布局文件,构造一棵 tree,放到 Canvas SWT 组件中,和当前 png 截图叠加在一起,同时监听鼠标 move 等事件,自动
获取该 tree 的 node 节点,并且把该 node 节点的所有属性获取显示出来。
代码结构
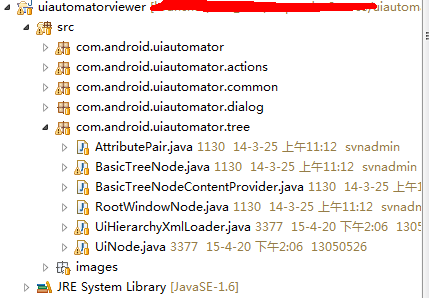
com.android.uiautomator:存放 uiautomatorviewer 工具的 GUI 界面代码,其中主入口 UiAutomatorViewer.java 文件里面有 main 函数入口,工具的窗口就在此创建。
com.android.uiautomator.actions:存放所有 anction 操作,如:Device screenshot 、open 等。
com.android.uiautomator.tree:存放 tree 封装,dump 出来的 xml 解析成一棵完整的 tree,这个包是核心包。
二次开发
首先,dump 出来的 xml 文件被 uiautomationviewer 解析成自定义的 tree,每个节点代表一个控件,所以,如何添加 Xpath 属性呢?只需要在 node 节点中添加一个字段即可,其实很简单。通过阅读代码,在 com.android.uiautomator.tree 包下,有个 node 节点封装类,UiNode.java,看下以下代码片源:
public class UiNode extends BasicTreeNode {
    private static final Pattern BOUNDS_PATTERN = Pattern
            .compile("\\[-?(\\d+),-?(\\d+)\\]\\[-?(\\d+),-?(\\d+)\\]");

    private final Map<String, String> mAttributes = new LinkedHashMap();
    private String mDisplayName = "ShouldNotSeeMe";
    private Object[] mCachedAttributesArray;

    public void addAtrribute(String key, String value) {
        this.mAttributes.put(key, value);
        updateDisplayName();
        if ("bounds".equals(key))
            updateBounds(value);
    }

    public Map<String, String> getAttributes() {
        return Collections.unmodifiableMap(this.mAttributes);
    }

    private void updateDisplayName() {
        String className = (String) this.mAttributes.get("class");
        if (className == null)
            return;
        String text = (String) this.mAttributes.get("text");
        if (text == null)
            return;
        String contentDescription = (String) this.mAttributes
                .get("content-desc");
        if (contentDescription == null)
            return;
        String index = (String) this.mAttributes.get("index");
        if (index == null)
            return;
        String bounds = (String) this.mAttributes.get("bounds");
        if (bounds == null) {
            return;
        }

        className = className.replace("android.widget.", "");
        className = className.replace("android.view.", "");
        StringBuilder builder = new StringBuilder();
        builder.append('(');
        builder.append(index);
        builder.append(") ");
        builder.append(className);
        if (!text.isEmpty()) {
            builder.append(':');
            builder.append(text);
        }
        if (!contentDescription.isEmpty()) {
            builder.append(" {");
            builder.append(contentDescription);
            builder.append('}');
        }
        builder.append(' ');
        builder.append(bounds);
        this.mDisplayName = builder.toString();
private final Map<String, String> mAttributes = new LinkedHashMap();UiNode 节点下定义一个 mAttributes LinkedHashMap,用于存储节点所有 key-value 属性,如:className、text 、index 等等,所以,只需要在这个 UiNode 类下添加一个获取 xpath 方法,如下:
public String getXpath()
{
    String className=getNodeClassAttribute();
    String xpath="//"+className;
    String text = getAttribute("text");
    if(text !=null&& !text.equals(""))
    {
        xpath += "[@text='"+text+"']";
        return xpath;
    }else
    {
        return getAttribute("content-desc") !=""?
                xpath+"[@content-desc='"+getAttribute("content-desc")+"']"
                :xpath+"[@index='"+getAttribute("index")+"']";
    }


}
根据约定的优先级,进行筛选(text>content-desc>index),方法定义完毕后,如何触发 getXpath() 代码呢?
同样,在此包下 UiHierarchyXmlLoader.java 中,该类是用于处理把 dump xml 转换为 BasicTreeNode 对象,UiHierarchyXmlLoader 引用 org.xml.sax.helpers 处理基本 xml 文件 (Default base class for SAX2 event handlers.),实现了 ContentHandler 接口下的 startElement、endElement 接口,
    public void endElement(String uri, String localName, String qName)
            throws SAXException {
        if (this.mParentNode != null) {
            this.mWorkingNode = this.mParentNode;
            this.mParentNode = this.mParentNode.getParent();
            `mTmpNode.addAtrribute("xpath",mTmpNode.getXpath());`
        }
    }
};
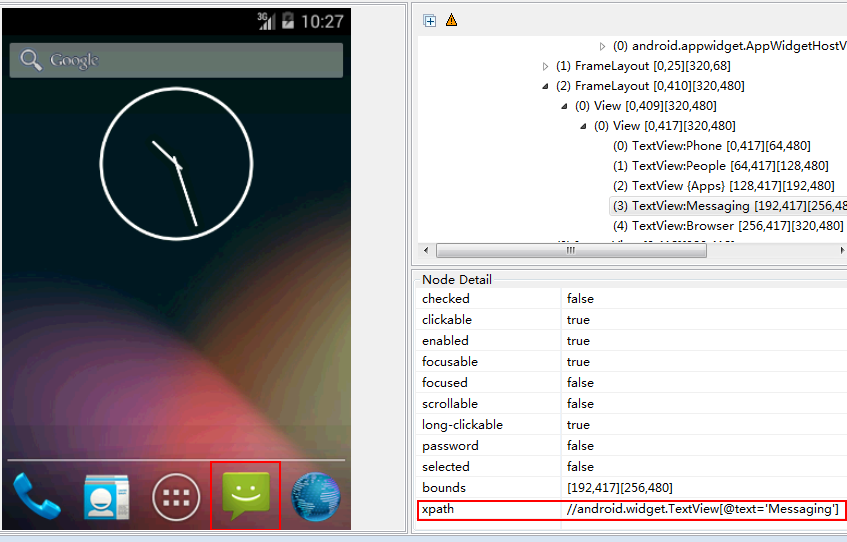
到这里,xpath 就会自动出现在 uiautomatorviewer 界面上了,效果如下:
补充
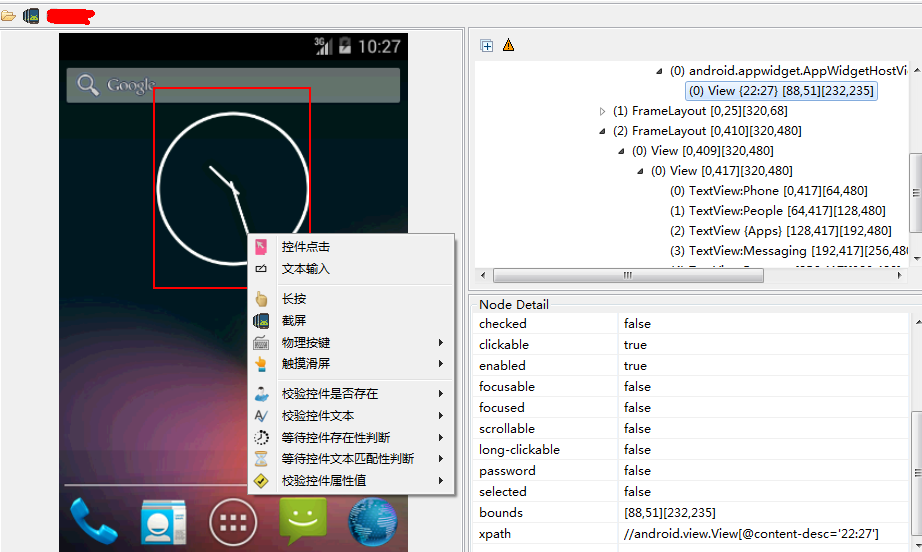
其实 uiautomatorviewer 二次开发还不止这些,我们可以在 uiautomatorviewer 中加入录制自动生成 java、python 等 appium 脚本,还可以每次用户点击 uiautomatorviewer 界面,同步刷新(目前需要用户手动点击 device screenshot 这个 action)等等,如下:
第一次发分享贴,写的不好,希望大家多多鼓励,后续会继续分享

↙↙↙阅读原文可查看相关链接,并与作者交流