ios-deploy -c # 获取已连接的设备

最近学习了 pytest 框架,学习过程中练习的代码想分享给大家,仅供参考。
参考精华帖https://testerhome.com/topics/17292
本文主要讲解使用 ATX+pytest+allure-pytest, 进行 IOS 的 UI 自动化测试。
ATX 官网:https://github.com/openatx/facebook-wda
Allure 官网:https://docs.qameta.io/allure/#_get_started
Pytest 官网:https://docs.pytest.org/en/latest/reference.html
macOS mojave 版本 10.14.5
Xcode: Version 11.3
WebDriverAgent :官网下载的最新版,解压后进入 Xcode 进行配置,具体配置方法后期新建文档详细说明
Pytest: 安装命令 pip install pytest==3.7
ATX:安装命令 pip install -U facebook-wda
Allure: 安装命令 brew install allure
allure-pytest: 安装命令 pip install allure-pytest
需要安装的命令行工具:
libimobiledevice (安装命令:brew install libimobiledevice)
ideviceinstaller (安装命令:brew install ideviceinstaller)
ios-deply (安装命令:brew install ios-deply)
usbmuxd (安装命令:brew install usbmuxd)
安装完成后,打开 Xcode 配置 WebDriverAgent 中的 project,连接设备,build 成功后 Test
执行以下命令获取需要的信息:
ios-deploy -c # 获取已连接的设备

ideviceinstaller -l # 获取 app 列表和信息

iproxy 8100 8100 # 把当前连接设备的 8100 端口 (SSH 端口) 映射到电脑的 8100 端口

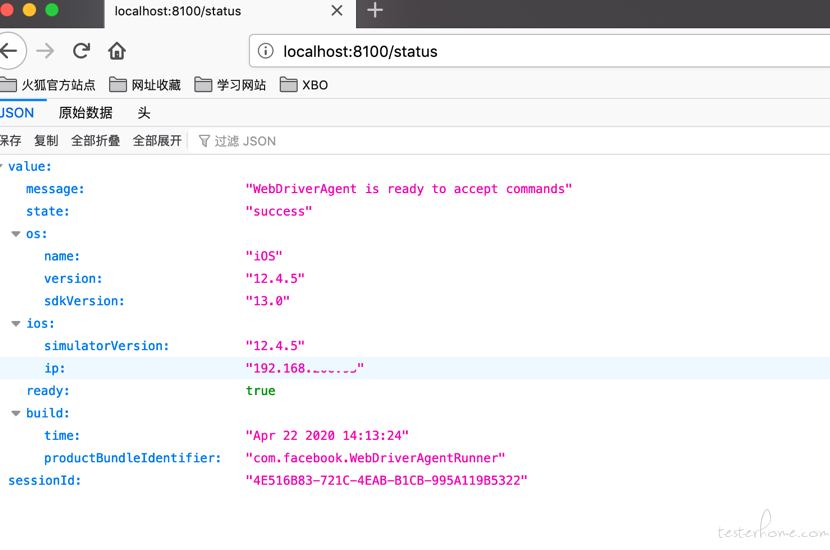
此时进入浏览器输入地址:http://localhost:8100/status,效果如图,说明环境配置成功:

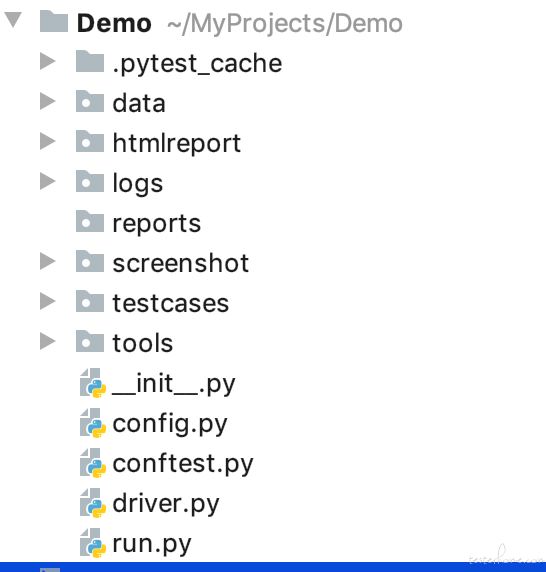
项目目录:

说明:
config.py 文件中配置了全局变量
conftest.py 文件为自定义的 fixture,实现了 setup,teardown,元素数据的传递,以及截图功能
import pytest
import yaml
import time
from driver import Driver
from config import *
from tools.loggers import JFMlogging
logger = JFMlogging().getloger()


@pytest.fixture()
def ios_driver_setup():
    logger.info("自动化测试开始!")
    request = Driver().init_ios_driver()
    # print(request.app_current())
    logger.info("创建session")
    s = request.session("com.tencent.xin")
    # print(s.orientation)
    # ios_allow(request)
    # 进入微信小程序
    s(name='发现').tap()
    s(name='小程序').tap()
    s(name='魔比UAT').tap()
    s.implicitly_wait(wait_timeout)
    yield s
    logger.info("自动化测试结束!")
    ios_screen_shot()
    s.close()
    logger.info("关闭session")

def ios_screen_shot():
    """
    截图操作
    pic_name:截图名称
    :return:
    """
    fail_time = time.strftime('%Y%m%d%H%M%S', time.localtime(time.time()))
    os.chdir(img_dir)
    a = os.system("idevicescreenshot")
    if a == 0:
        logger.info('截图成功')
    else:
        logger.info(fail_time, "截图失败")

@pytest.fixture()
def imyaml():
    file = open(yaml_dir, "r")
    f = yaml.safe_load(file)
    logger.info("导入yaml数据成功")
    return f
logs 存放生成的日志
tools 目录下 loggers.py 自定义日志
htmlreport 存放 html 测试报告
reports 为 allure 生成的 json 文件存放位置
data 目录下 data.yaml 文件配置了控件元素
testcases 目录下为测试用例
@allure.feature("测试XXX")
def test_post(ios_driver_setup, imyaml):
    s = ios_driver_setup
    # 定位元素
    f = imyaml
    keyvalues = []
    for i in f.keys():
        keyvalues.append(i)
    name1 = f[keyvalues[1]][0]
    name2 = f[keyvalues[1]][1]
    name3 = f[keyvalues[1]][2]
    xpath1 = f[keyvalues[0]][0]
    xpath2 = f[keyvalues[0]][1]
    xpath3 = f[keyvalues[0]][2]
    xpath4 = f[keyvalues[0]][3]
    # 开始
    s(name=name1).tap()
    s.implicitly_wait(30)
    s(name=name2).tap()
    s.swipe(0.741, 0.792, 0.741, 0.48)
    s.implicitly_wait(30.0)
    # 选择时间
    s(xpath=xpath1).tap()
    s(xpath=xpath2).tap()
    #选择XX
    s(xpath=xpath3).click_exists(timeout=5.0)
    # 提交
    s(xpath=xpath4).tap()
    s.implicitly_wait(30.0)
    try:
        s(name='取消').tap()
        assert s(name=name3).exists
        logger.info("成功!")
        """if s(name=name3).exists is True:
            logger.info("成功")
        else:
            logger.info("失败...")"""
    except Exception as e:
        logger.info("异常信息:".format(e))
    s.implicitly_wait(30.0)
driver.py 进行了设备初始化
import wda


class Driver():

    def init_ios_driver(self):
        """
        ios设备初始化
        :return:
        """
        try:
            c = wda.Client('http://localhost:8100')
            c.healthcheck()
            logger.info("连接设备:{}".format(ios_device_udid))
            c.wait_ready(timeout=wait_timeout)
            return c
        except Exception as e:
            logger.info("初始化ios端driver异常!{}".format(e))
run.py 进行环境初始化,执行指定用例,生成测试报告
import pytest
from config import *


def init_env():
    cmd = "iproxy 8100 8100"
    os.popen(cmd)


def init_report():
    cmd = "allure generate reports -o htmlreport --clean"
    os.popen(cmd)
    # cmd = "allure open htmlreport"


if __name__ == '__main__':
    init_env()
    pytest.main(["-s",  case_dir,  "--setup-show", "--alluredir=reports", "--emoji"])
    init_report()
