FAutoTest简称 FAT,主要用来解决微信内的 UI 的自动化测试问题,包括微信内的 H5 页面和小程序。不过这个项目已经 8 个月没更新了,关注度越来越低,笔者看到这种情况,实在是痛心。
因为这个项目的思路想法都还很不错的,直接通过 chrome dev tools 与小程序交互,而没有使用 chromedriver 这种中间层,稳定性应该更高一些。
这篇文章是我看这个项目的源码学习到的,希望能给大家带来帮助,希望腾讯官网也能够再次重视起来这个项目。
为了防止写文章的时候,突然又有提交了,或者下掉了,我先 Fork 一份代码到了这里。https://github.com/codeskyblue/FAutoTest
下面直接从官方项目 README 中摘抄
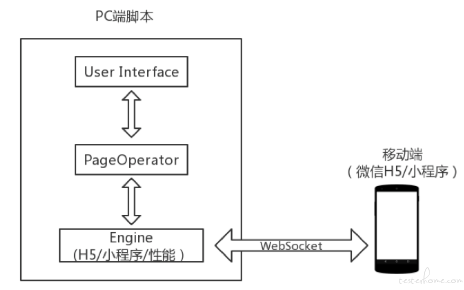
代码结构设计
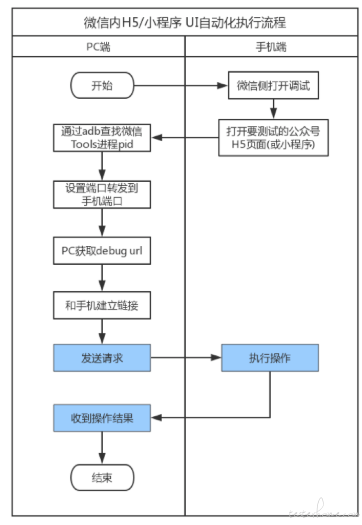
H5 页面/小程序 UI 自动化执行流程
在 sample 目录下提供了 3 个使用的例子。考虑到长得都差不多,我们只看H5Demo.py这个文件。
from fastAutoTest.core.h5.h5Engine import H5Driver

# http://h5.baike.qq.com/mobile/enter.html 从微信进入此链接,首屏加载完后执行脚本
if __name__ == '__main__':
    h5Driver = H5Driver()
    h5Driver.initDriver()
    h5Driver.clickElementByXpath('/html/body/div[1]/div/div[3]/p')
    h5Driver.close()
先看h5Driver = H5Driver() 这行的实现,需要打开 fastAutoTest/core/h5/h5Engine.py这个文件。
为了方便起见,很多代码我没有贴出来,也有些地方我稍微改了一点,只为了方便理解。
# File: fastAutoTest/core/h5/h5Engine.py

class H5Driver():
    def __init__(self, device=None):
        self.d = uiautomator.Device(device)
        self._pageOperator = H5PageOperator()
        self._networkHandler = ShortLiveWebSocket(self._webSocketDataTransfer, self._executor, self)
        # .... 没贴的代码 ....

    def clickElementByXpath(self, xpath):
        self.scrollToElementByXpath(xpath)
        sendStr = self._pageOperator.getElementRect(xpath)
        self._networkHandler.send(sendStr)

        x = self._getRelativeDirectionValue("x")
        y = self._getRelativeDirectionValue("y")

        self.logger.debug('clickElementByXpath --> x:' + str(x) + '   y:' + str(y))
        clickCommand = self._pageOperator.clickElementByXpath(x, y)
        return self._networkHandler.send(clickCommand)
这里的这个self._pageOperator对象由H5PageOperator()实例生成。先看刚才这段代码的最后两行
clickCommand = self._pageOperator.clickElementByXpath(x, y)
return self._networkHandler.send(clickCommand)
这个_pageOperator实际上就是用来生成clickCommand这个命令用的。继续向下追踪clickElementByXpath的方式实现。
文件fastAutoTest/core/h5/h5PageOperator.py
from fastAutoTest.core.common.command.commandProcessor import CommandProcessor
from fastAutoTest.core.h5 import h5UserAPI

class H5PageOperator():
    processor = CommandProcessor('h5')

    def clickElementByXpath(self, x, y, duration=50, tapCount=1):
          params = {"x": x, "y": y, "duration": duration, "tapCount": tapCount}
          return self.processor.doCommandWithoutElement(h5UserAPI.ActionType.CLICK, **params)
其中的h5UserAPI.ActionType.CLICK对应字符串click
我们再看CommandProcessor的实现。路径fastAutoTest/core/common/command/commandProcessor.py
import string

from jsonConcat import JsonConcat
from fastAutoTest.core.h5 import h5CommandManager, h5UserAPI
from fastAutoTest.core.wx import wxCommandManager, wxUserAPI

class CommandProcessor(object):
    def __init__(self, managerType):
        if managerType == 'h5':
            self.manager = h5CommandManager.H5CommandManager()
            self.userAPI = h5UserAPI
            self.concat = JsonConcat('h5')
        else:
            # ...

        def doCommandWithoutElement(self, actionType, **kwargs):
            return self.concat.concat(actionType, **kwargs)
这里有个 JsonContact 的实现需要查看下 路径fastAutoTest/core/common/command/jsonConcat.py
# file: fastAutoTest/core/common/command/jsonConcat.py

from fastAutoTest.core.h5 import h5CommandManager
from fastAutoTest.core.wx import wxCommandManager

class JsonConcat():
    def __init__(self, managerType):
        if managerType == "h5":
            self.manager = h5CommandManager.H5CommandManager()
        else:
            self.manager = wxCommandManager.WxCommandManager()

    def concat(self, action_type, **params):
        method = self.manager.getMethod(action_type, None) # return: Input.synthesizeTapGesture
        if len(params) != 0:
            paramsTemplate = self.manager.getParams(method)
            paramsCat = string.Template(paramsTemplate)
            paramsResult = paramsCat.substitute(**params)
            paramsResult = json.loads(paramsResult)
        else:
            # 有getDocument这些不需要参数的情况
            paramsResult = "{}"
        result = dict()
        result['method'] = method
        result['params'] = paramsResult
        jsonResult = json.dumps(result)
        return jsonResult
这里的 contat 函数返回的是一个 json 字符串,我们用下面这些代码测试下
from fastAutoTest.core.common.command.jsonConcat import JsonConcat
JsonConcat("h5").concat("click", x=20, y=30, duration=500, tapCount=1)
# output: {"params": {"y": 30, "x": 20, "duration": 500, "tapCount": 1}, "method": "Input.synthesizeTapGesture"}
文件fastAutoTest/core/h5/h5CommandManager.py有各种各样的定义。
看到这里我也感觉代码真的有点绕了,去掉这些绕绕,我们之前提到的代码 clickCommand = self._pageOperator.clickElementByXpath(x, y) 等价于
# self._pageOperator.clickElementByXpath(x, y)

clickCommand = json.dumps({
  "method": "Input.synthesizeTapGesture",
  "params": {"x": 10, "y": 15, "duration": 500, "tapCount": 1},
})
获取到命令之后,就是通过下面的代码return self._networkHandler.send(clickCommand)发送给手机的 websocket 进程了。
from fastAutoTest.utils.singlethreadexecutor import SingleThreadExecutor
from fastAutoTest.core.common.network.websocketdatatransfer import WebSocketDataTransfer
from fastAutoTest.core.common.network.shortLiveWebSocket import ShortLiveWebSocket

class H5Driver():
    def __init__(self):
        # ...
        self._executor = SingleThreadExecutor()
        self._webSocketDataTransfer = WebSocketDataTransfer(url=url)
        self._networkHandler = ShortLiveWebSocket(self._webSocketDataTransfer, self._executor, self)
跟 websocket 通讯的代码还真少。那个SingleThreadExecutor的作用就是让函数可以顺序调用,感觉用处不大。
WebSocketDataTransfer 则主要负责 websocket 的通信。
我只直接来看 self._networkHandler.send(clickCommand)的实现
File: fastAutoTest/core/common/network/shortLiveWebSocket.py

class ShortLiveWebSocket():
    # ... 此处省略无数代码 ...
    def __init__(self, ...., driver):
        self.driver = driver # H5Driver实例
        # ...

    def send(self, data, timeout=60):
        self._waitForConnectOrThrow()

        # 微信小程序和QQ公众号都需要切换页面
        if self.driver.getDriverType() == WXDRIVER or self.driver.getDriverType == QQDRIVER:
            # 只有点击事件才会导致页面的切换
            if 'x=Math.round((left+right)/2)' in data:
                time.sleep(WAIT_REFLESH_1_SECOND)
            if self.driver.needSwitchNextPage():
                self.driver.switchToNextPage()

        # 增加id字段
        jdata = json.loads(data)
        jdata["id"] = self._id.getAndIncrement()
        data = json.dumps(data)

        self._currentRequest = _NetWorkRequset(self._id.getAndIncrement(), data)
        currentRequestToJsonStr = self._currentRequest.toSendJsonString()
        self.logger.debug(' ---> ' + currentRequestToJsonStr)

        # scroll操作需要滑动到位置才会有返回,如果是scroll操作则等待,防止超时退出
        if 'synthesizeScrollGesture' in data:
            self._webSocketDataTransfer.send(currentRequestToJsonStr)
            self._retryEvent.wait(WAIT_REFLESH_40_SECOND)
        else:
            for num in range(0, SEND_DATA_ATTEMPT_TOTAL_NUM): # 这个Num的值是7
                self.logger.debug(" ---> attempt num: " + str(num))

                if num != 3 and num != 5:
                    self._webSocketDataTransfer.send(currentRequestToJsonStr)
                    self._retryEvent.wait(3)
                else:
                    self.driver.switchToNextPage()
                    time.sleep(WAIT_REFLESH_2_SECOND)
                    self.logger.debug('switch when request:  ' + currentRequestToJsonStr)
                    self._webSocketDataTransfer.send(currentRequestToJsonStr)
                    self._retryEvent.wait(WAIT_REFLESH_2_SECOND)

                if self._readWriteSyncEvent.isSet():
                    break

        self._readWriteSyncEvent.wait(timeout=timeout)
        self._readWriteSyncEvent.clear()
        self._retryEvent.clear()

        self._checkReturnOrThrow(self._currentRequest)

        return self._currentRequest
这里可以频繁的看到switchToNextPage这个方法,其实这个方法将 websocket 断了,然后在重连。
def switchToNextPage(self):
    """
    把之前缓存的html置为none
    再重新连接websocket
    """
    self.logger.debug('')
    self.html = None
    self._networkHandler.disconnect()
    self._networkHandler.connect()
FAT 的代码逻辑太多,这里仅仅分析九牛一毛。接下来我应该会写一篇文章,用简洁一些的代码,讲述 FAT 的原理。花了很多时间去看,感觉还是挺有收获的。
