很多小伙伴们,不管是做接口还是 UI 测试的时候,都想过或使用过 yaml,xlsx,sql 来维护用例吧~,但是不管是解析,还是测试用例的处理,报告的生成等等,都是相当的麻烦。
之前一篇文章介绍了一些 pytest+appium+allure 的一些基本用法
用 Pytest+Appium+Allure 做 UI 自动化的那些事
本文主要介绍一下 pytest hook 方法是怎么运行 yaml 文件做测试的 (喜欢其他方式也可以用 xlsx,sql 等),怎么与 Appium 结合,来驱动 Appium 做自动化测试。
该运行方式参照 pytest --doctest 参数运行的方法, 想深入了解的同学可以查看 _pytest/doctest.py 源码
本文 Demo 的代码地址:https://github.com/cpj1352/YamlAppium
使用 pytest_collect_file 钩子函数,在脚本运行之前过滤 .yml 文件
def pytest_collect_file(parent, path):
    # 获取文件.yml 文件
    if path.ext == ".yml" and path.basename.startswith("test"):
        return YamlFile(path, parent)
读取 yml 转成 json 移交至 YamlTest 类
class YamlFile(pytest.File):
    # 读取文件内容
    def collect(self):
        import yaml
        raw = yaml.safe_load(self.fspath.open(encoding='utf-8'))
        for name, values in raw.items():
            yield YamlTest(name, self, values)
下面就是测试类了,这里我们 Appium 还是使用单例初始化,方便所有测试用例继承一个 session
class Singleton(object):
    """单例
    ElementActions 为自己封装操作类"""
    Action = None

    def __new__(cls, *args, **kw):
        if not hasattr(cls, '_instance'):
            desired_caps={}
            host = "http://localhost:4723/wd/hub"
            driver = webdriver.Remote(host, desired_caps)
            Action = ElementActions(driver, desired_caps)
            orig = super(Singleton, cls)
            cls._instance = orig.__new__(cls, *args, **kw)
            cls._instance.Action = Action
        return cls._instance

class DriverClient(Singleton):
    pass
测试类初始化,这里要说一下,测试类一定要继承 pytest.Item 方法
class YamlTest(pytest.Item):
    def __init__(self, name, parent, values):
        super(YamlTest, self).__init__(name, parent)
        self.values = values
        self.Action = DriverClient().Action # 初始化 Appium
        self.locator = None
为了减少代码的逻辑,取出来的 yaml json 字符串怎么可以直接转化成可运行方法呢?
这里就要说到 class 的 _getattribute_ 内建属性的用法,下面举个简单例子
class TestExample:
    def test1(self):
        print('test1')

>>> TestExample().__getattribute__('test1')()
test1
现在我们就能直接读取 yaml 文件中的 method 字符串直接转化成 Appium api 运行了(method 对应自己封装或 Appium api 的方法)
class YamlTest(pytest.Item):
    def __init__(self, name, parent, values):
        super(YamlTest, self).__init__(name, parent)
        self.values = values
        self.Action = DriverClient().Action
        self.locator = None

    def runtest(self):
        # 运行用例
        for self.locator in self.values:
            self.locator['time'] = 5
            if self.locator.get('element'):
                # 需要接收参数
                response = self.Action.__getattribute__(self.locator.get('method'))(self.locator)
            else:
                # 不需要参数
                response = self.Action.__getattribute__(self.locator.get('method'))()
            self.assert_response(response, self.locator)
这里将 Appium api 基本操作封装成了两类:
def repr_failure(self, excinfo):
    """自定义报错信息,如果没有定义则会默认打印错误堆栈信息,因为比较乱,所以这里自定义一下 """

    if isinstance(excinfo.value, Exception):
        return '测试用例名称:{} \n' \
               '步骤输入参数:{} \n' \
               '数据:{}'.format(self.name, self.locator, excinfo.value.args)

def reportinfo(self):
    return self.fspath, 0, "CaseName: %s" % self.name
下面就是完整的测试类了
class YamlTest(pytest.Item):
    def __init__(self, name, parent, values):
        super(YamlTest, self).__init__(name, parent)
        self.values = values
        self.Action = DriverClient().Action
        self.locator = None

    def runtest(self):
        # 运行用例
        for self.locator in self.values:
            self.locator['time'] = 5
            is_displayed = True
            if not self.locator.get('is_displayed'):
                is_displayed = False if str(self.locator.get('is_displayed')).lower() == 'false' else True
            try:
                if self.locator.get('element'):
                    response = self.Action.__getattribute__(self.locator.get('method'))(yamldict(self.locator))
                else:
                    response = self.Action.__getattribute__(self.locator.get('method'))()
                self.assert_response(response, self.locator)
            except Exception as E:
                if is_displayed:
                    raise E
                pass

    def repr_failure(self, excinfo):
        """自定义报错信息,如果没有定义则会打印堆栈错误信息,调试时可以注释该函数,便于问题查找 """
        if isinstance(excinfo.value, Exception):
            return '测试类名称:{} \n' \
                   '输入参数:{} \n' \
                   '错误信息:{}'.format(self.name, self.locator, excinfo.value.args)

    def assert_response(self, response, locator):
        if locator.get('assert_text'):
            assert locator['assert_text'] in response
        elif locator.get('assert_element'):
            assert response

    def reportinfo(self):
        return self.fspath, 0, "CaseName: %s" % self.name
这里我们主体 Pytest+yaml 测试框架就构建完成了,当然还有各种异常的捕获等钩子函数,自己封装的 Appium api 方法等,上篇文章讲过了,这里就不赘述了,自行选择添加更多功能
因为我们上面将接收方法分成了需要 element 参数和不需要 element 参数两类所以 yaml 格式如下
test_index:
  -
    method: launchApp # 启动 APP
  -
    method: 方法名称 例如:click (必填)
    element: 查找元素id,class等 (选填,配合 method 如需要点击元素,查找元素等必填)
    type: 元素类型 id,xpath,class  name,accessibility id (选填,会自动识别,如识别错误则自行填写)
    name: 测试步骤的名称 例如:点击搜索按钮 (选填)
    text: 需要输入或者查找的文本 (选填,配合部分 method 使用)
    time: 查找该元素需要的时间,默认 5s (选填)
    index: 页面有多个id,class时,不为空则查找元素数组下标 (选填)
    is_displayed: 默认 True ,当为 False 时元素未找到也不会抛异常(选填)
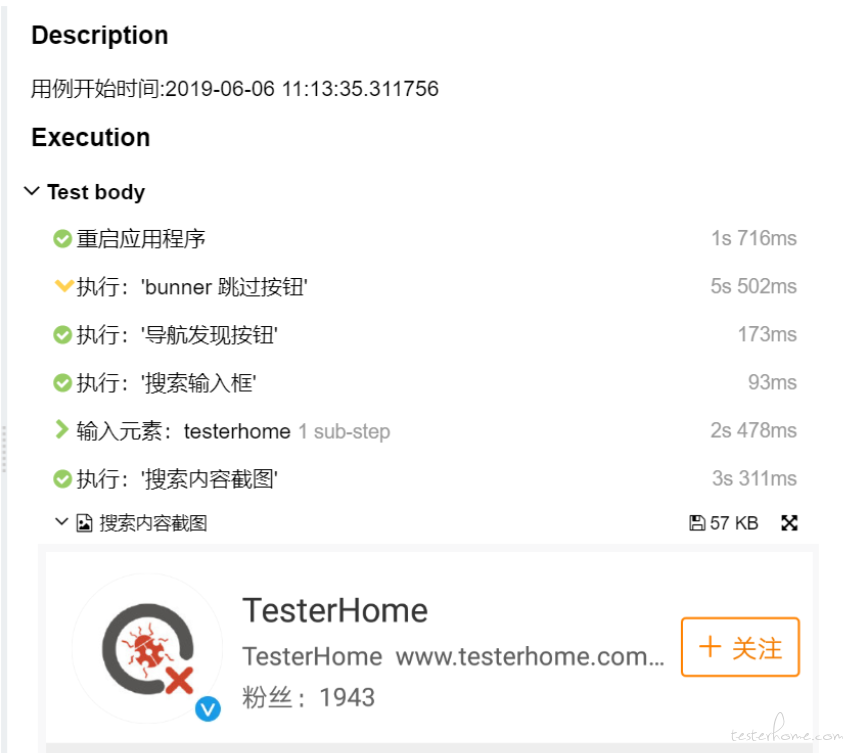
咱们用微博做个 demo 测试一下
test_index:
  -
    method: launchApp # 重启 APP
  -
    method: click
    element: click_ad_skip
    name: 广告跳过按钮
    is_displayed: False
  -
    method: click
    element: 发现
    name: 导航发现按钮
  -
    method: sleep
    element: 3
  -
    method: set_text
    element: com.sina.weibo:id/tv_search_keyword
    text: testerhome
    name: 搜索输入框
  -
    method: set_keycode_enter
  -
    method: screenshot_element
    element: //*[@resource-id="com.sina.weibo:id/lv_content"]/android.widget.RelativeLayout[1]
    name: 搜索内容截图
运行用例
pytest -v ./test_case/test_ranking.yml --alluredir /report/test
或者直接运行文件目录
使用方法和基本 pytest 用法没有太大区别
pytest -v ./test_case --alluredir /report/test
来查看下运行结果:

