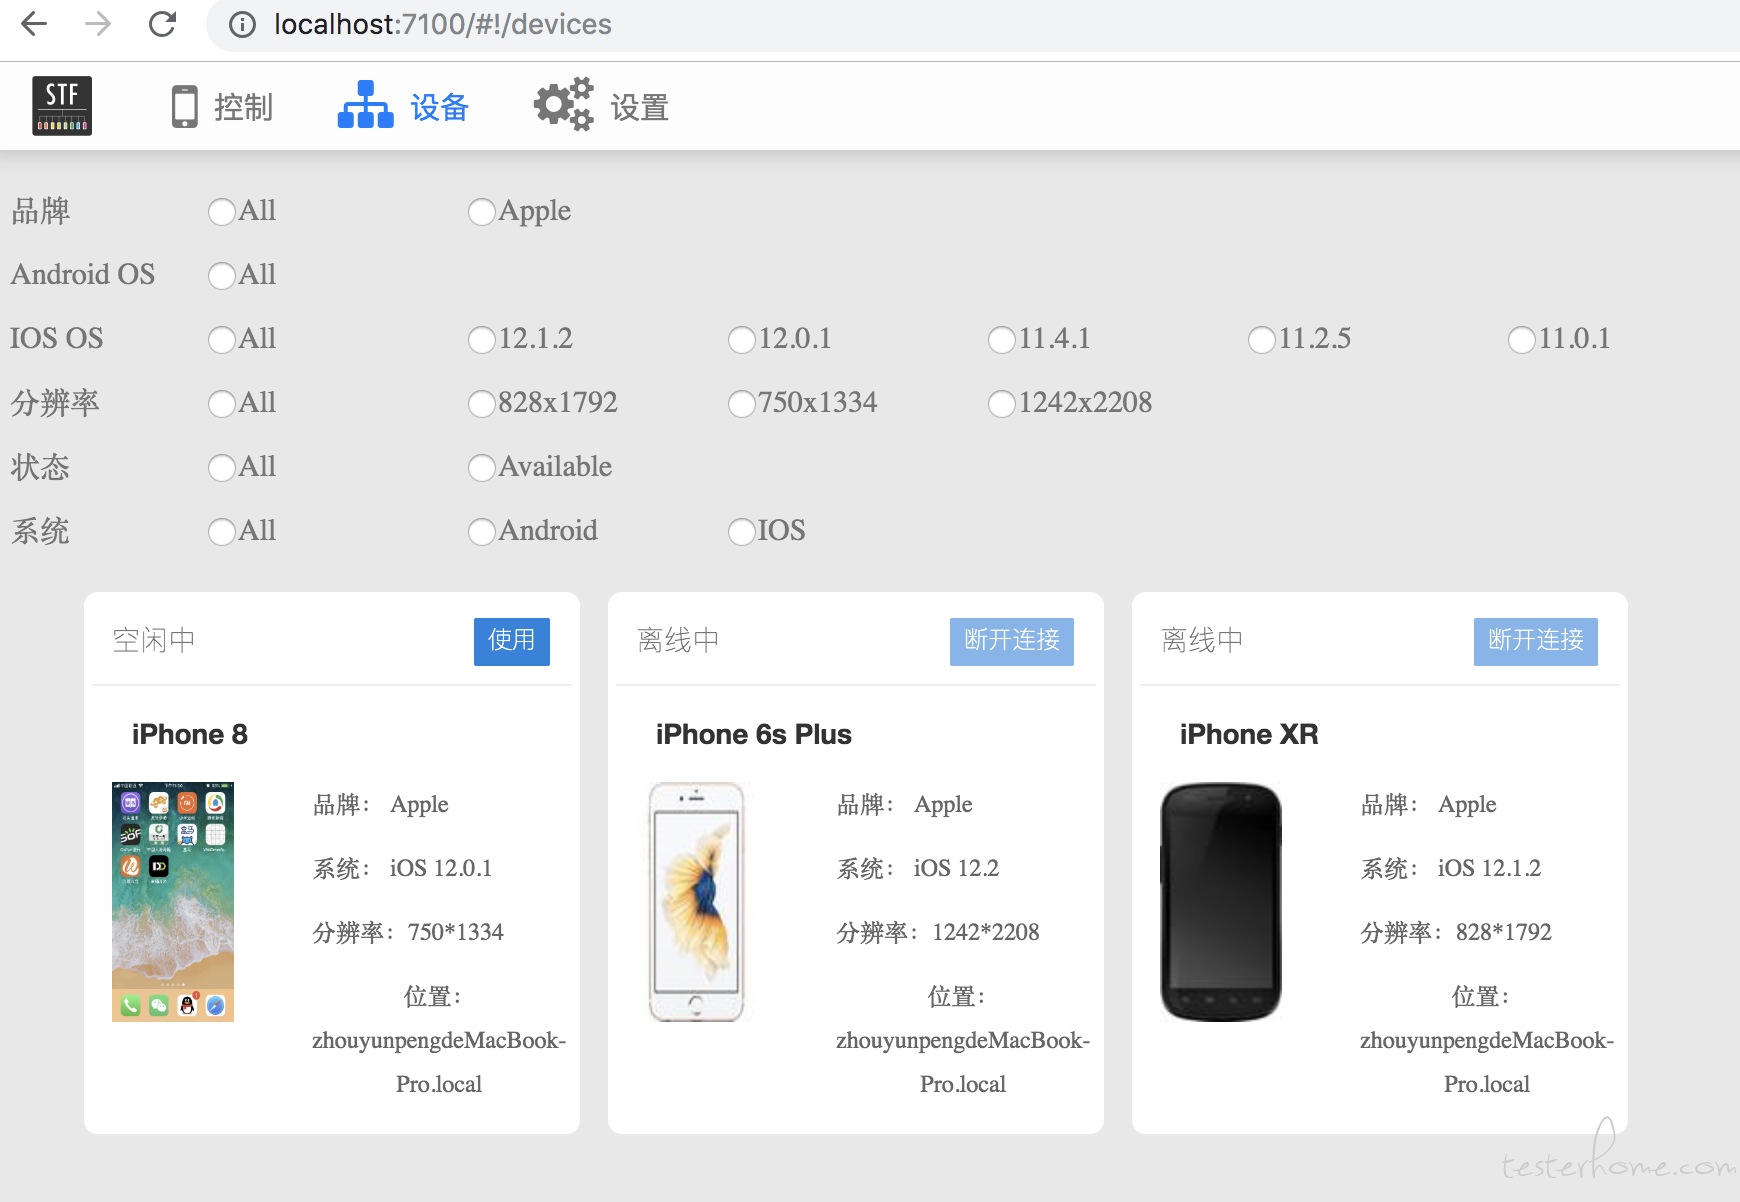
做完这些,那恭喜你,你可以在 STF 的设备列表上看到你的 iOS 设备了。
最后上个图给大家看看效果,我这里改了前端页面,样式比较丑,大家可以忽略。
目前,iOS 的设备集群工具已经有不少了,但是还没人直接在 STF 上做集成,现在就来说下 STF 怎么集成 iOS。
我们先来看下 Android 的设备是怎么连接上的。在 STF 中,设备是通过 provider 进程来管理的,一个 provider 可以连接多个设备,设备的连接就是通过 provider 这个进程来处理的。我们先找到 provider 的代码,在/stf/lib/units/provider/index.js 文件,注意以下代码段:
var client = adb.createClient({
    host: options.adbHost
  , port: options.adbPort
  })
......
// Track and manage devices
client.trackDevices().then(function(tracker) {
log.info('Tracking devices')
......
tracker.on('add', filterDevice(function(device) {
log.info('Found device "%s" (%s)', device.id, device.type)
......
tracker.on('change', filterDevice(function(device) {
    flippedTracker.emit(device.id, 'change', device)
}))
tracker.on('remove', filterDevice(function(device) {
   flippedTracker.emit(device.id, 'remove', device)
}))
首先,通过传入参数 adbHost 和 adbPort 创建一个 adbkit 的对象 client,调用 client.trackDevices 返回 tracker 对象,然后监听 tracker 的 add/change/remove 事件,顾名思义,这三个事件分别就是设备的增加/改变/删除了。我们主要看下 add 事件的处理函数里做了什么,首先有个匿名函数
// Wait for others to acknowledge the device
      var register = new Promise(function(resolve) {
        // Tell others we found a device
        push.send([
          wireutil.global
        , wireutil.envelope(new wire.DeviceIntroductionMessage(
            device.id
          , wireutil.toDeviceStatus(device.type)
          , new wire.ProviderMessage(
              solo
            , options.name
            )
          ))
        ])

        privateTracker.once('register', resolve)
      })
这个函数的作用就是通过 zmq 发送 DeviceIntroductionMessage 消息通知其他模块,我发现了一个设备。接下来有一个 spawn 函数
// Spawn a device worker
      function spawn() {
        var allocatedPorts = ports.splice(0, 4)
        var proc = options.fork(device, allocatedPorts.slice())
        var resolver = Promise.defer()
        ......
        function messageListener(message) {
          switch (message) {
            case 'ready':
              _.pull(lists.waiting, device.id)
              lists.ready.push(device.id)
             ......
          }
        }
        ......
        lists.waiting.push(device.id)
这个 options.fork 是什么呢?我们知道 options 是传入的参数对象,那我们先看看 provider 的传入参数有哪些,找到文件/stf/stf/lib/cli/provider/index.js
return require('../../units/provider')({
    name: argv.name
   ......
  , fork: function(device, ports) {
      var fork = require('child_process').fork
      var args = [
        'device'
      , '--serial', device.id
      , '--provider', argv.name
       ......
      ]
      ......
      return fork(cli, args)
    }
  ......
这里可以看到 fork 参数实际上是一个函数,在这个函数里通过 fork 的方式启动了一个 device 的子进程。再回到前面 spawn 函数,也就是说,spawn 函数实际上是开启了一个 device 子进程,后面的代码就是对 device 子进程事件和消息的处理了。可能有人已经注意到了 lists,这个 lists 的定义如下:
var lists = {
   all: []
 , ready: []
 , waiting: []
 }
lists 用来存储所有设备和两种状态的设备列表,设备首先会添加到 waiting 列表,只有当 device 进程的所有模块加载完成,收到 device 进程的 ready 消息才会被添加到 ready 列表,同时从 waiting 列表移除。接下来有个 work 函数
// Starts a device worker and keeps it alive
      function work() {
        return (worker = workers[device.id] = spawn())
          .then(function() {
            ......
          }
       ......
      }
这个主要是调用 spawn 函数启动 device 进程,如果进程抛出异常则重启 device 进程。那么 work 函数又是在哪调用的呢,这里面的函数调用链如下:匿名函数发送 DeviceIntroductionMessage 消息返回 register-->register.then(()=>check())-->work-->spawn-->开启 device 子进程。这就是设备连接的大致过程。
了解了 android 设备的连接过程,那要接入 iOS 的设备连接就简单多了。从上面的分析可以知道,其实大部分的东西我们可以复用 android 的,我们需要做的只是一个发现 iOS 设备的模块,当有设备新增时,发送一个 add 消息,有设备断开时,发送 remove 消息,就是这么简单。
那么 iOS 用什么工具来发现设备呢,答案当然是功能强大的 libimobiledevice 工具集了,我们用 idevice_id 这个工具来获取设备列表,具体命令为 idevice_id -l。值得注意的时,add/remove 消息发送的数据是包含 id 和 type 的 map,type 可取的值如下(取左边的),如果填了其他的值,会出现状态转换错误。
{
      device: 'ONLINE'
    , emulator: 'ONLINE'
    , unauthorized: 'UNAUTHORIZED'
    , offline: 'OFFLINE'
    , connecting: 'CONNECTING'
    , authorizing: 'AUTHORIZING'
}
在设备连接完成后,我们需要向前端发送设备信息。我们先来看下 device 模块,打开文件/stf/lib/units/device/index.js,
return syrup.serial()
    // We want to send logs before anything else starts happening
    ......
    .define(function(options) {
      return syrup.serial()
        .dependency(require('./plugins/heartbeat'))
        .dependency(require('./plugins/solo'))
        ......
        .define(function(options, heartbeat, solo) {
          if (process.send) {
            // Only if we have a parent process
            process.send('ready')
          }
          log.info('Fully operational')
          return solo.poke()
        })
       ......
    })
可以看到 device 进程会加载很多的依赖模块,设备信息的获取主要在 solo 这个模块,打开文件/stf/lib/units/device/plugins/solo.js
router.on(wire.ProbeMessage, function() {
      push.send([
        wireutil.global
      , wireutil.envelope(new wire.DeviceIdentityMessage(
          options.serial
        ......
    })
    return {
      channel: channel
    , poke: function() {
        push.send([
          wireutil.global
        , wireutil.envelope(new wire.DeviceReadyMessage(
            options.serial
         ......
    }
可以看到这个文件里会发出两个广播消息,一个是 DeviceIdentityMessage,一个是 DeviceReadyMessage,很显然,第一个就是设备信息的消息了,而第二个则是在 poke 方法中发送的.在上一段代码中可以看到,在最后调用了 solo.poke,就是通知前端,这个设备已经准备好了,可以使用了。
那么设备信息的获取是在哪里呢,我们看 solo 文件中引用的 identity 模块,打开/stf/lib/units/device/plugins/util/identity.js 文件
function solve() {
      log.info('Solving identity')
      var identity = devutil.makeIdentity(options.serial, properties)
      identity.display = display.properties
      identity.phone = phone
      return identity
    }
这里返回了一个 identity 对象,这就是我们需要的设备信息了。这个对象包含了三个模块,一个用于获取设备的基础信息 properties,一个用于获取设备的屏幕信息 display,还有一个则用于获取手机 imei/联网状态等信息。对于 iOS,我们需要重写 properties 和 display,在 properties 中,使用 libimobiledevice 工具集下的 ideviceinfo 获取基础信息。至于屏幕信息,我目前只获取了分辨率,而且是通过截图,取图片分辨率的方式获取的,目前没找到其他更好的办法获取 iOS 的分辨率。
做完这些,那恭喜你,你可以在 STF 的设备列表上看到你的 iOS 设备了。
最后上个图给大家看看效果,我这里改了前端页面,样式比较丑,大家可以忽略。
参考文档:
