XMind2TestCase 工具,提供了一个高效测试用例设计的解决方案!
软件测试过程中,最重要、最核心就是测试用例的设计,也是测试童鞋、测试团队日常投入最多时间的工作内容之一。
然而,传统的测试用例设计过程有很多痛点:
基于这些情况,现在越来越多公司选择使用思维导图这种高效的生产力工具进行用例设计,特别是敏捷开发团队。
事实上也证明,思维导图其发散性思维、图形化思维的特点,跟测试用例设计时所需的思维非常吻合,所以在实际工作中极大提升了我们测试用例设计的效率,也非常方便测试用例评审。
但是与此同时,使用思维导图进行测试用例设计的过程中也带来不少问题:
综合以上情况,我们可以发现不同的测试用例设计方式,各有各个的优劣。
那么问题来了,我们能不能将它们各自优点合在一起呢?这样不就可以提升我们的效率了!
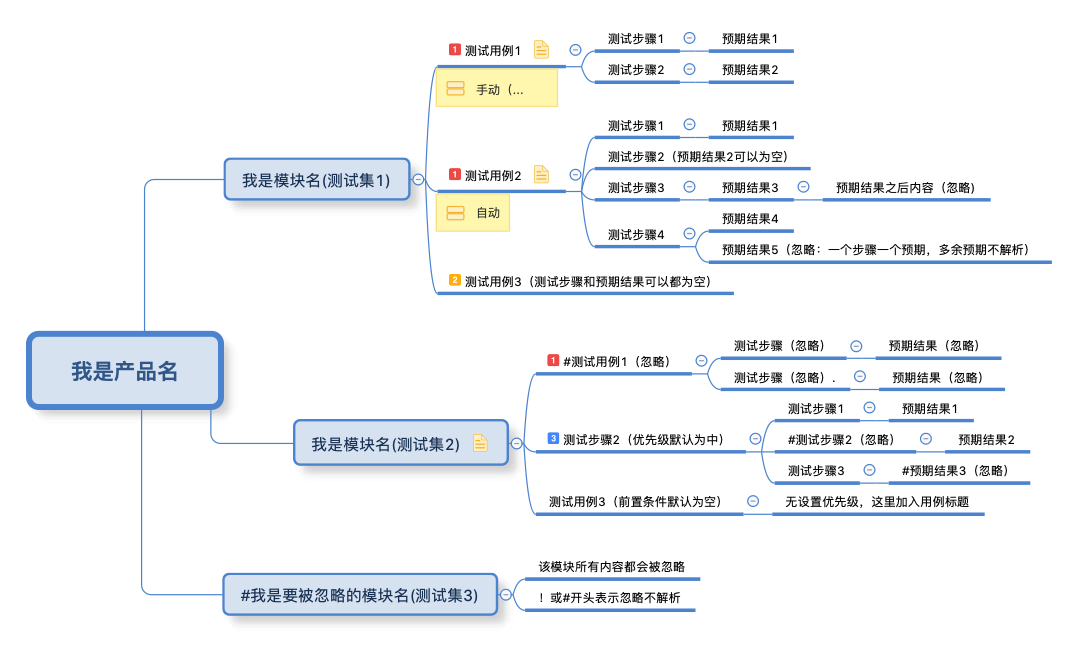
于是,这时候 XMind2TestCase 就应运而生了,该工具基于 Python 实现,通过制定测试用例通用模板,
然后使用 XMind 这款广为流传且开源的思维导图工具进行用例设计。
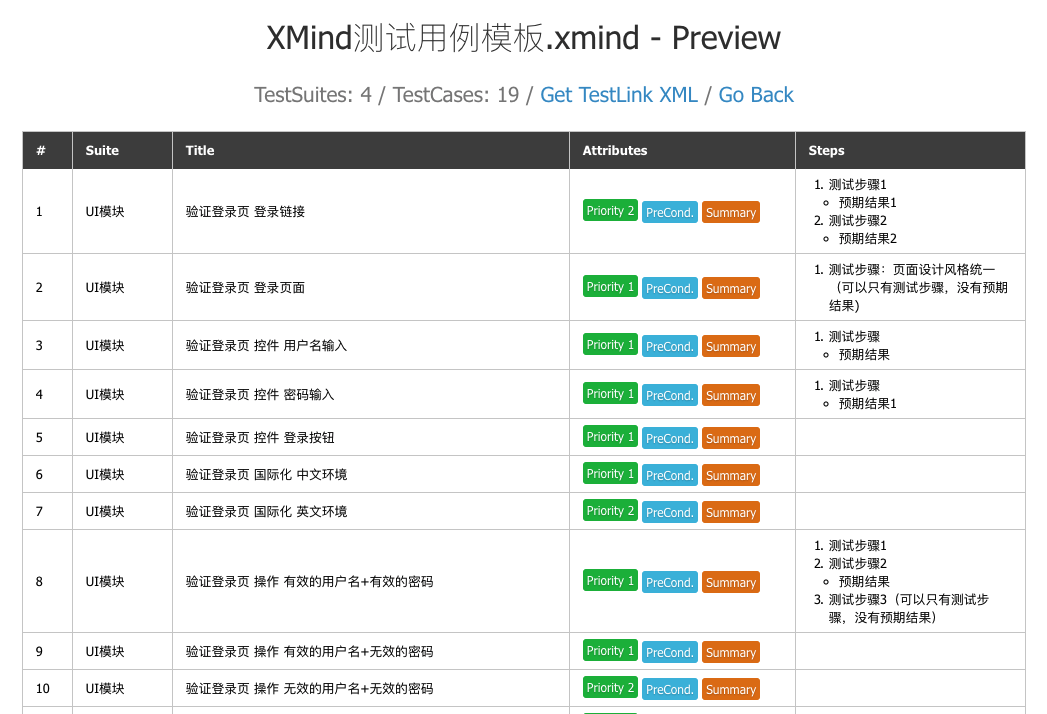
其中制定测试用例通用模板是一个非常核心的步骤(具体请看使用指南),有了通用的测试用例模板,我们就可以在 XMind 文件上解析并提取出测试用例所需的基本信息,
然后合成常见测试用例管理系统所需的用例导入文件。这样就将 XMind 设计测试用例的便利与常见测试用例系统的高效管理结合起来了!
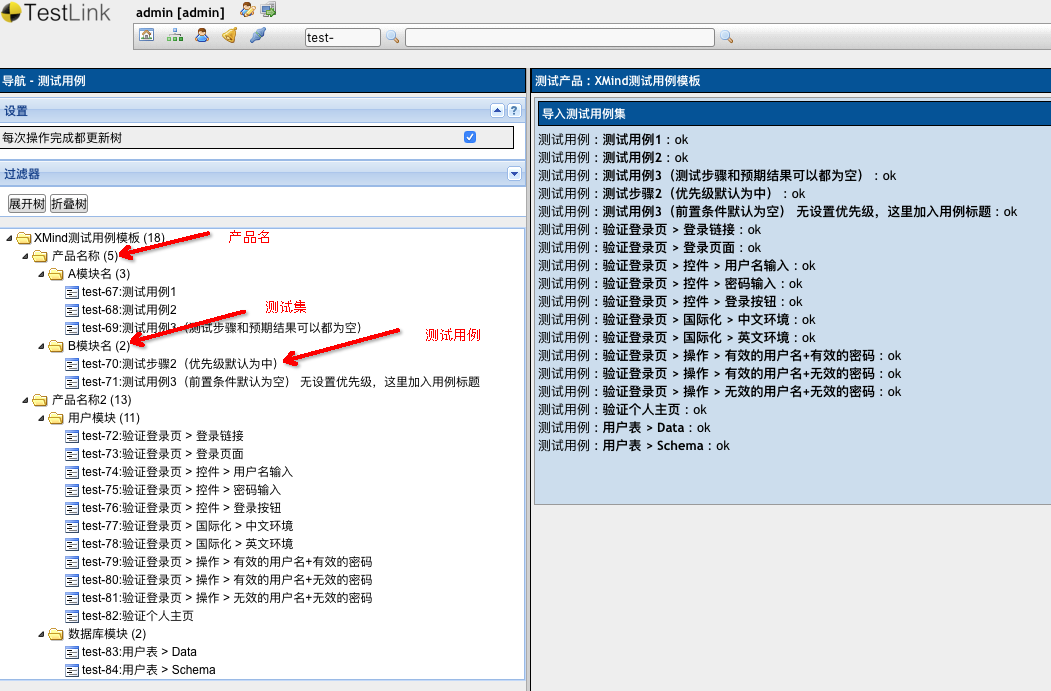
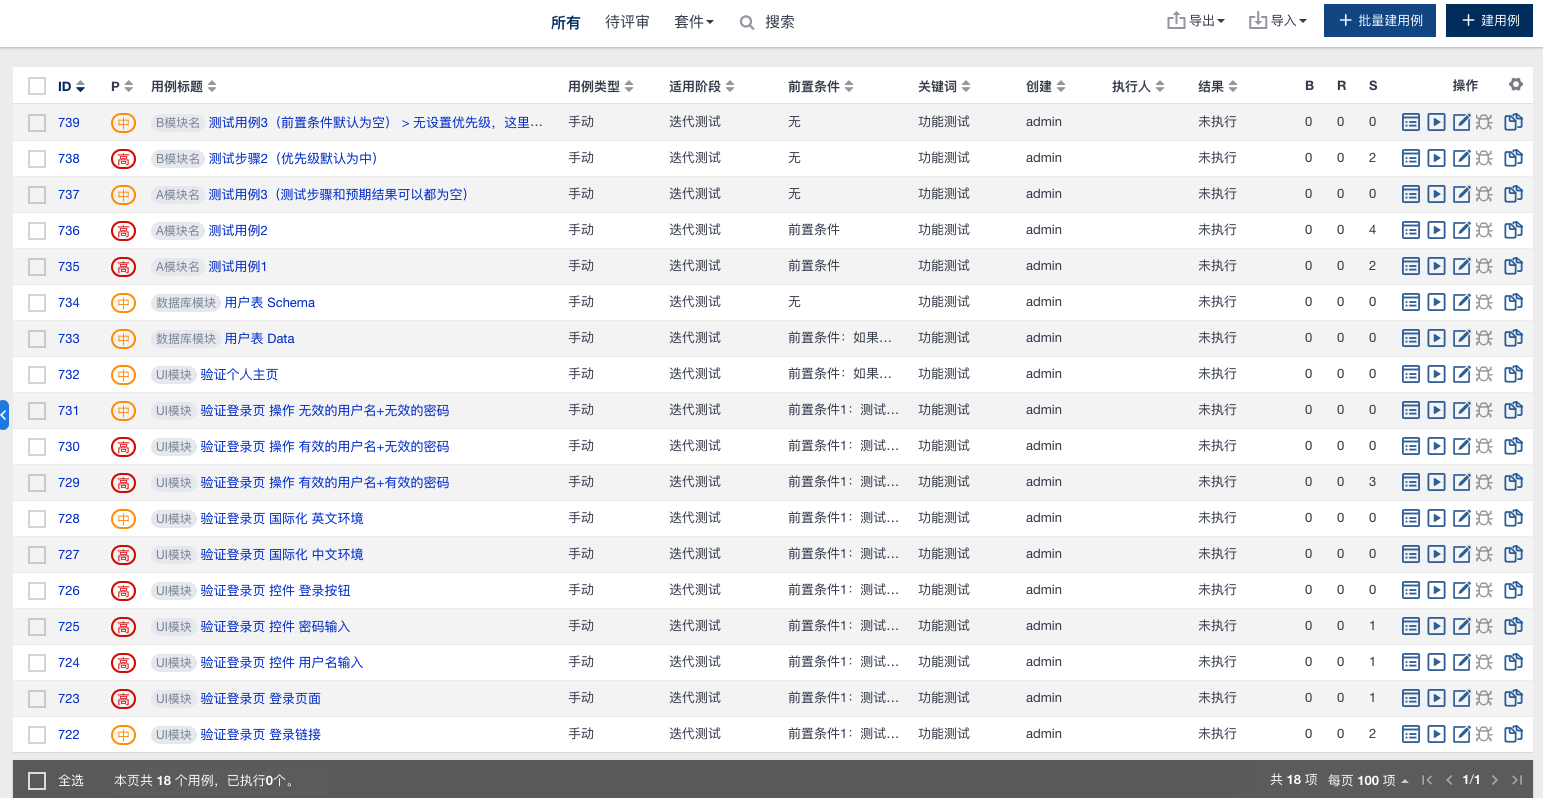
当前 XMind2TestCase 已实现从 XMind 文件到 TestLink 和 Zentao(禅道) 两大常见用例管理系统的测试用例转换,同时也提供 XMind 文件解析后的两种数据接口
(TestSuites、TestCases 两种级别的 JSON 数据),方便快速与其他测试用例管理系统打通。
pip3 install xmind2testcase
pip3 install -U xmind2testcase
Usage:
 xmind2testcase [path_to_xmind_file] [-csv] [-xml] [-json]

Example:
 xmind2testcase /path/to/testcase.xmind        => output testcase.csv、testcase.xml、testcase.json
 xmind2testcase /path/to/testcase.xmind -csv   => output testcase.csv
 xmind2testcase /path/to/testcase.xmind -xml   => output testcase.xml
 xmind2testcase /path/to/testcase.xmind -json  => output testcase.json
Usage:
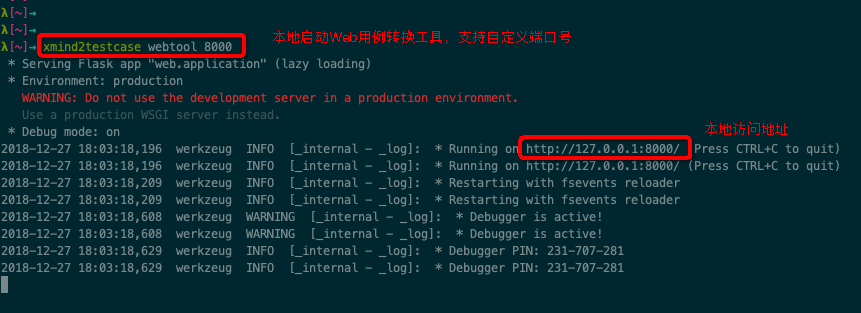
xmind2testcase [webtool] [port_num]
Example:
xmind2testcase webtool => launch the web testcase convertion tool locally -> 127.0.0.1:5001
xmind2testcase webtool 8000 => launch the web testcase convertion tool locally -> 127.0.0.1:8000
import json
import xmind
from xmind2testcase.zentao import xmind_to_zentao_csv_file
from xmind2testcase.testlink import xmind_to_testlink_xml_file
from xmind2testcase.utils import xmind_testcase_to_json_file
from xmind2testcase.utils import xmind_testsuite_to_json_file
from xmind2testcase.utils import get_xmind_testcase_list
from xmind2testcase.utils import get_xmind_testsuite_list


def main():
    xmind_file = 'docs/xmind_testcase_template.xmind'
    print('Start to convert XMind file: %s' % xmind_file)

    zentao_csv_file = xmind_to_zentao_csv_file(xmind_file)
    print('Convert XMind file to zentao csv file successfully: %s' % zentao_csv_file)

    testlink_xml_file = xmind_to_testlink_xml_file(xmind_file)
    print('Convert XMind file to testlink xml file successfully: %s' % testlink_xml_file)

    testsuite_json_file = xmind_testsuite_to_json_file(xmind_file)
    print('Convert XMind file to testsuite json file successfully: %s' % testsuite_json_file)

    testcase_json_file = xmind_testcase_to_json_file(xmind_file)
    print('Convert XMind file to testcase json file successfully: %s' % testcase_json_file)

    testsuites = get_xmind_testsuite_list(xmind_file)
    print('Convert XMind to testsuits dict data:\n%s' % json.dumps(testsuites, indent=2, separators=(',', ': '), ensure_ascii=False))

    testcases = get_xmind_testcase_list(xmind_file)
    print('Convert Xmind to testcases dict data:\n%s' % json.dumps(testcases, indent=4, separators=(',', ': ')))

    workbook = xmind.load(xmind_file)
    print('Convert XMind to Json data:\n%s' % json.dumps(workbook.getData(), indent=2, separators=(',', ': '), ensure_ascii=False))

    print('Finished conversion, Congratulations!')


if __name__ == '__main__':
    main()
from xmind2testcase.utils import get_xmind_testcase_list
xmind_file = 'docs/xmind_testcase_demo.xmind'
testcases = get_xmind_testcase_list(xmind_file)
print(testcases)


Output:

[
    {                                                # 测试用例
        "name": "测试用例1",                           # 用例标题
        "version": 1,                                 # 用例版本
        "summary": "测试用例1",                        # 用例摘要
        "preconditions": "前置条件",                   # 前置条件
        "execution_type": 1,                          # 用例执行类型(1:手动、2:自动)
        "importance": 1,                              # 优先级(1:高、2:中、3:低)
        "estimated_exec_duration": 3,                 # 预计执行时间(分钟)
        "status": 7,                                  # 用例状态(1:草稿、2:待评审、3:评审中、4:重做、5、废弃、6:feature、7:终稿)
        "steps": [                                    # 测试步骤列表
            {
                "step_number": 1,                     # 编号
                "actions": "测试步骤1",                 # 步骤内容
                "expectedresults": "预期结果1",         # 预期结果
                "execution_type": 1                    # 执行类型(1:手动,2:自动)
            },
            {
                "step_number": 2,
                "actions": "测试步骤2",
                "expectedresults": "预期结果2",
                "execution_type": 1
            }
        ],
        "product": "我是产品名",                          # 产品名称
        "suite": "我是模块名(测试集1)"                     # 测试集(模块名)
    },
    {
        "name": "测试用例2",
        "version": 1,
        "summary": "测试用例2",
        "preconditions": "前置条件",
        "execution_type": 1,
        "importance": 1,
        "estimated_exec_duration": 3,
        "status": 7,
        "steps": [
            {
                "step_number": 1,
                "actions": "测试步骤1",
                "expectedresults": "预期结果1",
                "execution_type": 1
            },
            {
                "step_number": 2,
                "actions": "测试步骤2(预期结果2可以为空)",
                "expectedresults": "",
                "execution_type": 1
            },
            {
                "step_number": 3,
                "actions": "测试步骤3",
                "expectedresults": "预期结果3",
                "execution_type": 1
            },
            {
                "step_number": 4,
                "actions": "测试步骤4",
                "expectedresults": "预期结果4",
                "execution_type": 1
            }
        ],
        "product": "我是产品名",
        "suite": "我是模块名(测试集1)"
    },
    {
        "name": "测试用例3(测试步骤和预期结果可以都为空)",
        "version": 1,
        "summary": "测试用例3(测试步骤和预期结果可以都为空)",
        "preconditions": "无",
        "execution_type": 1,
        "importance": 2,
        "estimated_exec_duration": 3,
        "status": 7,
        "steps": [ ],
        "product": "我是产品名",
        "suite": "我是模块名(测试集1)"
    },
    {
        "name": "测试步骤2(优先级默认为中)",
        "version": 1,
        "summary": "测试步骤2(优先级默认为中)",
        "preconditions": "无",
        "execution_type": 1,
        "importance": 3,
        "estimated_exec_duration": 3,
        "status": 7,
        "steps": [
            {
                "step_number": 1,
                "actions": "测试步骤1",
                "expectedresults": "预期结果1",
                "execution_type": 1
            },
            {
                "step_number": 2,
                "actions": "测试步骤3",
                "expectedresults": "",
                "execution_type": 1
            }
        ],
        "product": "我是产品名",
        "suite": "我是模块名(测试集2)"
    },
    {
        "name": "测试用例3(前置条件默认为空) 无设置优先级,这里加入用例标题",
        "version": 1,
        "summary": "测试用例3(前置条件默认为空) 无设置优先级,这里加入用例标题",
        "preconditions": "无",
        "execution_type": 1,
        "importance": 2,
        "estimated_exec_duration": 3,
        "status": 7,
        "steps": [ ],
        "product": "我是产品名",
        "suite": "我是模块名(测试集2)"
    }
]
from xmind2testcase.utils import get_xmind_testsuite_list
xmind_file = 'docs/xmind_testcase_demo.xmind'
testsuites = get_xmind_testsuite_list(xmind_file)
print(testsuites)


Output:

[
  {                                                 # XMind画布(Sheet)列表
    "name": "我是产品名",                             # 产品名称
    "details": null,                                 # 产品摘要
    "testcase_list": [],                             # 用例列表
    "sub_suites": [                                  # 用例集列表
      {
        "name": "我是模块名(测试集1)",                  # 用例集1名称(模块名)
        "details": null,                             # 用例集摘要
        "testcase_list": [                           # 用例列表
          {                                          # 具体用例
            "name": "测试用例1",
            "version": 1,
            "summary": "测试用例1",
            "preconditions": "前置条件",
            "execution_type": 1,
            "importance": 1,
            "estimated_exec_duration": 3,
            "status": 7,
            "steps": [
              {
                "step_number": 1,
                "actions": "测试步骤1",
                "expectedresults": "预期结果1",
                "execution_type": 1
              },
              {
                "step_number": 2,
                "actions": "测试步骤2",
                "expectedresults": "预期结果2",
                "execution_type": 1
              }
            ]
          },
          {
            "name": "测试用例2",
            "version": 1,
            "summary": "测试用例2",
            "preconditions": "前置条件",
            "execution_type": 1,
            "importance": 1,
            "estimated_exec_duration": 3,
            "status": 7,
            "steps": [
              {
                "step_number": 1,
                "actions": "测试步骤1",
                "expectedresults": "预期结果1",
                "execution_type": 1
              },
              {
                "step_number": 2,
                "actions": "测试步骤2(预期结果2可以为空)",
                "expectedresults": "",
                "execution_type": 1
              },
              {
                "step_number": 3,
                "actions": "测试步骤3",
                "expectedresults": "预期结果3",
                "execution_type": 1
              },
              {
                "step_number": 4,
                "actions": "测试步骤4",
                "expectedresults": "预期结果4",
                "execution_type": 1
              }
            ]
          },
          {
            "name": "测试用例3(测试步骤和预期结果可以都为空)",
            "version": 1,
            "summary": "测试用例3(测试步骤和预期结果可以都为空)",
            "preconditions": "无",
            "execution_type": 1,
            "importance": 2,
            "estimated_exec_duration": 3,
            "status": 7,
            "steps": []
          }
        ],
        "sub_suites": []                            # 用例集中可以包含子用例集(目前只要产品类别下有用例集)
      },
      {
        "name": "我是模块名(测试集2)",                  # 用例集2名称(模块名)
        "details": "测试集摘要(详情)",
        "testcase_list": [
          {
            "name": "测试步骤2(优先级默认为中)",
            "version": 1,
            "summary": "测试步骤2(优先级默认为中)",
            "preconditions": "无",
            "execution_type": 1,
            "importance": 3,
            "estimated_exec_duration": 3,
            "status": 7,
            "steps": [
              {
                "step_number": 1,
                "actions": "测试步骤1",
                "expectedresults": "预期结果1",
                "execution_type": 1
              },
              {
                "step_number": 2,
                "actions": "测试步骤3",
                "expectedresults": "",
                "execution_type": 1
              }
            ]
          },
          {
            "name": "测试用例3(前置条件默认为空) 无设置优先级,这里加入用例标题",
            "version": 1,
            "summary": "测试用例3(前置条件默认为空) 无设置优先级,这里加入用例标题",
            "preconditions": "无",
            "execution_type": 1,
            "importance": 2,
            "estimated_exec_duration": 3,
            "status": 7,
            "steps": []
          }
        ],
        "sub_suites": []
      }
    ]
  }
]
以上(1)TestCase 数据、(2)TestSuite 数据的获取,其实是基于XMind这个工具,对 XMind 文件进行解析和数据提取,然后转换而来。
这个工具是在设计 XMind2TestCase 时,针对 XMind 单独抽取出来的库,提供了 XMind 思维导图创建、解析、更新的一系列方法。使用它可以直接将 XMind 文件转换为 JSON 数据:
import xmind
xmind_file = 'docs/xmind_testcase_demo.xmind'
workbook = xmind.load(xmind_file)
data = workbook.getData()
print(data)


Output:

[
  {                                                    # XMind画布(sheet)列表
    "id": "7hmnj6ahp0lonp4k2hodfok24f",                # 画布ID
    "title": "画布 1",                                  # 画布名称
    "topic": {                                         # 中心主题
      "id": "7c8av5gt8qfbac641lth4g1p67",              # 主题ID
      "link": null,                                    # 主题上的超链接信息
      "title": "我是产品名",                             # 主题名称
      "note": null,                                    # 主题上的备注信息
      "label": null,                                   # 主题上标签信息
      "comment": null,                                 # 主题上的批注(评论)信息
      "markers": [],                                   # 主题上的图标信息
      "topics": [                                      # 子主题列表
        {
          "id": "2rj4ek3nn4sk0lc4pje3gvgv9k",
          "link": null,
          "title": "我是模块名(测试集1)",                  # 子主题1
          "note": null,
          "label": null,
          "comment": null,
          "markers": [],
          "topics": [                                    # 子主题下的子主题列表
            {
              "id": "3hjj43s7rv66uncr1srl3qsboi",
              "link": null,
              "title": "测试用例1",
              "note": "前置条件\n",
              "label": "手动(执行方式默认为手动)",
              "comment": null,
              "markers": [
                "priority-1"
              ],
              "topics": [
                {
                  "id": "3djn37j1fdc6081de319slf035",
                  "link": null,
                  "title": "测试步骤1",
                  "note": null,
                  "label": null,
                  "comment": null,
                  "markers": [],
                  "topics": [
                    {
                      "id": "7v0f1152popou38ndaaamt49l5",
                      "link": null,
                      "title": "预期结果1",
                      "note": null,
                      "label": null,
                      "comment": null,
                      "markers": []
                    }
                  ]
                },
                {
                  "id": "2srtqqjp818clkk1drm233lank",
                  "link": null,
                  "title": "测试步骤2",
                  "note": null,
                  "label": null,
                  "comment": null,
                  "markers": [],
                  "topics": [
                    {
                      "id": "4jlbo280urmid3qkd01j7h8jnq",
                      "link": null,
                      "title": "预期结果2",
                      "note": null,
                      "label": null,
                      "comment": null,
                      "markers": []
                    }
                  ]
                }
              ]
            },
            ...
          ]
        },
        ...
      ]
    }
  }
]
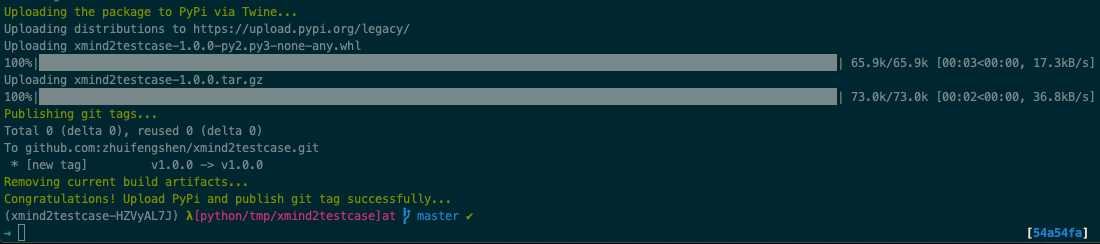
每次在 __ about __.py 更新版本号后,运行以下命令,实现自动化更新打包上传至 PYPI ,同时根据其版本号自动打 Tag 并推送到仓库:
python3 setup.py pypi
XMind2TestCase 工具的产生,受益于以下四个开源项目,并在此基础上扩展、优化,受益匪浅,感恩!
得益于开源,也将坚持开源,并为努力开源贡献自己的点滴之力。后续,将继续根据实际项目需要,定期进行更新维护,
欢迎大伙的使用和意见反馈,谢谢!
(如果本项目对你有帮助的话,也欢迎 star )