最近正在学习 python 的 pytest 框架,和之前使用的 unittest 框架有很大区别.刚使用 pytest 框架也非常不习惯,主要是和原来的编程思想有很多区别,后来写了一些代码加上练习多了就习惯了.
本文主要讲解使用 uiautomator2+pytest+allure 进行 Android 的 UI 自动化测试,其实主要目的是写一些实战的脚本来更深入学习 pytest 框架.
另外也顺便介绍一下 uiautomator2 这款自动化框架,在使用上也是非常的顺畅.
之前我已经使用 appium+testng 写了一套自动化脚本了并且在公司实际使用了.这次就不用公司的 app 测试了,使用上家公司 58 同城的 app 进行自动化测试.
做 UI 自动化肯定需要选择一种适合的测试框架,比如 java 的 testng、python 的 unittest,主要目的是让代码的层级明确、简洁、复用性强,本次介绍下 python 的 pytest 框架.
pytest 官方:https://docs.pytest.org/en/latest/
The pytest framework makes it easy to write small tests, yet scales to support complex functional testing for applications and libraries.
官方的一段介绍,简单来说就是让写测试代码更容易并且没有那么多约束.当然这块不重点介绍 pytest 为什么好、怎么好,只需要记住 pytest 就是一个测试框架就够了.
github 地址:https://github.com/openatx/uiautomator2
uiautomator2 是一个 Android UI 自动化框架,支持 Python 编写测试脚本对设备进行自动.底层基于 Google uiautomator,隶属于最近比较火热的 openatx 项目中.
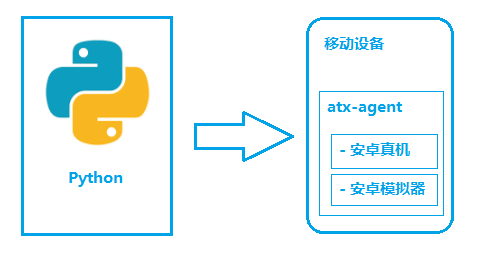
下图是运行示意图:

设备中需要安装 atx-agent 作为 uiautomator2 的服务端,解析收到的请求,并转化成 uiautomator2 的代码.总体看来交互过程没有那么繁琐,在实际使用上的确比 appium 快不少.
allure 是一款测试报告,炫酷的页面加上多种数据统计,比 HTMLTestRunner 报告强百倍,当然也支持多语言.
使用 mac 电脑搭建环境
最新版本出到 4.0 了,但是实际使用 4.0 和 allure 有些不兼容.
所以推荐使用 3.7 版本的 pytest
pip install pytest==3.7
uiautomator2 也是 python 的一个类库,用 pip 安装即可.
pip install uiautomator2
brew install allure
pip install pytest-allure-adaptor
有了测试框架、自动化框架、测试报告,基本上就能 coding 了.
pytest 插件可以实现失败重试、打印进度、指定顺序
pip install pytest-sugar # 打印进度

pip install pytest-rerunfailures # 失败重试

pip install pytest-ordering # 执行顺序
当然插件还有很多,这里就不一一介绍了.
做 UI 自动化都需要初始化一个 driver 对象,这个 driver 对象可以点击事件、滑动、双击等操作
uiautomator2 的初始化 driver 方式
相比 appium 配置很少,同时可以设置全局隐式等待元素时间
import uiautomator2  as ut2
def init_driver(self,device_name):
    '''
    初始化driver
    :return:driver
    '''
    try:
        logger.info(device_name)
        d = ut2.connect(device_name)
        #logger.info("设备信息:{}".format(d.info))
        # 设置全局寻找元素超时时间
        d.wait_timeout = wait_timeout  # default 20.0
        # 设置点击元素延迟时间
        d.click_post_delay = click_post_delay
        #d.service("uiautomator").stop()
        # 停止uiautomator 可能和atx agent冲突
        logger.info("连接设备:{}".format(device_name))
        return d
    except Exception as e:
        logger.info("初始化driver异常!{}".format(e))
unittest 框架有 setup 和 teardown 方法,用来做初始化和结束测试操作.pytest 是用@pytest.fixture方法来实现 setup 和 teardown.
下面这段代码就是定义一个 driver_setup 方法,来初始化和结束.
# 当设置autouse为True时,
# 在一个session内的所有的test都会自动调用这个fixture
@pytest.fixture()
def driver_setup(request):
    logger.info("自动化测试开始!")
    request.instance.driver = Driver().init_driver(device_name)
    logger.info("driver初始化")
    request.instance.driver.app_start(pck_name, lanuch_activity, stop=True)
    time.sleep(lanuch_time)
    allow(request.instance.driver)
    def driver_teardown():
        logger.info("自动化测试结束!")
        request.instance.driver.app_stop(pck_name)
    request.addfinalizer(driver_teardown)
另外还有一种方式实现,可以理解为 setup 和 teardown 在一个方法内,通过 yield 关键字停顿.
@pytest.fixture()
def init(self,scope="class"):
    self.home = Home(self.driver)
    self.home.news_tab()
    self.news = News(self.driver)
    logger.info("初始化消息模块")
    yield self.news
    logger.info("结束消息模块")
yield 关键字是在 python 语法生成器和迭代器中使用,用来节省内存.
比如 for 循环一个大列表,一次性都循环出来非常浪费性能.
所以通过 yield 关键字来控制循环.
下面演示下 yield:
#!/usr/bin/env python
# -*- coding: utf-8 -*-

def yt():
    print "第一次打印"
    yield 0
    print("第二次打印")

if __name__ == '__main__':
    a = yt()
    print next(a)
    print next(a)
如果直接调用 yt 函数会发现啥也打印不出来,因为此时只是声明了 yt 函数并没有真正的使用.
使用 next 方法调用第一次,输入结果如下:
yield 在此时相当于 return 0,此时不会输出"第二次打印",会在这块停住.
第一次打印
0
使用 next 方法调用第二次,输入结果如下:
第二次打印
再来回顾下上面那个例子:
在 yield 之前完成了 setup 操作并且返回 self.news 对象
在 yied 之后完成了 teardown 操作
@pytest.fixture()
def init(self,scope="class"):
    self.home = Home(self.driver)
    self.home.news_tab()
    self.news = News(self.driver)
    logger.info("初始化消息模块")
    yield self.news
    logger.info("结束消息模块")
在 pytest 中只需要写 conftest.py 类,可以实现数据共享,不需要 import 就能自动找到一些配置.
刚才讲到的初始化 driver_setup 函数,就可以定在 conftest.py 类中,此时这个函数是全局可以函数,在测试类中使用如下:
使用@pytest.mark.usefixtures 装饰器就能引用到 driver_setup 函数
@allure.feature("测试发布")
@pytest.mark.usefixtures('driver_setup')
class TestNews:

    @pytest.fixture(params=item)
    def item(self, request):
        return request.param
pytest 检测如果是 test 开头或者 test 结尾的类,都认为是可以执行测试类.
在测试类中写 test 开头的测试方法
@allure.story('测试首页搜索')
def test_home_search(self,init):
    init.home_search()
假设场景是首页搜索多个词,需要借助参数化来完成
@pytest.mark.parametrize(('kewords'), [(u"司机"), (u"老师"), (u"公寓")])
def test_home_moresearch(self, init,kewords):
    init.home_more_search(kewords)
假设发布用例,需要先登录才可以.可以通过用例排序的方式先登录,再发布
使用@pytest.mark.run,odrer 从小到大优先执行
@pytest.mark.usefixtures('driver_setup')
@pytest.mark.run(order=1)
# 指定login先执行
class TestLogin:
假设已经写了很多用例,有些用例是冒烟用例,可以指定级别运行.
@allure.story('测试首页更多')
@pytest.mark.P0
def test_home_more(self, init):
    init.home_more()
命令行执行: pytest -v -m "P0", 会执行所有 P0 级别的用例
这个时候需要借助 pytest-rerunfailures 插件,用法如下:
@pytest.mark.flaky(reruns=5, reruns_delay=2)
@allure.story('测试精选活动')
def test_news_good(self,init):
    init.news_good()
当然这种方法是指定某个 case 失败重试
还可以全局设置用户如下:
pytest --reruns 2 --reruns_delay 2
reruns:重试次数
reruns_delay:重试的间隔时间
在 conftest.py 文件中定义@pytest.hookimpl函数,这个函数可以 hook 住 pytest 运行的状况
@pytest.hookimpl(tryfirst=True, hookwrapper=True)
def pytest_runtest_makereport(item, call):
    '''
    hook pytest失败
    :param item:
    :param call:
    :return:
    '''
    # execute all other hooks to obtain the report object
    outcome = yield
    rep = outcome.get_result()
    # we only look at actual failing test calls, not setup/teardown
    if rep.when == "call" and rep.failed:
        mode = "a" if os.path.exists("failures") else "w"
        with open("failures", mode) as f:
            # let's also access a fixture for the fun of it
            if "tmpdir" in item.fixturenames:
                extra = " (%s)" % item.funcargs["tmpdir"]
            else:
                extra = ""
            f.write(rep.nodeid + extra + "\n")
从代码中可以看出可以获取失败情况的相关信息,当时有了失败信息就可以搞事情了,比如当用例失败的时候截图或者记录失败数量做数据统计.
在跑用例的时候最后一步都会断言一下,比如断言元素是否存在等
def assert_exited(self, element):
    '''
    断言当前页面存在要查找的元素,存在则判断成功
    :param driver:
    :return:
    '''
    if self.find_elements(element):
        logger.info("断言{}元素存在,成功!".format(element))
        assert True
    else:
        logger.info("断言{}元素存在,失败!".format(element))
        assert False
还可以这样优化代码:
def assert_exited(self, element):
  '''
  断言当前页面存在要查找的元素,存在则判断成功
  :param driver:
  :return:
  '''
  assert self.find_elements(element) == True,"断言{}元素存在,失败!".format(element)
  logger.info("断言{}元素存在,成功!".format(element))
assert 失败后会跑出 AssertionError 和定义的文案
AssertionError: 断言xxxxx元素存在,失败!
介绍下几种常用命令行运行
运行某个文件下的所有用例
pytest android/testcase
类文件地址::方法名
pytest test_home.py::test_home_more
或者使用-k 参数 + 方法名
pytest -k test_home_more
有的时候需要调试正个测试类中所有测试方法
直接跟上类文件地址
pytest test_home.py
pytest -v -m "P0"
pytest -v -m "not P0"
在 run.py 中写如下代码,这种方式相当于把命令行参数封装到脚本中.
pytest.main(["-s","--reruns=2", "android/testcase","--alluredir=data"])
测试代码写完了,还差一个非常好看的报告.以前我们一般都用 HTMLTestRunner 报告,但是 HTMLTestRunner 报告功能比较单一并且也不支持失败截图.
偶然在社区中看到了 allure 的帖子,看了展示报告简直是吊炸天,先附一张跑完用例的截图.
另外可以在代码中设置报告层次,用法如下:
@allure.feature("测试首页")
@pytest.mark.usefixtures('driver_setup')
class TestHome:

    @pytest.fixture()
    def init(self,scope="class"):
        self.home = Home(self.driver)
        logger.info("初始化首页模块")
        yield self.home
        logger.info("结束首页模块")


    @allure.story('测试首页搜索')
    def test_home_search(self,init):
        init.home_search()
设置 allure.feature 和 allure.story,相当于上下级关系.
点击失败用例就能看到失败的相关信息
在跑自动化的过程已经遇到失败情况,需要一张截图描述当时的情况.
在上面提到@pytest.hookimpl函数中,最后调用截图方法,使用
allure.attach 把截图加上.
需要注意的是 attach 中的第二个参数是图片的二进制信息.
@pytest.hookimpl(tryfirst=True, hookwrapper=True)
def pytest_runtest_makereport(item, call):
    '''
    hook pytest失败
    :param item:
    :param call:
    :return:
    '''
    # execute all other hooks to obtain the report object
    outcome = yield
    rep = outcome.get_result()
    # we only look at actual failing test calls, not setup/teardown
    if rep.when == "call" and rep.failed:
        mode = "a" if os.path.exists("failures") else "w"
        with open("failures", mode) as f:
            # let's also access a fixture for the fun of it
            if "tmpdir" in item.fixturenames:
                extra = " (%s)" % item.funcargs["tmpdir"]
            else:
                extra = ""
            f.write(rep.nodeid + extra + "\n")
        pic_info = adb_screen_shot()
        with allure.step('添加失败截图...'):
            allure.attach("失败截图", pic_info, allure.attach_type.JPG)
执行如下命令:
python -m uiautomator2 init
会在手机上安装 atx-agent.apk 并且会在手机上启动服务
2018-12-14 18:03:50,691 - __main__.py:327 - INFO - Detect pluged devices: [u'a3f8ca3a']
2018-12-14 18:03:50,693 - __main__.py:343 - INFO - Device(a3f8ca3a) initialing ...
2018-12-14 18:03:51,154 - __main__.py:133 - INFO - install minicap
2018-12-14 18:03:51,314 - __main__.py:140 - INFO - install minitouch
2018-12-14 18:03:51,743 - __main__.py:168 - INFO - apk(1.1.7) already installed, skip
2018-12-14 18:03:51,744 - __main__.py:350 - INFO - atx-agent is already running, force stop
2018-12-14 18:03:52,308 - __main__.py:213 - INFO - atx-agent(0.5.0) already installed, skip
2018-12-14 18:03:52,490 - __main__.py:254 - INFO - launch atx-agent daemon
2018-12-14 18:03:54,568 - __main__.py:273 - INFO - atx-agent version: 0.5.0
atx-agent output: 2018/12/14 18:03:52 [INFO][github.com/openatx/atx-agent] main.go:508: atx-agent listening on 192.168.129.93:7912
监听的是手机上的 ip+ 默认 7921.
事件类型比如点击和滑动等,介绍几个常用的.
根据 id、xpath、text 定位元素,和 appium 使用上差别不大.
self.d(resourceId=element).click()
self.d.xpath(element).click()
self.d(text=element).click()
前 4 个参数是坐标,time 是控制滑动时间
self.d.drag(self.width / 2, self.height * 3 / 4, self.width / 2, self.height / 4, time)
这个用于首次启动 app 点击权限或者开屏幕广告
when 方法就相当于 if 判断,满足条件才会点击,可以生去一大堆逻辑代码.
driver.watcher("允许").when(text="允许").click(text="允许")
driver.watcher("跳过 >").when(text="跳过 >").click(text="跳过 >")
driver.watcher("不要啦").when(text="不要啦").click(text="不要啦")
需要安装 weditor 库
pip install weditor
python -m weditor
会在自动打开浏览器并且展示元素,相当于 web 版本的 uiautomatorviewer,使用起来比较方便.
上边提到的手机 ip,有个这个手机 ip 就可以进行无线运行脚本
把 connect 中的方法替换成手机 ip 就可以了
# d = ut2.connect(device_name)
d = ut2.connect("192.168.129.93")
写了一套 demo 代码,需要安装下 58 同城最新版 apk.
代码地址:https://github.com/xinxi1990/atxdemo.git
执行方式:
随着自动化技术的不断更新,可以选择的技术手段更多.但是要根据自己公司项目和技术成熟度多方面因素选择自动化框架.
