
作者 | 刘晓琳
转转运营系统是一个主要为转转平台提供各类促销活动、各种个性玩法的中台能力支撑系统,它每天承载着各种各样促销活动的正常运作;然而最为直接与用户接触的莫过于一个个酷炫的活动页面。
在转转运营系统中,一个个酷炫的活动 M 页是由一个叫魔方的系统不断的由运营人员自主式 “生产” 而出,运营人员可根据活动需求配置出各种不同展示效果的页面。那么问题来了,转转平台每日有如此多的活动,运营人员要在魔方系统配置如此多的活动页面的同时,魔方系统也在不断的迭代添加新的功能,或优化旧的功能,如何保障在活动运作期间,魔方系统能够在不影响用户体验及使用的前提下进行正常功能迭代呢?
基于上面的问题,我们对活动魔方系统及 M 页分以下三个部分测试:
业务逻辑测试
功能回归测试
功能兼容测试
业务功能逻辑测试不必说,新增或修改的功能模块必然要进行重点测试。
主要讲一下业务功能回归测试阶段,这一环节效率最低的测试方案莫过于手工测试:评估所有可能影响的功能模块,将这些功能模块构成的 M 页进行人工回归测试;
测试方式:
页面展示数据正确性
页面展示样式正确性;
测试量:每次魔方系统稍有改动,为保障活动页面的正常运作,将进行接近 20 套页面的测试,换算一下相当于:1 个人不停隙的测试 3 小时;但是每次魔方系统的功能迭代都要进行一次这样工作量的测试哦,而且眼一花,一些细节方面的展示问题就测试不出了,想一想工作量可是不小。而且测试方式也仅仅是 “点点点”。
思考了那么久,到底要怎么做!!!
经过笔者的调研以及与团队激烈的讨论,最终在回归测试阶段产生以下自动化回归测试方案,本方案主旨在于高效率,低操作成本,低维护成本,各种……低成本,从而体现自动化价值所在。下面切入正题:
运作流程
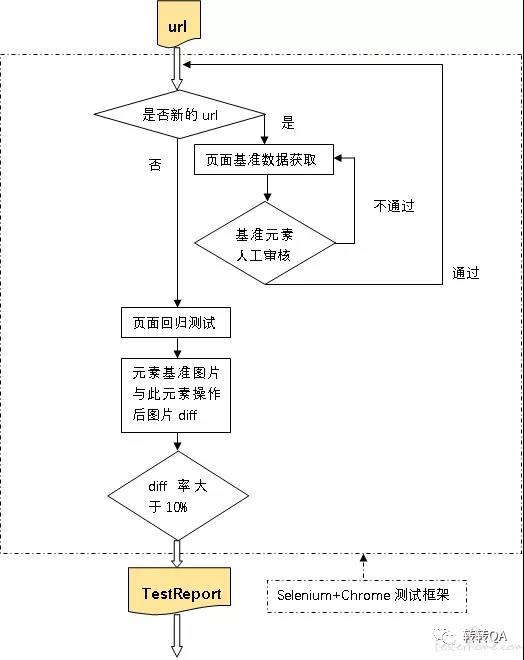
笔者给自己的这套自动化测试方案起了一个洋气的名字 “监控狗”,它主要采用当前主流的 ui 自动化测试框架 selenium+chrome( headless) 进行 M 页快速自动化回归测试。
对于操作人员来讲主要进行以下三个步骤的操作即可完成一套页面的测试:
流程说明
driver
.
findElementsByTagName
(
"*"
);
//获取页面元素总数
Object  metrics =sendEvaluate( "({"+"width: Math.max(window.innerWidth,document.body.scrollWidth,document.documentElement.scrollWidth)|0,"+
"height: Math.max(window.innerHeight,document.body.scrollHeight,document.documentElement.scrollHeight)|0,"+"deviceScaleFactor: window.devicePixelRatio || 1,"+"mobile: typeof window.orientation == 'undefined'"+"})");
    sendCommand("Emulation.setDeviceMetricsOverride",metrics);
    Object result =sendCommand("Page.captureScreenshot",ImmutableMap.of("format","png", "fromSurface", true));
    sendCommand("Emulation.clearDeviceMetricsOverride",ImmutableMap.of());
String base64EncodedPng =(String)((Map<Strin,?>) result).get("data");   return outputType.convertFromBase64Png(base64EncodedPng);
loc =indexElements.get(elementActualNum).getLocation().toString();
IMOperation imageOperator =new IMOperation();
imageOperator.addImage(StdFile);
//添加基准图片
 imageOperator.addImage(monitorFile);
//添加监控图片
String  diffFileInfo =compareTargetPath +diffFileName;
//拼装diff图片路径
imageOperator.addImage(diffFileInfo);
//生成diff图片存放路径
CompareCmd  cmd =new CompareCmd();
//实例化图片比较命令
cmd.setSearchPath("C:\\Program Files\\ImageMagick-7.0.8-Q16");
//设置命令所在目录,Windows需要设置,Linux不需要
cmd.run(imageOperator);
int[]  rgb =new int[3];
DecimalFormat  df =new  DecimalFormat("0.00");
float  pxRed =0f;
List  <Integer>  write =newArrayList<Integer>();//白色
List<Integer> red =newArrayList<Integer>();//灰色
File  file =new  File(diffPath);
BufferedImage  bi =null;
  if (null  !=file)
{
try
{ bi = ImageIO.read(file);       }
catch
 (
IOException  e
)
{
            e.printStackTrace();
}
int  width = bi.getWidth();
int  height =bi.getHeight();
int minx =bi.getMinX();
int miny = bi.getMinY();
for
(
int  i =minx;
 i <width;
 i++)
{
for
(
int  j =miny;
 j <height;
 j++)
{
int  pixel =bi.getRGB
(
i,j
);
  rgb[0]=(pixel &0xff0000)>>16;
  if(rgb[0]>=204 && rgb[0] < 255) {
                    write.add(pixel);
}else{
            red.add(pixel);
}
if  (i ==111&& j ==55)
{
System.out.println(rgb[0]);
}}}
int total =write.size()+ red.size();
float  pxWrite = (float) write.size() / total;
pxRed = (float) red.size() /total;
}
else
{
System.out.println
(
"info*************************未读取到图片*************************"
);

}
