
每日优鲜便利购微信小程序集成 Jenkins 生成二维码发版
微信小程序的测试发版在没有 CI/CD 等相关工具的情况下,存在诸多问题,为了让前端小程序的测试发版过程更加严谨可控化,我们采用了 Jenkins 集成微信开发者工具,来解决当前遇到的问题,首先给大家展示一下集成 jenkins 前后带来的差异。
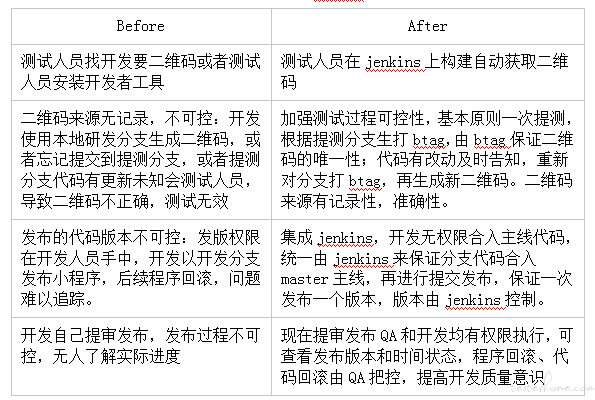
下面我们给大家演示一下具体的实现过程:
1、安装 jenkins
Jenkins 依赖于 Java 运行环境,因此需要首先安装 Java。
安装 Jenkins 的方式有多种,可以运行对应系统类型的安装包,可以通过 docker 获取镜像,也可以直接运行 war 包。
个人倾向于直接运行 war 包的形式,只需下载 jenkins.war 后,运行如下命令即可启动 Jenkins。如果不指定 httpPort,Jenkins 的默认端口为 8080。

2、Jenkins 主要涉及的插件:
GIT plugin
SSH Credentials Plugin
Git Changelog Plugin: 获取仓库提交的 commit log
build-name-setter:用于修改 Build 名称
description setter plugin:用于在修改 Build 描述信息,在描述信息中增加显示 QRCode(二维码)
Post-Build Script Plug-in:在编译完成后通过执行脚本实现一些额外功能
NodeJS:小程序构建需要,在更改提交状态时使用 node 技术
AnsiColor:日志输出有颜色,脚本中有设置 log 格式类似:33[字符背景颜色;字符颜色 m{String}33[0m
安装方式也比较简单,直接在 Jenkins 的插件管理页面搜索上述插件,点击安装即可。
3、创建项目(job),第一次创建自由风格的 job 即可,后续可作为模板,针对具体的项目复制该模板,修改少量配置信息,即可将这一套持续集成发版平台运行起来
(1)在 jenkins 中创建一个自由风格类型的 job

(2)参数的传递
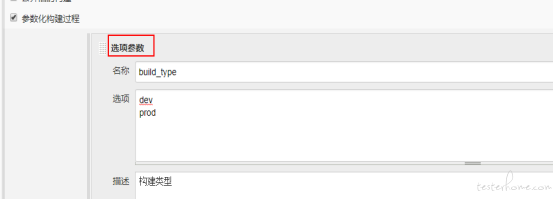
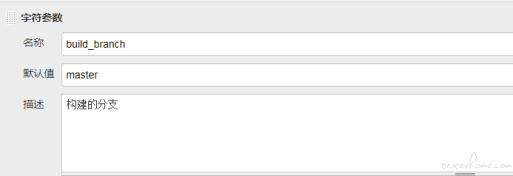
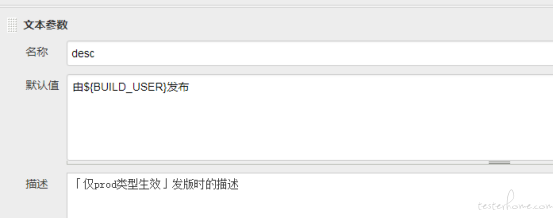
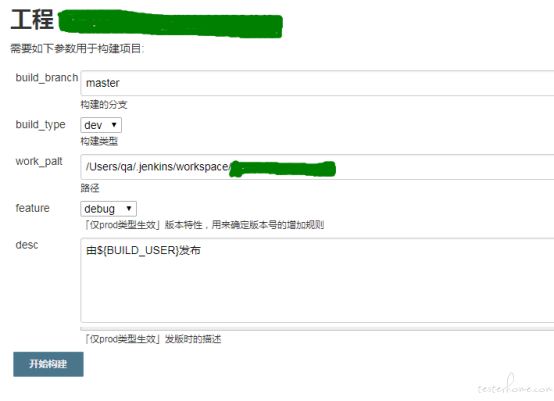
在构建脚本中,我们已经对常用的可配置参数实现了可传参机制,在 jenkins 的配置如下:
参数一:选项参数类型的,build_type 用来区分是线上后台域还是测试后台域
参数二:字符参数类型,build_branch 用于区分分支的版本
参数三:字符参数类型:work_palt 用于配置项目所在路径

参数四:文本参数类型:desc 用于描述上传代码时的备注,默认设置备注为发布人员信息
参数五:选项参数类型:feature 用于命令上传代码时指定上传版本的自增
refactor 为主版本,update 为次版本,debug 为修改版,根据选项来对版本自增

最终展示状态为:
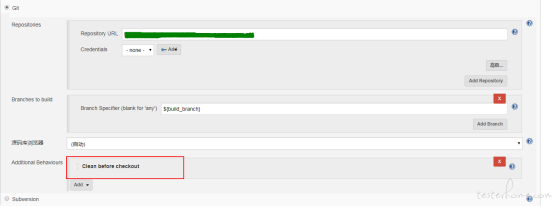
(3)源码管理,git 配置:配置 git 路径,分支可配,支持在每次拉取代码时先清理工作空间
(4)构建环境:
Add timestamps to the Console Output:在控制台添加时间戳
Color ANSI Console Output 对输出的文本颜色进行控制
Provide Node & npm bin/ folder to PATH 配置 node.js
Build User Vars Plugin 是 jenkins 用户相关变量插件,使得在构建过程中可以使用用户相关环境变量,例如代码提交时设置的用户信息
(5)构建:
执行 shell:

mp_deploy.sh
#!/bin/bash
msg() {
    printf '%b\n' "$1" >&2
}

info()
{
    msg "[INFO] $1"
}

success() {
    msg "\e[1;32m[✔] ${1}${2} \33[0m "
}

notice() {
    msg "\e[1;33m ${1} \e[0m"
}

error_exit() {
    msg "\e[1;31m[✘] ${1}${2} \33[0m"
    exit 1
}

exec_cmd()
{
  echo "[执行命令] $1"
  $1
  if [ "$?" != "0" ]; then
    error_exit "命令执行失败: 错误码为 $?"
  fi
}

# sed匹配hosts.js内容,替换服务端环境
change_hosts()
{
    if [ -f "hosts.js" ]; then
        case $build_type in
            "dev")
                target_env="dev"
                echo "${work_palt}"/hosts.js
                sed -i "" "s/^const curr_env = .*/const curr_env = '$target_env'/" ${work_palt}"/hosts.js"
                info "切换到 ${target_env} 环境"
            ;;
            "prod")
                target_env="prod"
                echo "${work_palt}"/hosts.js
                sed -i "" "s/^const curr_env = .*/const curr_env = '$target_env'/" ${work_palt}"/hosts.js"
                info "切换到 ${target_env} 环境"
            ;;
        esac
        if [ "$?" != "0" ]; then
            error_exit "切换环境失败!"
        fi
    else
        error_exit "没有找到hosts.js文件!"
    fi
}

# 根据feature参数增加版本号,上传到微信小程序后台准备提审
# 用node程序直接读取version.js修改版本号
upload_for_release()
{
    if [ -f ${work_palt}"/version.js" ]; then
        exec_cmd "node /Users/qa/.jenkins/workspace/ops-server/tmp/mp/upload.js ${work_palt} $feature $desc"
    else
        error_exit "没有找到version.js文件!"
    fi
}

# 生成开发版二维码
# 这里直接执行小程序cli的命令
uplaod_for_preview()
{
    exec_cmd "/Applications/wechatwebdevtools.app/Contents/Resources/app.nw/bin/cli -o"
    port=$(cat "/Users/qa/Library/Application Support/微信web开发者工具/Default/.ide")
    echo "微信开发者工具运行在${port}端口"
    echo "调用http://127.0.0.1:${port}/open"
    return_code=$(curl -sL -w %{http_code} http://127.0.0.1:${port} -o /open)
    if [ $return_code == 200 ]; then
        echo "返回状态码200,devtool启动成功!"
    else
    echo "返回状态码${return_code},devtool启动失败"
        exit 1
    fi
  exec_cmd "pwd"
    exec_cmd "wget  -O  $BUILD_ID.png http://127.0.0.1:${port}/preview?projectpath=${work_palt}"
}

if [ "$build_type" == "dev" ]; then
  info "发布开发版!"
  change_hosts
  #生成二维码
  uplaod_for_preview
  success "预览成功!请扫描二维码进入开发版!"
elif [ "$build_type" == 'prod' ]; then
  info "准备上传!"
  change_hosts
  #提交代码微信公众平台
  upload_for_release
  success "上传成功!请到微信小程序后台设置体验版并提交审核!"
else
    error_exit "需要设置合法的build_type!"
fi
uploda.js:
var fs = require('fs');
var cp = require('child_process');
var args = process.argv;  // 获取命令行带入的参数 args[0]是程序执行的目录 args[1]是文件名

const succ_code = 0;
const err_code = 1;

function err_msg(str) {
    console.log('[NODE ERR] ', str);
}

function info_msg(str) {
    console.log('[NODE INFO] ', str);
}

function exec_cmd(cmd, cb) {
    info_msg('执行命令: ' + cmd)
    // 使用child_process在终端执行命令
    cp.exec(cmd, function(err, stdout, stderr) {
        var succ = true;
        if (err) {
            // 命令执行异常,退出程序
            err_msg(err);
            if (stderr) {
                err_msg(stderr);
            }
            succ = false;
        }   else {
            // 打印所执行命令的标准输出
            info_msg(stdout);
            if (stderr) {
                err_msg(stderr);
            }
        }
        typeof cb === 'function' && cb(succ);
    })
}

try {
    var path = args[2];
    var feature = args[3];
    var desc = '【RELEASE】' + args[4];

    var ver_path = path + '/version.js';
    var version_conf = require(ver_path);

    // 根据feature参数确定版本号增加的逻辑
    switch(feature) {
        case 'debug': {
            version_conf.debug++;
            break;
        }
        case 'update': {
            version_conf.update++;
            version_conf.debug = 0;
            break;
        }
        case 'refactor': {
            version_conf.refactor++;
            version_conf.update = 0;
            version_conf.debug = 0;
            break;
        }
        default:
            err_msg('未设置正确的版本特性!');
            process.exit(err_code);
    }
    // 生成version.js所需的文件内容,方便小程序代码直接读取
    var str = 'module.exports = {' + '\n\trefactor: ' + version_conf.refactor + ',\n\tupdate: ' + version_conf.update + ',\n\tdebug: ' + version_conf.debug + '\n}';
    // 写入文件(fs.writeFile() 以w模式打开文件,写入的内容会覆盖原有内容)
    fs.writeFile(ver_path, str, function(err) {
        if (err) {
            err_msg(err);
            process.exit(err_code);
        } else {
            info_msg('UPDATE VERSION SUCCESS!');
            info_msg('Build feature is: ' + feature);
            info_msg('Current version is: ' + version_conf.refactor + '.' + version_conf.update + '.' + version_conf.debug);
            var ver = version_conf.refactor + '.' + version_conf.update + '.' + version_conf.debug;
            // 写入正常,执行小程序cli命令上传
            var upload_cmd = '/Applications/wechatwebdevtools.app/Contents/Resources/app.nw/bin/cli -u ' + ver + '@' + path + ' --upload-desc ' + desc;
            exec_cmd(upload_cmd, function(ok) {
                process.exit(ok ? succ_code : err_code);
            });
        }
    });
} catch(error) {
    // 捕获异常,退出程序
    err_msg(error);
    process.exit(err_code);
}
(6)构建后操作
description setter plugin 插件,构建完成后设置当次 build 的二维码采用 HTML 的 img 标签,将<img src='二维码png路径'><a href='二维码png路径'>写入到build描述信息中。例如:<img src="http://机器ip:端口/job/项目名称/ws/${BUILD_ID}.png" alt="二维码${BUILD_ID}" width="200" height="200" /><a href="http://机器ip:端口/job/项目名称/ws/${BUILD_ID}.png">二维码${BUILD_ID}</a>`

展示二维码图片:
Jenkins 出于安全的考虑,所有描述信息的 Markup Formatter 默认都是采用 Plain text 模式,在这种模式下是不会对 build 描述信息中的 HTML 编码进行解析的。
Manage Jenkins -> Configure Global Security,将 Markup Formatter 的设置更改为 Safe HTML 即可。更改配置后,我们就可以在 build 描述信息中看到采用 HTML 的 img 标签插入的图片了。
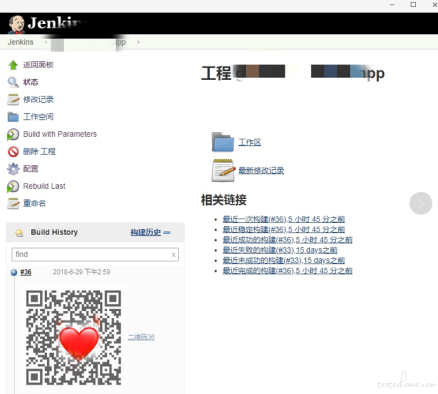
对于一个持续集成打包平台,每次打包都由 4 步组成:触发构建、拉取代码、执行构建、构建后处理。对应的,在每个 Job 中也对应了这几项的配置。
4、脚本简易说明:
生成二维码操作步骤:1.获取微信开发者工具启动端口:在微信开发者工具的安装目录找到.ide 文件获取;2.使用命令方式打开微信开发者工具;3.通过开发者工具发送 http 请求生成二维码,下载并保存为 png 图片到指定目录
代码上传:配置 version 文件,自动升级版本,通过小程序 cli 命令上传代码到微信平台进行提审。

5、相关文件准备,注意事项说明:
项目代码中需要能提供 hosts.js,upload.js,project.config.json 文件
微信开发者工具需要先登录,且有该项目的开发者权限,以此保证二维码的生成
(1)host.js 文件说明:提供两个节点 dev 和 prod;dev 是测试环境后台域名配置;prod 是线上后台域名配置,例如:
const curr_env = 'dev'
const hosts = {
dev: {
hostSmart: 'http://.具体环境 (如:beta)..com',
hostDc: 'https://.cn' //
},
prod: {
hostSmart: 'http://.生成环境..com',
hostDc: 'https://.cn' //
}
}
module.exports = {
getHosts: function () {
return hosts[curr_env]
}
}
(2)version.js 文件说明:发布时小程序的版本说明:版本会在 jenkins 中根据本次发布情况自动升级,version,js 文件每次发布均会自动根据选择升级版本
已有版本的按照 master 已有版本配置,没有版本的主版本 refactor 配置为 1,次版本 update 为 0,修改版 debug 本为 0
module.exports = {
refactor: 0,
update: 0,
debug: 0
}
(3)project.config.json 文件,开发者工具在小程序代码处自动生成,在使用开发者工具的 http 接口生成二维码时需要读该文件的配置。

↙↙↙阅读原文可查看相关链接,并与作者交流


