
提供简单的例子说明如何使用
文件名 hunter.xlsx
文档 https://openpyxl.readthedocs.io
安装 pip install openpyxl
Example
import openpyxl
# data_only=True will read value instead of formula
book = openpyxl.load_workbook("hunter.xlsx", data_only=True)
# 智能的赋值模式,eg: sh['A1'] = '%10' 读取的时候是`0.1`
book.guess_types = True
print("Sheet names:", wb.sheetnames)
# Output: Sheet names: ['技能卡', '角色']
for sheet in book:
print("Sheet name:", sheet.title)
# Output >
# Sheet name: 技能卡
# Sheet name: 角色
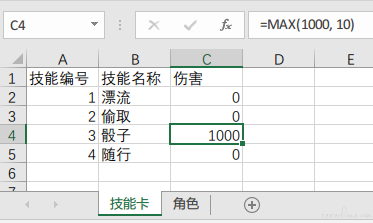
sheet = book['技能卡']
for row in sheet.rows:
for cell in row:
print("Value:", cell.offset(), cell.value)
# Output >
# Value: <Cell '技能卡'.A1> 技能编号
# Value: <Cell '技能卡'.B1> 技能名称
# Value: <Cell '技能卡'.C1> 伤害
# Value: <Cell '技能卡'.A2> 1
# Value: <Cell '技能卡'.B2> 漂流
# Value: <Cell '技能卡'.C2> 1.5
# Value: <Cell '技能卡'.A3> 2
# Value: <Cell '技能卡'.B3> 偷取
# Value: <Cell '技能卡'.C3> 0
# Value: <Cell '技能卡'.A4> 3
# Value: <Cell '技能卡'.B4> 骰子
# Value: <Cell '技能卡'.C4> 1000
# Value: <Cell '技能卡'.A5> 4
# Value: <Cell '技能卡'.B5> 随行
# Value: <Cell '技能卡'.C5> 0
# 读取指定位置的值
print(sheet['A1'].value, sheet.cell(row=1, column=1).value)
# Output: 技能编号 技能编号
# 设置值
sheet['A1'] = 'Hello' # sheet['A1'].value = 'Hello'
sheet.cell(row=1, column=1).value = 'Hello'
# 删除行
sheet.delete_rows(1) # 删除第一行
# 注:删除行的时候,其他行的Formula不会自动调整。使用win32com库则会自动调整
# 保存
book.save("destination.xlsx") # 覆盖时不会提示
xlrd 的文档 http://xlrd.readthedocs.io
安装 pip install xlrd
Example
import xlrd

book = xlrd.open_workbook("hunter.xlsx")
print("The number of worksheets is {0}".format(book.nsheets))
# Output The number of worksheets is 2

print("Worksheet name(s): {0}".format(book.sheet_names()))
# Output Worksheet name(s): ['技能卡', '角色']

sh = book.sheet_by_index(0)
print("{0} {1} {2}".format(sh.name, sh.nrows, sh.ncols))
# Output 技能卡 5 3

print("Cell B4 is {0}".format(sh.cell_value(rowx=3, colx=1))) # index start from 0
for rx in range(sh.nrows):
    print(sh.row(rx))
# Output
# [text:'技能编号', text:'技能名称', text:'伤害']
# [number:1.0, text:'漂流', number:0.0]
# [number:2.0, text:'偷取', number:0.0]
# [number:3.0, text:'骰子', number:1000.0]
# [number:4.0, text:'随行', number:0.0]
#
# Open an existing workbook
#
import win32com.client as win32
excel = win32.gencache.EnsureDispatch('Excel.Application')
wb = excel.Workbooks.Open('D:/workbook1.xlsx') # 这里要用绝对路径,不然会提示文件不存在
# Alternately, specify the full path to the workbook
# wb = excel.Workbooks.Open(r'C:\myfiles\excel\workbook2.xlsx')
excel.Visible = True # make Excel visible
Ranges and Offsets
单个数据可以通过Cells(row, column)获取到。row 是行号,column 是列号。下标从 1 开始。通过 Range 可以一次选定一个 (eg: Range("A2")) 或多个单元格 (eg: Range("A3:B4"))。
Offset 相当于偏移的效果。Offset(1, 1) 意思是保持不动。Offset(1, 3) 相当于行不偏移,列向右移动两个单元格。
ws = wb.Worksheets("Sheet1")
ws.Cells(1,1).Value = "Cell A1"
ws.Cells(1,1).Offset(2,4).Value = "Cell D2"
ws.Range("A2").Value = "Cell A2"
ws.Range("A3:B4").Value = "A3:B4"
ws.Range("A6:B7,A9:B10").Value = "A6:B7,A9:B10"
ws.Rows(2).EntireRow.Delete() # 删除第二行
ws.Rows(2).Insert(Shift=win32.constants.xlShiftDown) # 第二行上插入空行
ws.Columns(2).EntireColumn.Delete() # 删除第二列

cell = ws.Cells(10, 7)
cell.Row # 10 行号
cell.Column # 7 列号
将已有的 excel 保存并关闭
import win32com.client as win32

excel = win32.gencache.EnsureDispatch('Excel.Application')
print("Active WB:", excel.ActiveWorkbook.Name)
for wb in excel.Workbooks:
    print("WB:",wb.Name)
    wb.Save()
保存和退出
wb = xlApp.Workbooks.Add() # 新增一个工作簿
wb.SaveAs('ranges_and_offsets.xlsx') # 另存为
wb.Save() # 只是保存
wb.Close(SaveChanges=0) # 不保存,直接退出

excel.Application.Quit()
设置背景颜色
# 设置背景颜色
sht.Cells(1,1).Interior.ColorIndex = 1
| 颜色 | ColorIndex |
|---|---|
 |
1 |
 |
3 |
 |
4 |
 |
5 |
 |
6 |
 |
7 |
 |
8 |
 |
9 |
 |
15 |
 |
27 |
 |
42 |
 |
44 |
 |
40 |
Win32com Cell 操作的其他函数 MSDN 文档
Google 文档查找语法 Excel formula site:https://msdn.microsoft.com
TODO:
参考链接
常见问题
Win32COM 有时候会出现错误 has no attribute 'CLSIDToClassMap'
解决办法。Win+R 打开运行窗口,输入%TEMP%回车。找到gen_py目录,删除掉。
参考:http://code.activestate.com/lists/python-win32/6053/
pandas 以来 xlrd 来读取 excel
